Tabla de contenido
Publicidad
Idiomas disponibles
Idiomas disponibles
Enlaces rápidos
GIK
K10
ELECT
RIC INSECT
ELEKT
RISCHE IN
TUE-IN
NSECTES ÉL
REPEL
LENTE ELEC
FLUGI
NSEKTENV
ELECT
ROCUTOR D
USER M
MANUAL
NOTICE
E D'EMPLOI
GEBRU
IKERSHAND
MANUA
AL DEL USUA
BEDIEN
NUNGSANLE
MANUA
AL DO UTILIZ
T KILLER -
4 UV LEDs
SECTENVER
RDELGER -
LECTRIQUE
E - 4 LED UV
CTRÓNICO P
PARA INSEC
VERNICHTER
R - 4 UV-LE
DE INSECTO
OS - 4 LEDE
DLEIDING
ARIO
ITUNG
ZADOR
4 UV-LEDS
S
V
CTOS - 4 LE
ED UV
ED
ES UV
2
4
6
8
1
0
1
2
Publicidad
Tabla de contenido

Resumen de contenidos para Perel Tools Gik10
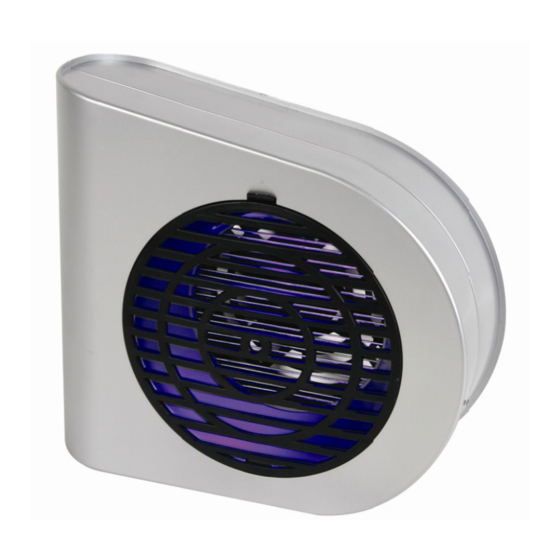
- Página 1 ELECT RIC INSECT T KILLER - 4 UV LEDs ELEKT RISCHE IN SECTENVER RDELGER - 4 UV-LEDS TUE-IN NSECTES ÉL LECTRIQUE E - 4 LED UV REPEL LENTE ELEC CTRÓNICO P PARA INSEC CTOS - 4 LE ED UV FLUGI NSEKTENV VERNICHTER R - 4 UV-LE...
- Página 2 GIK1 USER MA ANUAL 1. Int troduction To all re esidents of the e European Un Importa ant environme ntal informati on about this product This symbol o on the device or r the package in ndicates that dis sposal of the de evice after its lifecycle could d harm the env...
-
Página 3: Technical Specifications
GIK10 • Unplug the device from the mains. • Use a screwdriver with an insulated handle. Make sure you only hold the screwdriver by the handle. • Short-circuit the 2 wires of the inner metal grid by gently touching them simultaneously with the metal shaft of the screwdriver. -
Página 4: Dir Rectives Gén Nérales
GIK1 OTICE D ’EMPLOI 1. Int troduction Aux rési idents de l'Uni ion européenn Des info ormations envi ironnementale es importantes s concernant c ce produit Ce symbole s sur l'appareil ou l'emballage ind dique que l’élim ination d’un app pareil en fin de peut polluer l l'environnement... -
Página 5: Spécifications Techniques
GIK10 4. Emploi IMPORTANT : Ne pas toucher la grille métallique avec les mains ! Suivre les instructions avec précision en cas de nettoyage du casier. a. Allumage/extinction de tue-insectes • Insérer la fiche d’alimentation dans une prise de courant. - Página 6 GIK1 GEBRU UIKERSHA ANDLEID DING 1. Inl eiding Aan alle e ingezetenen v van de Europe ese Unie Belangr ijke milieu-inf formatie betre effende dit pro oduct Dit symbool op p het toestel of de verpakking geeft aan dat, a als het na zijn le evenscyclus wor weggeworpen,...
-
Página 7: Technische Specificaties
GIK10 b. Het toestel ontladen voor het onderhoud • Trek de stekker uit het stopcontact. • Gebruik een schroevendraaier met een geïsoleerd handvat. Houd de schroevendraaier enkel vast bij het handvat. • Veroorzaak een kortsluiting tussen de 2 draden van de interne metalen rooster door ze gelijktijdig aan te raken met het metalen gedeelte van de schroevendraaier. -
Página 8: Int Troducción
¡Gracias por haber comp prado el GIK10 ! Lea atentame nte las instrucc iones del manua al antes de usar rlo. Si el aparat to ha sufrido alg gún daño en el t... - Página 9 GIK10 b. Descargar el aparato antes del mantenimiento • Desconecte el aparato de la red. • Utilice sólo un destornillador con mango aislado. Mantenga el destornillador siempre por el mango. • Cortocircuite los 2 cables de la rejilla metálica interna al tocarlos simultáneamente con la hoja del destornillador.
- Página 10 GIK1 BEDIE ENUNGS ANLEITU 1. Ein nführung An alle E Einwohner der r Europäischen n Union Wichtige e Umweltinfor rmationen übe er dieses Produ Dieses Symbo ol auf dem Prod ukt oder der Ve erpackung zeigt an, dass die En ntsorgung diese Produktes nac ch seinem Lebe...
-
Página 11: Technische Daten
GIK10 • Schalten Sie das Gerät aus, indem Sie den Schalter auf OFF stellen. b. Das Gerät vor der Wartung entladen • Trennen Sie das Gerät vom Netz. • Verwenden Sie einen Schraubendreher mit isoliertem Handgriff. Achten Sie darauf, dass Sie den Schraubendreher nur am Handgriff festhalten. - Página 12 íduos. Obrigada a por ter adquiri do o GIK10! Le eia atentamente e as instruções d deste manual a ntes de o usar. Caso o aparelh ho tenha sofrido...
-
Página 13: Especificações Técnicas
GIK10 4. Uso IMPORTANTE: Não tocar na grelha metálica com as mãos! Seguir as instruções para procecer à limpeza da bandeja. a. Ligar o aparelho ON/OFF • Ligue o cabo de alimentação à corrente. • Coloque o botão da parte traseira na posição ON. Os LED's acendem e o ventilador começa a funcionar. - Página 14 Algemene waarborgvoorwaarden consumentengoederen (voor Europese Unie): Velleman® Service and Quality Warranty • Op alle consumentengoederen geldt een garantieperiode van 24 maanden op productie- en materiaalfouten en dit vanaf de Velleman® has over 35 years of experience in the electronics oorspronkelijke aankoopdatum. world and distributes its products in more than 85 countries.
- Página 15 rembourser la totalité ou une partie du prix d’achat. Le cas compra o la sustitución de un 50% del precio de compra al échéant, il vous sera consenti un article de remplacement ou descubrir un defecto después de 1 a 2 años. le remboursement complet du prix d’achat lors d’un défaut •...
- Página 16 - Verbrauchsgüter, Teile oder Zubehörteile, die regelmäßig - danos provocados por negligencia, voluntária ou não, uma ausgewechselt werden, wie z.B. Batterien, Lampen, utilização ou manutenção incorrecta, ou uma utilização do Gummiteile, Treibriemen, usw. (unbeschränkte Liste). aparelho contrária as prescrições do fabricante ; - Schäden verursacht durch Brandschaden, Wasserschaden, - todos os danos por causa de uma utilização comercial, Blitz, Unfälle, Naturkatastrophen, usw.