Tabla de contenido
Publicidad
Idiomas disponibles
Idiomas disponibles
Enlaces rápidos
Bagless 3.0 L Upright Vacuum Cleaner with High Effi ciency Motor
Aspirateur Balai De 3,0 L Sans Sac Avec Moteur Haut Rendement
3,0 L Handstaubsauger ohne Beutel mit Hochleistungsmotor
Aspirapolvere Verticale Senza Sacchetto 3,0 L con Motore ad Alta Effi cienza
Aspirador Vertical Sin Bolsa Con Motor De Alta Efi ciencia, 3,0 L
Zakloze rechtopstaande cilinderstofzuiger met hoogeffi ciënte motor, 3,0 l
B07B9BWKL7, B07K94GQ23
Publicidad
Tabla de contenido
Solución de problemas

Manuales relacionados para AmazonBasics B07B9BWKL7


Resumen de contenidos para AmazonBasics B07B9BWKL7
- Página 1 3,0 L Handstaubsauger ohne Beutel mit Hochleistungsmotor Aspirapolvere Verticale Senza Sacchetto 3,0 L con Motore ad Alta Effi cienza Aspirador Vertical Sin Bolsa Con Motor De Alta Efi ciencia, 3,0 L Zakloze rechtopstaande cilinderstofzuiger met hoogeffi ciënte motor, 3,0 l B07B9BWKL7, B07K94GQ23...
- Página 2 English ............ 3 Français ..........14 Deutsch ..........26 Italiano ..........38 Español ..........50 Nederlands ..........61...
- Página 3 Welcome Guide • English Contents: Before getting started, ensure the package contains the following components:...
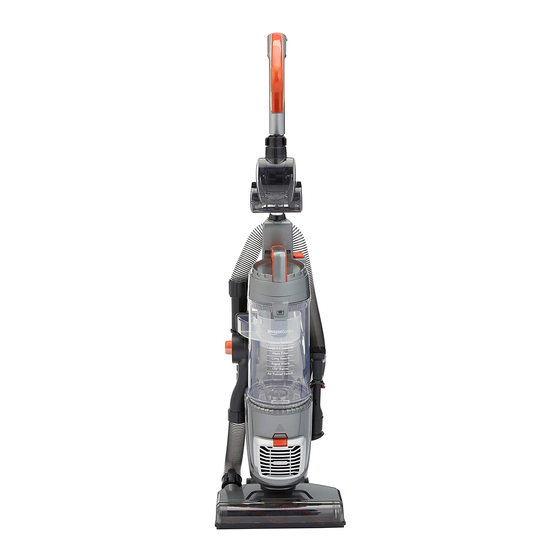
- Página 4 Handle Hose Dust container Power cord hook Motor fi lter release button Power cord Motor fi lter Above fl oor brush Brush roller button Dust container release button On/off button Vacuum knob Accessories holder Crevice nozzle Combo brush Dusting brush nozzle Brush roller Furniture nozzle Handle release lever...
-
Página 5: Important Safeguards
IMPORTANT SAFEGUARDS Read these instructions carefully and retain them for future use. If this product is passed to a third party, then these instructions must be included. When using electrical appliances, basic safety precautions should always be followed to reduce the risk of fi re, electric shock, and/or injury to persons including the following: •... -
Página 6: Description Of Signal Words
• Only use this product for its intended use. • Never use a damaged product! Disconnect the product from the electrical outlet and contact your retailer if it is damaged. • To avoid damaging the cord, do not squeeze, bend or chafe it on sharp edges. -
Página 7: Intended Use
NOTICE Indicates a practical tip, advice or practice not related to personal injury. Intended Use • This product is only intended for vacuuming of dust, lint and dirt on soft and hard surfaces. • Do not use the product for vacuuming ashes, sharp objects, e.g. glass, or to suck up liquids or fl... - Página 8 Brush roller NOTICE The brush roller (I) will automatically shut off when the product is locked in upright position. Recline the product to reactivate the brush roller. • Press the brush roller button (E) to activate the brush roller. • Press the brush roller button (E) again to deactivate the brush roller.
- Página 9 • Push down the handle release lever (J) and pull the handle (A) out. • Connect the handle (A) with the hose. • Ensure the other end of the hose is connected to the product below the vacuum knob (P). Above floor cleaning: •...
-
Página 10: Cleaning And Maintenance
• Place the dust container back on the product. Brush roller: replacing the brush and belt: NOTICE Always unplug the product before replacing parts. Brush plate • Unscrew 5 screws located underneath the combo brush (H). • Remove the brush base plate. •... - Página 11 Filter • Remove the dust container (B) from the product (see “Emptying the dust container”). • Lift the latch to open the cover of the dust container. • Take the fi lter out. • Tap on the fi lter to remove the dirt. •...
-
Página 12: Troubleshooting
Cleaning the dust container • Open the dust container (B) (see “Cleaning the motor fi lter”). • Remove the cyclone separator from the dust container (B). • Turn the upper part anti-clockwise and pull it up. • Clean the parts with a dry cloth. General cleaning advice •... - Página 13 Feedback and Help Love it? Hate it? Let us know with a customer review. AmazonBasics is committed to delivering customer-driven products that live up to your high standards. We encourage you to write a review sharing your experiences with the product.
- Página 14 Guide de Bienvenue • Français Table des matières : Avant de commencer, veuillez vous assurer que l’emballage contient les composants suivants :...
- Página 15 Poignée Tuyau Bac à poussière Crochet pour cordon d’alimentation Bouton de dégagement du fi ltre Cordon d’alimentation du moteur Filtre du moteur Brosse à plancher Bouton de détachement du bac Bouton du rouleau-brosse à poussière Bouton On/Off (Marche/Arrêt) Bouton d’aspiration Porte-accessoires Suceur pour fentes Brosse Combi Buse de la brosse à...
-
Página 16: Mesures De Sécurité Importantes
MESURES DE SÉCURITÉ IMPORTANTES Veuillez lire attentivement les présentes instructions et les conserver afi n de pouvoir vous y référer ultérieurement. En cas de cession de ce produit à un tiers, le présent manuel d’utilisation doit également lui être remis. Lorsque vous utilisez des appareils électriques, vous devez toujours prendre des mesures de sécurité... - Página 17 • Ne pas aspirer d’objets chauds ou incandescents, de produits chimiques ou de matériaux infl ammables. • Ne jamais utiliser l’aspirateur sans éléments fi ltrants. L’appareil pourrait être endommagé. • Avant de procéder au nettoyage ou à l’entretien du produit, vous devez débrancher la fi che de la prise de courant. •...
-
Página 18: Utilisation Prévue
• Ne jamais utiliser un appareil avec une buse d’aération obstruée. Ne laissez pas les peluches, la poussière et les tissus lâches s’accumuler dans les buses d’aération. • Ne pas utiliser sur les animaux de compagnie. CONSERVEZ CES INSTRUCTIONS DESCRIPTION DES TERMES D’AVERTISSEMENT DANGER Terme d’avertissement indiquant un danger associé... -
Página 19: Utilisation
Utilisation Nettoyage des planchers : FLOOR • Tournez le bouton d’aspiration (P) dans le sens des aiguilles d’une montre pour le positionner sur FLOOR (Plancher). Verrouillage/déverrouillage de la brosse Combi • Appuyez délicatement sur la brosse Combi (H). Tirez la poignée (A) pour incliner et déverrouiller la position verticale. - Página 20 Nettoyage des surfaces de planchers • Tournez le bouton d’aspiration (P) dans le sens inverse des aiguilles d’une montre pour le positionner sur HOSE (Tuyau). • Tirez sur la poignée pour verrouiller le produit. Poignée et accessoires REMARQUE Maintenez le produit en position verrouillée lorsque vous utilisez les accessoires.
- Página 21 Nettoyage des surfaces de planchers • Raccordez un accessoire choisi à la poignée. Vidange du bac à poussière • Appuyez sur le bouton de déverrouillage du bac à poussière (O). • Retirez le bac à poussière (B). • Appuyez sur le bouton de verrouillage inférieur, puis videz le bac à poussière (B). •...
-
Página 22: Nettoyage Et Entretien
• Dévissez les 5 vis situées sous la brosse Combi (H). • Retirez la plaque de base de la brosse. • Retirez le rouleau-brosse et la courroie. Courroie • Enroulez la nouvelle courroie autour de la poulie du moteur (1), puis de la poulie du rouleau-brosse (I) (2). - Página 23 • Tapez sur le fi ltre pour en éliminer toute la saleté. • Si le fi ltre est très sale, rincez-le à l’eau tiède, puis laissez-le sécher. Filtre du moteur • Appuyez sur le bouton de déverrouillage du fi ltre du moteur (C), puis retirez le couvercle du fi...
-
Página 24: Dépannage
Conseil de nettoyage général • Nettoyez le produit en l’essuyant à l’aide d’un chiffon doux légèrement humide. • Séchez le produit après le nettoyage. • Ne jamais utiliser de détergents corrosifs, de brosses métalliques, de lavettes abrasives ou d’ustensiles tranchants ou en métal pour nettoyer le produit. Entretien •... -
Página 25: Mise Au Rebut
Vos Avis et Aide Vous l’adorez ? Vous le détestez ? Faites-le nous savoir en laissant un commentaire. AmazonBasics s’engage à vous offrir des produits axés sur les besoins de la clientèle et répondant à vos normes élevées. Nous vous encourageons à rédiger un commentaire visant à... - Página 26 Bedienungsanleitung • Deutsch Inhalt: Bevor Sie beginnen, prüfen Sie, ob die Verpackung die folgenden Teile enthält:...
- Página 27 Griff Schlauch Staubbehälter Haken für Anschlussleitung Entriegelungstaste für Motorfi lter Anschlussleitung Motorfi lter Schlauchbürste Bürstenroller-Taste Entriegelungstaste für Staubbehälter Ein-/Aus-Taste Vakuum-Drehregler Zubehörhalter Fugendüse Kombi-Bürste Staubbürsten-Düse Bürstenroller Möbeldüse Griff-Entriegelungshebel Zubehörteil Vorgesehen für ... Bürste Fliesen, Holzböden, Linoleum Kombi-Bürste Bürste Teppiche Teppiche, Sofas, Kissen und Staubbürste Polstermöbel Entfernt Staub und kleine...
-
Página 28: Wichtige Sicherheitshinweise
WICHTIGE SICHERHEITSHINWEISE Lesen Sie diese Anweisungen sorgfältig durch und bewahren Sie sie zur künftigen Verwendung auf. Wenn dieses Produkt an Dritte weitergegeben wird, muss diese Gebrauchsanweisung beigefügt werden. Bei der Verwendung von Elektrogeräten sollten immer grundlegende Sicherheitsmaßnahmen befolgt werden, um die Gefahr von Feuer, Stromschlag und/oder Verletzungen zu reduzieren, einschließlich der folgenden: •... - Página 29 • Vor der Reinigung oder Wartung des Produkts muss der Netzstecker von der Steckdose getrennt werden. • Verwenden Sie dieses Produkt ausschließlich für seinen vorgesehenen Verwendungszweck. • Verwenden Sie kein beschädigtes Produkt! Wenn das Produkt beschädigt ist, trennen Sie es von der Steckdose und kontaktieren Sie Ihren Händler.
-
Página 30: Vor Der Ersten Verwendung
BEWAHREN SIE DIESE ANLEITUNG AUF BESCHREIBUNG DER SIGNALWÖRTER GEFAHR Signalwort, das eine Gefahr mit hohem Risiko anzeigt, die bei Nichtvermeidung zu schweren Verletzungen oder zum Tod führt. WARNUNG Signalwort, das eine Gefahr mit mittlerem Risiko anzeigt, die bei Nichtvermeidung zu schweren Verletzungen oder zum Tod führten kann. - Página 31 Betrieb Bodenreinigung: FLOOR • Drehen Sie den Vakuum-Drehregler (P) im Uhrzeigersinn in die Position FLOOR (BODEN). Kombi-Bürste verriegeln/entriegeln • Treten Sie vorsichtig auf die Kombi-Bürste (H). Ziehen Sie den Griff (A) nach hinten, um ihn nach hinten zu legen und die senkrechte Position zu entriegeln. •...
- Página 32 Reinigung mit dem Schlauch: • Drehen Sie den Vakuum-Drehregler (P) gegen den Uhrzeigersinn in die Position HOSE (SCHLAUCH). • Ziehen Sie am Griff nach vorne, um das Produkt zu verriegeln. Griff und Zubehörteile HINWEIS Halten Sie das Produkt in verriegelter Position, wenn Sie die Zubehörteile verwenden.
- Página 33 Reinigung mit dem Schlauch: • Verbinden Sie das gewünschte Zubehörteil mit dem Griff. Staubbehälter entleeren • Drücken Sie die Entriegelungstaste für den Staubbehälter (O). • Entfernen Sie den Staubbehälter (B). • Drücken Sie die Verriegelungstaste unten und entleeren Sie den Staubbehälter (B). •...
-
Página 34: Reinigung Und Pflege
• Lösen Sie die 5 Schrauben an der Unterseite der Kombi-Bürste (H). • Entfernen Sie die Bodenplatte der Bürste. • Entfernen Sie den Bürstenroller und den Riemen. Riemen • Führen Sie den neuen Riemen um das Riemenrad des Motors (1) und danach um das Riemenrad des Bürstenrollers (I) (2). - Página 35 • Klopfen Sie auf den Filter, um Schmutz zu entfernen. • Wenn der Filter stark verschmutzt ist, spülen Sie ihn mit warmem Wasser und lassen Sie ihn trocknen. Motorfi lter • Drücken Sie die Entriegelungstaste für den Motorfi lter (C) und entfernen Sie die Filterabdeckung. •...
-
Página 36: Fehlerbehebung
Allgemeine Reinigungshinweise • Verwenden Sie zur Reinigung ein weiches, leicht angefeuchtetes Tuch. • Trocknen Sie das Produkt nach der Reinigung. • Verwenden Sie keine ätzenden Reinigungsmittel, Drahtbürsten, Scheuermittel, Metall oder scharfe Materialien, um das Produkt zu reinigen. Wartung • Bewahren Sie das Produkt an einem kühlen, trockenen Ort, außerhalb der Reichweite von Kindern und Haustieren, am besten in der Originalverpackung, auf. -
Página 37: Technische Daten
Gefällt es Ihnen? Gefällt es Ihnen nicht? Dann bewerten Sie das Produkt auf unserer Webseite! AmazonBasics setzt sich für die Bereitstellung kundenorientierter Produkte ein, um Ihre hohen Qualitätsstandards zu erfüllen. Bitte schreiben Sie eine Rezension, in der Sie Ihre Erfahrungen mit dem Produkt teilen. - Página 38 Guida di Benvenuto • Italiano Contenuto: Prima di iniziare, assicurarsi che la confezione contenga i seguenti componenti:...
- Página 39 Manico Tubo Contenitore raccoglipolvere Gancio per cavo di alimentazione Pulsante di sblocco del fi ltro motore Cavo di alimentazione Filtro motore Spazzola per pavimento superiore Pulsante di sblocco contenitore Pulsante del rullo spazzola raccoglipolvere Pulsante ON/OFF Manopola del vuoto Porta accessori Ugello per fessure Spazzola combinata Ugello spazzola per spolverare...
- Página 40 AVVISI DI SICUREZZA IMPORTANTI Leggere attentamente le istruzioni e conservarle per utilizzo futuro. In caso di cessione del prodotto a terzi, accludere parimenti questo manuale utente. Quando si utilizzano apparecchi elettrici, è necessario seguire sempre le precauzioni di sicurezza di base per ridurre il rischio di incendi, scosse elettriche e / o lesioni a persone tra cui: •...
- Página 41 • Non usare un prodotto danneggiato! Se danneggiato, scollegare il prodotto dalla presa elettrica e contattare il rivenditore. • Per evitare danni, non schiacciare o piegare il cavo di alimentazione e non farlo passare su spigoli taglienti. Tenere lontano da superfi ci calde, così come da fi amme libere. •...
-
Página 42: Uso Previsto
ATTENZIONE Parola di segnalazione che indica un pericolo con un basso livello di rischio che, se non evitato, potrebbe causare lesioni di lieve o moderata entità. Indica un suggerimento pratico, un consiglio o una pratica non AVVISO legata a lesioni personali. Uso Previsto •... - Página 43 Bloccaggio/sbloccaggio della spazzola combinata • Salire delicatamente sulla spazzola combinata (H). Tirare indietro il manico (A) per reclinare e sbloccare la posizione verticale. • Per bloccare il prodotto in posizione verticale, tirare in avanti il manico. Rullo spazzola AVVISO Il rullo spazzola (I) si spegne automaticamente quando il prodotto è bloccato in posizione verticale.
- Página 44 Manico e accessori AVVISO Tenere il prodotto in posizione bloccata durante l’utilizzo degli accessori. • Premere verso il basso la leva di sblocco della maniglia (J) ed estrarre il manico (A). • Collegare il manico (A) al tubo. • Assicurarsi che l’altra estremità del tubo sia collegata al prodotto sotto la manopola del vuoto (P).
- Página 45 Svuotamento del contenitore della polvere • Premere il pulsante di sblocco del contenitore polvere (O). • Rimozione del contenitore della polvere (B). • Premere il pulsante di blocco inferiore e svuotare il contenitore della polvere (B). • Riposizionare il contenitore della polvere sul prodotto. Rullo spazzola: sostituzione della spazzola e della cinghia: AVVISO Scollegare sempre il prodotto prima di sostituire le parti.
-
Página 46: Pulizia E Manutenzione
Cinghia • Avvolgere la nuova cinghia attorno alla puleggia del motore (1) e quindi alla puleggia del rullo spazzola (I) (2). • Allungare la cinghia e rimettere il rullo spazzola in posizione. • Ruotare il rullo spazzola (I) per assicurare il libero movimento della cinghia. Pulizia e Manutenzione AVVERTENZA Rischio di scossa elettrica! Per prevenire il rischio di scossa... - Página 47 Filtro motore • Premere il pulsante di sblocco del fi ltro motore (C) e rimuovere il coperchio del fi ltro. • Estrarre il fi ltro motore (D). • Dare dei colpetti sul fi ltro per rimuovere lo sporco. • Se il fi ltro è molto sporco, sciacquarlo con acqua calda e lasciarlo asciugare. Pulizia del contenitore della polvere •...
-
Página 48: Risoluzione Dei Problemi
Manutenzione • Conservare in un luogo fresco e asciutto, idealmente nella confezione originale, fuori dalla portata di bambini e animali domestici. • Evitare vibrazioni e urti. Risoluzione Dei Problemi Problema Soluzioni L’apparecchio non si avvia • Collegare correttamente la spina di alimentazione. -
Página 49: Smaltimento
Feedback e Aiuto Ti piace? Oppure no? Faccelo sapere scrivendo la tua recensione. AmazonBasics si impegna a distribuire prodotti orientati al cliente che siano all’altezza degli standard più elevati. Pertanto, invitiamo i clienti a scrivere una recensione per condividere le proprie esperienze con il prodotto. - Página 50 Guía de Bienvenida • Español Contenido: Antes de comenzar, compruebe que el embalaje incluye los siguientes componentes:...
- Página 51 Manguera Gancho para el cable de Depósito del polvo alimentación Botón para soltar el fi ltro del motor Cable de alimentación Filtro del motor Cepillo para sobresuelo Botón de liberación del depósito del Botón del rodillo de cepillado polvo Botón de encendido/apagado Control de aspiración Soporte para los accesorios Boquilla para grietas...
-
Página 52: Consejos De Seguridad Importantes
CONSEJOS DE SEGURIDAD IMPORTANTES Lea estas instrucciones atentamente y guárdelas para futuras consultas. Si transfi ere el producto a una tercera persona, debe incluir también este manual de instrucciones. Al usar aparatos eléctricos, siempre deben tomarse unas precauciones de seguridad básicas para reducir el riesgo de incendio, de descarga eléctrica y/o de daños personales incluyendo las siguientes: •... -
Página 53: Descripción De Las Palabras De Advertencia
• Antes de limpiar o realizar tareas de mantenimiento en el producto, desenchúfelo de la toma de corriente. • Solo utilice este producto para su uso previsto. • ¡Nunca utilice un producto dañado! Desconecte el producto de la toma eléctrica y contacte con su proveedor si está dañado. -
Página 54: Antes Del Primer Uso
ADVERTENCIA La palabra de advertencia que indica un peligro con un nivel medio de riesgo que, si no se evita, podría provocar la muerte o lesiones graves. La palabra de advertencia que indica un peligro con un nivel ATENCIÓN bajo de riesgo que, si no se evita, podría provocar lesiones leves o moderadas. - Página 55 Bloquear/desbloquear el cepillo combinado • Pise suavemente el cepillo combinado (H). Tire del mango (A) hacia atrás para reclinar y desbloquear la posición vertical. • Para bloquear el aparato en la posición vertical, empuje el mango hacia delante. Rodillo de cepillado AVISO El rodillo de cepillado (I) se apaga automáticamente cuando el producto está...
- Página 56 Mango y accesorios AVISO Al utilizar los accesorios, mantenga el producto en la posición de bloqueado. • Empuje hacia abajo la palanca para soltar el mango (J) y tire de él (A). • Conecte el mango (A) a la manguera. •...
-
Página 57: Limpieza Y Mantenimiento
• Presione el botón para soltar el del depósito del polvo (O). • Extraiga el depósito del polvo (B). • Presione el botón de bloqueo inferior y vacíe el depósito del polvo (B). • Vuelva a colocar el depósito del polvo en el producto. Rodillo de cepillado: sustitución del cepillo y la correa: AVISO Desenchufe siempre el producto antes de reemplazar las piezas. - Página 58 ADVERTENCIA ¡Riesgo de descarga eléctrica! No sumerja las piezas eléctricas del producto en agua u otros líquidos. Nunca sujete el producto bajo el agua. AVISO Vuelva a colocar los fi ltros únicamente cuando estén totalmente secos. Filter • Extraiga el depósito del polvo (B) del aparato (véase “Vaciar el depósito del polvo”).
-
Página 59: Solución De Problemas
Limpieza del depósito del polvo • Abra el depósito del polvo (B) (véase “Limpieza del fi ltro del motor”). • Extraiga el separador ciclónico del depósito del polvo (B). • Gire la parte superior hacia la izquierda y tire de ella. •... -
Página 60: Desmontaje Por Mantenimiento
Comentarios y Ayuda ¿Le encanta? ¿No le gusta nada? Escriba una opinión como cliente. En AmazonBasics nos comprometemos a proveer productos pensados para satisfacer a nuestros clientes y que estén a la altura de sus elevados estándares de calidad. Le animamos a que escriba una opinión sobre su experiencia con el producto. - Página 61 Welkomstgids • Nederlands Inhoud: Controleer, voordat u aan de slag gaat, of het pakket de volgende zaken bevat:...
- Página 62 Handvat Slang Stofbak Haak voor netsnoer Ontgrendelknop motorfi lter Netsnoer Motorfi lter Vloerborstel Knop voor borstelrol Ontgrendelknop voor stofbak Aan-uitknop Zuigknop Accessoirehouder Spleetmondstuk Combiborstel Mondstuk voor stofborstel Borstelrol Meubelmondstuk Ontgrendelhendel van handgreep Accessoire Bedoeld voor... Borstel Tegels, houten vloeren, linoleum Combiborstel Borstel Matten, tapijten...
-
Página 63: Belangrijke Voorzorgsmaatregelen
BELANGRIJKE VOORZORGSMAATREGELEN Lees deze gebruiksaanwijzing aandachtig door en bewaar ze voor later gebruik. Doe bij overdracht van dit product aan derden deze gebruiksaanwijzing erbij. Volg altijd de basisvoorschriften inzake veiligheid wanneer u elektrische apparaten gebruikt om het risico op brand, elektrische schok en letsel aan personen te beperken, waaronder de volgende: •... - Página 64 • Gebruik nooit een beschadigd product! Haal de stekker uit het stopcontact en neem contact op met uw verkoper als het product beschadigd is. • Knel, buig of schuur het elektrische snoer niet tegen scherpe randen om beschadiging te voorkomen. Houd het ook uit de buurt van hete oppervlakken en open vlammen.
-
Página 65: Beoogd Gebruik
WAARSCHUWING Deze waarschuwingsaanduiding geeft een gemiddeld risiconiveau aan dat, als het niet wordt voorkomen, overlijden of ernstig letsel kan veroorzaken. VOORZICHTIG Deze waarschuwingsaanduiding geeft een laag risiconiveau aan dat, als het niet wordt voorkomen, licht of matig letsel kan veroorzaken. MEDEDELING Geeft praktisch advies, een aanbeveling of een methode aan die geen verband houdt met lichamelijk letsel. - Página 66 De combiborstel vergrendelen/ontgrendelen • Druk voorzichtig op de combiborstel (H). Trek aan de handgreep (A) naar achteren om deze te kantelen en de verticale positie te ontgrendelen. • Om het product rechtop te vergrendelen, duwt u de handgreep naar voren. Borstelrol MEDEDELING De borstelrol (I) wordt automatisch uitgeschakeld wanneer het product rechtop wordt vergrendeld.
- Página 67 De handgreep en accessoires MEDEDELING Houd het product in de vergrendelstand wanneer u accessoires gebruikt. • Duw de ontgrendelhendel van de handgreep (J) en trek de handgreep (A) naar buiten. • Sluit de handgreep (A) aan op de slang. • Zorg ervoor dat het andere uiteinde van de slang is aangesloten op het product onder de zuigknop (P).
- Página 68 De stofbak leegmaken • Druk op de ontgrendelknop van de stofbak (O). • Verwijder de stofbak (B). • Druk op de onderste vergrendelknop en maak de stofbak (B) leeg. • Plaats de stofbak terug in het product. Borstelroller: De borstel en riem vervangen: MEDEDELING Haal de stekker uit het stopcontact voordat u onderdelen vervangt.
-
Página 69: Reiniging En Onderhoud
Riem • Leg de nieuwe riem rond de poelie van de motor (1) en daarna rond de poelie (2) van de borstelrol (I). • Span de riem aan en plaats de borstelrol terug. • Draai de borstelrol (I) om ervoor te zorgen dat de riem ongehinderd kan bewegen. Reiniging en onderhoud WAARSCHUWING Risico op een elektrische schok! Om een elektrische... - Página 70 Motorfi lter • Druk op de ontgrendelknop van het motorfi lter (C) en verwijder het fi lterdeksel. • Haal het motorfi lter (D) eruit. • Tik op het fi lter om het vuil te verwijderen. • Als het fi lter zwaar verontreinigd is, spoelt u het met warm water en laat u het drogen.
-
Página 71: Problemen Oplossen
Onderhoud • Berg het product op in een koele, droge ruimte, en uit de buurt van kinderen en huisdieren, bij voorkeur in de originele verpakking. • Vermijd trillingen en stoten. Problemen oplossen Probleem Oplossingen Het apparaat start niet • Steek de stekker juist in het stopcontact. •... -
Página 72: Specificaties
Vind je het leuk? Vind je het niet leuk? Beoordeel het product dan op onze website! AmazonBasics is toegewijd aan het leveren van klantgerichte producten die voldoen aan uw hoge standaarden. Wij moedigen u aan om een review te schrijven waarin u uw ervaringen met het product deelt. - Página 73 MADE IN CHINA FABRIQUÉ EN CHINE HERGESTELLT IN CHINA PRODOTTO IN CINA HECHO EN CHINA GEMAAKT IN CHINA V6-11/19...