Tabla de contenido
Publicidad
Idiomas disponibles
Idiomas disponibles
Enlaces rápidos
BT DPRF-01
IMPORTANT!
Before starting work the installer should carefully read this
Installation & Operation Manual, and make sure all
instructions contained therein are understood and observed.
- The thermostat should be mounted, operated and
maintained by specially trained personnel only. Personnel in
the course of training are only allowed to handle the product
under the supervision of an experienced fitter. Subject to
observation of the above terms, the manufacture shall
assume the liability for the equipment as provided by legal
stipulations.
- All instructions in this Installation & Operation manual
should be observed when working with the controller. Any
other application shall not comply with the regulations. The
manufacturer shall not be liable in case of incompetent use
of the control. Any modifications and amendments are not
allowed for safety reasons. The maintenance may be
performed by service shops approved by the manufacturer
only.
- The functionality of the controller depends on the model
and equipment. This installation leaflet is part of the product
and has to be obtained.
4
2
APPLICATION
- The thermostats of the "BT" series are developed to control
and manage all type of heating installations.
- The controllers have been designed for use in residential
rooms, office spaces and industrial facilities.
Verify that the installation complies with existing regulations
before operation to ensure proper use of the installation.
SAFETY INSTRUCTIONS
Before starting work disconnect power supply!
- All installation and wiring work related to the thermostat
must be carried out only when de-energized. The appliance
should be connected and commissioned by qualified
personnel only. Make sure to adhere to valid safety
regulations.
- The thermostats are neither splash- nor drip-proof.
Therefore, they must be mounted at a dry place.
- Do not interchange the connections of the sensors and the
230V connections under any circumstances! Interchanging
these connections may result in life endangering electrical
hazards or the destruction of the appliance and the
connected sensors and other appliances.
5
USER GUIDE
RF Digital programmable Thermostat
GUIDE D'UTILISATION
RF Digital programmable Thermostat
GUÍA DE USUARIO
Termostato digital programable RF
GUIA DO UTILIZADOR
Termostato programável digital de RF
HANDLEIDING
RF Digitale programmeerbare Thermostaat192-234
INSTRUKCJA UŻYTKOWNIKA
Elektroniczny radiowy termostat
programowalny
3
Table of content
1
Presentation ..................................................... 7
1.1
Keyboard.......................................................... 9
1.2
Display & LED ................................................ 10
2
First Installation .............................................. 12
2.1
Batteries installation ....................................... 12
2.2
Time and Date adjustment ............................. 13
2.3
RF installation ................................................ 14
2.4
Starting .......................................................... 17
3
Working mode definition ................................ 19
3.1
Manual mode Comfort .................................. 20
3.2
Manual mode, Reduced ................................ 20
3.3
OFF mode ..................................................... 20
3.4
Automatic mode ............................................. 21
3.5
Program mode .............................................. 22
3.6
Holiday mode ................................................. 33
3.7
Timer mode ................................................... 34
4
Special function .............................................. 35
4.1
Keyboards lock Function ............................... 35
4.2
Information ..................................................... 35
5
Parameter's menu .......................................... 37
6
Technical characteristics ................................ 42
7
Troubleshooting & Solution ............................ 44
6
GB
3-49
F
50-95
ES
96-141
PT
142-190
NL
PL
232-277
Publicidad
Capítulos
Tabla de contenido
Solución de problemas

Manuales relacionados para Watts Industries BT DPRF-01


Resumen de contenidos para Watts Industries BT DPRF-01
-
Página 1: Tabla De Contenido
Termostato programável digital de RF 142-190 HANDLEIDING RF Digitale programmeerbare Thermostaat192-234 INSTRUKCJA UŻYTKOWNIKA Elektroniczny radiowy termostat 232-277 programowalny BT DPRF-01 Table of content IMPORTANT! APPLICATION - The thermostats of the “BT” series are developed to control Presentation ............. 7 Before starting work the installer should carefully read this and manage all type of heating installations. -
Página 2: Presentation
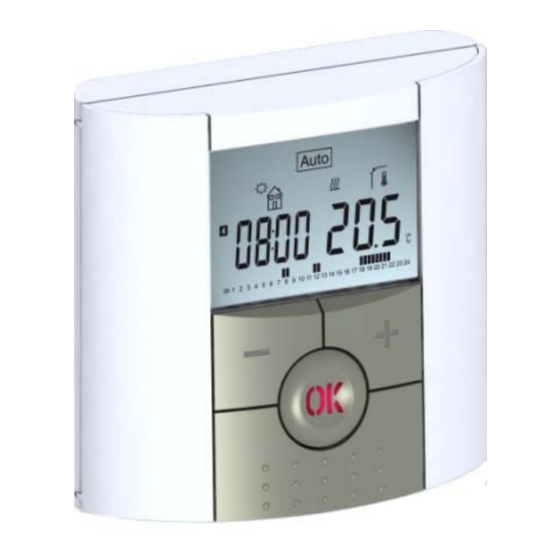
Presentation It will be your best partner to optimize your Keyboard energy consumption and increase your comfort. - Modern design with soft touch material. - Wiring & Installation simplified. Minus Key (-) Plus Key (+) - “Easy program creation” function. - Weekly programmable by step of 30min. -
Página 3: Time And Date Adjustment
- Now your thermostat will propose you to adjust the Then the message “Save” and blinking green LED current time and date. appears, press (OK) to validate the adjusted time and date. Time and Date adjustment You can always reach the time and date adjustments, by pressing and maintaining the Each time a value blinks, you can adjust it with the edition ( ) key during 2 seconds in normal... -
Página 4: Working Mode Definition
Working mode definition Manual mode Comfort - At any time, when display is off, press on the (Ok) Manual working mode, the comfort setting key to display a few seconds the current How to change the working mode? temperature will be followed all the time. temperature and time. - Página 5 Middle step of the day ( Comfort temp.) The comeback hour will need to be adjusted Last step of the day ( Reduced temp.) Now you are invited to choose the type of the next The sleeping hour need to be adjusted Now you are invited to adjust the hour of the first step of the program (blinking icons), step of the program with (-) or (+),...
-
Página 6: Holiday Mode
Holiday mode Change the choice “Yes” or “no” with (-) or (+) and The Holiday mode allows you to set the anti-freeze validate your choice with (OK). temperature for a selected number of days - If you select “no”, you will be invited to create a - You can adjust, the duration in day “d”... -
Página 7: Parameter's Menu
To leave the parameter menu, choose the AirC: Calibration of the internal probe Parameter’s menu parameter « End » and press (OK). The calibration must be done after 1 day working with Your thermostat has a parameter’s menu, in order the same setting temperature in accordance with the N°... -
Página 8: Troubleshooting & Solution
Radio Frequency 868 MHz, <10mW. Batteries level is Troubleshooting & Solution Showed in the parameter The logo blinks (Batteries) too less Software version menu. Vers xxx - Replace the batteries. EN 60730-1 : 2003 My BT DP-01 seems work correctly but the heating doesn’t My BT DP-01 doesn’t start EN 61000-6-1 : 2002 work correctly... -
Página 9: Clavier
Presentation APPLICATION Presentation ........... 51 - Grace à leur menu d’installation et de paramétrage les Clavier ............54 thermostats de la gamme « BT » vous permettront de réguler une Affichage et voyant ........55 ... -
Página 10: Affichage Et Voyant
Affichage et voyant Jours courant. 10. Consigne et température mesurées par les Mode de fonctionnement (mode actif encadré). différentes sondes si “5” est affiché, Donne la Numéro de programme ou du paramètre si “4” valeur d’un paramètre si “4” est affiché. Rouge: Indicateur de chauffe. -
Página 11: Démarrage
- Ensuite sur le thermostat appuyez sur la touche - Si la réception des signaux thermostats ne ce fait Samedi et Dimanche Edition ( ) durant 10 secondes. Le paramètre « Rf pas correctement, essayez de rapprocher le ini » apparaît sur l’afficheur. Le thermostat envoie thermostat du récepteur, vérifier l’installation du alors les trames de configuration au récepteur. -
Página 12: Mode Automatique
- Une fois votre thermostat à l’arrêt, un appui bref Il vous suffira de modifier la consigne courante du Mode Programme sur la touche (Ok) vous permettra de visualiser un programme en utilisant simplement les touches (-) court instant la température ambiante. ou (+). - Página 13 Dernière étape de la journée, l’heure du coucher devra être ajustée. (Température ECO - La programmation se fera par pas de 30 minutes. (1 palier =>1 période = - Durant la programmation si un symbole ou une Vous êtes maintenant invité à régler l’heure de Vous devez maintenant choisir le type du prochain valeur clignote, vous serez appelé...
-
Página 14: Mode Vacances
Vous serez alors invitez à sauvegarder “SAVE” Mode Vacances votre programme en cliquant sur (OK) au jour 7 Le mode vacances vous permettra de mettre votre (Dimanche). installation de chauffage en mode Hors Gel pendant L’écran suivant accompagné de La LED verte le nombre de jours que vous souhaitez. -
Página 15: Visualisation
Visualisation nouveau sur la touche (OK) pour valider votre Menu paramètre Utilisateur réglage. A l’aide de cette fonction vous pourrez visualiser - Pour sortir du menu utilisateur et revenir au menu très rapidement la consigne courante ainsi que les Votre thermostat possède un menu de paramétrage principal déplacez vous sur le paramètre “... -
Página 16: Caractéristiques Techniques
Alimentation & autonomie * L’autonomie peut varier suivant la - Remplacer les piles qualité des piles. Mon BT DPRF-01 semble fonctionner correctement mais Mon BT DPRF-01 semble fonctionner correctement mais ¡IMPORTANTE! le chauffage ne fonctionne pas correctement la température dans la pièce n’est jamais en accord avec - vérifiez les branchements du... -
Página 17: Presentación
- La funcionalidad del controlador depende del modelo y el - Los termostatos no son a prueba de salpicaduras ni Índice equipo. Este folleto de instalación es parte del producto y inmersión. Por tanto, deben montarse en un lugar seco. debe observarse. -
Página 18: Pantalla Y Led
Pantalla y LED Día actual de la semana 10. Temperatura de ajuste o medida si se muestra Menú del modo de funcionamiento (el modo “5”. Valor de parámetro si se muestra “4”. activo se muestra en un recuadro). 11. Función de neutralización de control activada o Color rojo permanente (cuando la Número de programa o número de parámetro función "ITCS"... -
Página 19: Inicio
entre el receptor y el termostato, pulse la tecla Si las señales RF no se recibieron Inicio correctamente, compruebe la instalación Escape ( ) para regresar a la pantalla principal. El termostato está ahora preparado para funcionar. (posición del receptor, distancia...) El modo de funcionamiento predeterminado será... -
Página 20: Modo Automático
Tenga cuidado: El pequeño logotipo de la mano se mostrará Puede elegir entre un programa incorporado P1 a En este modo su instalación puede congelarse. cuando la función de neutralización de control está P9 o un programa de usuario U1 a U4. activa. - Página 21 ª - La 2 selección es elegir el icono de salida, para Se le invitará directamente a ajustar con (-) o (+) la añadir un paso al programa durante el día. hora del paso de regreso. Una vez realizada la selección, pulse (OK) para validar.
-
Página 22: Modo Vacaciones
El logotipo parpadeará y el número de horas / Modo Vacaciones días restantes se muestra hasta el final del periodo. Modo Temporizador El modo Vacaciones le permite fijar la temperatura anticongelante para un número determinado de Si desea detener la función de temporizador días El modo Temporizador le permite ajustar la antes del final, fije el periodo de duración en “no”... -
Página 23: Características Técnicas
Debería mostrarse el mensaje “Sí”; el valor se ITCS: SÍ, no guardará en la memoria interna. El Sistema Inteligente de Control de Temperatura __:__ Selección de la unidad del reloj Si necesita borrar una calibración, pulse la tecla (Intelligent Temperature Control System) activará su instalación con antelación (2 horas como máximo) para 24H (24:00) Escape (... -
Página 24: Resolución De Problemas
El nivel de carga de Resolución de problemas las pilas es muy El logotipo parpadea (pilas) bajo - Sustituya las pilas. Mi BT DP-01 parece funcionar correctamente, pero la Mi BT DP-01 no se pone en funcionamiento Mi BT DP-01 parece funcionar correctamente, pero la temperatura en la sala nunca fue acorde al programa. - Página 25 Índice Apresentação Termostato programável electrónico com ecrã LCD, especialmente concebido para controlar diferentes tipos de sistemas de aquecimento. Apresentação ..........146 Será o seu melhor parceiro para optimizar o seu Teclado ............148 consumo de energia e aumentar o seu conforto. Ecrã...
-
Página 26: Primeira Instalação
10. Definição ou medição de temperatura, se for Primeira Instalação Ordem de apresentação dos ajustes de horas e apresentado “5”. Valor de parâmetro, se for data: Esta secção proporciona indicações para configurar apresentado “4”. o termostato pela primeira vez. 11. Função de anulação temporária activada ou Horas e dia: função “ITCS”... -
Página 27: Definição Do Modo De Funcionamento
Iniciar Nota: Definição do modo de Pode personalizar o seu programa como desejar; Agora, o termostato está pronto a ser utilizado. consulte “Programa” no próximo capítulo, funcionamento O modo de funcionamento predefinido será “Definição do modo de funcionamento” para automático, com um programa incorporado mais explicações. - Página 28 Se escolher um programa incorporado, P1 até - Prima a tecla (OK) para confirmar a sua escolha e Modo de programa regressar ao ecrã principal (no modo AUTO) Apenas poderá visualizar e escolher o programa. Se escolher um programa de utilizador, U1 até Program Manhã, Noite e Fim-de-semana Como acima, pode escolher o programa, visualizá-...
-
Página 29: Modo De Férias
- A segunda escolha é o ícone de saída, para Será directamente solicitado o ajuste das horas, - A primeira escolha são os ícones de dormir. (Fim adicionar um passo ao programa durante o dia. com (-) ou (+) , do passo de regresso. do dia) Após efectuar a escolha, prima (OK) para validar. -
Página 30: Função Especial
- O logótipo “ ” será apresentado no ecrã. O logótipo piscará e o número de horas/dias - Repita o mesmo procedimento para desbloquear Se quiser parar a função de Férias antes do restantes é apresentado até ao fim do período. o teclado. -
Página 31: Resolução De Problemas
desejada na hora programada conforme o programa Versão de software tecla Escape ( semanal. VErS ___ O valor antigo será apagado, sendo apresentada a Este sistema de controlo automático funciona da End (fim): Sair do menu de parâmetros mensagem “no” (não). seguinte forma: Prima (OK) para sair do menu de parâmetros da Ao iniciar o termostato pela primeira vez, o mesmo... - Página 32 As pilhas estão Belangrijk! O logótipo pisca (Pilhas) fracas - Substitua as pilhas. O BT DP-01 parece funcionar correctamente, mas a Alvorens met de montage begonnen wordt, dient men de O BT DP-01 parece funcionar correctamente, mas o temperatura no espaço anterior não está acordo com o handleiding goed te lezen en te begrijpen.
-
Página 33: Eerste Montage
De beste keus als het gaat om energiebesparen Toetsen Display & LED en optimaal comfort genieten. Rood Continu (bij verlicht display): - Modern design met soft touch materiaal. Warmte vraag - Eenvoudige aansluiting en montage. Min toets (-) Plus toets (+) Green knipperend: Uw bevestiging wordt - “Easy program creation”... -
Página 34: Omschrijving Menu's
Noot: u kunt altijd terug naar de vorige waarde door RF initialisatie - U kunt nu het bereik testen door de thermostaat op ( ) te drukken. - Om de thermpostaat te kunnen initialiseren naar de ruimte te brengen die geregeld moet Volgorde van instelling: (inlezen) op de ontvanger, dient de ontvanger op worden. -
Página 35: Handbediening Comfort
Programma modus Handbediening Comfort - Door op (Ok) te drukken, zal ook bij uitgeschakeld Programma De thermostaat handhaaft de door u ingestelde display enkele seconden de actuele tijd en temperatuur. Huidige dag temperatuur weergegeven worden. Door op (-) of (+) te drukken, zal de ingestelde - Om de thermostaat (en daarmee de installatie) waarde knipperen en kunt u deze aanpassen. - Página 36 Nadat u ( ) heeft gedrukt, verschijnt het volgende display: Nu kunt u kiezen wat de volgende stap in het Bevestig het tijdstip met (OK) om naar de volgende programma moet worden(knipperend icoon), stap te gaan. U heeft 2 mogelijkheden: Nu kunt u het eerste tijdstip van uw programma - 1e is het slapen icoon.
-
Página 37: Vakantie Modus
- De Vorstbeveiliging temperatuur is af fabriek 10°C. - U kunt hier een aantal uren “H” (indien korter dan U kunt dit aanpassen in het parameter menu 24), of dagen “d” instellen met (-) of (+). Met (OK) nummer 06 ‘HG’ (zie hoofdstuk 6). bevestigd u uw keuze (instelbaar van 1 uur tot 99 dagen). -
Página 38: Technische Specificaties
AirC: Calibreren interne sensor U kunt de sensor calibreren nadat de thermostaat N° Af fabriek instelling & alternatieven HG: Vorstbeveiliging temperatuur die aangehouden minimaal 1dag op dezelfde temperatuur ingesteld is geweest. wordt in de vakantie modus. Af fabriek 10°C. RF INI: Radio configuratie Plaats een thermometer op 1.5M boven de vloer (net Met (-) of (+)kunt u de temperatuur aanpassen. -
Página 39: Probleemoplossing
Probleem & Oplossing Thermostaat lijkt te werken, maar het wordt niet warm Op de ontvanger: Het display is” leeg” - controleer of het RF signaal aankomt - Controleer of de isoleerstrip tussen - Controleer de aansluiting naar de batterij en thermostaat is verwijderd . Uitgang Batterij ketel. - Página 40 Spis treści 1. Prezentacja Termostat BT DP-RF-01 najlepszym partnerem do optymalizacji zużycia energii i zwiększenia komfortu pracy. Prezentacja ..........236 - Nowoczesne wykonanie z miękkiego w dotyku Klawiatura ............ 238 Wyświetlacz i wskaźniki LED ....... 239 materiału.
-
Página 41: Pierwsza Instalacja
Wskazanie zapotrzebowania na ciepło. 2. Pierwsza instalacja Lista nastaw czasu i daty: Wskaźnik poziomu zużycia baterii. Ten rozdział opisuje pierwsze ustawienie Wskaźnik jednostki temperatury °C lub °F. Godzina i dzień: termostatu po instalacji. 10. Ustawiana lub zmierzona temperatura jeśli Dostosowanie godzin. aktywna jest pozycja „5”. - Página 42 2.4 Uruchomienie Uwaga: 3. Definiowanie trybu pracy Termostat jest gotowy do pracy. Możesz dowolnie dostosować swój program. Domyślnym trybem pracy będzie tryb automatyczny Aby uzyskać więcej informacji zobacz rozdział Jak zmienić tryb pracy? ze standardowo wbudowanym programem "definiowanie trybu pracy". "P1".
- Página 43 Jeśli wybrałeś wbudowany program: P1 - P9, Jeśli wybierzesz program użytkownika U1 - U4, 3.5 Tryb Program Możesz tylko zobaczyć i wybrać program. Możesz tak jak powyżej wybrać program, zobaczyć P1: Rano, wieczór i weekend; go, ale możesz również go dostosować. Wybrany P2: Rano, południe, wieczór i weekend;...
- Página 44 Możliwe są dwie opcje wyboru: - 1 - możesz wybrać ikonę uśpienia. (Koniec dnia), - 2 – możesz też dodać inny etap do programu ciągu dnia. Należy wtedy wybrać ikonę „opuszczania domu”. Kiedy zmiany są gotowe, należy nacisnąć przycisk (OK), aby zatwierdzić. Kiedy godziny zostaną...
- Página 45 - Następnie ustaw żądaną temperaturę za pomocą (-) lub (+), następnie naciśnij przycisk (OK), aby - Logo będzie wyświetlane na ekranie. Jeśli chcesz zatrzymać funkcję „Holiday” przed uruchomić funkcję. (Wartość domyślna 22°C). - Aby odblokować klawiaturę, powtórz tę samą końcem ustawionego okresu, zmień czas trwania procedurę.
-
Página 46: Charakterystyka Techniczna
7. Problemy i ich rozwiązywanie Opcjonalnie czujnik 6. Charakterystyka techniczna 10k ohms przy 25°C zewnętrzny Częstotliwość radiowa 868 MHz, <10mW. My BT DPRF-01 nie uruchamia się Wersja oprogramowania Otoczenie: - Sprawdź czy ochronna naklejka Wersja oprogramowania pokazana w ustawieniach Temperatura pracy: od 0°C do 40°C... - Página 47 BT DPRF-01 - wygląda że działa normalnie ale ogrzewanie Annexes (Built-in Program description) nie działa poprawnie. Na odbiorniku: - Sprawdź poprawność odbioru sygnału radiowego. Na wyjściu 0 1 2 3 4 5 6 7 8 9 10 111213141516 17 1819 20212223 0 1 2 3 4 5 6 7 8 9 10 111213141516 17 1819 20212223 - Sprawdź...
- Página 48 0 1 2 3 4 5 6 7 8 9 10 111213141516 17 1819 20212223 0 1 2 3 4 5 6 7 8 9 10 111213141516 17 1819 20212223 0 1 2 3 4 5 6 7 8 9 10 111213141516 17 1819 20212223 0 1 2 3 4 5 6 7 8 9 10 111213141516 17 1819 20212223 0 1 2 3 4 5 6 7 8 9 10 111213141516 17 1819 20212223 0 1 2 3 4 5 6 7 8 9 10 111213141516 17 1819 20212223...