Tabla de contenido
Publicidad
Idiomas disponibles
Idiomas disponibles
Enlaces rápidos
WS-7394U
Wireless 433 MHz
Weather Station
Instruction Manual
FCC DISCLAIMER
R
FCC ID: OMO-01RX (Receiver), OMO-01TX (transmitter)
This device complies with part 15 of the FCC rules. Operation is sub-
ject to the following two conditions:
(1) This device may not cause harmful interference.
(2) This device must accept any interference received, including inter
ference that may cause undesired operation.
Publicidad
Capítulos
Tabla de contenido

Manuales relacionados para La Crosse Technology WS-7394U


Resumen de contenidos para La Crosse Technology WS-7394U
- Página 1 WS-7394U Wireless 433 MHz Weather Station Instruction Manual FCC DISCLAIMER FCC ID: OMO-01RX (Receiver), OMO-01TX (transmitter) This device complies with part 15 of the FCC rules. Operation is sub- ject to the following two conditions: (1) This device may not cause harmful interference.
-
Página 2: Tabla De Contenido
TABLE OF CONTENTS Contents Topic Page Inventory of Contents/ Additional Equipment Language Page About WWVB Quick Set Up Guide English Detailed Set Up Guide Battery Installation French Start Up Sequence Explanation of LCD Information Spanish Function Key Layout Program Mode Overview of Programming Sequence LCD Contrast Setting Time Zone Setting... -
Página 3: Inventory Of Contents/ Additional Equipment
INVENTORY OF CONTENTS For more information about WWVB please see the NIST website at 1. WS-7394U-indoor weather station http://www.boulder.nist.gov/timefreq/stations/wwvb.htm 2. TX6U-remote temperature (temperature/humidity) sensor QUICK SET-UP GUIDE 3. Instruction manual and warranty card Hint: Use good quality Alkaline Batteries and avoid rechargeable ADDITIONAL EQUIPMENT (not included) batteries. -
Página 4: Detailed Set Up Guide
DETAILED SET-UP GUIDE 1. Remove the battery cover (the cover has white writing on it). 2. Observe the correct polarity, and install two Alkaline AA batteries. I. Battery Installation 3. Do not press any buttons for at least ten minutes. If a button is Batteries will fit tightly. -
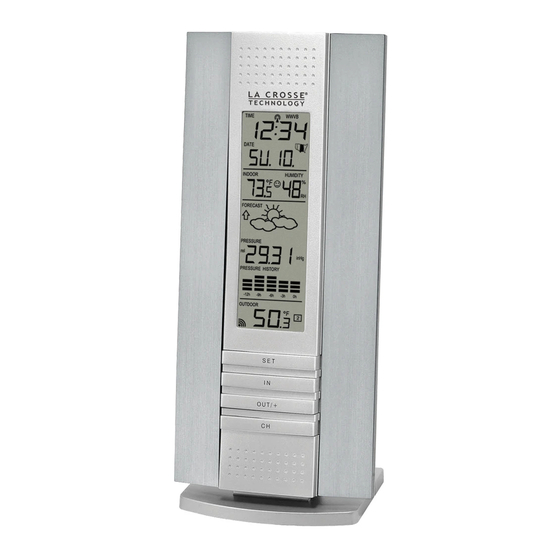
Página 5: Explanation Of Lcd Information
5. Once the time and date are set, the indoor weather station will B. There are many different modes the indoor weather station can be conduct a search every night at midnight and correct to the accu- set to. The LCD shown is the normal operating mode, and your rate time and date (Daylight Saving Time is automatic). -
Página 6: Time Zone Setting
2. “lcd” will appear at the top of the display and a number will flash Note: Some locations (Arizona and parts of Indiana) do not follow next to it. Daylight Saving Time. 3. Press and release the “OUT/+” button to select the desired LCD contrast setting. -
Página 7: Setting The Time/Date Manually
Note: In 12h mode “PM” will appear to the left of the time during PM 3. Press and release the “SET” button seven more times to advance hours. If the time is not within the PM hours nothing will be displayed. to the Manual Year setting. -
Página 8: Air Pressure Measuring Units (Inhg/Hpa)
2. “lcd” will appear at the top of the display and a number will flash 3. Press and release the “SET” button twelve more times to advance next to it. to the Relative Pressure setting. 3. Press and release the “SET” button ten more times to advance to 4. -
Página 9: Multiple Remote Temperature/Humidity Sensors
B. Multiple Remote Temperature Sensors between 68˚F and 79˚F (20˚C and 25.9˚C), and the humidity is The WS-7394U is able to receive signals from 3 different remote between 45% and 64%. sensors. These extra remote sensors can be purchased through the 3. -
Página 10: Weather Icons
forecast-creating a necessity to disregard all weather forecasting for 7. A storm can be expected if there is a drop of 4 hPa or more in less 12-24 hours after the unit has been set-up, reset, or moved from one than 6 hours. -
Página 11: Mounting
Place the mounting bracket over the desired location. E. Opening the casings invalidates the warranty. Do not try to repair c. Through the three screw holes of the bracket, mark the mounting the unit. Contact La Crosse Technology for repairs. surface with a pencil. TROUBLESHOOTING d. -
Página 12: Specifications
All replaced parts and products become Indoor 1% to 99% with 1% resolution, the property of La Crosse Technology, Ltd and must be returned to La indoor weather station displays “—.-” Crosse Technology, Ltd. Replacement parts and products assume if outside this range the remaining original warranty, or ninety (90) days, whichever is longer. - Página 13 La Crosse Technology, Ltd will pay reasonable return Phone: 507.895.7095 shipping charges to the owner of the product. Fax: 507.895.2820 Your La Crosse Technology, Ltd warranty covers all defects in material e-mail: and workmanship with the following specified exceptions: (1) damage support@lacrossetechnology.com...
- Página 14 TABLE DES MATIÈRES INVENTAIRE 1. La station météo WS-7394U Sujet Page 2. Le capteur de température (température/humidité)) distant TX6U Inventaire/ Équipement supplémentaire 3. Manuel d’instructions et fiche de garantie A propos du WWVB ÉQUIPEMENT SUPPLÉMENTAIRE (non-fourni) Guide de paramétrage rapide 1.
-
Página 15: Guide De Paramétrage Rapide
étant 9 192 631 770 vibrations d’un atome de Césium-133 dans un vérifiez que les unités sont dans le rayon de réception l’un de l’autre vacuum. Pour plus d’informations sur le WWVB et l’horloge atomique, ou répétez l’installation des piles. visitez le site web du NIST http: //www.boulder.nist.gov/timefreq/sta- GUIDE DE PARAMÉTRAGE DETAILLE tions/wwvb.htm... -
Página 16: Séquence De Mise En Route
B. Station météo intérieure 3. La température et l’humidité intérieures et la pression atmosphérique 1. Retirez le couvercle du compartiment à piles (le couvercle porte un barométrique (29,91 inHg HR) seront également affichées. texte en blanc). 4. Une icône “satellite” s’affiche en bas de l’écran LCD à gauche de la 2. -
Página 17: Explication Des Informations Affichées À L'écran Lcd
III. Explication des informations affichées à l’écran LCD IV. Disposition des touches de fonction A. Le schéma ci-dessous présente les fonctionnalités de l’écran LCD. A. Le schéma ci-dessous présente les quatre touches de fonction utilisées pour la programmation et le fonctionnement de votre sta- Indicateur de tion météo intérieure réception WWVB... -
Página 18: Fuseau Horaire
4. Appuyez sur la touche “SET” pour confirmer le niveau du contraste E. A c t i v a t i o n ( O N ) / d é s a c t i v a t i o n ( O F F ) d e l ’ h e u r e et passer en mode réglage du fuseau horaire. -
Página 19: Réglage Manuel De L'heure/Date
6. Appuyez sur la touche “SET” pour confirmer le format 12H ou 24H 3. Appuyez encore sept fois sur la touche “SET” pour avancer au et passer en mode réglage manuel de l’heure. réglage manuel de l’année. 4. L’année clignote en dessous de l’affichage de l’heure. G. -
Página 20: Unités De Mesure De La Pression Atmosphérique (Inhg/Hpa)
3. Appuyez encore dix fois sur la touche “SET” pour avancer à la 3. Appuyez encore onze fois sur la touche “SET” pour avancer à la programmation des unités de mesure de la température. programmation de la pression relative. 4. ˚F ou ˚C clignote en haut de l’écran. 4. -
Página 21: Fonctionnalités Et Fonctionnement
B. Capteurs de température distants multiples valeurs minimums et maximums sont automatiquement mises à jour La station WS-7394U peut réceptionner les signaux provenant de 3 lorsqu’un nouveau minimum ou maximum est relevé ou en cas de capteurs distants différents. Ces capteurs distants supplémentaires réinitialisation manuelle. -
Página 22: Prévisions Météo Et Indicateurs De Tendance Météo
3. Ces flèches reflètent les variations actuelles de la pression estimée à environ 75%. La station météo WS-7394U calcule une atmosphérique. moyenne des relevés de pression atmosphérique antérieurs et fournit 4. -
Página 23: Fixation
9. L’histogramme défile en continu pour éviter de “griller” l’écran LCD. recevoir le signal. Remarque: Cette fonctionnalité ne peut être désactivée. B. Fixation de la Station Météo Intérieure WS-7394U La station météo intérieure peut être fixée de deux façons : VII.FIXATION •... -
Página 24: Dépistage Des Pannes
C. N’immergez pas les unités dans l’eau. Problème : D. Retirez immédiatement toute pile usée afin d’éviter tout risque de L’heure et la date WWVB ne s’affiche pas ou ne se met pas à jour fuite et de dommages. Solution : E. -
Página 25: Informations Sur La Garantie
SAV agréé par La Crosse Technology, Ltd. Le ticket de caisse d’origine CONSÉCUTIFS, PUNITIFS OU AUTRES DOMMAGES SIMILAIRES doit être présenté sur demande à La Crosse Technology, Ltd ou à son RELATIFS À L’UTILISATION OU AU MAUVAIS FONCTIONNEMENT centre de SAV comme preuve d’achat. - Página 26 TABLA DE CONTENIDO sales@lacrossetechnology.com (informations sur les autres produits) Tema Página site web : Inventario del Contenido /Equipo Adicional www.lacrossetechnology.com Sobre la señal de la hora radio-controlada WWVB Vous avez des questions ? Visionnez notre vidéo d’instructions à Guía rápida para la puesta en funcionamiento www.lacrossetechnology.info/7394 Guía Detalla para la puesta en funcionamiento Instalación de las pilas...
-
Página 27: Iinventario Del Contenido Del Paquete
IINVENTARIO DEL CONTENIDO DEL PAQUETE continuamente cada segundo de cada día hasta lograr una exactitud 1. La estación meteorológica WS-7394U- de diez billonésimos de segundo por día. Estos físicos han creado 2. Un sensor remoto TX6U- (temperatura/humedad) una norma o estándar internacional, midiendo un segundo como 9, 3. -
Página 28: G U I A D E Ta L L A D A Pa R A L A P U E S Ta E Nfuncionamiento
Para finalizar el proceso de puesta en funcionamiento de su nueva pilas no queden sueltas para evitar problemas de transmisión). Estación del tiempo en interiores, después de 15 minutos, por favor 4. Vuelva a colocar la tapa de las pilas deslizándola hacia arriba. siga los pasos anotados a continuación en la Guía Detallada para la Asegúrese que la tapa de las pilas quede bien asegurada. - Página 29 meteorológica esta intentando recibir las señales del sensor. Dentro III. Explicación de la Información de la Pantalla LCD de cinco minutos deberán visualizarse la lectura de la temperatura A. La foto de la pantalla que encontrará a continuación le indica las y humedad-si esto no sucede, retire las pilas de todas las unidades funciones de la pantalla LCD.
- Página 30 IV. Distribución de las Teclas de Funcionamiento 2. El icono “lcd” aparecerá en la parte alta de la pantalla y un número relampagueará a su lado. 3. Pulse la tecla “OUT/+” para seleccionar el nivel de contraste deseado de la pantalla LCD. 4.
- Página 31 Nota: Algunos lugares (como Arizona y otras partes de Indiana) no 3. Presione la tecla “SET” cuatro veces más para pasar a la tienen el cambio de Hora de Verano. programación del Formato de la Hora en las 12/24 Horas. 4.
- Página 32 5. Pulse la tecla “OUT/+” para seleccionar los minutos deseados. 3. Pulse la tecla “SET” nueve veces más para pasar al modo de ajuste 6. Presione la tecla “SET” para confirmar el ajuste de los minutos y manual de la fecha. pasar al ajuste del Año.
-
Página 33: Funciones Y Operaciones
4. El símbolo ‘inHg’ o ‘hPa’ titilará en la parte alta de la pantalla. 1. Presione la tecla SET” durante cinco segundos. 5. Presione la tecla “OUT/+” para seleccionar la unidad de medición 2. El icono “lcd” aparecerá en la parte alta de la pantalla y un número de la Presión Atmosférica relampagueará... - Página 34 Cada sensor almacenará sus propios mínimos y máximos registros. B. Múltiples Sensores Remotos de la Temperatura La estación WS-7394U es capaz de recibir información de tres (3) diferentes sensores remotos. Estos sensores adicionales pueden ser P.65 P.66...
- Página 35 La estación 2. Hay una que apunta hacia arriba (al lado izquierdo de la pantalla meteorológica WS-7394U promedia los registros anteriores/previos LCD) y una que apunta hacia abajo (al lado derecho de la pantalla de la presión atmosférica para suministrarle un pronóstico exacto, es...
- Página 36 B. FIJANDO LA ESTACION METEOROLOGICA EN INTERIORES Estación Meteorológica en Interiores pueda recibir la señal de los WS-7394U transmisores y la señal de la hora WWVB desde la ubicación deseada. La Estación meteorológica en Interiores puede ser instalada de dos...
-
Página 37: Instrucciones De Cuidado Y Mantenimiento
E. Si abre las cubiertas de la unidad invalidará la garantía. No intente Problema: reparar la unidad. Para las reparaciones contacte directamente a No se recibe o no se actualiza la hora y la fecha de la señal del “La Crosse Technology”. transmisor WWVB Solución: PROBLEMAS Y SOLUCIONES 1) Espere durante toda la noche para recibir la señal... -
Página 38: Informacion Sobre La Garantia
R E S P O N S A B I L I D A D P O R D A Ñ O S I N C I D E N TA L E S , prueba de la compra por La Crosse Technology, Ltd o el centro de CONSECUTIVOS, PUNITIVOS U OTROS DAÑOS SIMILARES... - Página 39 Para trabajos de la garantía, asistencia técnica o información, por fa- vor contacte: La Crosse Technology, Ltd 190 Main Street La Crescent, MN 55947 Teléfono: 507.895.7095 Fax: 507.895.2820...