Tabla de contenido
Publicidad
Idiomas disponibles
Idiomas disponibles
Enlaces rápidos
Publicidad
Tabla de contenido

Resumen de contenidos para Telstar TSW001910MD
- Página 1 PARRILLA 3 EN 1 TSW001910MD...
- Página 2 PARRILLA 3 EN 1 TSW001910MD IMPORTANTE Consulte las diferentes partes de este manual o los íconos correspondientes antes de la operación, el man- tenimiento y la instalación de los productos. Al usar aparatos eléctricos, siempre se deben seguir las precauciones básicas de seguridad: Lea todas las instrucciones antes de usar la máquina.
-
Página 3: Instrucciones De Seguridad
PARRILLA 3 EN 1 TSW001910MD a) Se debe proporcionar un cable de alimentación corto para reducir el riesgo resultante de enredarse o tropezar con un cable más largo. b) Los cables de extensión más largos están disponibles y se pueden usar si se tiene cuidado en su uso. -
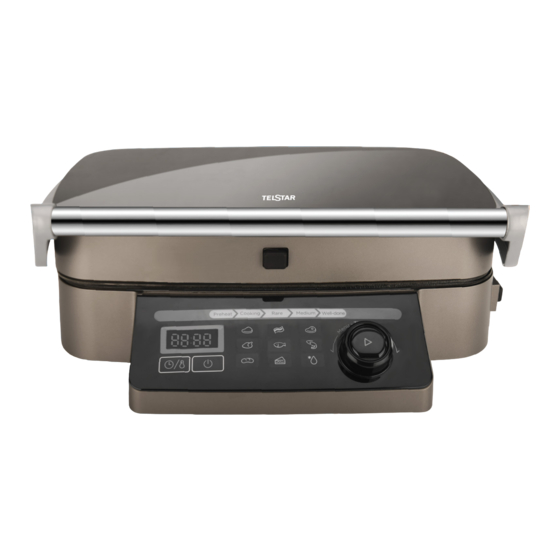
Página 4: Panel De Control
PARRILLA 3 EN 1 TSW001910MD PANEL DE CONTROL Especificación técnica: • Modelo del producto: TSW001910MD • Tensión nominal: 120V • Potencia nominal: 1500W Antes de usar: Coloque la parrilla en una superficie limpia y plana. La parrilla se puede colocar de tres maneras: Posición cerrada: Coloque el bandeja superior en la base. - Página 5 PARRILLA 3 EN 1 TSW001910MD •Posición horizontal Las bandejas de hornear superior e inferior se pueden colocar de forma horizontal, y las bandejas superior e inferior están dispuestas en una fila para formar un área de cocción grande. Ajuste la parrilla a la posición abierta.
-
Página 6: Limpieza
PARRILLA 3 EN 1 TSW001910MD LIMPIEZA Asegúrese de desconectar el aparato de la fuente de alimentación. Limpie la cavidad del horno después de usar con un paño ligeramente húmedo. Limpie los accesorios de la forma habitual en agua jabonosa. El marco de la puerta y el sello y las partes adyacentes deben limpiarse cuidadosamente con un paño húmedo cuando estén sucios. - Página 7 PARRILLA 3 EN 1 TSW001910MD PASOS ESPECÍFICOS DE LA OPERACIÓN: 1. Enchufe la fuente de alimentación y toque el botón “ “, luego los productos entrarán en estado de espera y la luz indicadora del tubo mostrará “--”. 2. Si la comida está congelada, debe colocarla en la parrilla y cerrar la cubierta superior, luego haga clic en el botón “...
-
Página 8: Recetas Automáticas
PARRILLA 3 EN 1 TSW001910MD RECETAS AUTOMÁTICAS: Nombre de Menú Ingrediente Término de Cocción Grosor Medio, ¾, bien coci- Carne de Cerdo Griskin 10-80mm Medio, ¾, bien coci- Carne de Res Filete 10-80mm Medio, ¾, bien coci- Pescado frito Salmón... - Página 9 PARRILLA 3 EN 1 TSW001910MD b. No sumerja la parrilla en agua o cualquier otro líquido. Asegúrese de almacenarla en un lugar seco. Cualquier otra situación deberá ser atendida por un especialista. Fallas: Display Causa Análisis de la falla Verificaciones...
- Página 10 GRILL 3 IN 1 TSW001910MD IMPORTANT NOTE Please read the manual carefully before operating your product. Retain it for future reference. IMPORTANT SAFEGUARDS Please refer to different parts of this manual or corresponding icons before operation, maintenance, and in- stallation of products. When using electrical appliances, basic safety precautions should always be followed: Read all instructions before using the machine.
- Página 11 GRILL 3 IN 1 TSW001910MD 1)The marked electrical rating of the extension cord should be at least as great as the electrical rating of the appliance; 2)The longer cord should be arranged so that it does not drape over the countertop or table top where it can be pulled on by children or tripped over unintentionally.
-
Página 12: Control Panel
GRILL 3 IN 1 TSW001910MD CONTROL PANEL Technical Specification: • Product Model: TSW001910MD • Rated Voltage: 120V • Rated Power: 1500W Before Use: Place the grill on a clean, flat surface. The grill can be positioned in a three ways: Closed position: Place the upper housing on the base This position is used to start and heat when using a contact grill. - Página 13 GRILL 3 IN 1 TSW001910MD •Horizontal placement The upper and lower baking trays are horizontal, and the upper and lower trays are arranged in a row to form a large cooking area. Be in this position as a full grill on trial.
- Página 14 GRILL 3 IN 1 TSW001910MD SPECIFIC OPERATION STEPS: Plug in the power supply and touch the “( )” button, then products will get into standby state and the nixie tube indicator light displays “----”. If the food is frozen, you need to put the food in the grill and close the upper housing, then click the “...
- Página 15 GRILL 3 IN 1 TSW001910MD AUTOMATIC GEAR RECIPES Cooking Menu Names Ingredient Test Thickness requiremet degree...
-
Página 16: Care And Cleaning
GRILL 3 IN 1 TSW001910MD CARE AND CLEANING Please remove the baking tray to avoid damaging the surface of the baking tray before cleaning. Oil trays and baking trays are safe in the dishwasher. If you don’t want to put them in the dishwasher, you can use a small amount of detergent to clean the baking tray, then rinse thoroughly and remove the residues and wipe thoroughly with a paper towel. - Página 17 HORNO MULTIUSO 3 EN 1 TMA001310MD...