Publicidad
Idiomas disponibles
Idiomas disponibles
Enlaces rápidos
WArNINg:
ELEcTrIcAL ShOck hAzArD.
Turn off power at the main power source before installing
a Dual Icemaker Water Valve. DO NOT restore electrical
power to the unit until the Dual Icemaker Water Valve is
properly installed and the compartment cover is secured
with the retaining screws supplied with the unit.
1. Disconnect the power source to the unit.
2. Turn off the water supply.
3. Pull the appliance away from wall being careful
not to kink the water line.
4. Remove the compartment cover from the rear of
appliance to gain access to the water valve. Keep any
retaining screws.
5. Remove the valve mounting screws. Keep the
mounting screws.
6. On each plastic tube, identify and label each tube and
label its connection on the water valve. You will need this
information to install the new valve.
7. Remove the three water lines from the valve by
depressing the quick connect collets and pulling out the
tubes. Place all water line ends into a bucket to catch
any water drainage.
8. Disconnect the wiring plugs from the coils by pulling them
off. Mark and label which connector was on which side
of the valve. Discard the old valve.
9. Connect the plastic tubes to the new valve. Use
the labels you created in Step 6 to make sure each
tube is connected to the right connection. Push each
tube into the appropriate connection until it stops which
should be approximately ½" (0.5 inch).
10. Reconnect the wiring plugs to the coils. Use the labels
you created in Step 7 to make sure each plug is
connected in the same position as they were on the
old valve.
11. Using original mounting screws, mount the new valve in
the same location as the old valve.
12. Turn on the water supply and plug the refrigerator into the
electrical outlet.
191 E. North Avenue
Carol Stream Illinois 60188 USA
Customer Service Telephone 1.800.304.6563
Customer Service Facsimile 1.800.426.0804
HVACCustomerService@Invensys.com
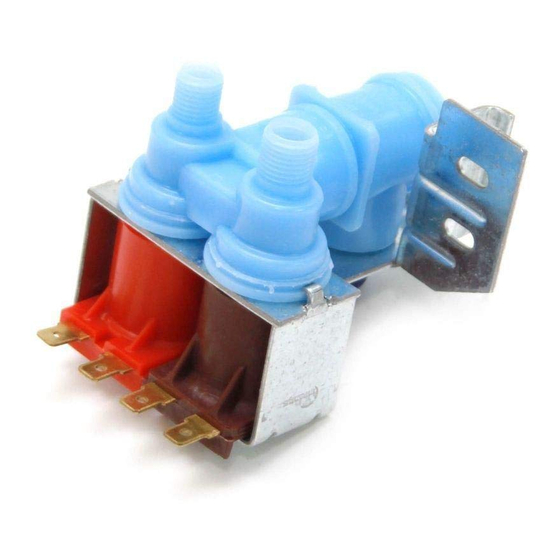
Dual icemaker Water ValVe With
Quick coNNect coNNectioNS
For Technical Service
Telephone 1.800.445.8299
Facsimile 1.630.260.7294
TechnicalService@Invensys.com
INSTALLATION DATA
13. Press the water dispenser handle until water flows
freely into a container. Check for leaks at the valve
and tube connections. If leakage is observed,
remove the leaking tube, carefully cut off 1" (1 inch)
and re-insert the tube.
14. Empty the icemaker tray of ice. Use the original
equipment service manual for the appliance for
instructions on how to manually cycle the
icemaker. Continue to check for leaks and
make any repairs necessary before continuing.
15. Re-attach the compartment cover and secure the
cover with the retaining screws.
16. Slide the appliance back into place being careful
not to kink the water line.
Uni-Line
and Robertshaw
are trademarks of Robertshaw
®
®
Controls Co. its subsidiaries and/or affiliated companies.
All other brands mentioned may be the trademarks of
their respective owners.
N-86 SerieS
N-86
www.Uni-Line.com
www.InvensysControls.com
©2014 Robertshaw Controls Co.
03/14 – 352-00180
Publicidad

Resumen de contenidos para Uni-Line Robertshaw N-86 Serie
- Página 1 12. Turn on the water supply and plug the refrigerator into the electrical outlet. 191 E. North Avenue Carol Stream Illinois 60188 USA For Technical Service Uni-Line and Robertshaw are trademarks of Robertshaw www.Uni-Line.com ® ®...
- Página 2 12. Restablezca el suministro de agua y enchufe el refrigerador en la toma de electricidad. 191 E. North Avenue Carol Stream Illinois 60188 USA Servicio técnico: Uni-Line y Robertshaw son marcas registradas de Teléfono de atención al cliente: 1.800.304.6563 ®...