Tabla de contenido
Publicidad
Idiomas disponibles
Idiomas disponibles
Enlaces rápidos
Publicidad
Tabla de contenido

Resumen de contenidos para Steren REC-825
-
Página 2: Caracteristicas
IMPORTANTE Antes de utilizar su nuevo Kit C Antes de utilizar su nueva Grabadora digital y reproductor MP3, por favor lea las siguientes recomendaciones. • Siempre utilice un paño suave, limpio y seco para limpiar el equipo. • No intente abrir el equipo, puede ocasionar malfuncionamiento y anulación de la garantía. - Página 3 CONTENIDO • Una grabadora digital tipo pluma con reproductor MP3 • Un audífono. • Un cable USB. • Un cable de línea telefónica. • Un micrófono de solapa. • Un adaptador telefónico. • Un CD de instalación. • Un manual de instrucciones. ESPAÑOL-03...
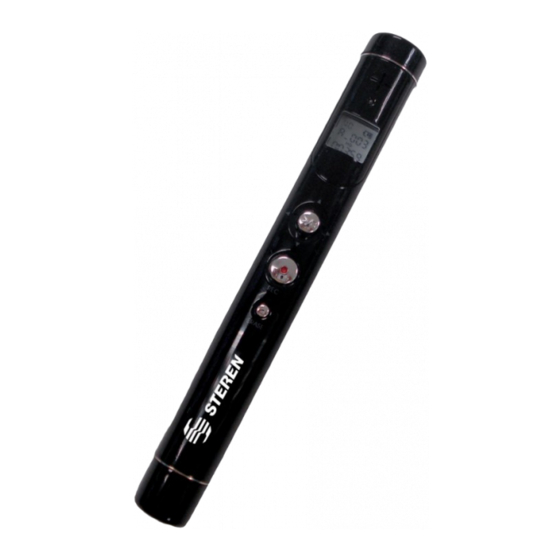
- Página 4 CONTROLES 1.- Micrófono. 2.- LED indicador Se ilumina en color verde cuando se enciende o apaga el grabador. Se ilumina en color rojo cuando esta en proceso de grabación. 3.- Pantalla LCD. 4.- Play/Stop Botón para encender y apagar la grabadora, además este Botón sirve para reproducir, parar, Control de volumen, control de avance y regreso.
- Página 5 8.- Bocina. 9.- Entrada de línea. 10.- Menú Entra al menú principal. 11.- Clip de sujeción. 12.- Interruptor on/off HOLD Deslice este botón el posición ON para encender el modo seguridad y asi evitar que se presionen los botones del equipo accidentalmente mientras esta en funcionamiento.
-
Página 6: Instalacion Y Cambio De Bateria
INSTALACION Y CAMBIO DE BATERIA 1.- Gire la tapa del compartimiento de baterías. 2.- Coloque una batería AAA, ponga atención a la polaridad. 3.- Coloque nuevamente la tapa del compartimiento. ESPAÑOL-06... -
Página 7: Indicador Y Duracion De La Bateria
INDICADOR Y DURACION DE LA BATERIA Totalmente cargado. Mitad de carga. Próximo cambio de batería. Cambio de batería inmediato. Además cuando la batería esta baja en pantalla aparecerá el mensaje “Low bat” Grabación con audífonos Reproducción con audífonos Batería Volumen medio Volumen medio Alcalina AAA Aproximadamente: 4Hrs... -
Página 8: Pantalla Lcd
PANTALLA LCD Características de la pantalla LCD: 1.- Modo Hay 3 modos de operación Vo; Voz Mu; Música. Para cambiar de modo, oprima una sola vez el botón Menú. REC: Grabando 2.- Carpeta. 3.- Calidad de grabación. 4.- Tiempo de reproducción. 5.- Modo de repetición A-B 6.- Indice. -
Página 9: Conectando A La Computadora
CONECTANDO A LA COMPUTADORA 1.- Asegurese de que la grabadora este apagada. 2.- Inserte el cable USB en la entrada USB de la grabadora, el extremo contrario conéctelo a un puerto USB disponible en la computadora. 3.- En pantalla aparecerá la palabra USB. 4.- Para Windows XP. - Página 10 5.- Una vez que termine este proceso, aparecerá el mensaje de que el equipo estará listo para usarse. 6.- El dispositivo aparecerá como Unidad extraíble y será identificado con una letra (E, F ó G normalmente, pero podría aparecer otra). 7.- Utilice el Explorador de Windows para realizar la transferencia de archivos MP3, simplemente copie y pegue los archivos en la carpeta “Music”...
-
Página 11: Menu Del Modo Voz
MENU DEL MODO VOZ Para accesar al menú de voz siga los siguientes pasos: 1.- Estando en modo de Voz oprima y sostenga el botón menú por 3 segundos, con el botón PLAY/STOP mueva hacia arriba o abajo para seleccionar las opciones disponibles. - Página 12 S_SEL Esta opción sirve para configurar el puerto de entrada de Línea. Line: acepta la entrada de audio de un cassette, MD o un reproductor Mp3, etc. E-MIC: Permite seleccionar el tipo de micrófono Mo: tipo monoaural ST: tipo estéreo. Utilice esta opción para borra todo el contenido de las carpetas, las opciones son Si (YES) para confirmar la selección y No para cancelar.
-
Página 13: Menu De Musica
R_QTY Este modo es para definir la calidad de grabación SHQ: Alta. HQ: Media SP: Baja T IE M P O D E G R AB AC IO N M O D O C AL ID AD S H Q : 192 m in V O Z H Q : 4200m in S P : 8400m in... - Página 14 M_INF F_INF S_DEF P_OFF D_VOL Modo de repetición, en esta opción encontrará 4 formas de repetir. NOR: Reproduce en forma normal. ONE: Repite una vez el archivo a reproducir. ALL: Repite todos los archivos en forma ordenada. SHUFF: Repite al azar los archivos de una carpeta. M_INF En esta opción le servirá...
- Página 15 P_OFF Permite habilitar o deshabilitar el apagado automático del equipo. Si el equipo no esta en uso, el equipo puede apagarse automáticamente. Para habilitarlo seleccione el tiempo de 1, 3 y 5 minutos y para deshabilitarlo, simplemente seleccione OFF. D_VOL Protección de volumen (Volumen predeterminado).
- Página 16 Modo de ecualización. Los diferentes tipos de modos de ecualización son: Nor (Normal), Pop, Cla (Clasico), Jaz (Jazz), Liv (Live), Roc (Rock) o 3D (sonido 3D) GRABACION Grabación de voz: 1.- Seleccione el modo Vo (voz). 2.- Seleccione Una carpeta del Directorio (Dir) del menú de voz.
- Página 17 Antes de utilizar su nuevo Kit C Por los primeros 5 segundos despues de empezar la grabación, no se puede parar la grabación. Un ejemplo de como se guarda el formato de grabación en este modo es: MIC001_SHQ.mp3 Para que cuando accese a la computadora pueda reconocer este archivo.
- Página 18 Antes de utilizar su nuevo Kit C Antes de conectar un dispositivo externo a la grabadora, ambos equipos deben estar apagados. Use la entrada LINE IN de la grabadora de voz para conectar el micrófono tipo solapa o algún dispositivo externo como una cassettera, un reproductor de MP3, etc.
- Página 19 6.- Presione el botón de grabación (REC), en pantalla se mostrará el modo REC y el LED indicador se iluminará en color rojo. 7.- Para realizar una pausa, presione una sola vez el botón PLAY/STOP. Para regresar al modo de grabar presione nuevamente el botón PLAY/STOP 8.- Para terminar con la grabación presione el botón REC.
- Página 20 4.- En S_SEL del menú de voz seleccione E-MIC y cambie a MO (monoaural). 5.- Seleccione la calidad de grabado (R_QTY) del menú de voz. 6.- Elija el nivel de sensibilidad del micrófono (MIC_S) del menú de voz. entre alta o media. 7.- Presione el botón de grabación (REC), en pantalla se mostrará...
-
Página 21: Reproduccion
REPRODUCCION Reproducción de voz: 1.- Seleccione el modo Voz. 2.- Seleccione la carpeta donde se encuentra el archivo para reproducir, del directorio (Dir) del menú de voz. 3.- Elija el archivo. 4.- Presione el botón PLAY/STOP para reproducir. 5.- Para realizar una pausa, presione una vez el botón PLAY/STOP, para regresar al modo de reproducción presione nuevamente el botón PLAY/STOP. -
Página 22: Reproducción De Música
Reproducción de música: Una vez que haya pasado archivos MP3 en la grabadora de voz, siga los siguientes pasos para la reproducción: 1.- Seleccione el modo Mu (música) 2.- Elija un archivo. 3.- Presione el botón PLAY/STOP para reproducir. 4.- Para realizar una pausa, presione una vez el botón PLAY/STOP, para regresar al modo de reproducción presione nuevamente el botón PLAY/STOP. -
Página 23: Repeticion De Segmento A-B
REPETICION DE SEGMENTO A-B Para repetir un segmento de una canción siga los siguientes pasos: 1.- En modo de reproducción oprima una vez el botón ERASE, en pantalla aparecerá parpadeando la letra A. 2.- “A” es el punto inicial apartir de donde inciaremos la repetición, elija un punto incial y luego oprima nuevamente el botón ERASE para determinar el punto final “B”... -
Página 24: Borrado De Archivos
BORRADO DE ARCHIVOS Para borrar un archivo: 1.- Seleccione el archivo para borrar. 2.- Oprima una sola vez el botón ERASE. 3.- La palabra Erase aparecerá parpadeando en la pantalla. 4.- Oprima nuevamente el botón Erase y borrará el archivo. En caso de oprimir otro botón mientras esta parpadeando la palabra Erase en pantalla no borrará... -
Página 25: Especificaciones
ESPECIFICACIONES Entrada: 1,5V - - - (1 x AAA) Memoria: 1GB Rango de Frecuencia: 400Hz a 3200Hz Antes de utilizar su nuevo Kit C El diseño del producto y las especificaciones pueden cambiar sin previo aviso. ESPAÑOL-25... - Página 26 1.- Para hacer efectiva la garantía, presente ésta póliza y el producto, en donde fue adquirido o en Electrónica Steren S.A. de C.V. 2.- Electrónica Steren S.A de C.V. se compromete a reparar el producto en caso de estar defectuoso sin ningún cargo al consumidor. Los gastos de transportación serán cubiertos por el proveedor.
- Página 28 IMPORTANT Antes de utilizar su nuevo Kit C Before using your new Digital pen voice recorder and MP3 player, please read the following recommendations. • Clean with a soft, dry cloth. • Do not try to open the equipment, may cause malfunction and warranty repeal.
- Página 29 CONTENT • One Digital pen recorder. • One Earphone. • One USB cable. • One Line-in cable. • One Lapel microphone. • Phone adapter. • Installation CD driver. • User´s manual. ENGLISH-03...
- Página 30 CONTROLS 1.- Microphone. 2.- LED indicator Glows green when turns on or off the recorder. Glows red when it is in recording process. 3.- LCD screen. 4.- Play/Stop Power button and Button to play, stop, volume control, forward and back control. 5.- REC Record button 6.- ERASE...
- Página 31 8.- Speaker. 9.- Line-in. 10.- Menú Come to the main menu. 11.- Clip. 12.- On / off switch HOLD Hold ON Move the hold switch to on position. all keys wont´n work poper and “hold on” will display on the LCD Hold off Move the hold switch to off position and disables the function...
- Página 32 INSTALLATION AND BATTERY CHANGE 1.- Open the battery compartment. 2.- Place one new AAA battery paying attention the polarity. 3.- Replace the battery compartment cover. ENGLISH-06...
-
Página 33: Battery Indicator
BATTERY INDICATOR Fully charged. Half charge. Soon battery change. Battery change. When the battery is low on the screen the message “Low bat” E arphon es rec ording E arphon es playing B atery (V olume: Middle) (V olume: Middle) Alka line AA A Approx: 4Hrs Approx: 7Hrs... -
Página 34: Lcd Screen
LCD SCREEN Features of LCD screen: 1.- Mode There are 3 modes of operation Vo; Voice Mu; Music. to change mode, press once the Menu button. REC: Recording 2.- Folder. 3.- Recording quality. 4.- Play time. 5.- A-B repeat 6.- Index. 7.- Battery status. -
Página 35: Connecting To The Computer
CONNECTING TO THE COMPUTER 1.- Make sure that the recorder off. 2.- Insert the USB cable into the USB input of the recorder, connect it to the extreme opposite an available USB port on the computer. 3.- On display the word USB.. 4.- For Windows XP. - Página 36 5.- Once the process finished, the next message displays on the screen: your new hardware is correctly installed. This message means that you can start to use the new hardware. 6.- The device appears such as removable drive and you can identify it by a letter (usually by letter E, F or letter G, but it could displays another one).
-
Página 37: Voice Menu
VOICE MENU To access the voice menu, follow these steps: 1.- Voice standby mode press and hold the menu button for 3 seconds, with the button PLAY / STOP move up or down to select the options available. 2.- To enter the desired option, press the PLAY / STOP once. - Página 38 S_SEL This option is used to configure the port of entry line. Line: Accepts audio input from a cassette or MD or an MP3 player, and so on. E-MIC: Allows you to select the type of microphone Mo: Mono ST: Stereo. Use this option to erase the entire contents of the folders, the options are YES to confirm the selection and NO to cancel.
-
Página 39: Music Menu
R_QTY This mode is to define quality recording. SHQ: High HQ: Medium SP: Low R E C O R D IN G T IM E M O D E Q U AL IT Y S H Q :192m in V O IC E H Q : 4200m in S P : 8400m in S H Q :96m in... - Página 40 M_INF S_DEF P_OFF D_VOL Repeat mode, this option will find ways to repeat 4. NOR: Plays in normal form. ONE: Repeat once the file to play. ALL: Repeat all the files orderly SHUFF: Repeats at random files in a folder. M_INF You can check the total folder size and the currently used folder size.
- Página 41 P_OFF To enable or disable the automatic shutdown of recorder If the recorder is not in use, the device may turn itself off. To enable selected the time of 1, 3 and 5 minutes and to disable it, you simply select OFF. D_VOL Protection of volume (Volume default).
- Página 42 Mode equalizer. The different types of EQ modes are: Nor (Normal), Pop, Cla (Classic), Jaz (Jazz), Liv (Live), Roc (Rock) or 3D (3D sound) RECORDING Voice recording: 1 .- Select mode Vo (voice). 2 .- Select a folder in the directory (Dir) from the menu of voice.
- Página 43 Antes de utilizar su nuevo Kit C For the first 5 seconds after recording starts, you can not stop recording. One example is saved as the recording format in this mode is: MIC001_SHQ.mp3 So that when access to a computer can rename this file. Recording an external device: Recorded files an external device are stored in the folder LINE.
- Página 44 Antes de utilizar su nuevo Kit C Before connecting to an external device recorder, both computers must be turned off. Use the LINE IN of the voice recorder to connect the lapel microphone or an external device cassettera, an MP3 player, and so on. To make the recording, follow these steps: 1.- Selecect Vo mode (Voice).
- Página 45 6.- Press the record button (REC), will be displayed on screen mode and the LED indicator will glow red. 7.- To pause, press the button only once PLAY / STOP. To return to recording mode again press the button PLAY / STOP 8.- To end the recording press the REC button Recording a telephone:...
- Página 46 4.- In S_SEL voice menu and select E-MIC switch to MO (mono). 5.- Select the quality of recording (R_QTY) of the voice menu. 6.- Choose the level of sensitivity of the microphone (MIC_S) of the voice menu. between high or mid 7.- Press the record button (REC), will be displayed on screen mode and the LED indicator will glow red.
- Página 47 PLAYING Voice playing: 1.- Select vo (voice) mode. 2 .- Select the folder where the file to play, the directory (Dir) from the menu of voice. 3 .- Choose the file. 4 .- Press the PLAY / STOP to play. 5 .- To pause, press the button once PLAY / STOP, to return to the playback mode press the button again PLAY / STOP.
- Página 48 Music playing: Once you have transferred MP3 files in the voice recorder, follow these steps to reproduction: 1.- Select Mu (Music) mode. 3.- Choose the file. 4.- Press the PLAY / STOP to play. 5.- To pause, press the button once PLAY / STOP, to return to the playback mode press the button again PLAY / STOP.
- Página 49 REPETITION A-B To repeat a segment of a song follow these steps: 1.- In play mode press the button once ERASE, will appear on the screen flashing the letter A. 2.- “A” is the starting point as of uncertain where the repetition, choose an initial point and then press the button again ERASE to determine the end point “B”...
- Página 50 TO DELETE FILES To delete a file: 1.- Select the file to delete. 2.- Press the button once ERASE. 3.- The word Erase appear to flash on the screen. 4.- Press the button again Erase and erase the file. If you press another button while flashing Erase the word displayed not erase the file.
- Página 51 SPECIFICATIONS Input: 1,5V - - - (1 x AAA) Memory: 1GB Frequency Range: 400Hz to 3200Hz Antes de utilizar su nuevo Kit C Products design and specifications are subject to change with no previous notice. ENGLISH-25...
- Página 52 3.- The repairing time will not exceed 30 natural days, from the day the claim was received. 4.- Steren sell parts, components, consumables and accesories to costumer, as well as war- ranty service, at any of the addresses mentioned later.