Tabla de contenido
Publicidad
Idiomas disponibles
Idiomas disponibles
Enlaces rápidos
Publicidad
Tabla de contenido

Manuales relacionados para Steren COM-562


Resumen de contenidos para Steren COM-562
-
Página 2: Caracteristicas
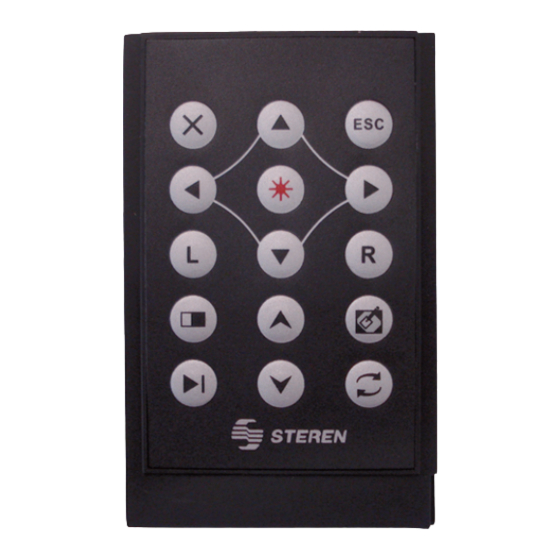
IMPORTANTE Antes de utilizar su nuevo Kit C Antes de utilizar su nuevo A�untador laser �� �ouse inal���ri�o A�untador laser �� �ouse inal���ri�o �ara la�to��� �or �avor lea las si�uientes re�o�enda�iones �� �or �avor lea las si�uientes re�o�enda�iones • Nunca apunte el rayo laser directamente a los ojos. •... - Página 3 CONTROLES 1.- Compartimiento de batería 2.- Compartimiento de receptor USB 3.- Haz de luz laser 4.- Salir Presione este botón para salir de la presentación 5.- Flechas de dirección Utilice estos botones para mover el puntero del ratón 6.- Escritorio Presione el botón para visualizar el escritorio de Windows 7.- Apuntador...
- Página 4 9.- Bajar Adelanta una página durante una presentación 10.- Pantalla en blanco Presione este botón para poner en blanco la pantalla de visualización de Power Point. Presione una vez más para regresar al modo de presentación. 11.- Botón derecho del ratón Este botón tiene la misma función que en el ratón 12.- Botón izquierdo del ratón Este botón tiene la misma función que en el ratón...
-
Página 5: Instalación De Batería
17.- Indicador de uso Enciende cuando el transmisor envía una señal INSTALACIÓN DE BATERÍA Su nuevo apuntador y ratón funciona con una batería de 3V tipo botón (CR2032). Asegúrese de que antes de comenzar a utilizar el equipo, haya instalado una batería nueva. Simplemente retire la tapa del compartimiento e inserte una batería nueva poniendo atención a la polaridad. -
Página 6: Uso Del Apuntador Y Ratón
1.- ON/OFF INSTALACIÓN DEL APUNTADOR EN WINDOWS XP Antes de utilizar su nuevo Kit C Ase�úrese de que �revia�ente ha instalado una �atería ti�o �otón en el equi�o. 1.- Retire el receptor del compartimiento. 2.- Inserte el receptor en un puerto USB disponible de la computadora. 3.- La computadora detecta un nuevo hardware y realiza las actualizaciones necesarias de forma automática. - Página 7 6.- Si requiere visualizar el escritorio de Windows, presione el botón de Escritorio una vez. Para regresar al modo de visualización presiónelo una vez más. 7. Cuando ya no requiera utilizar el dispositivo, desconecte el receptor de la computadora y colóquelo en el compartimiento del transmisor. Antes de utilizar su nuevo Kit C Cuando �resiona el �otón de es�ritorio durante una �resenta�ión ��...
-
Página 8: Especificaciones
1.- ON/OFF ESPECIFICACIONES Trans�isor Inter�ase Clase II Clase IIIa Frecuencia 433,92 +0,075MHz 433,92 +0,075MHz Potencia 0dbm 0dbm Distancia de control Hasta 10m Hasta 10m Distancia del láser Hasta 200m Hasta 200m Batería 1 x CR2032 1 x CR2032 Entrada 3V --- 3V --- Corriente Longitud de onda... -
Página 9: Póliza De Garantía
1.- Para hacer efectiva la garantía, presente ésta póliza y el producto, en donde fue adquirido o en Electrónica Steren S.A. de C.V. 2.- Electrónica Steren S.A de C.V. se compromete a reparar el producto en caso de estar defectuoso sin ningún cargo al consumidor. Los gastos de transportación serán cubiertos por el proveedor. -
Página 10: Datos Del Distribuidor
Biólogo MaximIno Martínez No. 3408 Int. 3 y 4, San Salvador Xochimanca, México, D.F. 02870, RFC: SPE941215H43 ELECTRONICA STEREN DEL CENTRO�� S.A. DE C.V. Rep. del Salvador 20 A y B, Centro, 06000, México. D.F. RFC: ESC9610259N4 ELECTRONICA STEREN DE GUADALAJARA�� S.A. - Página 12 IMPORTANT Before using your new Po��e�� �resen��er wire�ess ��ser�� ��e�se Po��e�� �resen��er wire�ess ��ser�� ��e�se �� ��e�se re�d ��he fo��owing re�ommend���ions. • Never aim the laser beam directly to the eyes. • Clean only with a soft, dry cloth. • Do not try to open this device, may cause malfunction and warranty repeal.
- Página 13 CONTROLS 1.- Battery compartment 2.- USB receiver compartment 3.- Laser beam 4.- Esc Press this button to leave the presentation 5.- Movement arrows Use this buttons to move the mouse pointer 6.- Desktop Press this button to visualize the Windows desktop 7.- Pointer Press to generate a laser beam 8.- Up...
- Página 14 10. Blank screen Press this button to put a blank screen during a presentation. Press once again to back to presentation mode. 11. Mouse’s right button Same function as in the mouse 12. Mouse’s left button Same function as in the mouse 13.
-
Página 15: Installing The Battery
INSTALLING THE BATTERY Your new Pocket Presenter Wireless Laser it’s powered by a 3V battery (CR2032). Make sure to install one new battery before to start to use the device. Remove the battery compartment cover and insert a new battery, paying attention to polarity. - Página 16 INSTALLING THE DEVICE IN WINDOWS XP M��e sure ��o ins����� � b�����ery before ��o s���r�� ��o use i��. 1.- Remove the receiver from the compartment. 2.- Plug the receiver into an available USB port in the computer. 3.- The computer will detects the new hardware and automatically will update the system.
- Página 17 6.- If you want to visualize the Windows desktop, press Desktop once. To back to presentation mode, press Desktop once again. 7.- Unplug the receiver and store it in the transmitter compartment, after their use. When you �ress ��he Des���o� bu����on during � �resen�����ion �nd b���...
- Página 18 SPECIFICATIONS Tr�nsmi����er In��erf��e C��ss II C��ss III� Frequency 433,92 +0,075MHz 433,92 +0,075MHz Power 0dbm 0dbm Control range Up to 10m Up to 10m Laser range Up to 200m Up to 200m Battery 1 x CR2032 1 x CR2032 Input 3V --- 3V --- Current Wave length...
- Página 19 P�r�� number: COM-562 Br�nd: S��eren WARRANTY This Steren product is warranted under normal usage against defects in workmanship and materials to the original purchaser for one year from the date of purchase. CONDITIONS 1.- This warranty card with all the required information, invoice or purchase ticket, product box or package, and product, must be presented when warranty service is required.
- Página 20 RETAILER INFORMATION Name of the retailer Address Product Brand Part number Serial number Date of delivery In ��se your �rodu��� f�i�s or h�ve ques��ions�� ��e�se �on������ your ne�res�� de��er. If you �re in Mexi�o�� ��e�se give � ���� ��o our C��� Cen��er. C���...