Publicidad
Idiomas disponibles
Idiomas disponibles
Enlaces rápidos
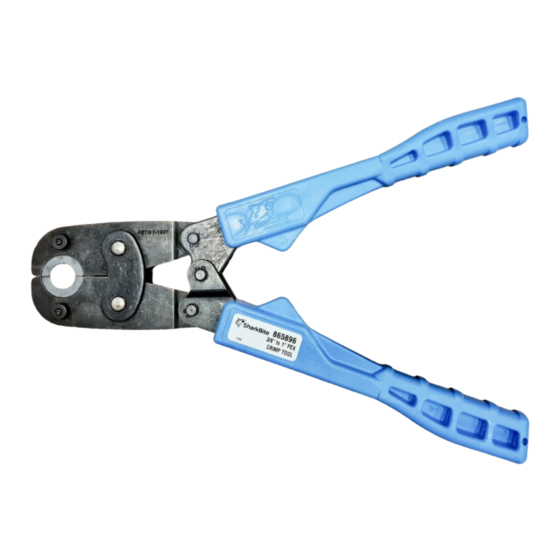
MULTI-HEAD PEX CRIMP TOOL KIT
#865896
INSTRUCTION GUIDE
CRIMPS CONFORM TO ASTM F 1807
CONNECTION ASSEMBLY
Cut the tube so that a clean, straight end is provided. Slide the crimp
ring over the tube end. Insert the fitting into the tubing until the
shoulder of the fitting contacts the tubing end. Position the crimp ring
1/8" to 1/4" (3.2 to 6.4 mm) from the cut end of the tubing.
Place the opened jaws of the PEX Crimp Tool around the crimp
ring. Check to be sure that the crimp ring is still properly positioned.
Compress the tool handles to complete the assembly.
CHECK ALL CRIMPS WITH GO/NO-GO GAGE
GAGING PROCEDURE
1.
Determine proper size of tubing: 3/8", 1/2", 3/4" or 1"
2.
If GO cavity fits over crimped ring and NO-GO does not, tool is
crimping properly.
3.
If GO cavity does not fit then handle distance must be increased.
4.
If GO fits—check NO-GO. If NO-GO fits over crimped ring,
the ring is over-crimped, decrease handle distance. Recheck.
NOTE: Over-crimped and under-crimped rings must be removed from
tubing. Crimp with a new copper ring.
ADJUSTMENT PROCEDURE
1.
Close tool handles until pre-load is reached (this is the point at
which jaws touch). Tool should not be completely closed.
2.
Measure the distance between dots on the handle ends as shown.
8"– 8 3/4" is the correct distance. If the distance is not 8" – 8 3/4"
the tool must be adjusted.
3.
To change the handle ends distance, remove the #6-32 eccentric
lock screw with an Allen wrench and push up eccentric from
back. Rotate eccentric counter-clockwise to increase the handle
distance and clockwise to decrease handle distance. Move
eccentric until hand distance is between 8" – 8 3/4". Push down
eccentric and re-install the #6-32 lock screw in the appropriate
hole which most closely yields the desired handle distance.
4.
Recheck the set distance after making three crimps. The distance
should be 8" – 8 3/4" between the "dots" on the handles.
5.
Check the crimps with the go/no-go gauge provided. If satisfactory
crimps do not result, the tool is likely worn and should be replaced.
United States: Oetiker, Inc. | 6317 Euclid Street
Marlette, Michigan 48453 | T +1 800 959 0398
Info.us.marlette@oetiker.com
www.oetiker.com
To insert/remove dies open tool fully
and push up plunger pin from back
side of tool.
3/8", 1/2" AND 3/4" PEX INSERTS
(TOOL WITHOUT DIE SET CRIMPS 1")
TOOL MAINTENANCE
1.
Check tool calibration daily. It
is recommended that at least
the first and last crimps of the
day are tested.
2.
Never exceed the specified
handle distance when
adjusting your crimp tool.
Premature wear will result.
3.
Lubricate linkages on a regular
basis to maximize tool life.
WARRANTY
When properly maintained and used
as intended, the PEX Crimp Ring Tool
is warranted against materials and
manufacturing defects for a period
of 1 year from date of purchase.
This Warranty does not cover defects
or damage arising from improper
installation, lack of or improper
maintenance, improper storage or
handling, ordinary wear and tear,
misuse, abuse or accident,
or use with unauthorized tool or
parts. Liability is limited to repair or
replacement of tool or component
parts which are determined defective
as covered by this Warranty.
DISTRIBUTED BY
RELIANCE WORLDWIDE CORPORATION 2727
Paces Ferry Road SE, Building II, Suite 1800,
Atlanta, GA 30339 | T +1 877 700 4242
Eccentric
Lock
Screw
"DOTS"
8"– 8 3/4"
HANDLE PRE-LOAD
Gage all crimps as shown.
Publicidad

Manuales relacionados para SharkBite 865896


Resumen de contenidos para SharkBite 865896
- Página 1 MULTI-HEAD PEX CRIMP TOOL KIT #865896 INSTRUCTION GUIDE CRIMPS CONFORM TO ASTM F 1807 CONNECTION ASSEMBLY To insert/remove dies open tool fully and push up plunger pin from back Cut the tube so that a clean, straight end is provided. Slide the crimp side of tool.
- Página 2 KIT DE ENGARZADORA PARA PEX CON CABEZALES MÚLTIPLES N. ̊ 865896 GUÍA DE INSTRUCCIONES LAS ENGARZADORAS CUMPLEN CON LAS ESPECIFICACIONES DE ASTM F 1807 MONTAJE DE CONEXIONES Para insertar o retirar los troqueles, abra la Corte el tubo para que el extremo quede limpio y recto. Deslice el anillo de herramienta del todo y levante el pasador engarce sobre el extremo del tubo.