Tabla de contenido
Publicidad
Idiomas disponibles
Idiomas disponibles
Enlaces rápidos
Owner's Manual
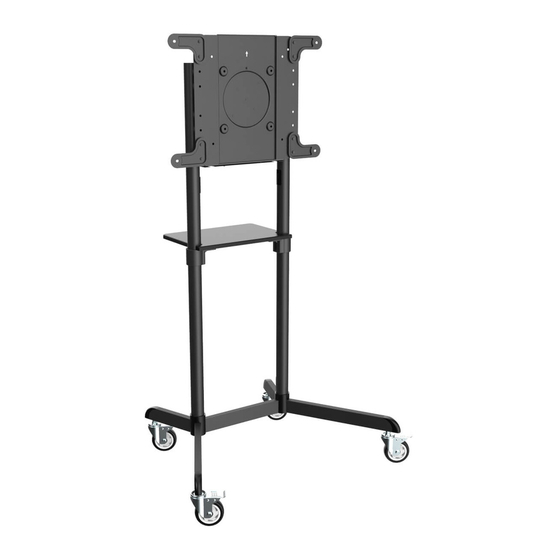
Mobile Rotating
Display Cart
200 x 200 / 300 x 300
350 x 350 / 400 x 200
400 x 400 / 600 x 200
600 x 400
Español 19 • Français 37 • Рессрил 55 • Deutsch 73
WARRANTY REGISTRATION
Register your product today and be
automatically entered to win an ISOBAR
surge protector in our monthly drawing!
tripplite.com/warranty
1111 W. 35th Street, Chicago, IL 60609 USA • tripplite.com/support
Model: DMCS3770ROT
WARNING! Always use an assistant or mechanical lifting equipment
to safely lift and position equipment.
70"
MAX
®
Copyright © 2020 Tripp Lite. All rights reserved.
1
Rated for TV
Rated for TV
Rated for DVD
Rated for DVD
154 lb. /
154 lb. /
11 lb. /
11 lb. /
70 kg
70 kg
5 kg
5 kg
Publicidad
Tabla de contenido

Resumen de contenidos para Tripp-Lite DMCS3770ROT
- Página 1 Owner’s Manual Mobile Rotating Display Cart Model: DMCS3770ROT WARNING! Always use an assistant or mechanical lifting equipment to safely lift and position equipment. 200 x 200 / 300 x 300 70” Rated for TV Rated for TV Rated for DVD...
-
Página 2: Important Safety Instructions
Important Safety Instructions CAUTION • Read the entire instruction manual before you start assembly and installation. If you have questions about any of the instructions or warnings, contact Tripp Lite Support. • Use with products heavier than the rated weights indicated may result in instability, causing possible injury. •... -
Página 3: Parts List
Parts List IMPORTANT: Before beginning installation, be sure you have received all the parts listed below. If any parts are missing or faulty, contact Tripp Lite for replacements. Base Caster Base Column Upper Column (x1) (x4) (x2) (x2) Equipment Shelf Shelf Mounting Front Cover Mounting Plate... -
Página 4: Assembly And Installation
Required for Installation Assembly and Installation Installing the Wheel Casters Keep casters locked prior to beginning installation. Attaching the Columns to the Base Align the column as shown, ensuring the cable management holes and the shorter legs are on the same side. - Página 5 Assembly and Installation Installing the Columns Position the cable management holes (found on each upper column leg) facing in as shown.
- Página 6 Assembly and Installation Installing the Shelf Mounting Brackets...
- Página 7 Assembly and Installation Installing the Front Cover and Equipment Shelf Position as indicated, ensuring the front of and the longer legs are on the same side. Make sure and the shorter legs are on the same side. CAUTION: Fully tighten the screws under the base.
- Página 8 Assembly and Installation Attaching the Mounting Plate to the Display VESA 200x200 / 300x300 / 350x350 / 400x200/ 400x400 Note: Choose the appropriate screws, washers and spacers (if necessary) according to the type of screen.
- Página 9 Assembly and Installation 6B-1: Installing the VESA Extension Adapter Arms VESA 600 x 200 VESA 600 x 400...
- Página 10 Assembly and Installation 6B-2: Attaching the Mounting Plate to the Display Note: Choose the appropriate screws, washers and spacers (if necessary) according to the type of screen.
- Página 11 Assembly and Installation Mounting the Display onto the Screws CAUTION: Adjust the columns to the desired height before installing the display. To adjust the height of the columns after the display is installed, remove the equipment shelf before adjusting the columns to the desired height.
- Página 12 Assembly and Installation Adjusting the Tilting Angle of the Display Default Position (0°) Tilted Position (5°) Adjusting the Rear Bolts Securely...
- Página 13 Assembly and Installation Fixing the Display in Landscape / Portrait Position (Optional) Tighten the screw to fix the display. Tighten the screw to fix the display.
- Página 14 Assembly and Installation Routing the Cables 11B-1: Attaching the Cable Clip Holders...
- Página 15 Assembly and Installation 11B-2: Routing Cables through the Cable Clips...
- Página 16 Assembly and Installation Attaching the Cable Covers...
- Página 17 Assembly and Installation Attaching the Rear Cover...
- Página 18 Assembly and Installation Maintenance • Check at regular intervals (at least every three months) to be sure the bracket remains secure and safe to use. • Please visit tripplite.com/support if you have any questions. 1111 W. 35th Street, Chicago, IL 60609 USA • tripplite.com/support 20-06-088 93-3CB9_RevA...
-
Página 19: Carro Móvil Giratorio Para Pantalla
Manual del Propietario Carro Móvil Giratorio para Pantalla Modelo: DMCS3770ROT ¡ADVERTENCIA! Utilice siempre un ayudante o equipo de elevación mecánico para levantar y colocar el equipo con seguridad. 200 x 200 / 300 x 300 70” Especificado Especificado 350 x 350 / 400 x 200... -
Página 20: Instrucciones De Seguridad Importantes
Instrucciones de Seguridad Importantes PRECAUCIÓN • Lea todo el manual de instrucciones antes de iniciar el ensamble y la instalación. Si usted tiene preguntas sobre cualquiera de las instrucciones o advertencias, póngase en contacto con el Soporte de Tripp Lite. •... -
Página 21: Lista De Partes
Lista de Partes IMPORTANTE: Antes de comenzar la instalación, asegúrese de haber recibido todas las partes que se enumeran a continuación. Si hay alguna parte faltante o defectuosa, póngase en contacto con Tripp Lite para solicitar reemplazos. Base Rueda Columna Base Columna Superior (x1) (x4) -
Página 22: Requerido Para Instalación
Requerido para Instalación Ensamble e Instalación Instalación de las Ruedas Mantenga las ruedas bloqueadas antes de comenzar la instalación. Colocación de las Columnas a la Base Alinee la columna como se muestra, asegurando que los orificios de administración de cables y las patas más cortas estén del mismo lado. - Página 23 Ensamble e Instalación Instalación de las Columnas Coloque los orificios de administración de cables (que se encuentran en cada pata de columna superior) viendo hacia adentro como se muestra.
- Página 24 Ensamble e Instalación Instalación de los Soportes de Instalación de la Repisa...
- Página 25 Ensamble e Instalación Instalación de la Cubierta Frontal y la Repisa para el Equipo Posicione como se indica, asegurando que el frente de y las patas más largas estén del mismo lado. Asegúrese de que y las patas más cortas estén del mismo lado. PRECAUCIÓN: Apriete completamente los tornillos debajo de la base.
-
Página 26: Colocación De La Placa De Instalación A La Pantalla
Ensamble e Instalación Colocación de la Placa de Instalación a la Pantalla VESA 200x200 / 300x300 / 350x350 / 400x200/ 400x400 Nota: Elija los tornillos, arandelas y espaciadores (si fueran necesarios) apropiados de acuerdo al tipo de pantalla. - Página 27 Ensamble e Instalación 6B-1: Instalación de los Brazos Adaptadores de Extensión VESA VESA 600 x 200 VESA 600 x 400...
- Página 28 Ensamble e Instalación 6B-2: Colocación de la Placa de Instalación a la Pantalla Nota: Elija los tornillos, arandelas y espaciadores (si fueran necesarios) apropiados de acuerdo al tipo de pantalla.
- Página 29 Ensamble e Instalación Instalación de la Pantalla en los Tornillos PRECAUCIÓN: Ajuste las columnas a la altura deseada antes de instalar la pantalla. Para ajustar la altura de las columnas después de instalada la pantalla, retire la repisa del equipo antes de ajustar las columnas a la altura deseada.
- Página 30 Ensamble e Instalación Ajuste del Ángulo de Inclinación de la Pantalla Posición Posición Inclinada Predeterminada (0°) (5°) Ajuste con Firmeza los Tornillos Posteriores...
-
Página 31: Fijación De La Pantalla En Posición Horizontal / Vertical
Ensamble e Instalación Fijación de la Pantalla en Posición Horizontal / Vertical (Opcional) Apriete el tornillo para fijar la pantalla. Apriete el tornillo para fijar la pantalla. - Página 32 Ensamble e Instalación Enrutamiento de los Cables 11B-1: Instalación de los Sujetadores de Cable...
- Página 33 Ensamble e Instalación 11B-2: Enrutamiento de los Cables a través de los Clips de Cables...
- Página 34 Ensamble e Instalación Instalación de las Cubiertas de Cable...
- Página 35 Ensamble e Instalación Colocación de la Cubierta Posterior...
-
Página 36: Mantenimiento
Ensamble e Instalación Mantenimiento • Revise a intervalos regulares (al menos trimestralmente) para asegurarse que el soporte esté firme y sea seguro para usarse. • Si tiene alguna pregunta, visite por favor tripplite.com/support. MÁS DE AÑOS 1111 W. 35th Street, Chicago, IL 60609, EE UU • tripplite.com/support 20-06-088 93-3CB9_RevA... - Página 37 Manuel de l'utilisateur Chariot mobile pour écran rotatif Modèle : DMCS3770ROT AVERTISSEMENT! Toujours faire appel à un assistant ou utiliser de l'équipement de levage mécanique pour soulever et mettre en place l'équipement. 200 x 200/300 x 300 177,8 cm Coté pour Coté...
-
Página 38: Consignes De Sécurité Importantes
Consignes de sécurité importantes MISE EN GARDE • Lire le manuel d'instructions dans son intégralité avant de commencer l'assemblage et l'installation. Pour toute question concernant les instructions ou les avertissements, communiquer avec le soutien de Tripp Lite. • L'utilisation avec des produits plus lourds que les charges nominales indiquées risquerait de causer une instabilité et possiblement des blessures. -
Página 39: Liste Des Pièces
Liste des pièces IMPORTANT : Avant de commencer l'installation, s'assurer d'avoir reçu toutes les pièces mentionnées ci-dessous. Si des pièces sont manquantes ou défectueuses, contacter Tripp Lite pour obtenir un remplacement. Base Roulette Colonne de base Colonne (x1) (x4) (x2) supérieure (x2) Étagère pour... -
Página 40: Assemblage Et Installation
Requis pour l'installation Assemblage et installation Installation des roulettes Garder les roulettes verrouillées avant de commencer l'installation. Fixation des colonnes à la base Aligner la colonne comme illustré en s'assurant que les trous de gestion des câbles et les pattes les plus courtes se trouvent du même côté. - Página 41 Assemblage et installation Installation des colonnes Positionner les trous de gestion des câbles (situés sur la patte de chaque colonne supérieure) tournés vers l'intérieur comme illustré.
- Página 42 Assemblage et installation Installation des supports de montage pour étagère...
- Página 43 Assemblage et installation Installation du couvercle avant et de l'étagère pour l'équipement Positionner comme indiqué en s'assurant que le devant de et les pattes les plus longues se trouvent du même côté. S'assurer que et les pattes les plus courtes se trouvent du même côté. MISE EN GARDE : Serrer complètement les vis sous la base.
- Página 44 Assemblage et installation Fixation de la plaque de montage à l'écran VESA 200 x 200/300 x 300/350 x 350/400 x 200/400 x 400 Remarque : Choisir les vis, les rondelles et les entretoises appropriées (le cas échéant) en fonction du type d'écran.
- Página 45 Assemblage et installation 6B-1 : Installation des bras d'adaptateur de rallonge VESA VESA 600 x 200 VESA 600 x 400...
- Página 46 Assemblage et installation 6B-2 : Fixation de la plaque de montage à l'écran Remarque : Choisir les vis, les rondelles et les entretoises appropriées (le cas échéant) en fonction du type d'écran.
- Página 47 Assemblage et installation Montage de l'écran sur les vis MISE EN GARDE : Ajuster les colonnes à la hauteur désirée avant d'installer l'écran. Pour ajuster la hauteur des colonnes une fois l'écran installé, retirer l'étagère pour l'équipement avant d'ajuster les colonnes à la hauteur souhaitée.
- Página 48 Assemblage et installation Ajustement de l'angle d'inclinaison de l'écran Position par défaut Position inclinée (5°) (0°) Ajustement ferme des boulons arrière...
- Página 49 Assemblage et installation Fixation de l'écran en position horizontale/verticale (facultatif) Serrer la vis pour fixer l'écran en place. Serrer la vis pour fixer l'écran en place.
- Página 50 Assemblage et installation Acheminement des câbles 11B-1 : Fixation des supports de serre-câble...
- Página 51 Assemblage et installation 11B-2 : Acheminement des câbles à travers les serre-câbles...
- Página 52 Assemblage et installation Fixation des couvercles de câble...
- Página 53 Assemblage et installation Fixation du couvercle arrière...
- Página 54 Assemblage et installation Entretien • Vérifier à intervalles réguliers (au moins tous les trois mois) que le support peut être utilisé de façon sûre et sécuritaire. • Pour toute question, visiter tripplite.com/support. 1111 W. 35th Street, Chicago, IL 60609 USA tripplite.com/support 20-06-088 93-3CB9_RevA...
- Página 55 Руководcтво пользoвателя Передвижная подставка для дисплея с вращающимся кронштейном Модель: DMCS3770ROT ВНИМАНИЕ! Для безопасного подъема и надлежащего размещения оборудования обязательно обращайтесь за помощью или пользуйтесь грузоподъемным оборудованием. 200 x 200 / 300 x 300 До Для DVD- Для DVD- Для телевизора...
-
Página 56: Важные Указания По Технике Безопасности
Важные указания по технике безопасности ВНИМАНИЕ! • Перед началом сборки и установки внимательно изучите все разделы руководства. С вопросами относительно любых указаний и предупреждений обращайтесь в службу поддержки компании Tripp Lite. • Использование данного приспособления с изделиями, масса которых превышает указанный предел, может привести к потере устойчивости с возможным нанесением... - Página 57 Комплектация ВНИМАНИЕ! Перед началом установки убедитесь в том, что вами получены все детали согласно представленному ниже перечню. В случае отсутствия или повреждения каких-либо деталей обратитесь в компанию Tripp Lite для их замены. Основание Ролик Стойка нижняя Стойка верхняя (1 шт.) (4 шт.) (2 шт.) (2 шт.)
-
Página 58: Сборка И Установка
Необходимо для установки Сборка и установка Установка роликов Перед началом установки заблокируйте ролики. Крепление стоек к основанию Выровняйте стойку как показано на рисунке, чтобы отверстия для прокладки кабеля и более короткие стойки находились на одной стороне. Вт Не затягивайте до упора винты... - Página 59 Сборка и установка Установка стоек Расположите отверстия для прокладки кабеля (находящиеся в каждой из верхней стоек), обратив их внутрь как показано на рисунке. В...
- Página 60 Сборка и установка Установка кронштейнов для крепления полки...
- Página 61 Сборка и установка Установка верхней заглушки и полки для оборудования Расположите как показано на рисунке, чтобы лицевая часть и более длинные стойки находились на одной стороне. Убедитесь в том, что и более короткие стойки находятся на одной стороне. ВНИМАНИЕ! Затяните до упора винты под...
- Página 62 Сборка и установка Крепление монтажной пластины к дисплею VESA 200x200 / 300x300 / 350x350 / 400x200/ 400x400 Примечание. Выберите соответствующие винты, шайбы и проставки (при необходимости) в соответствии с типом экрана.
- Página 63 Сборка и установка 6B-1: Установка раздвижных соединительных рычагов VESA VESA 600 x 200 Вт VESA 600 x 400...
- Página 64 Сборка и установка 6B-2: Крепление монтажной пластины к дисплею Примечание. Выберите соответствующие винты, шайбы и проставки (при необходимости) в соответствии с типом экрана.
- Página 65 Сборка и установка Крепление дисплея на винтах ВНИМАНИЕ! Перед установкой дисплея отрегулируйте высоту опорных стоек. Для регулировки высоты стоек после установки дисплея снимите полку для оборудования, прежде чем зафиксировать стойки на нужной высоте.
- Página 66 Сборка и установка Регулировка угла наклона дисплея Исходное положение (0°) Наклонное положение (5°) Вт Регулировка задних болтов с фиксацией...
- Página 67 Сборка и установка Фиксация дисплея в горизонтальном/вертикальном положении (опционально) Затяните винт для фиксации дисплея. Затяните винт для фиксации дисплея.
- Página 68 Сборка и установка Прокладка кабелей 11B-1: Крепление держателей кабельных хомутов...
- Página 69 Сборка и установка 11B-2: Прокладка кабелей через кабельные хомуты...
- Página 70 Сборка и установка Крепление защитных крышек кабельных каналов...
- Página 71 Сборка и установка Крепление задней заглушки...
- Página 72 Сборка и установка Техническое обслуживание • Регулярно (не реже, чем раз в три месяца) проверяйте надежность крепления кронштейна и безопасность его использования. • В случае возникновения каких-либо вопросов посетите страницу tripplite.com/support. 1111 W. 35th Street, Chicago, IL 60609 USA • tripplite.com/support 20-06-088 93-3CB9_RevA...
- Página 73 Benutzerhandbuch Mobiler rotierender Bildschirmwagen Modell: DMCS3770ROT WARNUNG! Verwenden Sie eine mechanische Hebevorrichtung, um das Gerät sicher anzuheben und zu positionieren. 200 x 200 / 300 x 300 70 Zoll Eingestuft für Eingestuft für 350 x 350 / 400 x 200 Eingestuft für DVD...
-
Página 74: Wichtige Sicherheitshinweise
Wichtige Sicherheitshinweise VORSICHT • Lesen Sie das gesamte Handbuch, bevor Sie mit der Installation und Montage beginnen. Wenden Sie sich bei Fragen zu dieser Anleitung oder diesen Warnhinweisen bitte an den Tripp Lite Support. • Die Verwendung mit Produkten, die schwerer als die angegebenen Nenngewichte sind, kann zu Instabilität und damit zu Verletzungen führen. - Página 75 Stückliste WICHTIG: Bevor Sie mit der Installation beginnen, stellen Sie sicher, dass Sie alle unten aufgeführten Teile erhalten haben. Wenn Teile fehlen oder fehlerhaft sind, wenden Sie sich an Tripp Lite, um Ersatz zu erhalten. Sockel Laufrolle Sockelsäule Obere Säule (x1) (x4) (x2)
-
Página 76: Montage Und Installation
Für die Installation erforderlich Montage und Installation Einbau der Radrollen Lassen Sie die Rollen vor der Installation verriegelt. Befestigung der Säule an der Basis Richten Sie die Säule wie gezeigt aus und stellen Sie sicher, dass sich die Kabelführungslöcher und die kürzeren Beine auf der gleichen Seite befinden. - Página 77 Montage und Installation Aufstellen der Säulen Positionieren Sie die Kabelführungslöcher (auf jedem Schenkel der oberen Säule), nach innen gewandt wie gezeigt.
- Página 78 Montage und Installation Anbringen der Regalbefestigungshalterungen...
- Página 79 Montage und Installation Montage der vorderen Abdeckung und des Geräteregals Positionieren Sie wie gezeigt und stellen Sie sicher, dass sich die Vorderseite von und die längeren Beine auf der gleichen Seite befinden. Stellen Sie sicher, dass und die kürzeren Beine sich auf der gleichen Seite befinden. ACHTUNG: Ziehen Sie die Schrauben unter dem Sockel fest.
- Página 80 Montage und Installation Befestigung der Montageplatte am Bildschirm VESA 200 x 200 / 300 x 300 / 350 x 350 / 400 x 200/ 400 x 400 Hinweis: Verwenden Sie die für den Bildschirmtyp geeigneten Schrauben, Unterlegscheiben und Abstandhalter (falls erforderlich).
- Página 81 Montage und Installation 6B-1: Installieren der VESA-Verlängerungsadapterarme VESA 600 x 200 VESA 600 x 400...
- Página 82 Montage und Installation 6B-2: Befestigen der Montageplatte am Bildschirm Hinweis: Verwenden Sie die für den Bildschirmtyp geeigneten Schrauben, Unterlegscheiben und Abstandhalter (falls erforderlich).
- Página 83 Montage und Installation Den Bildschirm auf die Schrauben aufsetzen ACHTUNG: Stellen Sie die Säulen auf die gewünschte Höhe ein, bevor Sie den Bildschirm anbringen. Um die Höhe der Säulen nach der Installation des Bildschirms anzupassen, entfernen Sie das Geräteregal, bevor Sie die Säulen auf die gewünschte Höhe einstellen.
- Página 84 Montage und Installation Einstellen des Neigungswinkels des Bildschirms Standardposition (0°) Gekippte Stellung (5°) Ziehen Sie die hinteren Schrauben in der gewünschten Position sicher fest...
- Página 85 Montage und Installation Befestigung des Displays in Querformat / Hochformat (Optional) Ziehen Sie die Schraube fest, um den Bildschirm zu fixieren. Ziehen Sie die Schraube fest, um den Bildschirm zu fixieren.
- Página 86 Montage und Installation Verlegen der Kabel 11B-1: Anbringen der Kabelklemmenhalter...
- Página 87 Montage und Installation 11B-2: Führen der Kabel durch die Kabelklemmen...
- Página 88 Montage und Installation Anbringen der Kabelabdeckungen...
- Página 89 Montage und Installation Anbringen der hinteren Abdeckung...
- Página 90 Montage und Installation Wartung • Kontrollieren Sie in regelmäßigen Abständen (mindestens alle drei Monate), um sicherzustellen, dass die Halterung fest sitzt und eine sichere Anwendung gewährleistet ist. • Wenn Sie Fragen haben, besuchen Sie bitte tripplite.com/support.
- Página 92 1111 W. 35th Street, Chicago, IL 60609 USA • tripplite.com/support 20-06-088 93-3CB9_RevA...