Tabla de contenido
Publicidad
Idiomas disponibles
Idiomas disponibles
Enlaces rápidos
WARNING: Please refer to the System Installation Manual for information on limitations regarding product use and function, and information on the limitations as to liability of the manufacturer.
These instructions are to be used in conjunction with the appropriate Control Panel Installation Manual, with which this equipment is intended to be used.
This Installation Sheet applies to the following models: WT5500-433 / WT5500-868 / WT5500P-433 / WT5500P-868 (only models WT5500P-433 and WT5500-433 are UL/ULC listed).
Operating Instructions shall be made available to the user.
Do not dispose the waste battery as unsorted municipal waste. Consult your local rules and /or laws regarding recycling of this battery, it will help protect the environment by reducing the number of batteries consumed.
Some of the materials that are found within the battery could become toxic if not disposed properly and/or may affect the environment, and indirectly everybody's health.
WT5500 Installation Instructions
English, Français, Español, Português
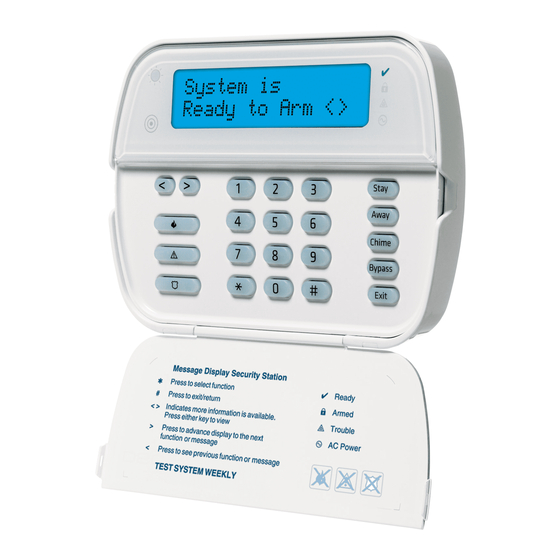
< > indicates user can
LCD
scroll through options
Ambient Light
Sensor
Scroll Keys
Emergency Keys
Fire
Auxiliary
Panic
System is
Ready to Arm
< >
1
2
3
4
5
6
7
8
9
*
#
0
LED Indicators
Ready
Armed
Trouble
AC Power
Function
Keys
2 90 0 7 6 1 6 R0 0 1
Publicidad
Tabla de contenido

Manuales relacionados para DSC WT5500


Resumen de contenidos para DSC WT5500
- Página 1 These instructions are to be used in conjunction with the appropriate Control Panel Installation Manual, with which this equipment is intended to be used. This Installation Sheet applies to the following models: WT5500-433 / WT5500-868 / WT5500P-433 / WT5500P-868 (only models WT5500P-433 and WT5500-433 are UL/ULC listed).
-
Página 2: Programming The Keypad
• Wall-mount tamper keypad. Insert the adaptor plug firmly into the jack. 3. Align the four mounting slots in the WT5500 housing with the four • 5 programmable function keys 4. Pivot the adaptor plug downwards so that it fits flush with the housing. - Página 3 ][5][Master Code]. You will enter the User Code Edit Select 1. Enter [ NOTE: This operation may take several minutes. 2. A WT5500 must be turned on during this two-minute period for it to be menu. 4. When the keypad is finished press the [#] key to exit.
- Página 4 (“HARDWARE”) and any copies of the SOFTWARE PRODUCT, are owned by DSC or its suppliers. which You acquired. ©2010 Digital Security Controls, Toronto, Canada • www.dsc.com • Tech. Support: 1-800-387-3630 (Canada, US), 905-760-3036 • Printed in Canada...
- Página 5 Keypad Function Key Programming [066] Fail to Arm Event Message Enter keypad programming by pressing [,][8][Installer Code][,][000]. Press 1 through 5 for individual Default: ‘System_Has_Failed_to_Arm’ function key programming. I _ ____I _ ____I_____I _ ____I _ ____I_____I _ ____I_____I _ ____I_____I _ ____I _ ____I_____I _ ____I [066] [1]-[5] Function Key Assignment I _ ____I_____I _ ____I_____I _ ____I _ ____I _ ____I _ ____I_____I _ ____I_____I _ ____I _ ____I_____I...
- Página 6 [100] CO Detector Alarm Label [075] Second Keypad Options Default: ‘CO_Alarm_Evacuate_Area’ Default Opt. ON Section/Label Local Clock Display ON Local Clock Display OFF I_____I I _ ____I _ ____ I _ ____I _ ____I _ _ ___I _ ____I _ ___ _I _ ____I _ ____I _ ____I _ ____I _ __ __I _ ____I _ ____ _| _ ___ __| _ ___ _| OFF I_____I Local Clock Displays 24-hr Time Local Clock Displays AM/PM...
- Página 7 NOTES...
- Página 8 NOTES...
- Página 9 Ces instructions doivent être utilisées avec le Manuel d’installation de la centrale de contrôle approprié pour lequel ce dispositif a été conçu. Cette notice d’installation s’applique aux modèles suivants : WT5500-433 / WT5500-868 / WT5500P-433 / WT5500P-868. Le mode d’emploi doit être donné à l’utilisateur.
-
Página 10: Sélection De La Langue
Attention – Ne pas mélanger de nouvelles batteries avec les vieilles. de sortie désignés. Une fois que vous avez sélectionné un endroit sec et sûr, Le clavier RF WT5500 a été conçu pour fonctionner avec la centrale sans-fil effectuez les étapes suivantes pour installer le clavier. -
Página 11: Changement De La Luminosité/Contraste
Effectuez les opérations suivantes pour transférer les textes: Tags de proximité (WT5500P seulement) 1. Paramétrez complètement le Clavier LCD 1. Le WT5500 doit être configuré en même temps que le PC9155 pour que le 2. Saisissez le paramétrage du clavier en appuyant sur [ ][8][Code Ins- système fonctionne bien. - Página 12 Ce CLU vous donne les droits suivants : du propriétaire respectif du contenu et ils peuvent être protégés par le droit ©2010 Digital Security Controls, Toronto, Canada • www.dsc.com • Assistance technique : 1-800-387-3630 (Canada, US), 905-760-3036 • Imprimé au Canada...
- Página 13 Paramétrage des touches de Fonction des claviers [066] Texte Défaut d’armement Saisissez le paramétrage du clavier en appuyant sur [ ][8][Code Installateur][ ][000]. Saisissez 1 à 5 Défaut: « Système a Echec d’Armement» pour le paramétrage individuel des touches de fonction des claviers. _ ____ _ ____ _ ____...
- Página 14 [100] Message détecteur monoxyde de carbone [075] Options Clavier n°2 Défaut : « Alarme Monoxyde Évacuer Locaux » Défaut Opt. ON Section/ Texte Affichage de l’heure Activé Affichage de l’heure désactivé I_____I _ ____ _ ____ _ _ ___ _ ____ _ ___ _ _ ____ _ ____...
- Página 15 REMARQUES...
- Página 16 REMARQUES...
-
Página 17: Sensor De Luz Ambiental
Estas instrucciones deben utilizarse junto con el correspondiente Manual de instalación del panel de control con el que se pretende utilizar este aparato. Esta Hoja de instalación corresponde a los siguientes modelos: WT5500-433 / WT5500-868 / WT5500P-433 / WT5500P-868. Se facilitará al usuario las instrucciones de funcionamiento. -
Página 18: Especificaciones
•Frecuencia: 433,92 MHz (WT5500-433/WT5500P-433 únicamente) 4. Gire la clavija del adaptador hacia abajo hasta que quede a ras con la caja. Pase 3. Alinee las cuatro ranuras de montaje de la caja del WT5500 con las cuatro •Frecuencia: 868,35MHz (WT5500-868/WT5500P-868 únicamente) el cable de CA por el canal de que dispone la caja del teclado;... -
Página 19: Enrolar El Teclado
Enrolar el teclado pueden emitirse a todos los teclados LCD restantes. Realice lo siguiente para transmitir las etiquetas: El WT5500 debe configurarse junto con el PC9155 para que el sistema funcione cor- Lector de 1. Programe el Teclado LCD 1 totalmente. - Página 20 El PRODUCTO propiedad de su respectivo propietario de contenido y pueden estar protegidos por derechos DE SOFTWARE es licenciado, no vendido. ©2010 Digital Security Controls, Toronto, Canadá • www.dsc.com • Asist. técnica: 1-800-387-3630 (Canadá, EE.UU.), 905-760-3036 • Impreso en Canadá...
-
Página 21: Programación De La Teclas De Función Del Teclado
Programación de la teclas de función del [065] Etiqueta de alarma de incendios (28 caracteres) Predeterminado: ’Zona_de_Fuego’ teclado I _ ____I_____I_____I _ ____I_____I_____I _ ____I _ ____I_____I_____I _ ____I _ ____I_____I_____I Acceda a la programación del teclado presionando [,][8][Código del instalador][,][000]. Presione de 1 a 5 para [065] programar las teclas de función de manera individual. -
Página 22: Etiqueta Del Sistema
[075] Segundo grupo de opciones del teclado [078] Duración del mensaje LCD descargado Predeter- Predeterminado: 003 I_____I_____I_____I (Entrada válidas son 000-255), 000=Mensajes en pantalla ilim- Opc. Activado Desctivado minado itados Este número representa las veces que el mensaje descargado ha sido borrado al presionar cualquier tecla tras Mostrar hora local Activado Mostrar hora local Desactivado Activado... - Página 23 NOTAS...
- Página 24 NOTAS...
-
Página 25: Sensor De Luz Ambiente
NOTA:Estas instruções devem ser utilizadas em conjunto com o Manual de Instalação do Painel de Controle apropriado, com o qual este equipamento deve ser utilizado. NOTA:Estas Instruções de Instalação aplicam-se aos seguintes modelos: WT5500-433 / WT5500-868 / WT5500P-433 / WT5500P-868. -
Página 26: Especificações
Uma vez selecionado um local seco e seguro, execute os procedimentos a seguir para montar o teclado. O teclado sem fio WT5500 foi projetado para funcionar com o painel sem fio PC9155. Placa de montagem na parede Orifícios de... -
Página 27: Registro Do Teclado
LCD. Execute os seguintes procedimentos para transmitir as identificações: O teclado WT5500 deve ser configurado em conjunto com o PC9155 para 1. Programe um teclado com LCD 1 por completo. que o sistema funcione como desejado. - Página 28 1. CONCESSÃO DA LICENÇA. Este CLUF (EULA), concede a V.Exa. os poderão ser protegidos por direitos de autor aplicáveis ou outros tratados e leis seguintes direitos: ©2010 Digital Security Controls, Toronto, Canadá • www.dsc.com • Suporte técnico: 1-800-387-3630 (Canadá, EUA), 905-760-3036 • Impresso no Canadá...
- Página 29 Programação das teclas de função do teclado [066] Mensagem de evento falha ao armar Padrão: “Sistema_Tem_Nao_Armou” Entre na programação do teclado pressionando [,][8][código do instalador][,][000]. Pressione os núme- I _ ____I_____I _ ____I _ ____I_____I _ ____I_____I _ ____I _ ____I_____I _ ____I_____I _ ____I_____I ros de 1 a 5 para a programação de teclas de função individuais.
- Página 30 [075] Segundo grupo de opões do teclado [078] Duração do download de mensagens no LCD Padrão Opção ON Default: 003 I_____I_____I_____I (As entradas válidas são 000-255), 000 = Exibição ilimitada de mensagens I_____I Exibição do relógio local Ativada Exibição do relógio local Desativada Esse número representa o número de vezes que a mensagem descarregada será...
- Página 31 NOTAS...
- Página 32 NOTAS...