Tabla de contenido
Publicidad
Idiomas disponibles
Idiomas disponibles
Enlaces rápidos
Publicidad
Tabla de contenido

Manuales relacionados para Innovaciones M.S. TOKYO

Resumen de contenidos para Innovaciones M.S. TOKYO
- Página 1 M A N U A L D E I N S T R U C C I O N E S CARRO TOKYO REFS.: 900111 Beige/ 900112 Fresa/ 900113 Azul ESTE CARRO CUMPLE CON LA NORMA UNE EN 1888:2018 IMPORTANTE!! LEER DETENIDAMENTE Y GUARDARLAS PARA FUTURAS CONSULTAS...
- Página 2 IMPORTANTE, MANTENER PARA FUTURAS CONSULTAS. LEER ATENTAMENTE PRECAUCIONES · Nunca deje al niño solo. · Asegúrese de que todos los mecanismos de cierre estén bien engan- chados antes de utilizarlo. · Para evitar heridas, asegúrese de que el niño no esté cerca cuando pliege y despliegue el producto.
-
Página 3: Mantenimiento Diario
PRECAUCIONES más peso, puede afectar a la estabilidad del carro. · Sólo puede ir un niño cada vez en el carro, no deje que dos niños o más estén en el carro al mismo tiempo. · Cuando vaya con el carro por la carretera, debe ir con mucho cuidado. ·... -
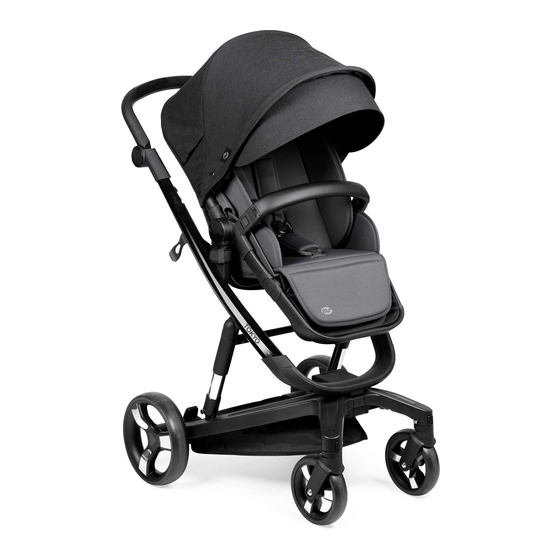
Página 4: Dibujo Para Montar La Silla De Paseo
DIBUJO PARA MONTAR LA SILLA DE PASEO Capota Reposa brazos Enganche de plegado Botón para sacar el asiento Reposa pies Botón para ajustar el reposa pies Botón para orientar Rueda trasera la rueda delantera Botón para ajustar el respaldo Pantalla Botón para ajustar Botón de plegado el asa... -
Página 5: Para Desplegar El Chasis
1. Para desplegar el chasis: a. Primero abra el botón que mantiene plegado el carro y tire hacia arriba del asa, despliegue el chasis. b. Apriete el botón de ajuste del asa que hay a ambos lados para ajustar la altura del asa que desee. -
Página 6: Para Colocar Y Quitar Las Partes Del Reposa Brazos
4. Para colocar y quitar las partes del reposa brazos Haga que las partes del reposa brazos se coloquen en la cavidad del reposa brazos. Coloque las piezas una por una. Las partes del reposa brazos se pueden quitar y volver a colocar por un lado. -
Página 7: Para Ajustar El Asiento
7. Para ajustar el asiento Ponga el pulgar en la parte superior del asiento. Utilice el ín- dice, el corazón y otro dedo para sujetar el botón de ajuste de las posiciones del asiento y sáquelo. Al mismo tiempo, suba o baje el asiento. -
Página 8: Para Ajustar El Reposa Pies
10. Para ajustar el reposa pies: Utilice las dos manos para apre- tar los dos botones de ajuste que hay a ambos lados del reposa pies y entonces puede ajustar la posición del reposa pies. Subiendo el tubo del reposa pies lo puede volver a colocar en su posición original. -
Página 9: Para Quitar La Colchoneta
13. Para quitar la colchoneta: Primero de nada, debe desabro- char el arnés de seguridad. Luego, saque el arnés de los hombros, de la cintura y de la entrepierna de su agujero co- rrespondiente. De esta forma ya puede quitar la colchoneta. Pue- de volverla a instalar siguiendo los pasos en el orden inverso. -
Página 10: Sistema De Conducción Automática Segura Del Carro
15. Sistema de conducción automática segura del carro El indicador luminoso al apretar el asa es como se muestra en el dibujo 15 - Luz indicadora de movimiento. - Luz que indica que está parado. - Luz que indica el nivel de batería . 16. -
Página 11: Para Cargar La Batería
17. Apague el sistema de conducción automática seguro (pase al modo manual) Método 1: apriete el botón de induc- ción del movimiento durante 3 segun- dos, y al mismo tiempo, pise el pedal de freno con el pie derecho. Luego abra la cremallera de la bolsa de la batería y apágela. -
Página 12: Para Desmontar Y Cambiar La Batería
19. Para desmontar y cambiar la batería: Desabroche la bolsa de la batería que hay debajo del carro. Utilice una herramienta especializada o moneda para desentornillar los Tapa de la batería tornillos con ranura que hay en la parte de arriba de la superficie de la caja. -
Página 13: Mantenimiento
Mantenimiento - Compruebe siempre que en el cuco no haya tornillos sueltos, partes desgastadas, que los materiales no están rotos o desgarrados , en este caso, tiene que cambiarlos o repararlos. - Limpie la capota con un trapo húmedo y jabón. - El tapizado y la capota no se pueden colocar en la lavadora, para evitar dañar la superficie de la tela, no la friegue muy fuerte. -
Página 14: Instrucciones Para Instalar El Cuco
Instrucciones para instalar el cuco Para poner y quitar la cesta. Varillas de 1. Para colocarla, introduzca las vari- apoyo llas de apoyo a ambos lados de la Ranura cesta dentro de sus ranuras corres- pondientes hasta que estén comple- tamente colocados en sus canales correspondientes como se muestra en el dibujo 1. - Página 16 GARANTIA FORMAL Los contenidos de este documento como se muestra a continua- ción tendrán efecto desde el momento que se compra el producto. Innovaciones M.S. S.L. el distribuidor oficial situado en Pol. Ind. La Cava. Avda. Generalitat Valenciana s/n. Sector Industrial 5. 46892 MONTAVERNER.
- Página 17 GARANTIA FORMAL ducto está expuesto a la humedad, o al calor extremo o a condiciones ambientales adversas, o a cambios repentinos de tiempo, cuando el producto se corroe , se oxida o se repara o se altera el producto sin autorización previa, si lo repara utilizando piezas de repuesto no auto- rizadas , si el uso o mantenimiento del producto no es el correcto, o no hace ningún tipo de mantenimiento sin hacer lo que se dice en el ma-...
- Página 18 IMPORTADO POR: INNOVACIONES M.S. S.L. Pol. Ind. La Cava. C/ Benigànim, 9 46892 MONTAVERNER (Valencia) Spain Tel. 96 229 76 70 Fax 96 229 76 76 INNOVACIONESMS.COM...
- Página 19 I N S T R U C T I O N M A N U A L BABY STROLLER TOKYO REFS.: 900111 Beige/ 900112 Strawberry/ 900113 Blue THIS BBY STROLLER COMPLIES WITH THE STANDARD UNE EN 1888:2018 IMPORTANT!! READ CAREFULLY AND KEEP THEM FOR FUTURE CONSULTATIONS...
- Página 20 IMPORTANT- READ CAREFULLY AND KEEP FOR FUTURE REFE- RENCE. WARNING • Never leave the child unattended. • Ensure that all the locking devices are engaged before use. • To avoid injury ensure that the child is kept away when unfolding and folding this product.
-
Página 21: Daily Maintenance
PRECAUCIONES use the stroller at the same time. • Should attend the situation on the road when push the stroller on the road. • Should hold your child in your arms and attend the safety all the time when yo u take the stairs or elevator. •... - Página 22 BABY STROLLER ASSEMBLY DRAWING Handle bar Canopy Armrest components Folding hook Seat pop-up button Pedal Pedal adjustment button Front wheel Rear wheel orientation button Front wheel Seat gear adjusting button Display screen Handle bar Folding button adjusting button Folding button Front wheel Carry cot Brake pedal...
- Página 23 1. Unfold the frame a.First open the collapse button and pull up the handle bar, un- fold the frame; b.Pressing the handle bar ad- justing button on the both sides can adjust the handle bar to the height you need. 2.
- Página 24 4. Installation and disassembly of armrest components: Make the armrest components against the armrest socket and insert them one by one. The armrest components can be pulled out and inserted on one side. You should press the armrest removed button and pull up the armrest if you need remove the armrest.
- Página 25 7. Adjust the seat gear: Put your thumb on the top of the seat. Use your index finger, middle finger and the third finger to hold the seat gear adjusting button and pull it out. At the same time, move the seat up or down.
- Página 26 10. Adjust the pedal: Use two hands to press the pedal adjusting button at both sides of pedal and then you can adjust the position of the pedal. You pull up the pedal tube can make the pedal return to its original position.
-
Página 27: Folding The Stroller
13. Remove the mattress: Untie the safety belt at first. Then pull out the shoulder,waist and crotch webbing from the lock hole. Then you can remove the mattress. You can install it follow the contrary order. 14. Folding the stroller: Under the condition of folded canopy, pull up the folding but- ton inside of the frame and push... - Página 28 15. STROLLER AUTOMATIC DRIVING SAFETY SYSTEM The indicator lights on pushing handle are as the picture 15. Driving indicator light Stopping indicator light Battery indicator light 16. TURN ON THE DRIVING SAFETY SYSTEM: UNZIP THE BATTERY BOX a. Turn on the driving safety system: Unzip the battery box behind the carry cot.
- Página 29 17. Turn off the automatic driving safety system - (turn to mechanical mode) Method 1: press the driving induction button for 3 seconds, and step on the brake pedal by using your right foot at the same time.Then unzip the battery box and switch it to off.
- Página 30 19. The disassembly and exchange of the battery: Unzip the battery box under the carry cot. Use the specialized tool or coin to screw out the slo- tted head screws on the surface Battery cover of the battery box. Open the box and bring the battery out.
- Página 31 MAINTENANCE - Always check the carry cot, if there are loose screws, parts are aging, materials and sewing threads are broken, please replace and repair if necessary. -Wipe the carry cot with a damp cloth and a mild detergent. -Cloth cover and canopy are not machine washable. In order to avoid damage to the surface of the cloth, do not brush the cloth cover hard.
- Página 32 carry cot installation instructions Basket installation and disassem- Support rod bly. 1. Installation: insert the support Blank rods at both ends of the basket into the blanks until they are completely stuck in the groove. as shown in F gure 1: Finally, the canopy, lining and seat Pull the zipper between them.
- Página 34 FORMAL WARRANTY The contents of this document as it is shown in the following part will be effective since the product is bought. Innovaciones M.S., S.L. the official distributor located in Pol. Ind La Cava, C/. Beniganim, 9, 46892 MONTAVERNER (Valencia - Spain) gua- rantees the consumer that this product is new and it has not got any fault in the materials, design and manufacturing process and that it has got the features declared by the manufacturer.
- Página 35 FORMAL WARRANTY authorized, if the use and maintenance of the product are not correct, or it is not made any maintenance at all not following the instructions on the manual, it is not assembled properly, it has some accident, it is damaged because the food or drink, or any chemical product or major force.
- Página 36 IMPORTED BY: INNOVACIONES M.S. S.L. Pol. Ind. La Cava. C/ Benigànim, 9 46892 MONTAVERNER (Valencia) Spain Tel. 96 229 76 70 Fax 96 229 76 76 INNOVACIONESMS.COM...
- Página 37 I N S T R U Ç Õ E S D E M O N T A G E M CARRINHO DE BÉBÉ TOKYO REFS.: 900111 Bege / 900112 Morango / 900113 Azul ESTE CARRINHO DE BÉBÉ COM- PLICA-SE COM O PADRÃO...
- Página 38 IMPORTANTE, LEIA ATENTAMENTE AS INSTRUÇÕES E MANTENHA-AS PARA CONSULTAS FUTURAS. PRECAUÇÕES! · Nunca deixar a criança sem vigilància. · Verifique se todos os mecanismos de encerramento são bem engraça- dos antes de usar. · Para evitar lesões, verifique se a criança não está fechada ao dobrar e exibir o produto.
-
Página 39: Manutenção Diária
PRECAUCIONES peso, pode afetar a estabilidade do carro. · Apenas uma criança pode passar toda a vez no carro , não deixe duas crianças ou mais estar no carro ao mesmo tempo. · Quando você vai com o carrinho na estrada, deve ir com muito cuidado. ·... -
Página 40: Desenho Para Andar No Carrinho
DESENHO PARA ANDAR NO CARRINHO Alça da capa apoios de braço Engate dobrável Botão para remover o assento descansar os pés Botão para ajustar o descansar os pés Botão de orientação Roda traseira da roda dianteira Botão do punho Alça da para ajustar o encosto Ecrã... -
Página 41: Para Implantar O Chassi
1. Para implantar o chassi : a. Primeiro abra o botão que mantém dobrou o carro e puxe para cima do punho, desdobre o chassi. b. Pressione o botão de ajuste da alça nos dois lados para ajustar a altura da alça que você deseja. 2. - Página 42 4. Para colocar e remover as partes restantes braços Faça as peças do suporte de braço na cavidade do apoio de braço. Coloque as peças uma a uma. As partes do apoio de braço podem ser remova e subs- titua por um lado. Deve pressio- ne o botão para remover o resto braços se você...
-
Página 43: Para Ajustar O Assento
7. Para ajustar o assento Coloque o polegar em cima do assento. Use o índice, o coração e outro dedo para segurar o botão de ajuste dos lugares sentados e remova-o. Ao mesmo tempo, levante ou abaixe o assento. Desta forma, você pode ajustar O assento para suas diferentes posições. -
Página 44: Para Ajustar O Apoio Para Os Pés
10. Para ajustar o apoio para os pés: Use as duas mãos para apertar dois botões de ajuste ambos os lados de descansa os pés e então você pode ajustar o posição do apoio para os pés. Ao levantar o tubo do apoio para os pés, você... -
Página 45: Para Remover O Tapete
13. Para remover o tapete: Primeiro de tudo, você deve desatar o cinto de segurança. Em seguida, remova o cinto dos ombros, da cintura e da virilha do seu buraco correspondente. Dessa forma, você pode remover o tapete. Você pode reinstalá-lo seguindo as etapas na ordem inversa. -
Página 46: Para Ligar O Sistema Safe Auto Driving
15. Sistema automático de condução seguro de carro A luz indicadora quando pressio- nada a alça é como mostrado no desenho 15 -Luz indicadora de movimento - Luz indicando que está parada - Luz indicando o nível da bateria. 16. Para ligar o sistema Safe Auto Driving a. -
Página 47: Carregar A Bateria
17. Desligue o sistema conducción seguro automóvel ( entre no modo manual) Método 1: pressione o botão de in- dução de movimento por 3 segundos, e em mesmo tempo, pise peda l de freio com o pé direito. Em seguida, abra o zíper da bateria e desligue-o . - Página 48 19. Desmontar e troque a bateria: Descompacte a bolsa da bateria que sob o carrinho. Use uma ferramenta especializada ou moeda para desapertar os Tampa da bateria parafusos com ranhura na parte de acima da superfície da caixa. Aberto a caixa e retire a bateria. Desconecte a bateria e o proces- so está...
- Página 49 MANUTENÇÃO - Comprove sempre que no moisés não haja parafusos soltos, partes desgastadas, que os materiais não estejam quebrados ou soltos; neste caso, é preciso trocá-los ou repará-los. - Limpe a capota com um pano úmido e sabão. - O estofado e a capota não podem ser colocados na máquina de lavar; para evitar danificar a superfície do tecido, não esfregue muito forte.
- Página 50 Instruções para instalar o moisés Para colocar e remover a cesta Hastes de 1. Para colocá-la, insira as hastes de apoio apoio em ambos os lados da cesta Encaixe dentro dos encaixes corresponden- tes até que estejam completamente colocadas em seus sulcos corres- pondentes, como indicado no desenho 1.
- Página 52 IMPORTADO POR: INNOVACIONES M.S. S.L. Pol. Ind. La Cava. C/ Benigànim, 9 46892 MONTAVERNER (Valencia) Spain Tel. 96 229 76 70 Fax 96 229 76 76 INNOVACIONESMS.COM...
- Página 53 N o t i c e d e m o n t a g e STROLLER TOKYO REFS.: 900111 Beige / 900112 Fraise / 900113 Bleu CETTE STROLLER CON- FORME À LA NORME UNE EN 1888:2018 IMPORTANT! LISEZ ATTENTIVEMENT ET CONSERVEZ-LES POUR DE FUTURES CONSULTATIONS.
- Página 54 IMPORTANT, VEUILLEZ LIRE ATTENTIVE- MENT LES INSTRUCTIONS ET LES CONSER- VER POUR LES CONSULTATIONS FUTURES. PRÉCAUTIONS! · Jamais l’enfant sans surveillance congé. · Assurez-vous que tous les mécanismes de fermeture sont bien engagés avant de les utiliser. · Pour éviter les blessures, assurez-vous que l’enfant ne se ferme pas lors du pliage et de l’affichage du produit.
-
Página 55: Entretien Quotidien
PRECAUTIONS · Un seul enfant peut choisir chaque fois dans la voiture , ne laissez pas deux enfants ou plus être dans la voiture à la fois. · Quand vous allez avec le panier sur la route, vous devez aller avec très pru- dence. - Página 56 DESSINER POUR MONTER LA POUSSETTE Poignée de Capot Reste les bras Attelage pliant Bouton pour enlever le siège Repos pieds Bouton pour ajuster le repos pieds roue arrière Bouton d’ orientation de la roue avant Poignée de Botón para ajustar el respaldo Écran Bouton pour ajus-...
- Página 57 1. Pour déployer le châssis a. Commencez par ouvrir le bouton qui maintient plié la voi- ture et remontez de la poignée, dépliez le châssis. b. Appuyez sur le bouton de réglage de la poignée des deux côtés pour ajuster la hauteur de la poignée que vous voulez.
-
Página 58: Utilisation De La Hotte
4. Placer et enlever les parties restantes bras faire les parties du support d’accoudoir dans la cavité de l’accoudoir. Placez les morceaux un par un. Les parties de l’accoudoir peu- vent être enlever et remplacer d’une part. Doit appuyez sur le bouton pour enlever le reste bras si vous voulez enlever l’accoudoir 5. -
Página 59: Ajuster Le Siège
7. Ajuster le siège Placez votre pouce sur le dessus du siège. Utilisez l’ index, le coeur et un autre doigt pour maintenir le bouton de réglage des places assises et retirez-le. En même temps, soulevez ou abaissez le siège. De cette façon, vous pouvez ajuster le siège à... -
Página 60: Utiliser Le Frein
10. Pour régler le repose-pieds Utilisez les deux mains pour se- rrer deux boutons de réglage les deux côtés de repose les pieds et ensuite vous pouvez ajuster la position du repo- se-pieds. En soulevant le tube du repo- se-pied, vous pouvez le retourner être placé... - Página 61 13. Pour enlever le tapis Tout d’abord, vous devez dé- tacher le harnais de sécurité. Ensuite, retirez le harnais des épaules, de la taille et de la four- che de son trou correspondant. De cette façon, vous pouvez enlever le tapis. Vous pouvez le réinstaller en suivant les étapes dans l’ordre inverse.
- Página 62 15. Système de conduite automatique assurance voiture. Le voyant lorsqu’il est enfoncé la poignée est comme indiqué dans le dessin 15. - Témoin de mouvement - Voyant indiquant qu’il est arrêté - Voyant indiquant le niveau de la batterie. 16. Pour activer le système Safe Auto Driving a.
- Página 63 17. Éteignez le système conducción assurance auto entrer en mode manuel) Méthode 1: appuyez sur le bouton d’ induction de mouvement pendant 3 secondes, et à en même temps, mar- che sur peda l frein sur le pied droit. Puis ouvre la fermeture éclair du sac de la batterie et éteignez-le.
- Página 64 19. Para desmontar y cambiar la batería: Décompressez le sac de batterie que sous la poussette. Utiliser un outil spécialisé ou pièce pour dévisser les vis avec fente dans la Couvercle de la batterie partie de au - dessus de la surfa- ce de la boîte.
- Página 65 ENTRETIEN - Assurez-vous toujours de l’absence de vis desserrées ou de parties usées, vérifiez que les différents éléments ne soient pas cassés ou déchirés, auquel cas ils devront être remplacés ou réparés. - Veillez à nettoyer la capote avec un chiffon humide et du savon. - Le tissu et la capote ne doivent pas être lavés à...
- Página 66 Instructions d’installation du couffin Pour installer et retirer le panier Tiges de Tiges soutien. de soutien 1. Pour l’installer, insérez les tiges de soutien Rainure des deux côtés du panier dans leurs rai- nures correspondantes jusqu’à ce qu’elles soient parfaitement en place dans leurs canaux correspondants, comme le montre le dessin 1.
- Página 68 IMPORTÉ PAR: INNOVACIONES M.S. S.L. Pol. Ind. La Cava. C/ Benigànim, 9 46892 MONTAVERNER (Valencia) Spain Tel. 96 229 76 70 Fax 96 229 76 76 INNOVACIONESMS.COM...
- Página 69 I S T R U Z I O N I D I M O N T A G G I O PASSEGGINO TOKYO REFS.: 900111 Beige / 900112 Fragola / 900113 Blu QUESTA PASSEGGINO È CONFORME ALLA NORMA UNE EN...
- Página 70 AVVERTENZE, LEGGERE ATTENTA- MENTE LE ISTRUZIONI E CONSER- VARLE PER FUTURE REFERENZE. AVVERTENZE . Non lasciare mai il bambino incustodito. . Prima dell’uso assicurarsi che tutti i meccanismi di bloccaggio siano correttamente agganciati. . Per evitare lesioni, assicurarsi che il bambino non sia vicino quando si apre e chiude il prodotto.
-
Página 71: Manutenzione Giornaliera
AVVERTENZE . È permesso l’uso del passeggino con un bambino per volta, non lascia- re che due o più bambini stiano nel passeggino contemporaneamente. . Prestare molta attenzione quando si percorre la strada con il passeggi- . Quando si utilizzano scale o ascensori, prendere in braccio il bambino e prestare sempre attenzione. - Página 72 FIGURA PER MONTARE IL PASSEGGINO Manico Capotta Corrimano Meccanismo di chiusura Pulsante per rimuovere la seduta Poggia piedi Pulsante per regolare il poggiapiedi Pulsante per istalla- Ruote posteriori re le ruote anteriori Manico Pulsante per rego- lare lo schienale Schermo Pulsante per rego- Pulsante di chiusura lare il manico...
- Página 73 1. Per aprire il telaio a. Innanzitutto, agire sul pulsante che mantiene chiuso il passeggi- no e spingere verso l’alto rispetto al manico, dispiegare il telaio. b. Premere il pulsante di contro- llo del manico che si trova in en- trambi i lati per regolare l’altezza del manico desiderata.
- Página 74 4. Per inserire e rimuovere le parti del corrimano fare in modo che le parti del corrimano vengano inserite nella cavità del corrimano. Inserire i pezzi uno ad uno. Le parti del corrimano si possono rimuovere e collocare da un lato. Mantenere premuto il pulsante di rimozio- ne del corrimano se si desidera rimuoverlo...
- Página 75 7. Regolare la seduta Disporre il pollice nella parte superio- re del seggiolino. Utilizzare l’indice, il dito medio ed un altro dito per mantenere premuto il pulsante di controllo delle inclinature della sedu- ta e rimuoverla. Nel frattempo, alzare o abbassare la seduta.
- Página 76 10. Per regolare il poggiapiedi Utilizzare entrambe le mani per premere i i due pulsanti di con- trollo che ci sono in entrambi i lati del poggiapiedi, quindi rego- lare la posizione del poggiapiedi. Sollevando il tubo del poggia- piedi è possibile ricollocarlo nella sua posizione originale.
- Página 77 13. Per rimuovere il materassino Come prima cosa, slacciare le cinture di sicurezza. In secon- do luogo, rimuovere la cintura dorsale, quella ventrale e quella sparti gambe dal corrispettivo foro. Così facendo il materassino potrà essere rimosso. È possibile ricollocarla eseguendo l’opera- zione al contrario.
- Página 78 15. SISTEMA SICURO DI GUIDA AUTOMATICA DEL PASSEGGINO La spia luminosa quando si im- pugna Il manico viene indicata nell’immagine 15 - Segnale luminoso di movimento - Segnale luminoso di arresto - Segnale luminoso che indica il livello lla batteria. 16.
- Página 79 17. Spegnimento del sistema sicuro di guida automatica (passare alla modalità manuale) Metodo 1: premere il pulsante di attivazio- ne del movimento per 3 secondi, ed allo stesso tempo, premere il pedale del freno col piede destro. Successivamente aprire la cerniera della borsa della batteria e spegnerla.
- Página 80 19. Per smontare e cambiare la batteria Slacciare la borsa della batteria che si trova sotto della seduta del passeggino. Utilizzare degli strumenti appropriati o una Coperchio della moneta per svitare le viti con batteria fenditura che si trovano nella parte superiore della superficie del contenitore.
- Página 81 MANUTENZIONE - Verificare sempre che nella navicella non ci siano viti allentate o parti usurate e che i materiali non siano rotti o danneggiati, se così fosse è necessario sostituirli o ripa- rarli. - Pulire la cappotta con un panno umido e del sapone. - Non lavare l’imbottitura e la cappotta in lavatrice.
- Página 82 Istruzioni per montare la navicella Collocamento e rimozione della Aste di sacca. supporto 1. Collocamento della sacca: intro- Scanalatura durre le bacchette d’appoggio in entrambi i lati della sacca nei fori appositamente predisposti fino al loro completo posizionamento. Fig. 1 Infine la cappotta, l’imbottitura e la Fig 1 base.
- Página 84 IMPORTATO DA: INNOVACIONES M.S. S.L. Pol. Ind. La Cava. C/ Benigànim, 9 46892 MONTAVERNER (Valencia) Spain Tel. 96 229 76 70 Fax 96 229 76 76 INNOVACIONESMS.COM...
- Página 85 B E D I E N U N G S A N L E I T U N G KINDERWAGEN TOKYO REFS.: 900111 Beige / 900112 Erdbeere / 900113 Blau Europäische Norm genehmigt UNE EN 1888:2018 WICHTIG !! LESEN SIE BITTE AUFMERKSAM DIE GEBRAUCHSANLETUNG UND...
- Página 86 WICHTIG. LESEN SIE BITTE AUFMERKSAM DIE GEBRAU- CHSANLETUNG UND BEWAHREN SIE SIE BITTE AUF FALLS SIE ZUKÜNFTLICH DIESE KONSULTIERN MÜSSEN. WICHTIG · Lassen sie niemals das kind unbeaufsichtigt. · Stellen sie sicher, dass alle schliessmechanismen gut verkoppelt sind bevor sie das gerät benutzen.
-
Página 87: Tägliche Wartung
WARNHINWEISE · Nur ein kind darf im wagen liegen. Verbieten sie es, dass zwei oder mehrere kinder den wagen zur gleichen zeit benutzen. · Wenn sie den kinderwagen auf der strasse benutzen, sollten sie sehr achtsam sein. · Wenn sie treppen oder fahrstuhl benutzen, sollten sie das kind in die arme nehmen und immer auf seine sicherheit achten. - Página 88 SKIZZE ZUM AUFBAU DES KINDERWAGENS Griff Haube Armlehne Faltkopplung Knopf für den Sitz rausholen Fussstütze Knopf für die Fusss- tütze Orientierungsknopf Hinterrad für das Voerderrad Griff Knopf zur Einstellung der Rückenlehne Schirmbild Knopf zur Einste- Faltknopf llung des Griffes Lehne Voerderrad Korb Fussbremse...
- Página 89 1. Fussbremse a. Öffnen Sie den Knopf, der den Wagen gefaltet hält und ziehen Sie den Griff nach oben. Faheren Sie das Gestell aus. b. Durch drücken auf den Knopf am Griff auf beiden Seiten kön- nen Sie die gewünschte Höhe einstellen.
- Página 90 4. Anbringen und lösen teile der Armlehne Die Teile der Armlehne in den dafür vorgesehenen Hohlraum bringen. Platzieren Sie die Teile der Reihe nach. Die Teile der Armlehne kann man wieder abnehmen und erneut ansetzen. Um die Armlehne zu entfer- nen, müssen Sie auf den Knopf drücken.
- Página 91 7. Sitz anpassen Tun Sie den Daumen auf die obere Seite des Sitzes. Benutzen Sie Zeige- und Herzfinger und noch einen zusätzlichen Finger für den Einstellungsknopf für den Sitz. So können Sie die Höhe des Sitzes bestimmen. ACHTUNG! DER WAGEN DARF IN AUFGERICHTERTER POSITION NICHT FÜR KINDER UNTER 6 MONATEN BENUTZT WERDEN.
- Página 92 10. Fussstütze justieren Benutzen Sie beide Hände um beide Knöpfe, rechts und links, einzustellen. 11. Einstellung des Vorderrads Richten Sie das Vorderrad so aus, wie Sie es für gut halten und schieben Sie das Orientierungsteil nach unten. So ist die Orientierung gewährleistet.
- Página 93 13. Matte entfernen Als erstes, den Sicherheitsgurt lösen. Danach, den Schulter-, Hüft- und Zwischenbeingurt lösen. Dann können Sie die Matte entfernen. Um sie wieder einzusetzen, machen Sie den Vorgang ander- srum. 14. Wagen zusammenklappen Bevor Sie den Wagen zusam- menklappen, muss die Haube zusammengeklappt sein.
- Página 94 15. AUTOMATISCHES LENKSYSTEM SICHERHEIT DES WAGENS Das Lichtsignal bei Betätigung des Griffes wird in Bild 15 aufge- führt. -Bewegungshinweislicht - Stopphinweislicht - Licht zur Kontrolle des Batterielevels 16. So schalten Sie das Safe Auto Driving-System ein a. So schalten Sie das Safe Auto Driving-System ein: Öffnen Sie den Reißverschluss des Batteriefachs.
- Página 95 17. Schalten Sie das System aus sicheres automatisches Fahren (in den manuellen Modus wechseln) Methode 1: Drücken Sie die Induktionstaste die Bewegung für 3 Sekunden, und das Gleichzeitig Schritt auf Pedalbremse auf dem rechten Fuß. Dann öffnen Sie den Reißvers- chluss aus der Batterietasche und schalten Sie es aus.
- Página 96 19. Demontieren und Batterie wechseln : Packen Sie den Akku aus dass unter dem Kinderwagen. Verwenden Sie ein spezielles Werkzeug oder Münze, um die Batterieabdeckung Schrauben zu lösen mit Schlitz im Teil von über der Oberfläche der Box. Öffnen die Box und nehmen Sie den Akku heraus.
- Página 97 Instandhaltung - Immer sicherstellen, dass bei der Tragetasche keine losen Schrauben oder ab- genutzte Teile vorhanden sind. Ebenso überprüfen, dass die Materialien nicht defekt oder zerrissen sind. In letzterem Fall müssen diese ausgetauscht oder repariert wer- den. - Das Verdeck mit einem feuchten Tuch und Seife reinigen. - Der Bezug und das Verdeck sind nicht waschmaschinentauglich.
- Página 98 Anleitung zur Montage der Tragetasche Anbringen und Abmontieren des Stützstan- Korbes. 1. Zum Anbringen, wie auf Bild 1 zu Rille sehen ist, die Stützstangen innen an beiden Seiten der Tragetasche entlang in die passenden Rillen ein- führen bis diese entsprechend richtig platziert sind.
- Página 100 IMPORTIERT VON: INNOVACIONES M.S. S.L. Pol. Ind. La Cava. C/ Benigànim, 9 46892 MONTAVERNER (Valencia) Spain Tel. 96 229 76 70 Fax 96 229 76 76 INNOVACIONESMS.COM...