Publicidad
Idiomas disponibles
Idiomas disponibles
Enlaces rápidos
DE
Bedienungsanleitung
Baby-Monitor-System
EN
User manual
Baby monitor
FR
Mode d'emploi
Système babyphone
NL
Gebruiksaanwijzing
Babyfoon-system
IT
Istruzioni per l'uso
Sistema baby monitor
ES
Manual de uso
Monitor de bebé
Seite 2
Page 16
Page 30
Pagina 44
Pagina 58
Página 72
Publicidad

Manuales relacionados para HumanTechnik mona

Resumen de contenidos para HumanTechnik mona
- Página 1 Seite 2 Bedienungsanleitung Baby-Monitor-System Page 16 User manual Baby monitor Page 30 Mode d’emploi Système babyphone Pagina 44 Gebruiksaanwijzing Babyfoon-system Pagina 58 Istruzioni per l’uso Sistema baby monitor Página 72 Manual de uso Monitor de bebé...
- Página 2 Wir beglückwünschen Sie zum Erwerb Ihres »mona«-Videomonitor- systems. Sie haben sich dabei für moderne und zuverlässige Geräte entschieden. Bitte lesen Sie diese Bedienungsanleitung aufmerksam durch, um die Anlage richtig in Betrieb nehmen zu können und mit allen Möglichkeiten des Systems vertraut zu werden.
- Página 3 Funktionsprinzip Eine »mona« Monitoranlage besteht aus mindestens einem Monitor und einem »mona«-Video-Empfänger. Es können insgesamt bis zu 4 Baby-Monitore eingebunden werden. Ab einem bestimmten Geräuschpegel reagiert der Baby-Monitor und ein Funksignal wird zum Video-Empfänger übertragen. Dieser zeigt das Signal akustisch und optisch durch Töne und Bild auf dem Display an.
- Página 4 Inbetriebnahme Video-Empfänger für Baby-Monitore Stecken Sie das Kabel des Stecker-Netzteils in die Buchse „DC 6V“ im Boden der Ladestation. Das Stecker-Netzteil ist in eine 230V Netzsteckdose einzustecken. Für die Erstladung setzen Sie den Video-Empfänger in die Ladestation ein und laden Sie das Gerät mindestens 15 Stunden auf. Es empfiehlt sich den Video-Empfänger regelmäßig in die Ladestation einzulegen, damit die Akkus geladen werden und eine unterbrechungs- freie Funktion erreicht wird.
- Página 5 Inbetriebnahme Baby-Monitor Stecken Sie das Kabel des Stecker-Netzteils in die Buchse „DC 6V“, welche sich auf der Rückseite des Gerätes befindet. Das Stecker-Netzteil ist in eine 230V Netzsteckdose einzustecken. Dem Baby-Monitor liegen 2 unterschiedliche Platzierungsmöglichkei- ten bei. ACHTUNG: Stellen Sie unbedingt sicher dass sich das Gerät und des- sen Stromkabel außerhalb der Reichweite des Kindes befinden! Bei Nichtbeachtung sind Verletzungen und Strangulierung möglich! 1.
-
Página 6: Baby-Monitor
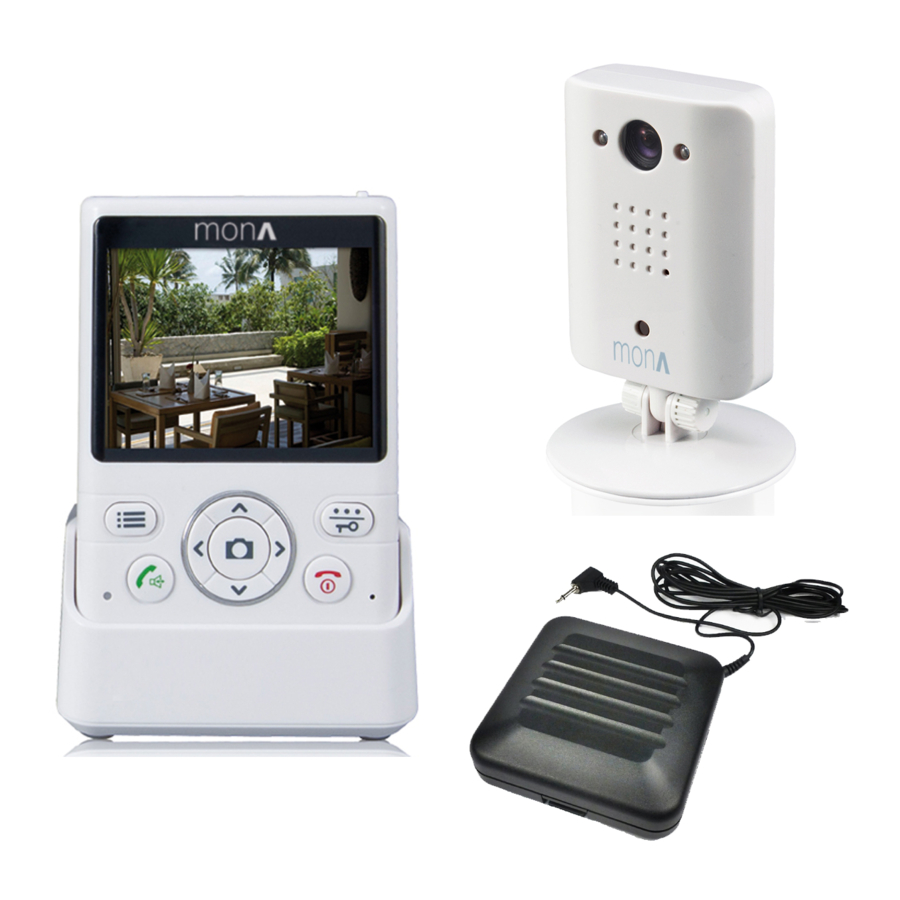
Bedienungs- und Anzeigeelemente Video-Empfänger Ausklappbare Antenne Steuerungs-Tasten LCD Display rechte Display-Taste / linke Display-Taste / Entsperren / Menü Wiederholung Annahme- Ein / Aus -Taste / Taste / OK Zurück Ladeanzeige Mikrofon Momentaufnahme / Bildschirm-Taste Baby-Monitor Infrarot-LED-Lichter Kamera Mikrofon Lichtsensor Standfuß Deutsch 6... - Página 7 Video-Empfänger Anzeige E F G Die Bilder zeigen das LCD-Display des Video-Empfängers nach Erwa- chen aus dem Ruhe-Modus. Ladeanzeige Gesprächsanzeige (Bei Baby-Monitor-Betrieb nicht sichtbar) Signalstärke zum Monitor Bildzoom Ablehnen G Stromanzeige des aktiven Baby-Monitors Nummer des Monitors (Bei mehreren angemeldeten Monitoren) Funktionsangabe für linke Displaytaste Funktionsangabe für rechte Displaytaste Video-Empfänger ein- / ausschalten...
- Página 8 Zusätzliche Baby-Monitore mit dem Video-Empfänger verbinden Bei Lieferung eines Sets sind Baby-Monitor und Video-Empfänger bereits verbunden. Es können wahlweise insgesamt vier Baby-Monitore mit dem Video-Emp- fänger wie folgt verbunden werden: 1. Video-Empfänger: Drücken Sie eine beliebige Taste um das Display einzuschalten. Drücken Sie die linke Taste , um ins Hauptmenü...
- Página 9 Verbindungen zurücksetzen Bereits angemeldete Monitore können wieder gelöscht werden. Drü- cken Sie hierzu die Annahme-Taste und die rechte Taste gleichzeitig für 5 Sekunden. Danach erscheint auf dem Display die Bestätigung „Verbindung gelöscht“. Baby-Monitore einschalten Man kann die verschiedenen Monitore vom Video-Empfänger aus ein- schalten.
- Página 10 Das Datums-Format ist: JJJJ-MM-TT. Datum und die Zeit sollten einge- stellt werden, damit die Momentaufnahmen mit korrekter Aufnahmezeit abgespeichert werden. Bei vollständiger Entladung oder bei Entnahme der Akkus müssen Zeit und Datum erneut eingegeben werden. Video-Empfänger: Einstellung der Lautstärke Es können 9 verschiedene Lautstärken eingestellt werden. Bei einer aktiven Video-Übertragung kann mit den Steuerungs-Tasten „“...
- Página 11 Video-Empfänger: Einstellung der Rufton-Lautstärke Die Lautstärke des Ruf-/Klingeltons kann in 5 Stufen eingestellt werden. Einstellungszahl „0“ ist lautlos und „4“ bietet die maximale Lautstärke. Befindet sich der Video-Empfänger im Standby, so gehen Sie wie folgt vor: 1. Schalten Sie das Display ein und drücken Sie , um in das Haupt- menü...
- Página 12 ACHTUNG: Um diese Funktion nutzen zu können, muss sich der Video-Empfänger in der Ladestation befinden! Vibrationskissen (A-3303-0): Schließen Sie das Vibrationskissen auf der Seite der Ladestation an. Verbindung zu Humantechnik-Signalsystemen: Mit dem Zusatzkabel A-2974-0 können Sie eine Verbindung zu folgen- den Sendern aufbauen: - lisa Funk-Babysender (A-2468-0) - signolux Universalsender Akustisch (A-2656-0, anschliessbar über...
- Página 13 Wartung und Pflege Ihre mona-Geräte sind wartungsfrei. Bei Verschmutzung sollten Sie die Geräte gelegentlich mit einem weichen, angefeuchteten Tuch reinigen. Verwenden Sie niemals Alkohol, Verdünner oder andere organische Lösungsmittel. Die Geräte sollten nicht über längere Zeit direkter Son- neneinstrahlung ausgesetzt werden und darüber hinaus vor großer Hit- ze, Feuchtigkeit oder starker mechanischer Erschütterung geschützt...
- Página 14 Entsorgung von gebrauchten elektrischen und elektronischen Geräten (anzuwenden in den Ländern der Europäischen Union und anderen europäischen Ländern mit einem separaten Sammelsystem für diese Geräte). Das Symbol auf dem Pro- dukt oder seiner Verpackung weist darauf hin, dass dieses Produkt nicht als normaler Haushaltsabfall zu behandeln ist, sondern an einer Annahmestelle für das Recycling von elektrischen und elektronischen Geräten abgegeben werden muss.
- Página 15 - 2012 / 19 / EC WEEE-Richtlinie - 2014 / 53 / EC RED-Richtlinie Die Konformität mit den o. a. Richtlinien wird durch das CE-Zeichen auf dem Gerät bestätigt. CE Konformitätserklärungen stehen im Internet unter www.humantechnik.com im Bereich „Service“zur Verfügung. Technische Änderungen vorbehalten. Deutsch 15...
- Página 16 Congratulations on the purchase of your video monitoring system »mona«. You have chosen highly modern and reliable devices, which will provide valuable service for your home. Please read this manual thoroughly to be able to set up the units correc- tly and to familiarise yourself with all of the features the system offers.
- Página 17 Function A »mona« monitoring system consists of at least one baby monitor and a »mona« video receiver. Up to four transmitters can be registered on one video receiver. When a certain sound level is reached, the baby monitor transmits a radio signal to the »mona«...
- Página 18 Setup of video receiver Insert the cable of the power supply into "DC 6V" socket located on the underside of the charger base. Plug the power supply into a 230 V mains socket. Place the receiver into the charger base. Before initial operation, you should fully charge the receiver for about 15 hours.
- Página 19 Setup of the baby monitor Plug the power supply cable into the "DC 6V" socket located on the rear side of the device. Plug the power supply into a 230 V mains socket.The baby monitor is supplied with 2 possibilities for mounting. ATTENTION: Make sure that the baby monitor and the electric cable are not within reach of the child! Danger of injuries and strangulation are otherwise possible.
- Página 20 Controls and display Video receiver Navigation keys LCD Display Right software key Left software key Unlock / / Menu key Replay key Accept key Power on / off / OK / Back key Charge indicator Microphone Manual snapshot / monitor key Baby monitor Infrared-LED-Lights Camera...
- Página 21 Video receiver display E F G The figures show the regular display which appears when the receiver is activated from standby mode. Battery charge status During a call (Irrelevant for use with baby monitor) Signal strength of monitor Zooming Rejecting a call G Indicates electric connection of current baby monitor Number of current monitor Function definition for left softkey...
- Página 22 Registering additional baby monitors The receiver and monitor are already registered together when pur- chased as a set. The following instructions are for the registration of up to 3 additional monitors: 1. Press any key to switch the display on. Press the menu key enter the main menu.
- Página 23 Reseting the registration All registered monitors can be deleted. To delete the registered moni- tors, press and hold the Accept key and the right key simulta- neously for 5 seconds. The register interface will then display "Register deleted". Viewing monitor feeds If multiple baby monitors have been registered, the receiver can toggle between the transmissions of the various baby monitors.
- Página 24 Video receiver: Setting the volume The call volume can be adjusted in 9 levels. - During a video transmission, press the Navigation keys "" and "" to adjust the volume. - If the receiver is in stand-by mode, press any key to switch the display on.
- Página 25 With Auto Snap on, the camera in the baby monitor will automatically take photographs when it is triggered by sound. If you have unrevie- wed photographs, the backlight of the Replay key will be blinking. Up to 50 photographs can be stored. When the store is full, the oldest photograph will be overwritten.
- Página 26 Vibrating pad (A-3303-0): Plug the vibrating pad into the AUX outlet. Connecting a Humantechnik signal system: With the auxillary cable A-2974-0, a connection to the following trans- mitters can be established: - lisa RF babycry transmitter (A-2468-0) - signolux Universal Acoustic Transmitter (A-2656-0, to be connected over the doorbell input socket.
- Página 27 Maintenance and care »mona« devices do not require any maintenance. If the units become dirty, simply wipe them clean with a soft, damp cloth. Never use spirits, thinners or other organic solvents. Do not set the units up where they will be exposed to full sunlight for long periods.
- Página 28 Disposal of used electric and electronic units (applicable in the countries of the European Union and other European countries with a separate collection system). The symbol on the product or the packaging indicates that this product is not to be handled as ordinary household waste but has to be returned to a collecting point for the recycling of electric and electronic units.
- Página 29 - 2014 / 53 / EC RED-Directive Compliance with the directives listed above is confirmed by the CE seal on the device. CE compliance declarations are available on the Internet at www.humantechnik.com within the „service“ section. Technical specifications subject to change without prior notice. English 29...
- Página 30 Nous vous félicitons pour l’acquisition de votre système babyphone « mona ». Vous avez opté pour un système moderne et fiable. Veuillez lire attentivement ce mode d’emploi pour une bonne mise en service de l’appareil et pour vous familiariser avec toutes les possibilités du système.
- Página 31 Fonction Un système de surveillance « mona » consiste au minimum en un émetteur babyphone et un récepteur babyphone « mona ». Jusqu’à quatre émetteurs peuvent être raccordés à un récepteur babyphone. Lorsqu’un certain niveau sonore est atteint, l‘émetteur babyphone transmet un signal radio au récepteur babyphone «...
- Página 32 Configuration du récepteur babyphone Insérez le câble d’alimentation électrique dans la prise « DC 6V » située sur la face inférieure de la station de charge. Branchez le bloc secteur sur une prise murale de 230 V. Placez le récepteur sur la sta- tion de charge.
- Página 33 Configuration de l’émetteur babyphone Branchez le câble d’alimentation électrique dans la prise « DC 6V » située sur la face arrière de l’appareil. Branchez le bloc secteur sur une prise murale de 230 V. L’émetteur babyphone peut être monté de deux manières différentes.
- Página 34 Commandes et affichage Récepteur babyphone Touches de navigation Affichage à LCD Touche logicielle droite Touche logicielle / déverrouillage gauche / touche replay / touche de menu Touche d’accep- Marche / arrêt tation / OK / touche retour Indicateur de charge Microphone Touche instantané...
- Página 35 Affichage du récepteur babyphone E F G Les illustrations indiquent l’affichage ordinaire qui apparaît lorsque le récepteur est activé à partir du mode de veille. État de charge de la batterie Pendant un appel (sans rapport à l’utilisation avec un babyphone) Puissance du signal de l’émetteur Zoom Refuser un appel...
- Página 36 Appairage d’émetteurs babyphones supplémentaires Le récepteur et l’émetteur sont d’ores et déjà appairés l’un à l’autre lorsqu’ils sont achetés sous forme de set. Les instructions suivantes per- mettent d’appairer jusqu’à 3 émetteurs supplémentaires. 1. Récepteur babyphone : Veuillez appuyer sur n’importe quelle touche pour allumer l’affichage. Appuyez sur la touche de menu pour ouvrir le menu principal.
- Página 37 Réinitialisation de l’appairage Tous les émetteurs appairés peuvent être effacés. Pour effacer les émetteurs appairés, appuyez et maintenez enfoncée la touche Ac- ceptation et la touche de droite simultanément pendant 5 se- condes. L’interface d’appairage affichera alors le message « Suppr. appairages ».
- Página 38 Le format des horaires est sur 24 h et le format de la date est AA-MM- JJ. La date et l’heure doivent être réglées pour correctement afficher l’horaire des images capturées. Lors du remplacement des piles ou en cas de décharge totale de la batterie du récepteur babyphone, la date et l’heure doivent à...
- Página 39 3. Appuyez sur « Retour » pour sauvegarder le réglage et retourner au menu précédent. Récepteur babyphone : Photo instantanée automatique Des photos instantanées peuvent être prises automatiquement (snapshot) lorsque le bébé active par un bruit l’émetteur du babypho- ne. Pour activer cette fonction procédez comme suit : 1.
-
Página 40: Veuillez Noter
VEUILLEZ NOTER : Pour pouvoir utiliser cette fonction, le récepteur babyphone doit être placé sur la station de charge ! Coussin vibrant (A-3303-0) : Branchez le coussin vibrant sur la prise AUX. sortie AUX Connexion d’un système de signalisation Humantechnik : Francais 40... - Página 41 Garantie Les appareils « mona » sont très fiables. Si en dépit d’un montage et d’un emploi corrects, des dysfonctionnements apparaissaient, veuillez contacter votre vendeur ou vous adresser directement au fabricant.
- Página 42 Gestion des déchets électriques et électroniques (dans les pays de l’Union Européenne et dans les autres pays européens disposant d’un système de collecte distinct pour cette classe de déchets). Le symbole sur le produit ou l’emballage indique que ce produit ne doit pas être jeté comme les déchets ménagers ordi- naires, mais apporté...
- Página 43 - 2014 / 53 / CE Directive RED La conformité avec les directives ci-dessus est attestée par le logo CE apposé sur l’appareil. Les déclarations de conformité CE sont consultables sur Internet sur le site www.humantechnik.com. Sous réserve de modifications techniques. Francais 43...
- Página 44 Gefeliciteerd met de aankoop van uw videobabyfoon »mona«. U hebt gekozen voor zeer moderne en betrouwbare apparatuur, die een waardevolle aanwinst voor uw huis zal zijn. Lees deze handleiding zorgvuldig door om de apparaten op de juiste wijze in te kunnen stellen en om bekend te geraken met alle functies die het systeem biedt.
- Página 45 Werking Een »mona« babyfoonsysteem bestaat uit ten minste één babyfoon en een »mona« video-ontvanger. Er kunnen tot vier zenders worden geregistreerd voor één video-ontvanger. Wanneer een bepaald geluidsniveau wordt bereikt, zendt de babyfoon een radiosignaal naar de »mona« video-ontvanger. De ontvanger geeft het signaal door als geluid en als beelden op de display.
-
Página 46: De Video-Ontvanger Instellen
De video-ontvanger instellen Sluit de voedingskabel aan op de „DC 6V“-aansluiting aan de onderzijde van het laadstation. Sluit de netstekker van de voedingskabel aan op een 230 V stopcontact. Plaats de ontvanger in het laadstation. Voordat de video-ontvanger voor de eerste keer in gebruik wordt genomen, moet hij ongeveer 15 uur opla- den. - Página 47 Instellen van de babyfoon Sluit de voedingskabel aan op de „DC 6V“-aansluiting aan de achter- zijde van het apparaat. Sluit de netstekker van de voedingskabel aan op een 230 V stopcontact. De babyfoon kan op twee manieren worden gemonteerd. LET OP: Zorg ervoor dat de babyfoon en de elektriciteitskabel zich niet binnen bereik van het kind bevinden! Anders bestaat er kans op verwondings- of verstikkingsgevaar voor het kind.
- Página 48 Bedieningsknoppen en display Video-ontvanger Navigatietoetsen LCD Display Rechter softwaretoets Linker softwaretoets / Ontgrendelen / Menutoets / Afspeeltoets Acceptatietoets Aan / Uit / OK / Terug-toets Laadindicator Microfoon Handmatige snapshot / monitortoets Babyfoon Infrarood-LED-lampen Camera Microfoon Lichtsensor Standaard Nederlands 48...
- Página 49 Display video-ontvanger E F G De afbeeldingen tonen het displayscherm dat verschijnt wanneer de ontvanger wordt geactiveerd vanuit stand-bymodus. Oplaadstatus batterij Tijdens een oproep (Niet van toepassing indien gebruikt als babyfoon) Signaalsterkte van babyfoon Zoomfunctie Een oproep weigeren G Duidt de elektronische aansluiting van de huidige babyfoon aan Nummer van de huidige babyfoon Functiedefinitie voor linkertoets Functiedefinitie voor rechtertoets...
- Página 50 Aanvullende babyfoons registreren De ontvanger en monitor zijn al samen geregistreerd als ze als een set zijn gekocht. Met de volgende instructies kunnen tot 3 extra mo- nitors worden geregistreerd: 1. Video-ontvanger: Druk op een willekeurige toets om de display te activeren. Druk op de menutoets om het hoofdmenu in te gaan.
- Página 51 De registratie resetten Alle geregistreerde monitors kunnen worden verwijderd. Houd om de geregistreerde monitors te verwijderen de toets Accepteren en de rechtertoets gelijktijdig ingedrukt gedurende 5 seconden. De registratie-interface geeft dan „Register verwijderd“ weer. Kiezen tussen monitorsignalen Als er meerdere babymonitors zijn geregistreerd, kan de ontvanger wisselen tussen de signalen van de verschillende babymonitors.
- Página 52 De tijdsindeling is 24 uur en de datumindeling is JJ-MM-DD. Datum en tijd moeten worden ingesteld om de tijd van vastgelegde beelden correct weer te geven. Wanneer de batterijen worden vervangen of in geval van volledige ontlading van de nettransformator van de vi- deo-ontvanger, moeten de datum en tijd opnieuw worden ingesteld.
- Página 53 Video-ontvanger: Automatische foto-instellingen De unieke snapshot functie neemt automatisch foto’s als een geluid de baby monitor activeert, om de automatische snapshot functie te activeren dient u het volgende te doen: 1. Druk op een willekeurige toets om de display te activeren. Druk op de menutoets om het hoofdmenu in te gaan.
- Página 54 LET OP: Om deze functie te gebruiken moet de video-ontvanger in het laadstation worden geplaatst! Trilkussen (A-3303-0): Sluit het trilkussen aan op de AUX-uitgang. Een Humantechnik signaleringssysteem aansluiten: Met de hulpkabel A-2974-0 kan verbinding worden gemaakt met de volgende zenders: - lisa RF babyzender (A-2468-0) - signolux Universele akoestische zender (A-2656-0, aan te sluiten via de deurbelingang.
- Página 55 Onderhoud en verzorging »mona« apparaten vereisen geen onderhoud. Als de apparaten vuil worden, veeg ze dan schoon met een zachte, vochtige doek. Gebruik nooit vluchtige schoonmaakmiddelen, verdunners of andere organi- sche oplosmiddelen. Plaats de apparaten niet op een plek waar ze lange tijd aan het zonlicht zullen blootstaan.
- Página 56 Verwijdering van gebruikte elektrische en elektronische apparaten van toepassing in landen binnen de Europese Unie en andere Europese landen met een gescheiden inzamel- systeem). Het symbool op het product of de verpakking duidt aan dat dit product niet mag worden verwijderd bij het huishoudelijk afval, maar moet worden ingeleverd bij een inzamelpunt voor het recyclen van elektrische en elektronische apparaten.
- Página 57 - 2014 / 53 / EG RED-richtlijn Naleving van de bovengenoemde richtlijnen wordt bevestigd door het CE-merk op het apparaat. EG-conformiteitsverklaringen zijn beschik- baar via Internet op www.humantechnik.com onder de kop „Service“. Technische specificaties zijn zonder voorafgaande kennisgeving aan wijziging onderhevig.
- Página 58 Grazie per aver acquistato il video monitor »mona«. Hai scelto un dis- positivo modernissimo e affidabile, che ti offrirà un servizio valido per la tua casa. Leggi attentamente questo manuale per installare le unità correttamen- te e familiarizzare con le caratteristiche del sistema.
- Página 59 Funzionamento Un sistema di monitoraggio »mona« è composto da almeno un baby monitor e un ricevitore video »mona«. A un solo ricevitore video posso- no essere collegati fino a quattro trasmettitori. Quando si raggiunge un certo livello di suono, il baby monitor trasmet- te un segnale radio al ricevitore video »mona«.
- Página 60 Installazione del ricevitore video Inserire il cavo di alimentazione nella presa "DC 6 V" (CC 6 V) posizionata sotto la base del caricatore. Collegare l’alimentatore con una presa di rete da 230 V. Posizionare il ricevitore nella base del caricatore. Prima della messa in funzione, caricare completamente il ricevitore per almeno 15 ore.
- Página 61 Installazione del baby monitor Inserire il cavo di alimentazione nella presa "DC 6 V" (CC 6 V) posizi- onata sul lato posteriore del dispositivo. Collegare l’alimentatore con una presa di rete da 230 V. Il baby monitor è dotato di 2 opzioni di montaggio.
- Página 62 Comandi e schermo Ricevitore video Antenna pieghevole Tasti di navigazione Schermo LCD Tasto software destro / sblocca / riproduci Tasto software sinistro / Tasto "Menu" Tasto accensione / Tasto "Accept" spegnimento / indietro / "OK" Indicatore di batteria Microfono Tasto iIstantanea manuale / “Monitor” Baby monitor Luci LED infrarossi Videocamera...
- Página 63 Schermo ricevitore video E F G Le illustrazioni mostrano la schermata normale che appare quando il ricevitore è attivato da modalità stand-by. Stato ricarica batteria Segnale durante una chiamata Livello batteria del sistema di controllo porta (quando si usano le batterie) Potenza del segnale del monitor Zoom...
- Página 64 Collegare baby monitor Il ricevitore e il monitor sono già collegati tra loro al momento dell’acquisto. Le seguenti istruzioni si riferiscono al collegamento di 3 monitor aggiuntivi: 1. Ricevitore video: Premere un tasto per accendere lo schermo. Premere il tasto "Menu" per accedere al menu principale.
- Página 65 Reimpostazione del collegamento Tutti i monitor collegati possono essere eliminati. Per eliminare i monitor collegati, tenere premuti contemporaneamente il tasto "Accept" e il tasto destro per 5 secondi. L’interfaccia di collegamento mostrerà quindi "Register deleted". Visualizzazione dei monitor Se sono stati collegati più baby monitor, il ricevitore può passare da uno all’altro mostrandone la trasmissione.
- Página 66 immagini acquisite. Quando si sostituiscono la batteria o in caso la batteria del ricevitore video è completamente scaricha, data e orario devono essere reimpostati. Ricevitore video: impostazione del volume trasmissione Il volume della trasmissione può essere regolato su 9 livelli. - Durante una trasmissione video, premere i tasti di navigazione ""...
- Página 67 Ricevitore video: impostazione del volume del tono di avviso Il volume del tono di avviso può essere regolato su 5 livelli. "0" è silen- zioso e "4" è il volume massimo. 1. Premere un tasto per accendere lo schermo. Premere il tasto "Menu" per accedere al menu principale.
- Página 68 Cuscinetto vibrante (A-3303-0): Inserire la spina del cuscinetto vibrante nell’uscita AUX. Collegamento a un sistema di avviso Humantechnik: Con il cavo ausiliario A-2974-0 è possibile stabilire una connessione con i seguenti trasmettitori: - Trasmettitore babycry lisa RF (A-2468-0) - Trasmettitore Universal Acoustic signolux (A-2656-0, da collegare alla presa d’ingresso del campanello.
- Página 69 Manutenzione I dispositivi »mona« non hanno bisogno di manutenzione. Pulire le pos- sibili impurità con un panno umido e morbido. Non utilizzare mai alcool, diluenti o altri solventi organici. I dispositivi »mona« non devono essere esposta per lunghi periodi ai diretti raggi del sole e deve essere protetta dalle temperature elevate, dall’umidità...
- Página 70 Specifiche tecniche Baby monitor: Frequenza di trasmissione: 2.400 GHz - 2.4835 GHz Massima potenza di trasmissione: <10 mW Velocità di trasmissione dati: 2,0 Mbps Potenza di trasmissione: 19 dBm (TYP) Tipo di demodulazione: GFSK Raggio di trasmissione: 50 m Sensore video: 1/4“...
- Página 71 - 2014 / 53 / UE Direttiva RED La conformità con le direttive di cui sopra viene confermata dalla mar- catura CE sull’apparecchio. Le dichiarazioni CE di conformità sono di- sponibili sul sito Internet www.humantechnik.com/service. Ci riserviamo di effettuare modifiche tecniche. Italiano 71...
- Página 72 Le damos la enhorabuena por la compra de su sistema de monitori- zación por vídeo «mona». Ha elegido un dispositivo fiable y moderno que proporcionará un valioso servicio en su hogar. Lea este manual atentamente para poder configurar las unidades cor- rectamente y para familiarizarse con las funciones del sistema.
- Página 73 Función Un sistema de monitorización «mona» consta de al menos un monitor de bebé y un receptor de vídeo «mona». En un receptor de vídeo se pueden registrar hasta cuatro transmisores. Cuando se alcance un determinado nivel sonoro, el monitor de bebé...
- Página 74 Configuración de un receptor de vídeo Inserte el cable de la fuente de alimentación en la toma «DC 6V» (6 V CC) que se encuentra debajo de la base cargadora. Enchufe la fuente de alimentación a la toma de corriente de 230 V. Coloque el receptor en la base cargadora.
- Página 75 Configuración del monitor de bebé Conecte el cable de alimentación en la toma «DC 6V» (6 V CC) situada en la parte posterior del dispositivo. Conecte la fuente de alimentación a la toma de corriente de 230 V. El monitor de bebé se suministra con 2 opciones de montaje.
- Página 76 Controles y pantalla Receptor de vídeo Antena plegable Teclas de navegación Pantalla LCD Tecla de software Tecla de software derecha / Desbloquear / izquierda / Tecla Repetir tecla de menú Encendido / Apagado / Tecla Aceptar / tecla Atrás Indicador de carga Micrófono Captura manual / tecla monitor Monitor de bebé...
- Página 77 Pantalla de receptor de vídeo E F G Las figuras muestran la pantalla normal que aparece cuando el recep- tor se activa desde el modo en espero. Estado de carga de la batería Indicación durante una llamada Estado de batería del monitor de puerta (cuando se utiliza con pilas) Intensidad de señal del monitor Ampliación Rechazo de una llamada...
- Página 78 Registro de monitores de bebé adicionales El receptor y el monitor ya están registrados juntos cuando se com- pran como un conjunto. Las siguientes instrucciones son para el registro de hasta 3 monitores adicionales: 1. Presione cualquier tecla para encender la pantalla. Presione la tecla de menú...
- Página 79 Restablecimiento del registro Es posible eliminar todos los monitores registrados. Para eliminar los monitores registrados, mantenga presionada la tecla Aceptar y la tecla derecha simultáneamente durante 5 segundos. La interfaz de registro mostrará "¡Registr.borrad!". Visualización de transmisión de monitores Si se han registrado varios monitores de bebé, el receptor puede alternar entre las transmisiones de los distintos monitores de bebé.
- Página 80 Receptor de vídeo: Configuración del volumen El volumen de llamada se puede ajustar en 9 niveles. - Durante una transmisión de vídeo, presione las teclas de navega- ción "" y "" para ajustar el volumen del sonido transmitido. - Si el receptor se encuentra en el modo en espera, presione cual- quier tecla para encender la pantalla.
- Página 81 3. Presione "Guardar OK" para guardar los ajustes y volver al menú anterior. Con la función de captura automática activada, la cámara del monitor de bebé tomará automáticamente fotografías cuando se active por el soni- do. Si tiene fotografías sin revisar, la retroliluminación de la tecla Repetir parpadeará.
- Página 82 Almohadilla vibratoria (A-3303-0): Enchufe la almohada vibratoria en la salida AUX. Conexión de un sistema de alerta Humantechnik: Con el cable auxiliar A-2974-0, se puede establecer una conexión a los siguientes transmisores: - Transmisor de radiofrecuencia de llanto de bebé lisa (A-2468-0) - Transmisor acústico universal signolux (A-2656-0, conectado a la...
- Página 83 Garantie El sistema «mona» presenta una gran seguridad efectiva de funciona- miento. En caso de que, a pesar de ha berse montado y operado de forma adecuada, se presenten fallos, le rogamos contactar su estable- cimiento especializado o directamente el fabricante.
- Página 84 Especificación técnica receptor de vídeo: Frecuencia de transmisión: 2,400 GHz - 2,4835 GHz. Velocidad de transmisión de datos: 2,0 Mbps Sensibilidad de recepción: -90 dBm Tipo de desmodulación: GFSK Resolución: 320 x 240 (RGB) Potencia de transmisión: 19 dBm (TYP) Consumo de energía: 400 mA Temperatura de funcionamiento:...
- Página 85 - Directiva 2014 / 53 / UE (RED) La conformidad con las directivas anteriores está avalada por la marca CE que lleva el aparato. Las declaraciones de conformidad CE están disponibles en Internet en www.humantechnik.com/service. Salvo modificaciones técnicos. Español 85...
- Página 88 Im Wörth 25 Fax.: +49 (0) 76 21/ 9 56 89-70 Germany D-79576 Weil am Rhein E-mail:info@humantechnik.com Humantechnik GHL AG Tel.: +41 (0) 61/ 6 93 22 60 Rastatterstrasse 9 Fax.: +41 (0) 61/ 6 93 22 61 Switzerland CH-4057 Basel E-mail:info@humantechnik.com...