Tabla de contenido
Publicidad
Idiomas disponibles
Idiomas disponibles
Enlaces rápidos
Publicidad
Capítulos
Tabla de contenido
Solución de problemas

Manuales relacionados para APOZA BT Cool EASY

Resumen de contenidos para APOZA BT Cool EASY
- Página 1 BT Cool EASY WHITENING SYSTEM USER’S MANUAL This unit is restricted to be installed by dentists, and operated by licensed trained medical or lab professionals only. All instructions in this USER’S MANUAL must be thoroughly read before installation or operation.
- Página 2 V.4: 20090723-EN...
-
Página 3: Tabla De Contenido
TABLE OF CONTENTS PRESENTATION∙ ∙ ∙ ∙ ∙ ∙ ∙ ∙ ∙ ∙ ∙ ∙ ∙ ∙ ADVANTAGES∙∙∙∙∙∙∙∙∙∙∙∙∙∙∙∙∙ CONTENTS and INSTALLATION∙∙∙∙∙∙∙∙∙ OPERATION∙∙∙∙∙∙∙∙∙∙∙∙∙∙∙∙∙∙ MAINTENANCE∙∙∙∙∙∙∙∙∙∙∙∙∙∙∙∙ TROUBLE SHOOTING∙∙∙∙∙∙∙∙∙∙∙∙∙ SPECIFICATION and ACCESSORIES∙∙∙∙∙∙ WARRANTY∙∙∙∙∙∙∙∙∙∙∙∙∙∙∙∙∙∙ V.4: 20090723-EN... -
Página 4: Presentation
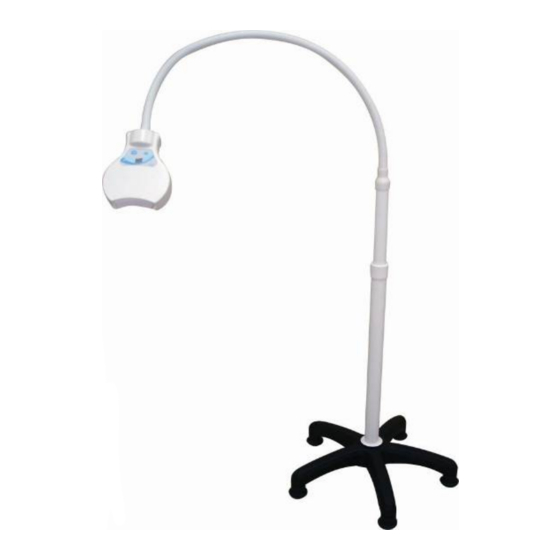
1. PRESENTATION This unit is designed for in-office tooth bleaching. This unit must be operated by licensed dental professionals only. 2. ADVANTAGES 1》 LED light source: emits blue light, powerful but not building much heat. Quiet operation without noisy fan. 2》... - Página 5 INSTALLATION: FIGURE ASSEMBLING PROCEDURE Place the arm into the stem vertically. Hold the arm steady and turn the stem anti-clockwise to screw tight. Place the rubber protector. V.4: 20090723-EN...
- Página 6 FIGURE ASSEMBLING PROCEDURE Insert metal sleeve into the hole of stand. Tighten the nut on the thread of metal sleeve. Complete installing the stem on the stand. V.4: 20090723-EN...
- Página 7 FIGURE ASSEMBLING PROCEDURE Turn the screw to adjust length of the stem: Clockwise: turn tight. Anti-Clockwise: turn loose. Place properly the Distance Guide. Complete installation. V.4: 20090723-EN...
-
Página 8: Operation
4. OPERATION 1》 Connect the power cable with the power supply, and plug the power supply with correct electric power (AC 100V~240V). Then it indicates “05” on the display. 2》 Adjust stem to the desired height. The arm is designed for adjusting the direction of the light to the right or to the left. -
Página 9: Trouble Shooting
6. TROUBLE SHOOTING Users could simply handle the following status. For any other unlisted fault, please contact the dealer immediately for further check. Any self-repairing might raise worse condition and severe damage or injury. FAULT POSSIBLE CAUSE SOLUTION “H5” shown on the Power supply is not Use correct power supply with output display. -
Página 10: Warranty
8. WARRANTY 1》 This instrument described in this manual has been fully inspected and conforms to the current product specification. 2》 This instrument is warranted for its designated use, against original defects in materials and workmanship for period of 12 months from date of purchase. -
Página 11: Warranty Statement
6F, 657, CHUNG-CHENG ROAD, HSIN-CHUANG CITY, 242 TAIPEI HSIEN, TAIWAN, R.O.C. TEL:886-2-29032774‧29010620 FAX:886-2-29033874‧29012208 E-mail:apoza@apoza.com.tw http://www.apoza.com WARRANTY STATEMENT This instrument described below has been fully inspected and conforms to the current products specification. This instrument is guarantied for its designated use, against original defects in materials and workmanship for a period of 12 months from date of purchase. - Página 12 V.4: 20090723-EN...
-
Página 13: Bt Cool Easy
BT Cool EASY SYSTEME DE BLANCHIMENT MANUEL D’UTILISATION Cet appareil ne doit être installé que chez des dentistes agréés, et doit uniquement être utilisé par des professionnels de santé certifiés ou des professionnels travaillant en laboratoire. L’intégralité des instructions de ce MANUEL D’UTILISATION doit être consultée avant l'installation ou la mise en route de l'appareil. - Página 14 V.4: 20090723-FR...
- Página 15 TABLE DES MATIÈRES PRESENTATION∙∙∙∙∙∙∙∙∙∙∙∙∙∙∙∙ CARACTERISTIQUES∙∙∙∙∙∙∙∙∙∙∙∙∙ COMPOSITION ET INSTALLATION∙∙∙∙∙∙∙ FONCTIONNEMENT∙∙∙∙∙∙∙∙∙∙∙∙∙∙ ENTRETIEN∙∙∙∙∙∙∙∙∙∙∙∙∙∙∙∙∙∙ RESOLUTION DES PANNES∙∙∙∙∙∙∙∙∙∙ SPECIFICITES TECHNIQUES ET ACCESSOIRES∙ GARANTIE∙∙∙∙∙∙∙∙∙∙∙∙∙∙∙∙∙∙ V.4: 20090723-FR...
-
Página 16: Presentation
1. PRESENTATION Cet appareil est destiné au blanchiment des dents en cabinet. Il doit être utilisé par des professionnels de la santé dentaire agréés uniquement. 2. CARACTERISTIQUES 1》 Source lumineuse LED : Émet une lumière bleue puissante, mais génère peu de chaleur. -
Página 17: Procedure De Montage
INSTALLATION : ILLUSTRATION PROCEDURE DE MONTAGE Placez verticalement le bras dans le pied. Tenez le bras de manière à ce qu’il soit stable, puis tournez le pied dans le sens inverse des aiguilles d’une montre, afin de visser fermement le bras. Placez la protection en caoutchouc. - Página 18 FIGURE PROCEDURE DE MONTAGE Insérez le manche en métal dans le trou du support. Serrez l’écrou sur la vis du manche en métal. Complétez en installant la tige sur le support. V.4: 20090723-FR...
- Página 19 ILLUSTRATION PROCEDURE DE MONTAGE Tournez la vis afin de régler la longueur du pied : Dans les sens des aiguilles d'une montre pour serrer ; Dans le sens inverse des aiguilles d'une montre pour desserrer. Placez convenablement le guide de distance.
-
Página 20: Fonctionnement
4. FONCTIONNEMENT 1》 Branchez le câble d’alimentation sur l’adaptateur secteur et branchez ce dernier sur le courant (AC 100V~240V). L’écran affiche alors « 05 » 2》 Ajustez la tige à la hauteur désirée. Le bras est conçu pour pouvoir ajuster la direction de la lumière à... -
Página 21: Resolution Des Pannes
6. RESOLUTION DES PANNES Afin de comprendre la cause d’une panne, il suffit à l’utilisateur de consulter le tableau ci-dessous. Pour tout problème qui ne serait pas indiqué dans ce tableau, veuillez contacter immédiatement votre revendeur pour un examen approfondi de l'appareil. Ne tentez pas de réparer l’appareil vous-même, cela pourrait engendrer une aggravation de l’état de l’appareil ou des blessures graves. -
Página 22: Garantie
8. GARANTIE 1》 L’appareil décrit dans ce manuel a été entièrement contrôlé et est conforme aux normes actuelles de ce produit. 2》 Cet appareil est garanti, dans le cadre de l'utilisation prévue, contre les défauts matériels et de fabrication d’origine, pour une période de 12 mois à compter de la date d’achat. -
Página 23: Declaration De Garantie
6F, 657, CHUNG-CHENG ROAD, HSIN-CHUANG CITY, 242 TAIPEI HSIEN, TAIWAN, R.O.C. TEL:886-2-29032774‧29010620 FAX:886-2-29033874‧29012208 E-mail:apoza@apoza.com.tw http://www.apoza.com DECLARATION DE GARANTIE L’appareil décrit ci-dessus a été entièrement contrôlé et est conforme aux normes actuelles de ce produit. Cet appareil est garanti, dans le cadre de l'utilisation prévue, contre les défauts matériels et de fabrication d’origine pour une période de 12 mois à... - Página 24 V.4: 20090723-es...
- Página 25 BT Cool EASY SISTEMA DE BLANQUEAMIENTO MANUAL DE USUARIO Esta unidad sólo puede ser instalada por dentistas y utilizada por personal médico o profesionales de laboratorio debidamente calificados. Deben leerse detenidamente todas las instrucciones de este MANUAL DE USUARIO antes del instalar y de poner en funcionamiento la unidad.
- Página 26 ÍNDICE PRESENTACIÓN∙∙∙∙∙∙∙∙∙∙∙∙∙∙∙ VENTAJAS∙∙∙∙∙∙∙∙∙∙∙∙∙∙∙∙∙∙ COMPONENTES e INSTALACIÓN∙∙∙∙∙∙∙∙ FUNCIONAMIENTO∙∙∙∙∙∙∙∙∙∙∙∙∙∙ MANTENIMIENTO∙∙∙∙∙∙∙∙∙∙∙∙∙∙∙ RESOLUCIÓN DE PROBLEMAS∙∙∙∙∙∙∙∙ ESPECIFICACIONES y ACCESORIOS∙∙∙∙∙∙ GARANTÍA∙∙∙∙∙∙∙∙∙∙∙∙∙∙∙∙∙∙ V.4: 20090723-ES...
-
Página 27: Presentación
1. PRESENTACIÓN Esta unidad ha sido diseñada para el blanqueamiento dental en la consulta. Sólo puede ser utilizada por profesionales dentales autorizados. 2. VENTAJAS 1》 Fuente de luz (LED): emite una luz azul, potente pero que no produce demasiado calor. Funcionamiento silencioso sin ningún ventilador que genere ruidos. -
Página 28: Instalación
INSTALACIÓN: FIGURA PROCEDIMIENTO DE MONTAJE Introduzca el brazo en la barra en posición vertical. Sujete el brazo firmemente y gire la barra en el sentido contrario a las agujas del reloj para que el brazo quede bien sujeto. Coloque el protector de goma. V.4: 20090723-ES... - Página 29 FIGURA PROCEDIMIENTO DE MONTAJE Inserte el mango de metal en el hoyo del soporte. Enrosque la tuerca sobre el tornillo del mango de metal. Complete instalando la barra sobre el soporte. V.4: 20090723-ES...
- Página 30 FIGURA PROCEDIMIENTO DE MONTAJE Gire la rosca para ajustar la longitud de la barra. En el sentido de las agujas del reloj: se cierra. En el sentido contrario a las agujas del reloj: se afloja. Coloque correctamente la guía distanciadora. Complete la instalación.
-
Página 31: Funcionamiento
4. FUNCIONAMIENTO 1》 Conecte el cable eléctrico a la alimentación y la fuente de alimentación a la potencia eléctrica adecuada (100 V~240 V CA). Aparecerá “05” en la pantalla. 2》 Ajuste la barra a la altura deseada. El brazo es concebido para poder ajustar la dirección de la luz a la derecha o a la izquierda. -
Página 32: Resolución De Problemas
6. RESOLUCIÓN DE PROBLEMAS Los usuarios pueden resolver fácilmente los siguientes problemas. En caso de producirse algún otro fallo, póngase en contacto con el distribuidor inmediatamente para realizar una revisión adicional. Cualquier reparación por parte del usuario puede empeorar el estado del aparato y producir daños o lesiones. FALLO CAUSA POSIBLE SOLUCIÓN... -
Página 33: Garantía
8. GARANTÍA 1》 El aparato descrito en el presente manual ha sido revisado completamente y está conforme a las especificaciones de producto actuales. 2》 Este aparato está garantizado para el uso que se ha previsto del mismo, contra defectos originales de material y de mano de obra durante un periodo de 12 meses a partir de la fecha de compra. -
Página 34: Declaración De Garantía
242 TAIPEI HSIEN, TAIWAN, R.O.C. ‧ TEL:886-2-29032774 29010620 ‧ FAX:886-2-29033874 29012208 E-mail:apoza@apoza.com.tw http://www.apoza.com DECLARACIÓN DE GARANTÍA El aparato que se describe a continuación ha sido revisado completamente y está conforme a las especificaciones de producto actuales. Este aparato está garantizado para el uso que se ha previsto del mismo, contra defectos originales de material y de mano de obra durante un periodo de 12 meses a partir de la fecha de compra. - Página 35 V.4: 20090723-es...
- Página 36 BT Cool EASY SISTEMA DE BRANQUEAMENTO MANUAL DO UTILIZADOR Esta unidade tem de ser instalada por dentistas certificados e utilizada apenas por pessoal médico licenciado e formado ou profissionais de laboratório. Todas as instruções neste MANUAL DO UTILIZADOR têm de ser lidas por completo antes da instalação ou funcionamento.
- Página 37 ÍNDICE APRESENTAÇÃO∙∙∙∙∙∙∙∙∙∙∙∙∙∙∙ VANTAGENS∙∙∙∙∙∙∙∙∙∙∙∙∙∙∙∙∙ CONSTITUIÇÃO e INSTALAÇÃO∙∙∙∙∙∙∙∙ FUNCIONAMENTO∙∙∙∙∙∙∙∙∙∙∙∙∙∙ MANUTENÇÃO∙∙∙∙∙∙∙∙∙∙∙∙∙∙∙∙ RESOLUÇÃO DE PROBLEMAS∙∙∙∙∙∙∙∙∙ ESPECIFICAÇÕES e ACESSÓRIOS∙∙∙∙∙∙∙ GARANTIA∙∙∙∙∙∙∙∙∙∙∙∙∙∙∙∙∙∙ V.4: 20090723-PT...
- Página 38 1. APRESENTAÇÃO Esta unidade foi criada para o branqueamento dos dentes num consultório. Esta unidade tem de ser utilizada apenas por profissionais dentistas. 2. VANTAGENS 1》 Fonte de iluminação LED: Emite uma luz azul, potente, mas que não cria muito calor.
-
Página 39: Instalação
INSTALAÇÃO: IMAGEM PROCESSO DE MONTAGEM Coloque o braço na haste verticalmente. Segure bem o braço e rode a haste no sentido inverso ao dos ponteiros do relógio para apertar bem o braço. Coloque o protector de borracha. V.4: 20090723-PT... - Página 40 IMAGEM PROCESSO DE MONTAGEM Insira o tubo de metal no buraco do apoio. Aperte a porca na linha do apoio em metal. Complete instalando a haste no apoio. V.4: 20090723-PT...
- Página 41 IMAGEM PROCESSO DE MONTAGEM Rode a rosca para ajustar o tamanho da haste: No sentido dos ponteiros do relógio: Aperta. No sentido inverso ao dos ponteiros do relógio: Desaperta. Coloque correctamente o Guia da Distância. Instalação completa. V.4: 20090723-PT...
-
Página 42: Manutenção
4. FUNCIONAMENTO 1》 Ligue o cabo da alimentação à alimentação e ligue a alimentação à corrente eléctrica correcta (AC 100V~240V). Aparece “05” no ecrã. 2》 Ajuste a haste à altura desejada. O braço é concebido para poder ajustar a direção da luz à direita ou à esquerda. 3》... -
Página 43: Resolução De Problemas
6. RESOLUÇÃO DE PROBLEMAS Os utilizadores podem simplesmente tratar das seguintes situações. Para qualquer outra situação que não esteja listada, por favor, contacte o seu revendedor imediatamente para uma verificação mais aprofundada. Qualquer reparação feita pelo utilizador pode piorar o estado do aparelho e dar origem a danos severos ou lesões. - Página 44 8. GARANTIA 1》 Este instrumento descrito neste manual foi completamente inspeccionado e encontra-se em conformidade com as especificações actuais do produto. 2》 Este instrumento tem a garantia para o seu uso designado contra defeitos de origem de material e mão-de-obra durante um período de 12 meses a partir da data de compra.
-
Página 45: Declaração De Garantia
6F, 657, CHUNG-CHENG ROAD, HSIN-CHUANG CITY, 242 TAIPEI HSIEN, TAIWAN, R.O.C. TEL:886-2-29032774‧29010620 FAX:886-2-29033874‧29012208 E-mail:apoza@apoza.com.tw http://www.apoza.com DECLARAÇÃO DE GARANTIA Este instrumento descrito abaixo foi completamente inspeccionado e encontra-se em conformidade com as especificações actuais do produto. Este instrumento tem a garantia para o seu uso designado contra defeitos de origem de material e mão-de-obra durante um período de 12 meses a partir da data de compra. - Página 46 V.4: 20090723-PT...
- Página 47 BT Cool EASY BLEICHSYSTEM BEDIENUNGSANLEITUNG Die Installation dieses Geräts darf ausschließlich durch qualifizierte Zahnärzte erfolgen. Der Betrieb ist lizenzierten medizinischen oder labortechnischen Fachkräften vorbehalten. Alle Hinweise in dieser BEDIENUNGSANLEITUNG sind vor Installation oder Betrieb aufmerksam zu lesen. V.4: 20090723-DE...
- Página 48 INHALT BESCHREIBUNG∙∙∙∙∙∙∙∙∙∙∙∙∙∙∙ EIGENSCHAFTEN∙∙∙∙∙∙∙∙∙∙∙∙∙∙∙ AUFBAU und INSTALLATION∙∙∙∙∙∙∙∙∙∙ BETRIEB∙∙∙∙∙∙∙∙∙∙∙∙∙∙∙∙∙∙∙ PFLEGE∙∙∙∙∙∙∙∙∙∙∙∙∙∙∙∙∙∙∙ FEHLERSUCHE∙∙∙∙∙∙∙∙∙∙∙∙∙∙∙∙ TECHNISCHE DATEN UND ZUBEHÖR∙∙∙∙∙∙ GARANTIE∙∙∙∙∙∙∙∙∙∙∙∙∙∙∙∙∙∙ V.4: 20090723-DE...
-
Página 49: Beschreibung
1. BESCHREIBUNG Das Gerät ist für das Bleichen von Zähnen in der Praxis ausgelegt. Das Gerät darf nur von lizenziertem Fachpersonal betrieben werden. 2. EIGENSCHAFTEN 1》 LED-Lichtquelle: strahlt blaues Licht aus, jedoch geringe Wärmeerzeugung. Geräuscharmer Betrieb ohne lauten Lüfter. 2》 Bogenform: ermöglicht Bleichen des nahezu kompletten Kiefers zu. - Página 50 INSTALLATION: ABBILDUNG AUFBAU Den Arm auf den Schaft stecken. Den Arm gerade halten und durch Drehen gegen den Uhrzeigersinn festschrauben. Die Gummiummantelung. V.4: 20090723-DE...
- Página 51 ABBILDUNG AUFBAU Setzen Sie die Metallhülle in die Öffnung des Fußes. Schrauben Sie die Mutter auf das Ende der Metallhülle. Beenden Sie die Installation des Lampenarms. V.4: 20090723-DE...
- Página 52 ABBILDUNG AUFBAU Zur Einstellung der Höhe des Fußes die Schraube drehen: Im Uhrzeigersinn: festziehen Entgegen dem Uhrzeigersinn lösen . Den Abstandshalter. Der Aufbau ist abgeschlossen. V.4: 20090723-DE...
-
Página 53: Betrieb
4. BETRIEB 1》 Das Stromkabel mit dem Netzteil verbinden und das Netzteil an eine geeignete Stromquelle anschließen (AC 100 V~240 V) Das Display zeigt „05“ an. 2》 Passen Sie den Lampenarm der gewünschten Höhe an. Der gekrümmte Hals dient zur besseren Drehung des Lampenkopfs (Bedienung) nach links und rechts. -
Página 54: Fehlersuche
6. FEHLERSUCHE Die folgenden Fehler können vom Benutzer leicht behoben werden. Bei allen anderen Problemen, die nicht unten aufgeführt sind, sofort an den Händler zur weiteren Überprüfung wenden. Selbst vorgenommene Reparaturversuche können zu einem schlechteren Zustand oder schwerer Beschädigung und ernsthaften Verletzungen führen. -
Página 55: Garantie
8. GARANTIE 1》 Das in dieser Anleitung beschriebene Gerät wurde vollständig geprüft und entspricht der aktuellen Produktspezifikation. 2》 Bei bestimmungsgemäßem Gebrauch wird für dieses Gerät eine 12-monatige Garantie gegen Material- und Verarbeitungsfehler ab Kaufdatum gewährt. 3》 Um Verzögerungen bei der Bearbeitung eines Anspruchs auf diese Garantie zu verhindern, sollte zum Zeitpunkt des Kaufes die Anmeldekarte ausgefüllt und zurückgesendet werden. - Página 56 6F, 657, CHUNG-CHENG ROAD, HSIN-CHUANG CITY, 242 TAIPEI HSIEN, TAIWAN, R.O.C. TEL:886-2-29032774‧29010620 FAX:886-2-29033874‧29012208 E-Mail:apoza@apoza.com.tw http://www.apoza.com GARANTIEERKLÄRUNG Das nachfolgend beschriebene Gerät wurde vollständig geprüft und entspricht der aktuellen Produktspezifikation. Bei bestimmungsgemäßem Gebrauch wird für dieses Gerät eine Garantie gegen Material- und Verarbeitungsfehler über einen Zeitraum von 12 Monaten ab Kaufdatum gewährt.
- Página 57 V.4: 20090723-DE...
- Página 58 BT Cool EASY SISTEMA DI SBIANCAMENTO MANUALE UTENTE Questo apparecchio può essere installato solo da dentisti certificati ed utilizzato esclusivamente da professionisti medici o di laboratorio autorizzati che abbiano ricevuto un’adeguata formazione. Tutte le istruzioni contenute in questo MANUALE UTENTE devono essere lette in modo approfondito prima dell’installazione e dell’uso.
- Página 59 INDICE PRESENTAZIONE∙∙∙∙∙∙∙∙∙∙∙∙∙∙∙ VANTAGGI∙∙∙∙∙∙∙∙∙∙∙∙∙∙∙∙∙∙ COMPONENTI E INSTALLAZIONE∙∙∙∙∙∙∙ FUNZIONAMENTO∙∙∙∙∙∙∙∙∙∙∙∙∙∙∙ MANUTENZIONE∙∙∙∙∙∙∙∙∙∙∙∙∙∙∙ RISOLUZIONE DEI PROBLEMI∙∙∙∙∙∙∙∙∙ SPECIFICHE e ACCESSORI∙∙∙∙∙∙∙∙∙∙ GARANZIA∙∙∙∙∙∙∙∙∙∙∙∙∙∙∙∙∙∙ V4: 20090723-IT...
-
Página 60: Presentazione
1. PRESENTAZIONE Questo apparecchio è destinato allo sbiancamento dei denti presso gli studi medici. L’unità deve essere messa in funzione solo da dentisti professionisti autorizzati. 2. VANTAGGI 1》 Sorgente luminosa a LED: emette una luce azzurra potente ma con modesta emissione di calore. -
Página 61: Procedura Di Montaggio
INSTALLAZIONE: FIGURA PROCEDURA DI MONTAGGIO Inserire il braccio nello stelo verticalmente. Tenere fermo il braccio, ruotare lo stelo in senso antiorario ed avvitare. Mettere le protezioni in gomma. V4: 20090723-IT... - Página 62 FIGURA PROCEDURA DI MONTAGGIO Inserire la ghiera in metallo nel foro del supporto. Avvitare l'anello filettato sulla ghiera in metallo. Completare l’installazione inserendo lo stelo nel supporto. V4: 20090723-IT...
- Página 63 FIGURA PROCEDURA DI MONTAGGIO Ruotare la ghiera filettata per regolare l’altezza dello stelo: • In senso orario: per stringere. • In senso antiorario: per allentare. Applicare correttamente il distanziatore, come illustrato nella figura. Installazione completata. V4: 20090723-IT...
- Página 64 4. FUNZIONAMENTO 1》 Collegare il cavo d’alimentazione all’alimentatore ed inserire la spina in una presa adeguata (100V~240V CA). Sul display sarà allora visualizzato “05”. 2》 Posizionare lo stelo all'altezza desiderata. Il braccio è stato concepito al fine di poter dirigere adeguatamente la lampada a destra o a sinistra. 3》...
-
Página 65: Risoluzione Dei Problemi
6. RISOLUZIONE DEI PROBLEMI Gli utenti possono facilmente gestire le seguenti situazioni. Per tutti gli altri guasti non riportati nell’elenco, rivolgersi immediatamente al rivenditore per ulteriori controlli. Qualsiasi riparazione effettuata dall’utente potrebbe determinare un peggioramento della situazione e gravi danni o lesioni. GUASTO CAUSA POSSIBILE SOLUZIONE... - Página 66 8. GARANZIA 1》 Lo strumento descritto nel presente manuale è stato completamente ispezionato ed è conforme alle attuali specifiche per il prodotto. 2》 Questo strumento è garantito, per l’utilizzo a cui e’ destinato, contro i difetti dei materiali e della lavorazione per un periodo di 12 mesi dalla data dell’acquisto.
-
Página 67: Dichiarazione Di Garanzia
6F, 657, CHUNG-CHENG ROAD, HSIN-CHUANG CITY, 242 TAIPEI HSIEN, TAIWAN, R.O.C. TEL:886-2-29032774‧29010620 FAX:886-2-29033874‧29012208 E-mail:apoza@apoza.com.tw http://www.apoza.com DICHIARAZIONE DI GARANZIA Lo strumento descritto qui di seguito è stato completamente ispezionato ed è conforme alle attuali specifiche per il prodotto. Questo strumento è garantito, per l’utilizzo a cui è destinato, contro i difetti originali dei materiali e della lavorazione per un periodo di 12 mesi dalla data dell’acquisto.