Tabla de contenido
Publicidad
Idiomas disponibles
Idiomas disponibles
Enlaces rápidos
EGWW - 0712 / 1012 / 1312 / 1512
IT IT
MANUALE INSTALLAZIONE ED USO
MANUALE INSTALLAZIONE ED USO
GB
GB
INSTALLATION AND USE MANUAL
INSTALLATION AND USE MANUAL
ES
ES
MANUAL DE INSTALACION Y USO
MANUAL DE INSTALACION Y USO
FR
FR
MANUEL D'INSTALLATION ET D'UTILISATION
MANUEL D'INSTALLATION ET D'UTILISATION
WALL FAN-COIL
Wall-mounted Fan Coil
Publicidad
Tabla de contenido

Resumen de contenidos para emmeti EGWW-0712
- Página 1 WALL FAN-COIL EGWW - 0712 / 1012 / 1312 / 1512 Wall-mounted Fan Coil IT IT MANUALE INSTALLAZIONE ED USO MANUALE INSTALLAZIONE ED USO INSTALLATION AND USE MANUAL INSTALLATION AND USE MANUAL MANUAL DE INSTALACION Y USO MANUAL DE INSTALACION Y USO MANUEL D’INSTALLATION ET D’UTILISATION MANUEL D’INSTALLATION ET D’UTILISATION...
- Página 2 IT IT pagina 3 página 59 Vi ringraziamo per la fiducia concessaci nell’acquisto di questo prodotto. Le agradecemos la confianza que nos ha otorgado al comprar esto produc- Vi invitiamo a leggere attentamente questo manuale dove sono riportate le to. Le invitamos a leer atentamente este manual donde le explicamos las caratteristiche tecniche e tutte le informazioni utili per ottenere un corretto características técnicas y toda la información necesaria para obtener un funzionamento.
- Página 3 IT IT INDICE 1 GENERALE ........5 4 MANUTENZIONE DEL VENTILCONVETORE ..22 1.1 Avvertenze generali 4.1 Pulizia del telecomando 1.2 Regole fondamentali di sicurezza 4.2 Pulizia dell’unità interna 1.3 Denominazione dei componenti 4.3 Pulizia dei filtri dell’unità interna 1.4 Composizione della fornitura 5 AVVERTENZE ......
-
Página 4: Informazioni Utili
IT IT PREMESSA Dichiarazione di conformità Descrizione dell’apparecchio I Ventilconvettori a parete sono conformi alle Direttive Europee: I ventilconvettori sono apparecchi dedicati ad utenze civili di elevato li- 2014/30/CE relativa alla compatibilità elettromagnetica vello qualitativo. L’eleganza del disegno estetico, l’elettronica di gestione 2014/35/CE relativa alla bassa tensione e la componentistica di prim’ordine consentono facile ambientabilità... -
Página 5: Avvertenze Generali
IT IT 1. GENERALE 1.1 Avvertenze generali 1.2 Regole fondamentali di sicurezza Dopo aver tolto l’imballo assicurarsi dell’integrità e della Ricordiamo che l’utilizzo di prodotti che impiegano energia completezza del contenuto. In caso di non rispondenza elettrica comporta l’osservanza di alcune regole fondamentali rivolgersi all’Agenzia che ha venduto l’apparecchio. -
Página 6: Denominazione Dei Componenti
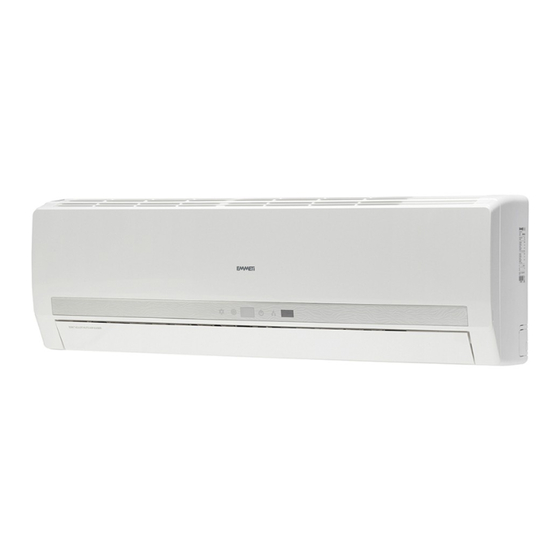
IT IT 1. GENERALE 1.3 Denominazione dei componenti Pulsanti e spie ³ 1 Ricevitore del segnale ad infrarossi inviato dal telecomando 2 Spia rossa di alimentazione, diventa verde quando si accende il condizionatore ´ 3 Display temperatura Funzionamento in raffreddamento Funzionamento in riscaldamento Funzionamento in deumidificazione 7 Pulsante di riserva. -
Página 7: Connessioni Elettriche
IT IT 1. DESCRIZIONE DEI COMPONENTI 1. GENERALE Connessioni elettriche I cavi hanno lunghezze ridotte Agire con cautela nella rimozione del coperchio di protezione degli indicatori luminosi. Ingresso collegamenti elettrici Morsettiera Pressacavo Connessioni idrauliche EGWW - 0712 - 1012 Connessioni idrauliche EGWW - 1312 - 1512 Vista posteriore Vista posteriore Uscita Ingresso... -
Página 8: Ricevimento Del Prodotto E Movimentazione
IT IT 1. GENERALE Dati tecnici Modelli Emmeti SILENCE EGWW-0712 EGWW-1012 EGWW-1312 EGWW-1512 2,20 2,60 3,70 4,10 kW (max) Pot. frigorifera totale (1) 1,90 2,00 3,10 3,70 kW (med) 1,60 1,70 2,80 3,10 kW (min) 1,70 1,90 2,85 3,20 kW (max) Pot. - Página 9 IT IT 1. DESCRIZIONE DEI COMPONENTI 1. GENERALE 1.6 Schema elettrico - EGWW 0712 / 1012 / 1312 / 1512 DIP SWITCH 4 DIP Switch per modificare le funzioni Switch Default Se la temperature ambiente è soddisfatta il ventilatore si ferma. Se la temperature ambiente è...
-
Página 10: Collegamenti Idraulici
- Operazioni non adeguate possono provocare gravi danni all’utente. - Spostare il tubo di scarico dell’attacco di destra a quello di sinistra - La lista dei centri assistenza è disponibile nel sito web www.emmeti.com. (Fig.2) riposizionando la molla di fissaggio. - Página 11 IT IT 1. DESCRIZIONE DEI COMPONENTI 2. INSTALLATORE Fig. 5 Inserire nel foro, praticato nel muro, un tubo di plastica di Agganciare qui protezione. Assicurarsi che il tratto di parete non interessi elementi portanti della costruzione, tubazioni o linee elettriche Al termine dei lavori è...
-
Página 12: Collegamenti Elettrici
IT IT 2. INSTALLATORE Fig. 9 Collegamenti a cura Collegamenti eseguiti dell’installatore in fabbrica Ingresso 1 Ventilatore 2 Scambiatore di calore 3 Sfiato aria manuale 4 Giunto di collegamento Uscita 5 Valvola di intercettazione a sfera (non fornito a corredo) Uscita 6 Valvola motorizzata (non fornita a corredo) Valvola motorizzata... -
Página 13: Caricamento E Svuotamento Dell'impianto
IT IT 1. DESCRIZIONE DEI COMPONENTI 2. INSTALLATORE 2.4 Caricamento e svuotamento dell’impianto ACCESO Caricamento - Posizionare l’interruttore generale dell’impianto su “spento” - Verificare che il rubinetto di scarico impianto sia chiuso - Sollevare il pannello frontale SPENTO - Rimuovere lo sportello per accedere alla valvola di sfiato dell’aria - Aprire la valvola di sfiato dell’aria ruotando la vite in senso antiorario - Iniziare il riempimento aprendo lentamente il rubinetto di carico acqua dell’impianto... -
Página 14: Uso Del Ventilconvettore
IT IT 3. USO DEL VENTILCONVETTORE 3.1 Telecomando ad infrarossi Trasmettitore segnale infrarosso Display a cristalli liquidi Pulsante ON/OFF AUTO Accensione e spegnimento del ventilconvettore. Pulsanti Pulsante di impostazione temperatura e ora. Pulsante FAN Selezione della velocità... -
Página 15: Inserimento Delle Batterie Nel Telecomando
IT IT 3. USO DEL VENTILCONVETTORE 1. DESCRIZIONE DEI COMPONENTI 3.2 Inserimento delle batterie nel telecomando Simboli del display Le batterie sono state progettate e prodotti con materiale di alta qualità e i componenti possono essere riciclati e/o riutilizzati. Il simbolo del cestino barrato indica che il prodotto ( batterie ) alla fine della propria vita utile (esaurite) deve essere separato dai rifiuti domestici e deve essere conferito in un centro di raccolta... -
Página 16: Avviamento Del Ventilconvettore
IT IT 3. USO DEL VENTILCONVETTORE 3.3 Avviamento del ventilconvettore • Assicurarsi della corretta alimentazione elettrica del’unità. • Premendo il pulsante light si accende la spia ON/OFF di colore rosso (l’unità è spenta luce rossa). • Premere sul telecomando il pulsante ON/OFF. L’invio del segnale infrarosso è... -
Página 17: Funzionamento In Raffreddamento
IT IT 3. USO DEL VENTILCONVETTORE 1. DESCRIZIONE DEI COMPONENTI 3.4 Funzionamento in ventilazione AUTO 1 Premendo il pulsante MODE selezionare il modo di funzionamento Il ventilconvettore ricircola l’aria dell’ambiente senza riscaldarla o raffreddarla. 2 La temperatura può essere selezionata ma non ha alcun effetto 3 Premendo il pulsante FAN selezionare la velocità... - Página 18 IT IT 3. USO DEL VENTILCONVETTORE 3.6 Funzionamento in riscaldamento Premendo il pulsante MODE selezionare il modo di funzionamento AUTO Con i pulsanti impostare la temperatura desiderata nell’ambiente (16÷30 °C). La temperatura può essere impostata di grado in grado. 3 Premendo il pulsante FAN selezionare la velocità...
- Página 19 IT IT 1. DESCRIZIONE DEI COMPONENTI 3. USO DEL VENTILCONVETTORE 3.7 Funzionamento in deumidificazione Premendo il pulsante MODE selezionare il modo di funzionamento Con i pulsanti impostare la temperatura desiderata nell’ambiente (16÷30 °C). La temperatura può essere impostata di grado in grado. 3 La velocità...
-
Página 20: Programmazione Del Timer
IT IT 3. USO DEL VENTILCONVETTORE Programmazione del Timer 3.9.1 Accensione programmata del ventilconvettore Il TIMER può essere impostato a qualunque ora del giorno. Premere il pulsante TIMER ON una volta. Compariranno il settore del dispay relativo all’orologio, ed il simbolo lampeggiante. - Página 21 IT IT 1. DESCRIZIONE DEI COMPONENTI 3. USO DEL VENTILCONVETTORE 3.11 Funzione LOCK Premere contemporaneamente i tasti + e – per bloccare o sbloccare la tastiera del telecomando. Se il telecomando è bloccato, l’icona è visualizzata sul display. Per verificare che la tastiera sia bloccata premere un tasto qualsiasi, l’icona lampeggerà...
-
Página 22: Pulizia Del Telecomando
IT IT 4. MANUTENZIONE DEL VENTILCONVETTORE 3. USO DEL VENTILCONVETTORE Attenzione! Tutte le operazioni di manutenzione devono essere eseguite dopo aver tolto l’alimentazione elettrica al ventilconvettore. Ogni anno è opportuno un intervento di manutenzione straordinaria per la pulizia integrale del ventilconvettore interpellando il rivenditore o il centro di assistenza tecnica autorizzato. - Página 23 IT IT 4. MANUTENZIONE DEL VENTILCONVETTORE Prima di qualsiasi intervento di manutenzione togliere l’alimentazione al ventilconvettore. Utilizzare il ventilconvettore solo per climatizzare il locale. Non utilizzare il ventilconvettore per altri scopi, per esempio: asciugare il bucato, conservare i cibi, allevare animali o coltivare vegetali. Evitare di bloccare le griglie di entrata e uscita dell’aria.
- Página 24 IT IT 4. MANUTENZIONE DEL VENTILCONVETTORE Scegliere la temperatura ambiente più adatta. Attenzione a locali occupati da bambini, ammalati e/o anziani. Non versare o spruzzare acqua sul ventilconvettore. Non installare il ventilconvettore in prossimità di fonti eccessive di vapore (acqueo, olii, ecc.) Eventuali manutenzioni devono essere eseguite solamente da personale qualificato Non usate l’interuttore di emergenza dell’unità...
- Página 25 IT IT 5. AVVERTENZE Non appoggiare vasi di fiori o contenitori d’acqua sopra l’unità Non indirizzare il flusso dell’aria direttamente sulle persone, piante e animali. L’apparecchio non è destinato a essere usato da persone (bambini compresi) le cui capacità fisiche, sensoriali o mentali siano ridotte, oppu- re con mancanza di esperienza o di conoscenza, a meno che esse abbiano potuto beneficiare, attraverso l’intermediazione di una persona responsabile della loro sicurezza, di una sorveglianza o di istruzioni riguardanti l’uso dell’apparecchio.
- Página 26 IT IT 1. DESCRIZIONE DEI COMPONENTI 5. AVVERTENZE Per evitare scosse elettriche o incendi, i seguenti punti devono essere ricordati e strettamente osservati. Non tirare il cavo per staccare la spina. Non far funzionare l’unità se la spina non è inserita correttamente. Per accendere o spegnere l’unità, non utilizzare la spina.
-
Página 27: Anomalie Di Funzionamento
IT IT 1. DESCRIZIONE DEI COMPONENTI 6. PRECAUZIONI PER LA SICUREZZA In particolari condizioni il ventilconvettore può presentare anomalie di funzionamento che spesso sono apparenti o determinate da cause accidentali o, più spesso, banali. Attenzione! Prima di richiedere l’intervento del centro assistenza è consigliabile eseguire facili controlli sia per usufruire in continuazione e al meglio delle prestazioni del ventilconvettore, sia per evitare inutili interventi di assistenza. -
Página 29: Condizioni Di Garanzia
Dichiara inoltre di aver preso visione della Informativa sui dati personali disponibile anche sul sito internet di Emmeti S.p.A. EMMETI spa - Via brigata Osoppo, 166 - 33074 Vigonovo frazione di Fontanafredda (PN) - Italia - Tel.0434567911 - Fax 0434567901 - www.emmeti.com... - Página 31 INDEX 1 GENERAL ........33 4 MAINTENANCE OF FAN ....51 1.1 General remarks 4.1 Cleaning the remote control 1.2 Basic safety rules 4.2 Cleaning the indoor unit 1.3 Access to connections 4.3 Cleaning the filters of the indoor unit 1.4 Contents Of The Supply 5 WARNINGS ........51 1.5 Receiving and handling the product 1.6 Wiring diagrams...
- Página 32 INTRODUCTION INFORMATION NOTE WEEE DIRECTIVE APPLICATION Unit description Directive 2012/19 / EU The fan coils are appliances intended for high quality civil use. The ele- gant aesthetic design, the control electronics and the top class compo- nents facilitate its location and guarantee optimum conditions of comfort. INDOOR UNIT •...
-
Página 33: General Remarks
1. GENERAL 1.1 General remarks 1.2 Basic safety rules After having removed the packaging, check that the con- Using electrically-operated products implies the observance of tents are intact and complete. In the event of non-com- certain basic safety rules, such as those given below: pliance, contact the Agency which sold you the appliance The appliances must be installed by a qualified company Children and unassisted disabled persons must not use... -
Página 34: Name Of Parts
1. GENERAL 1.3 Name of parts Buttons and indicator lights ³ 1 Infrared signal receiver sent by remote control 2 Red power indicator light, turns green when the air conditioner is switched on ´ 3 Temperature display Cooling mode Heating mode Dehumidifying mode 7 Function reserve The reserve function is implemented by acting on... -
Página 35: Contents Of The Supply
1. GENERAL Electrical connections The cables are shorter Take care when removing the protective cover from the indi- cator lights. Electric connection input Terminal block Cable gland Hydraulic connections EGWW - 0712 - 1012 Hydraulic connections EGWW - 1312 - 1512 Rear view Rear view output... -
Página 36: Receiving And Handling The Product
1. GENERAL Technical Data SILENCE EGWW-0712 EGWW-1012 EGWW-1312 EGWW-1512 Emmeti Models 2,20 2,60 3,70 4,10 kW (max) Refrigerating capacity (1) 1,90 2,00 3,10 3,70 kW (med) 1,60 1,70 2,80 3,10 kW (min) 1,70 1,90 2,85 3,20 kW (max) Refrigerating capacity... - Página 37 1. GENERAL 1.6 Wiring diagrams - EGWW 0712 / 1012 / 1312 / 1512 DIP SWITCH 4 - Dip Switch to change the functions Switch Default If the ambient temperature is satisfied the fan If the ambient temperature is satisfied the fan continues to run, stops.
-
Página 38: Unit Installation
2. INSTALLER 2.1 Installation To move the drain pipe to the left side connection: - Use a tool to remove the fixing spring in the condensation drain pipe (Fig.1) Locating the indoor unit The place of installation must be established by the installation designer/ - Remove the cap on the left side connection services engineer or by a technically competent person and must take - Move the drain pipe of the right side connection to that on the left (Fig.2) - Página 39 2. INSTALLER Fig. 5 Pass a protective plastic pipe through the hole in the wall. Hook on here Ensure that the section of wall in question has no bearing structural members, pipes or electric cables. At the end of work, it is recommended to close the passa- ge holes drilled in the wall with the provided sealant - To facilitate carrying out the water connections, keep Fig.
-
Página 40: Electrical Connections
2. INSTALLER Connections carried out by Connections carried out in the the installer factory Inlet 1 Fan 2 Heat exchanger 3 Manual bleed 4 Joint (Not included) Outlet 5 Ball shutoff valve (Not included) Outlet 6 Motorized valve (Not included) Motorized valve EGWW 0712 / 1012 / 1312 / 1512 Electrical connections... -
Página 41: First Time Of Switching On
2. INSTALLER 2.4 First time of switching on Loading - Switch off the appliance using the remote control. - Check that the drain tap is closed - Take out the mesh filters. - Remove the dust with a vacuum cleaner. - Replace the filters, proceeding in the reverse order.- Start filling by slowly opening the installation water supply tap outside the appliance - When water starts to come out the air valve, close it immediately and... -
Página 42: Infrared Remote Control
2. INSTALLER 3.1 Infrared remote control Infrared signal transmitter Liquid crystal display ON/OFF key AUTO For turning the fan on and off. - + Key Keys for setting temperature and hour. FAN key Selects the fan speed. - Página 43 3. USE OF FAN 3.2 How to insert batteries in the infrared remote control Symbols on the display The batteries have been designed and produced with high quality materials and the components can be recycled and/or re-used. The symbol of the crossed-out rubbish bin indicates that the product (batteries) at the end of its useful life must be handled separately from domestic waste and must be sent to a separate waste collection center, as provided by...
- Página 44 3. USE OF FAN 3.3 Starting the fan • Check that the electrical power supply to the unit is correct. • Pressing the button turns the light ON / OFF red (the unit is off red light). •...
- Página 45 3. USE OF FAN 3.4 Operation in ventilation mode 1 Press the MODE key to select the operating mode. AUTO The fan recirculates the ambient air without heating or cooling it. 2 The temperature can be selected but is not effect 3 Pressing the FAN button, select the fan speed: AUTO Auto*...
- Página 46 3. USE OF FAN 3.6 Operation in heating mode “Heat” Press the MODE key to select the operating mode. AUTO Use the keys to set the desired room temperature (16÷30 °C). The temperature can be set degree by degree. 3 Pressing the FAN button, select the fan speed: AUTO Auto*...
-
Página 47: Setting The Clock
3. USE OF FAN 3.7 Operation in dehumidification mode “Dry” Press the MODE key to select the . operating mode Use the keys to set the desired room temperature (16÷30 °C). The temperature can be set degree by degree. 3 The fan speed and set to MIN. -
Página 48: Programming The Timer
3. USE OF FAN Programming the Timer 3.9.1 Programmed startup of the fan The TIMER can be set for any time of the day . Press the TIMER key once. The display will show the section relating to the clock, together with the symbol (flashing). -
Página 49: Autorestart Function
3. USE OF FAN 3.11 Function LOCK – Press the keys at the same time to lock or unlock the remote control keypad. If the remote control is locked, the icon appears on the display. To check that the keypad is locked, press any key, the icon will flash 3 times. -
Página 50: Cleaning The Remote Control
It is recommended to carry out, at least once a year, a complete maintenance operation for the overall cleaning of the fan. To this purpose, call your retailer or Emmeti technical assistance service. 4.1 Cleaning the remote control • To clean the remote control, use a dry cloth. Do not use detergents or glass-cleaning products. - Página 51 5. WARNINGS Prior to any maintenance operation, disconnect the power supply from the fan. Use the fan only to air-condition the room. Do not use the fan for other purposes, such as: dry clothes, preserve food, raise animals or grow vegetables. Do not obstruct the air inlet and outlet grilles.
- Página 52 1. DESCRIZIONE DEI COMPONENTI 5. WARNINGS Choose the most suitable room temperature. Pay special attention to rooms where children or sick and elderly people are staying Do not pour or spray water on the fan. Do not install the fan in proximity to excessive sources of fumes (steam, oils etc.) Any maintenance should be carried out only by qualified personnel.
- Página 53 1. DESCRIZIONE DEI COMPONENTI 5. SAFETY PRECAUTIONS Do not put vases of flowers or water containers on top of the unit. Check that the fan is solidly mounted. Do not lean objects on it or climb on it. Do not direct the airflow directly at people, plants or animals. This appliance is not intended for use persons ( including children ) with reduded physical swnsory or mental capabilities, or lack of expe- rience and knowledge, unless they have been given supervisor or instruction concerning use of the appliance by a person responsible for their safety.
- Página 54 1. DESCRIZIONE DEI COMPONENTI 6. SAFETY PRECAUTIONS To avoid electrical shock or fires, following points have to be strictly observed. Do not pull the power cord from the mains to unplug the unit. Do not switch on the unit if plug is not firmly inserted into mains socket.
- Página 55 1. DESCRIZIONE DEI COMPONENTI 7. TROUBLESHOOTING Attention! Under particular conditions the fan might show malfunctions which are Before calling the technical service for assistance, it is suggested to carry often evident or determined by accidental causes or, more often, simple out a few simple checks, this in order to keep on using the fan at the best of ones.
- Página 57 8 days of their discovery, unless otherwise agreed in writing and confirmed by both the parties. EMMETI spa Via brigata Osoppo, 166 - 33074 Vigonovo frazione di Fontanafredda (PN) - Italia - Tel.0434567911 - Fax0434567901 - www.emmeti.com...
- Página 58 GUARANTEE CERTIFICATE Slip A Model Serial Number Date installation/first running Seller Slip “A” for End User To be kept Company (Please print in block Street letters). Town Country To make the guarantee valid we ask you to follow the below rule: - Fill in the Certificate of Guarantee in a clear and readable way, by Installer.
- Página 59 ÍNDICE 1 GENERAL ........61 4 MANTENIMIENTO DE LA FAN 1.1 Advertencias Generales 4.1 Limpieza del mando a distancia 1.2 Reglas fundamentales de seguridad 4.2 Limpieza de la unidad interna 1.3 Acceso a los conexionados 4.3 Limpieza de los filtros de la unidad interna 1.4 Composición de la provisión 5 ADVERTENCIAS ......
-
Página 60: Informaciones Útiles
PREMISA Descripción del aparato Declaración de conformidad Los ventiloconvectores son aparatos destinados para utilizadores do- Los ventilconvectore han sido fabricados conforme a la directiva europea mésticos de nivel cualitativo elevado. La elegancia del diseño estético, 2014/30/CE la electrónica de control y los componentes de primera calidad, permiten relativa a la compatibilidad electromagnética y la directiva 2014/35/CE una fácil ambientación y un elevado nivel de confort. -
Página 61: Advertencias Generales
1. GENERAL 1.1 Advertencias Generales 1.2 Reglas fundamentales de seguridad Luego de haber quitado el embalaje, asegurarse de la Se recuerda que el uso de productos que utilizan energía eléc- integridad del contenido; en caso de no correspondencia trica conlleva el cumplimiento de algunas reglas fundamenta- del contenido, dirigirse a la Agencia que le ha vendido el les de seguridad, tales como: aparato. -
Página 62: Acceso A Los Conexionados
1. GENERAL 1.3 Acceso a los conexionados Pulsadores y pilotos ³ 1 Receptor de señal por infrarojos enviada desde el mando 2 Piloto rojo de alimentación, pasa a verde al encender el acondicionador. ´ 3 Display temperatura Funcionamiento en refrigeración Funcionamiento en calefacción Funcionamiento en deshumidificación 7 Botón de emergencia. -
Página 63: Composición De La Provisión
1. GENERAL Conexiones elettriche Los cables son cortos Quite con cuidado la tapa de protección de los indicadores luminosos. Entrada conexionado eléctrico válvula agua/Relé verano/ Relé/invierno Terminal Prensaestopas Conexiones frigoríficas EGWW - 0712 - 1012 Conexiones frigoríficas EGWW - 1312 - 1512 Vista posterior Vista posterior Salida admisión... -
Página 64: Recepción Del Producto Y Manipulación
1. GENERAL Datos técnicos Modelos Emmeti SILENCE EGWW-0712 EGWW-1012 EGWW-1312 EGWW-1512 2,20 2,60 3,70 4,10 kW (max) Capacidad de enfriamiento total (1) 1,90 2,00 3,10 3,70 kW (med) 1,60 1,70 2,80 3,10 kW (min) 1,70 1,90 2,85 3,20 kW (max) Capacidad de refrigeración sensible (1) - Página 65 1. DESCRIZIONE DEI COMPONENTI 1. GENERAL 1.6 Esquemas de conexión - EGWW 0712 / 1012 / 1312 / 1512 DIP SWITCH 4 Dip Switch para cambiar las funciones Switch Default Si la temperatura ambiente está satisfecho detiene el Si la temperatura ambiente se satisface el ventilador ventilador.
-
Página 66: Instalador
2. INSTALADOR 2.1 Instalación Para trasladar la tubería de desagüe en la conexión de izquierda: - Utilizar una herramienta para retirar el muelle de fijación que hay en la Posicionamiento de la unidad interior tubería de desague (Fig.1) El lugar de la instalación debe ser establecido por el diseñador industrial - Retirar el tapón que hay en la conexión de izquierda del sistema o por una persona competente en la materia, considerando las - Trasladar la tubería de desague de la conexión de derecha a la izquierda... - Página 67 1. DESCRIZIONE DEI COMPONENTI 2. INSTALADOR Fig. 5 Introducir, en el taladro realizado en la pared, un tubo de plástico de protección. Enganchar aquí Controlar que el trecho de pared no involucre elementos portadores de la construcción, tuberías o líneas eléctricas. Al terminar los trabajos es aconsejable tapar los agujeros de pasaje realizados en la pared con el sellador sumini- strado.
-
Página 68: Conexionados Eléctricos
2. INSTALADOR Conexionados que deben Conexionados realizados ser realizados por cuenta en fábrica del instalador Entrada 1 Ventilador 2 Intercambiador de calor 3 Purgador de aire manual 4 Acoplamiento de conexionados (No se suministra Salida adjunto) Salida 5 Válvula de cierre de bola (No se suministra adjunto) Válvula motorizada 6 Válvula motorizada (no suministrado adjunto) Fig. -
Página 69: Carga Y Descarga Planta
1. DESCRIZIONE DEI COMPONENTI 2. INSTALADOR 2.4 Carga y descarga planta ENCENDIDO Carga - Antes de iniciar la carga del sistema, situar el interruptor general en “apagado”. - Controlar que la llave de evacuación del sistema esté cerrada APAGADO - Retirar la carcasa (ver párrafo precedente) - Abrir la válvula de purga del ventiloconvector y del sistema (véase figura) - Iniciar el llenado, abriendo lentamente la llave de carga del agua del sistema que se encuentra en el exterior del aparato... -
Página 70: Mando A Distancia De Infrarrojos
3. USO DE FAN 3.1 Mando a distancia de infrarrojos Transmisor de señales de infrarrojos Pantalla de cristal líquido Pulsador ON/OFF AUTO Encendido y apagado del climatizador. Pulsador Pulsador para fijar la temperatura e la horas ... -
Página 71: Introducción De Las Pilas En El Mando A Distancia
1. DESCRIZIONE DEI COMPONENTI 3. USO DE FAN 3.2 Introducción de las pilas en el mando Símbolos de la pantalla a distancia Las pilas han sido diseñadas y producidas con material de alta calidad, y sus componentes pueden ser reciclados y/o reutilizados.El símbolo de la papelera tachada indica que el producto (pilas), al final de su vida útil (agotadas), debe separarse de los residuos domésticos y entregarse a... -
Página 72: Puesta En Marcha Del Climatizador
3. USO DE FAN 3.3 Puesta en marcha del climatizador ¡Atención! • Para que la unidad interna reciba correctamente las señales, el mando a distancia debe estar orientado hacia ésta. • Evite que se interponga cualquier obstáculo entre el mando a distancia y el receptor de la unidad interna. -
Página 73: Funcionamiento En Ventilación
1. DESCRIZIONE DEI COMPONENTI 3. USO DE FAN 3.4 Funcionamiento en ventilación 1 Pulsando el pulsador MODE seleccionar el modo de funcionamiento AUTO . El climatizador hace recircular el aire del ambiente sin calentarlo o enfriarlo. 2 La temperatura puede ser seleccionada, pero no tiene ningún efecto 3 Presionado el pulsador FAN seleccionar la velocidad deseada del ventilador: AUTO... -
Página 74: Funcionamiento En Calefacción
3. USO DE FAN 3.6 Funcionamiento en calefacción Pulsando el pulsador MODE seleccionar el modo de funcionamiento AUTO Con los pulsadores fije la temperatura deseada en el ambiente (16÷30 °C). La temperatura puede fijarse de grado en grado. 3 Al pulsar el botón FAN para seleccionar la velocidad del ventilador deseada: AUTO... -
Página 75: Fijación Del Reloj
1. DESCRIZIONE DEI COMPONENTI 3. USO DE FAN 3.7 Funcionamento in deshumidificación Pulsando el pulsador MODE seleccionar el modo de funcionamiento Con los pulsadores fije la temperatura deseada en el ambiente (16÷30 °C). La temperatura puede fijarse de grado en grado. - válvula abierta Ts+2 - ventilador en función velocidad MIN... -
Página 76: Programación Del Timer
3. USO DE FAN Programación del Timer 3.9.1 Encendido programado del climatizador El TIMER puede fijarse a cualquier hora del día. Pulsar el pulsador TIMER una vez. Aparecerán el sector de la pantalla relativo al reloj, el mensaje AM y el símbolo parpadeante. -
Página 77: Funcionamiento Lock
3. USO DE FAN 3.11 Funcionamiento LOCK Pulse simultáneamente los botones + y – para bloquear o desbloquear el teclado del mando a distancia. Si el mando a distancia está bloqueado, aparece el icono aparece el icono en el display.. Para comprobar que el teclado está... -
Página 78: Mantenimiento De La Fan
4. MANTENIMIENTO DE LA FAN ¡Atención! Todas las operaciones de mantenimiento deben ser efectuadas después de haber desconectado la alimentación eléctrica al climatizador. Cada año es oportuno efectuar una intervención de mantenimiento extraordinaria para la limpieza integral del climatizador llamando al instalador o al centro de asistencia técnica autorizado. - Página 79 4. MANTENIMIENTO DE LA FAN Antes de cualquier intervención de mantenimiento desconectar la alimentación eléctrica del climatizador. Utilice el climatizador solo para climatizar el local. No utilice el climatizador para otros fines, por ejemplo: secar la colada, conservar alimentos, criar animales o cultivar vegetales. Evite bloquear las rejillas de entrada y salida del aire.
- Página 80 1. DESCRIZIONE DEI COMPONENTI 5. ADVERTENCIAS Elija la temperatura ambiente más adecuada. Atención a los locales ocupados por niños, enfermos y/o ancianos. No tire o deje que salpique agua en el climatizador. No instale el climatizador en proximidad de fuentes excesivas de vapor (de agua, aceites, etc) Las operaciones de mantenimiento deben ser realizadas solamente por personal cualificado.
- Página 81 1. DESCRIZIONE DEI COMPONENTI 5. ADVERTENCIAS No apoye recipientes con flores o contenedores de agua encima de la unidad. No dirija el flujo de aire directamente sobre las personas, plantas o animales. El aparato no está destinado a ser usado por personas (niños incluidos) cuyas capacidades físicas, sensoriales o mentales sean reducidas, o bien con falta de experiencia o de conocimiento, a menos que ellas hayan podido beneficiarse, por la intermediación de una persona responsable de su seguridad, de una vigilancia o de instrucciones referentes al uso del aparato.
- Página 82 1. DESCRIZIONE DEI COMPONENTI 5. ADVERTENCIAS Para evitar descargas eléctricas o incendios, deben recordarse y respetarse estrictamente los siguientes puntos: No tire del cable para sacar el enchufe. No haga funcionar la unidad si el enchufe no está correctamente introducido. Para encender o apagar la unidad, no utilice el enchufe.
-
Página 83: Anomalías E Mal Funcionamiento
1. DESCRIZIONE DEI COMPONENTI 6. MEDIDAS DE SEGURIDAD ¡Atención! En particulares condiciones, el climatizador puede presentar anomalías Antes de solicitar la intervención del centro de asistencia se aconseja de funcionamiento que a menudo se detectan con facilidad o están efectuar simples controles, ya sea para hacer un buen uso y mejoramiento determinadas por causas accidentales, o en la mayor parte de las de las prestaciones del climatizador, o bien para evitar inútiles ocasiones, banales. - Página 84 Note...
- Página 85 Note...
-
Página 87: Tabla De Contenido
TABLE DES MATIÈRES GÉNÉRALITÉS ENTRETIEN DE FAN ......89 ....106 4.1 Nettoyage de la télécommande 1.1 Avertissements généraux 4.2 Nettoyage de l’unité interne 1.2 Règles fondamentales de sécurité 4.3 Nettoyage des filtres de l’unité interne 1.3 Accès aux connexions 5 MISES EN GARDE ....107 1.4 Réception du produit et manutention 1.5 Les schémas de câblage 6 MESURES DE SÉCURITÉ... - Página 88 INTRODUCTION Description de l’appareil Déclaration de conformité Les ventilo-convecteurs sont des appareils dédiés à un usage domestique de haute qualité. L’élégance du design esthétique, l’électronique de ges- Les Ventilo-convecteur objet du présent manuel sont conformes aux tion et les composants de première classe facilitent son intégration et directives européennes garantissent un niveau de confort élevé.
-
Página 89: Généralités
1. GÉNÉRALITÉS 1.1 Avertissements généraux 1.2 Règles fondamentales de sécurité Après avoir enlevé l’emballage, s’assurer que tous les com- Nous vous rappelons que l’emploi des appareils utilisant posants sont bien intacts et complets. Si ce n’est pas le cas, l’énergie électrique implique le respect de certaines règles s’adresser à... -
Página 90: Accès Aux Connexions
1. GÉNÉRALITÉS 1.3 Accès aux connexions Boutons et voyants ³ 1 Récepteur du signal infrarouge envoyé par la télécommande 2 Voyant rouge d’alimentation, qui devient vert lors de la mise en marche du climatiseur ´ 3 Écran température Fonctionnement en mode refroidissement Fonctionnement en mode chauffage Fonctionnement en mode déshumidification 7 Bouton de réservation... -
Página 91: Composition De La Fourniture
1. GÉNÉRALITÉS Connexions electriques Les fils sont de longueur réduite Enlever délicatement le couvercle de protection des indicateurs lumineux Entrée pour raccordement électrique Barrette de raccordement Serre fil Connexions hydrauliques EGWW - 0712 - 1012 Connexions hydrauliques EGWW - 1312 - 1512 Vue arrière Vue arrière sortie... -
Página 92: Réception Du Produit Et Manutention
1. GÉNÉRALITÉS Données techniques Modèles Emmeti SILENCE EGWW-0712 EGWW-1012 EGWW-1312 EGWW-1512 2,20 2,60 3,70 4,10 kW (max) Capacité de refroidissement 1,90 2,00 3,10 3,70 kW (med) totale (1) 1,60 1,70 2,80 3,10 kW (min) 1,70 1,90 2,85 3,20 kW (max) Capacité... -
Página 93: Les Schémas De Câblage
1. DESCRIZIONE DEI COMPONENTI 1. GÉNÉRALITÉS 1.6 Les schémas de câblage - EGWW 0712 / 1012 / 1312 / 1512 DIP SWITCH 4 - Dip Passez à modifier les fonctions Switch Default Si la température ambiante est convaincu que le ventilateur Passez à... -
Página 94: Installateur
2. INSTALLATEUR 2.1 Installation Pour déplacer le tuyau d’évacuation sur le raccord de gauche : - Enlever le panneau frontal - Utiliser un outil pour extraire le ressort de fixation situé sur le tuyau Positionnement de l’unité interne d’évacuation de la condensation (Fig.1) Le lieu de l’installation doit être établi par le concepteur du système ou par - Enlever le bouchon situé... - Página 95 1. DESCRIZIONE DEI COMPONENTI 2. INSTALLATEUR Fig. 5 Introduire dans l’orifice pratiqué dans le mur, un tuyau en Fixer Ici plastique de protection. S’assurer que cette partie de mur ne contient pas d’élé- ments porteurs de la construction, tuyauteries ou lignes électriques Une fois les travaux terminés, il est conseillé...
-
Página 96: Connexions Électriques
2. INSTALLATEUR Connexions à charge Connexions exécutées De l’installateur d’usine Entrée 1 Ventilateur 2 Échangeur de chaleur 3 Évent air manuel 4 Joint de connexion (Non fourni) Sortie 5 Vanne d’interception à bille (Non fourni) Sortie 6 Vanne Motorisé (Non fourni) Vanne Motorisé... -
Página 97: Chargement Et Vidange Du Système
1. DESCRIZIONE DEI COMPONENTI 2. INSTALLATEUR 2.4 Chargement et vidange du système ALLUMÉ Chargement - Avant de commencer le chargement, placer l’interrupteur général du système sur la position “éteint” ÉTEINT - Vérifier si le robinet d’évacuation du système est fermé - Enlever le meuble de couverture (voir paragraphe précédent) - Ouvrir la vanne de purge du ventilo-convecteur et du système (voir figure) - Commencer le remplissage en ouvrant lentement le robinet de... -
Página 98: Télécommande À Infrarouges
1. DESCRIZIONE DEI COMPONENTI 3. UTILISATION DE FAN 3.1 Télécommande à infrarouges Émetteur de signal à infrarouges Écran à cristaux liquides Bouton ON/OFF Allumage et arrêt du climatiseur. AUTO Boutons Bouton pou paramètre de la température et heure ... -
Página 99: Utilisation De Fan
3. UTILISATION DE FAN 3.2 Mise en place des piles dans la télécommande Symboles de l’écran Les piles ont été conçues et produites avec un matériau de haute qualité et les composants peuvent être recyclés et/ou réutilisés. Le symbole de la corbeille barrée indique que le produit (piles) à... -
Página 100: Mise En Marche Du Climatiseur
3. UTILISATION DE FAN 3.3 Mise en marche du climatiseur • S’assurer de la bonne alimentation électrique du climatiseur. • Appuyer sur le bouton allume la lumière rouge ON / OFF (l’unité est la lumière sur rouge). •... -
Página 101: Fonctionnement En Mode Ventilation
3. UTILISATION DE FAN 3.4 Fonctionnement en mode ventilation 1 En appuyant sur le bouton MODE sélectionner le mode de AUTO . Le climatiseur assure la recirculation de l’air fonctionnement ambiant sans chauffage ni refroidissement. 2 La température peut être sélectionné mais n’a aucun effet 3 Il est impossible de sélectionner la température 4 Appuyer sur le bouton FAN pour sélectionner la vitesse du ventilateur souhaitée :... -
Página 102: Fonctionnement En Mode Chauffage
3. UTILISATION DE FAN 3.6 Fonctionnement en mode chauffage AUTO En appuyant sur le bouton MODE sélectionner le mode de fonctionnement Avec les boutons configurer la température souhaitée dans l’espace ambiant (16÷30 °C). La température peut être configurée degré par degré. 3 Appuyer sur le bouton FAN pour sélectionner la vitesse du ventilateur: AUTO Auto*... -
Página 103: Fonctionnement En Mode Déshumidification
3. UTILISATION DE FAN 3.7 Fonctionnement en mode déshumidification En appuyant sur le bouton MODE sélectionner le mode de fonctionnement Avec les boutons configurer la température souhaitée dans l’espace ambiant (16÷30 °C). La température peut être configurée degré par degré. - vanne ouverte Ts+2 - ventilateur en marche à... -
Página 104: Programmation Du Timer
3. UTILISATION DE FAN Programmation du Timer 3.9.1 Allumage programmé du climatiseur Le TIMER peut être configuré à toute heure du jour Appuyer une fois sur le bouton TIMER. S’affichent ensuite sur la partie horloge de l’écran, l’indication AM et le symbole clignotant. -
Página 105: Fonction Lock
3. UTILISATION DE FAN 3.11 Fonction LOCK Appuyer en même temps sur les touches + et – pour bloquer ou débloquer le clavier de la télécommande. Si la télécommande est bloquée, l’icône s’affiche sur l’écran. Pour vérifier si le clavier est bloqué, appuyer sur une touche quelconque, l’icône clignotera 3 fois. -
Página 106: Entretien De Fan
4. ENTRETIEN DE FAN Attention ! Toutes les opérations d’entretien doivent être effectuées après avoir coupé l’alimentation électrique au climatiseur. Il est recommandé de procéder chaque année à une intervention d’entretien extraordinaire, à savoir au nettoyage complet du climatiseur en contactant à... - Página 107 5. MISES EN GARDE Avant toute opération d’entretien, couper l’alimentation au climatiseur. Utiliser le climatiseur uniquement pour climatiser l’espace ambiant. Ne pas utiliser le climatiseur pour une autre fonction, par exemple: sécher du linge, conserver des denrées, élever des animaux ou cultiver des plantes.
- Página 108 1. DESCRIZIONE DEI COMPONENTI 5. MISES EN GARDE Programmer la température ambiante la plus adéquate. Observer la prudence nécessaire en présence d’enfants, de malades et/ou de personnes âgées. Ne pas verser ni ne vaporiser d’eau sur le climatiseur. Ne pas installer le climatiseur à proximité de sources de vapeur excessives (eau, huile, etc.) Les éventuelles interventions d’entretien doivent être exclusivement confiées à...
- Página 109 1. DESCRIZIONE DEI COMPONENTI 5. MISES EN GARDE Ne pas poser de pots de fleurs ou autres récipients contenant de l’eau sur l’unité. Ne pas orienter le flux d’air directement vers des personnes, des plantes ou des animaux. L’appareil n’est pas destiné à l’usage par des personnes (enfants inclus) dont les capacités physiques, sensorielles ou mentales sont réduites et/ou manquant d’expérience ou des connaissances nécessaires, sauf si la personne responsable de leur sécurité...
- Página 110 5. MISES EN GARDE Afin de prévenir les risques de décharge électrique et les risques d’incendie, il est impératif de veiller au respect des recommandations suivantes. Ne pas tirer le câble pour débrancher la fiche de la prise. Ne pas faire fonctionner l’unité si la fiche n’est pas branchée correctement.
- Página 111 1. DESCRIZIONE DEI COMPONENTI 6. MESURES DE SÉCURITÉ 1. DESCRIZIONE DEI COMPONENTI Attention ! Dans certaines conditions le climatiseur peut présenter des anomalies de Avant de demander l’intervention du centre d’assistance, il est recommandé fonctionnement qui souvent ne sont qu'apparentes, voire provoquées par de procéder à...
- Página 112 Pour procéder correctement à leur élimination, les matériaux doivent être triés et remis à un centre de collecte dans le respect des normes en vigueur. EMMETI Spa Via B. Osoppo, 166 - 33074 Fontanafredda frazione Vigonovo (PN) Italy Tel. 0434-567911 - Fax 0434-567901 Internet: http://www.emmeti.com - E-mail: info@emmeti.com...