Tabla de contenido
Publicidad
Idiomas disponibles
Idiomas disponibles
Enlaces rápidos
INSTALLATION INSTRUCTIONS FOR PART 95-7322
Hyundai Azera 2006-2011
KIT FEATURES
• Double DIN radio provision
• Stacked ISO unit provision
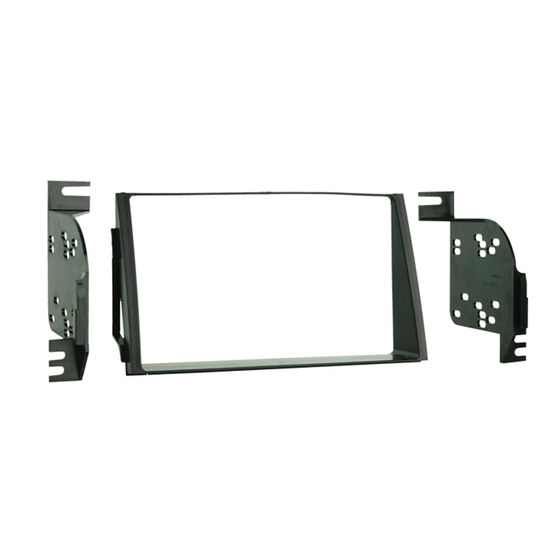
KIT COMPONENTS
• A) Double DIN trim plate • B) Double DIN brackets
A
WIRING & ANTENNA CONNECTIONS (sold separately)
Wiring Harness:
• 70-1004 - Hyundai/Kia harness 2004-up
• 70-7303 - Hyundai/Kia harness 2009
Antenna Adapter:
• 40-KI10 - Kia antenna adapter 2007-up
• Panel removal tool • Phillips screwdriver • Small flat blade screwdriver
APPLICATIONS
95-7322
TOOLS REQUIRED
METRA. THE WORLD'S BEST KITS.™
1-800-221-0932
© COPYRIGHT 2004-2011 METRA ELECTRONICS CORPORATION
B
metraonline.com
Publicidad
Tabla de contenido

Manuales relacionados para Metra 95-7322


Resumen de contenidos para Metra 95-7322
- Página 1 INSTALLATION INSTRUCTIONS FOR PART 95-7322 APPLICATIONS Hyundai Azera 2006-2011 95-7322 KIT FEATURES • Double DIN radio provision • Stacked ISO unit provision KIT COMPONENTS • A) Double DIN trim plate • B) Double DIN brackets WIRING & ANTENNA CONNECTIONS (sold separately) Wiring Harness: •...
-
Página 2: Tabla De Contenido
– Double DIN radio provision ....................5 – Stacked ISO unit provision ....................6 CAUTION: Metra recommends disconnecting the negative battery terminal before beginning any installation. All accessories, switches, and especially air bag indicator lights must be plugged in before reconnecting the battery or cycling the ignition. -
Página 3: Dash Disassembly
Dash Disassembly 95-7322 Hyundai Azera 2006-2011 1. Remove (1) Phillips head screw from bottom right hand corner then unclip and let the panel below the steering column hang. (Figure A) 2. Remove (1) Phillips screw from the lower left side of the radio panel behind panel removed in step 2. - Página 4 Dash Disassembly 95-7322 Hyundai Azera 2006-2011 4. Remove (3) Phillips screws from the top of the radio trim panel. (Figure D) 5. Remove (2) Phillips screws from under radio trim panel. (Figure E) 6. Unclip and remove the entire trim panel surrounding the radio.
-
Página 5: Kit Assembly
(Figure B) 3. Locate the factory wiring harness in the dash. Metra recommends using the proper mating adapter from Metra or (Figure A) AXXESS. Re-connect the negative battery terminal and test the unit for proper operation. -
Página 6: Stacked Iso Unit Provision
(Figure B) 3. Locate the factory wiring harness in the dash. Metra recommends using the proper mating adapter from Metra or (Figure A) AXXESS. Re-connect the negative battery terminal and test the unit for proper operation. - Página 7 Notes...
- Página 8 INSTALLATION INSTRUCTIONS FOR PART 95-7322 METRA. THE WORLD’S BEST KITS.™ metraonline.com 1-800-221-0932 © COPYRIGHT 2004-2011 METRA ELECTRONICS CORPORATION...
-
Página 9: Componentes Del Kit
INSTRUCCIONES DE INSTALACIÓN PARA LA PIEZA 95-7322 APLICACIONES Hyundai Azera 2006-2011 95-7322 CARACTERÍSTICAS DEL KIT • Provisión de radio doble DIN • Provisión de unidades ISO verticales COMPONENTES DEL KIT • A) Placa de moldura doble DIN • B) Soportes doble DIN... - Página 10 – Provisión de unidades ISO verticales ................6 PRECAUCIÓN: Metra recomienda desconectar el terminal negativo de la batería antes de comenzar cualquier instalación. Todos los accesorios, interruptores y, especialmente, las luces indicadoras de airbag deben estar enchufados antes de volver a conectar la batería o comenzar el ciclo de ignición.
-
Página 11: Desmontaje Del Tablero 95-7322
Desmontaje del tablero 95-7322 Hyundai Azera 2006-2011 1. Quite (1) tornillo de cabeza Phillips de la esquina derecha de abajo y luego desenganche y deje que el panel quede colgando debajo de la columna de dirección. (Figura A) 2. Quite (1) tornillo Phillips de la parte inferior izquierda del panel del radio detrás del panel que quitó. - Página 12 Desmontaje del tablero 95-7322 Hyundai Azera 2006-2011 4. Quite los (3) tornillos Phillips de la parte superior del panel de la moldura del tablero. (Figura D) 5. Quite los (2) tornillos Phillips de abajo del panel de la moldura del radio.
-
Página 13: Ensamble Del Kit 95-7322
(Figura B) 3. Ubique el arnés del cableado de fábrica en el tablero. Metra recomienda usar el adaptador de acoplamiento adecuado (Figura A) de Metra o AXXESS. Vuelva a conectar el terminal negativo de la batería y... -
Página 14: Provisión De Unidades Iso Verticales
(Figura B) 3. Ubique el arnés del cableado de fábrica en el tablero. Metra recomienda usar el adaptador de acoplamiento adecuado (Figura A) de Metra o AXXESS. Vuelva a conectar el terminal negativo de la batería y... - Página 15 Notas...
- Página 16 INSTRUCCIONES DE INSTALACIÓN PARA LA PIEZA 95-7322 METRA. THE WORLD’S BEST KITS.™ metraonline.com 1-800-221-0932 © COPYRIGHT 2004-2011 METRA ELECTRONICS CORPORATION...