Tabla de contenido
Publicidad
Idiomas disponibles
Idiomas disponibles
Enlaces rápidos
Your opinion matters! Visit
Like
www.LearningResources.com
us on
to write a product review or to
find a store near you.
© Learning Resources, Inc., Vernon Hills, IL, US
Learning Resources Ltd., Bergen Way,
King's Lynn, Norfolk, PE30 2JG, UK
Please retain the package for future reference.
Made in China.
LRM6900-GUD
Hecho en China.
Conserva el envase para
futuras consultas.
Fabriqué en Chine.
Veuillez conserver
l'emballage.
Hergestellt in China.
Bitte Verpackung gut
aufbewahren.
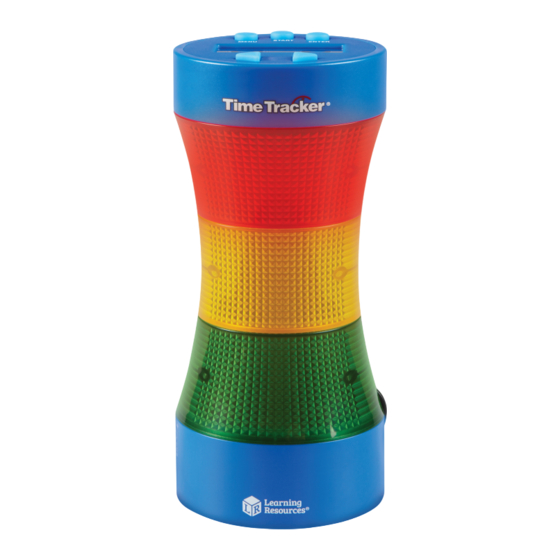
Time Tracker
Visual Timer and Clock
Monitor de tiempo • Minuteur • Zeitampel
Art.Nr. 2164117
LER 6900
®
Publicidad
Tabla de contenido

Resumen de contenidos para Learning Resources Time Tracker
- Página 1 Time Tracker ® Visual Timer and Clock Monitor de tiempo • Minuteur • Zeitampel © Learning Resources, Inc., Vernon Hills, IL, US Learning Resources Ltd., Bergen Way, King’s Lynn, Norfolk, PE30 2JG, UK Please retain the package for future reference.
-
Página 2: Insert Batteries
You can program exactly how long each of the sections remains lit, or you can select the automatic setting TIMER – Program exactly and the Time Tracker will divide the time for you. Use the Right how long you want each... - Página 3 Important note: When using an adapter (LER 6989, sold 7. To STOP timer, press and hold the MENU button. separately at LearningResources.com), unplug the adapter from the Time Tracker first, before unplugging the adapter from the ® wall. Unplugging the adapter from the wall first will reset the...
-
Página 4: Reset Button
To clean, wipe gently with a damp, soft cloth. • Only charge rechargeable batteries under adult supervision (if RESET BUTTON removable). If the Time Tracker isn’t working correctly, use the end of ® • Only use batteries of the same or equivalent type, as a paper clip or similar small object to push the reset button, recommended. -
Página 5: Insertar Las Pilas
PRIMEROS PASOS Iniciar Entrar Menú Pantalla El monitor de tiempo tiene 3 modos: MONITOR DE TIEMPO ® RELOJ - Reloj digital El monitor de tiempo te ayuda a gestionar el tiempo de una Flecha estándar forma nueva. Se compone de secciones de colores que se derecha TEMPORIZADOR - iluminan para dar pistas visuales de cuánto tiempo queda para... -
Página 6: Temporizador
RELOJ 7. Para DETENER el temporizador, mantén pulsado el botón MENU (Menú). Para poner el RELOJ en hora: TEMPORIZADOR AUTOMÁTICO 1. Pulsa MENU (Menú) para desplazarte por: CLOCK (Reloj), Define la cantidad de tiempo total y la luz verde se encenderá TIMER (Temporizador), AUTO TIMER (Temporizador automáticamente durante el 80% de ese tiempo, la luz amarilla automático). -
Página 7: Usar Un Adaptador
INFORMACIÓN IMPORTANTE SOBRE LAS iluminada. Vuelve a pulsar START (Iniciar) para ver el tiempo total que queda. PILAS BOTÓN RESET ( RESTABLECER ) Lee detenidamente las siguientes instrucciones adicionales Si el monitor de tiempo no funciona correctamente, utiliza el sobre el uso de las pilas: extremo de un clip o un objeto similar para presionar el botón •... -
Página 8: Pour Commencer
POUR COMMENCER Démarrer Entrée Menu Le minuteur comprend 3 Écran MINUTEUR modes : Le minuteur aide à gérer le temps d’une nouvelle manière. HORLOGE – Horloge Les parties illuminées de couleur différente fournissent numérique standard. Flèche une indication visuelle du temps restant pour terminer une de droite tâche. - Página 9 HORLOGE MINUTEUR AUTO (Saisissez la durée totale pour que la lumière verte s’allume Réglage de l’horloge : automatiquement pendant 80 %, la lumière jaune pendant 15 % 1. Appuyez sur MENU pour faire défiler les modes suivants et la lumière rouge pendant 5 % de la durée totale.) : CLOCK (HORLOGE), TIMER (MINUTEUR), AUTO TIMER RÉGLAGE DU MINUTEUR AUTO : (MINUTEUR AUTO)
-
Página 10: Bouton De Réinitialisation
BOUTON DE RÉINITIALISATION INFORMATIONS IMPORTANTES SUR LES PILES Si le minuteur ne fonctionne pas correctement, utilisez Veuillez lire et comprendre les instructions supplémentaires l’extrémité d’un trombone ou d’un petit objet similaire pour suivantes concernant les piles. appuyer sur le bouton de réinitialisation qui se trouve dans un •... -
Página 11: Batterien Einsetzen
ERSTE SCHRITTE Start Eingabe Menü Die Zeitampel verfügt Display ZEITAMPEL ® über 3 Modi: Anzeige Mit der Zeitampel können Sie die Zeit jetzt auf ganz neue Weise planen Die beleuchteten, bunten Abschnitte zeigen visuell an, Herkömmliche Digitaluhr Pfeil rechts wie viel Zeit für eine Aufgabe noch verbleibt. Jeder Abschnitt TIMER Pfeil stellt einen Zeitraum dar. - Página 12 AUTO TIMER ( AUTO-TIMER ) Geben Sie die Gesamtdauer ein. Das grüne Lämpchen leuchtet DIE UHR EINSTELLEN: dann automatisch für 80 %, das gelbe Lämpchen für 15 % und 1. MENU (Menü) drücken und blättern: CLOCK (Uhr), TIMER, das rote Lämpchen für 5 % dieser Dauer. AUTO TIMER (Auto-Timer) AUTO TIMER ( AUTO-TIMER ) EINSTELLEN: 2.
- Página 13 RÜCKSTELLTASTE die Abdeckung wieder auf das Batteriefach und legen Sie die Schraube ein. Schrauben Sie die Schraube mit einem kleinen Falls die Zeitampel nicht ordnungsgemäß funktioniert, Kreuzschlitzschraubendreher im Uhrzeigersinn ein, bis sie verwenden Sie das Ende einer Büroklammer oder einen ähnlich wieder festsitzt.
- Página 14 WICHTIGE INFORMATIONEN : MAX. 6V D.C. 300mA • Das Spielzeug ist für Kinder unter 3 Jahren nicht geeignet. • Dieses Spielzeug ist nicht geeignet für Kinder unter 3 Jahren. • Das Spielzeug darf nur mit dem empfohlenen Transformator betrieben werden. •...
