Tabla de contenido
Publicidad
Idiomas disponibles
Idiomas disponibles
Enlaces rápidos
NS-228 DBT
ART: 2201425
RADIO MP3 CD WMA USB BT AUX-IN DAB
FR ................................1
NL ................................24
ES ................................45
IT .................................67
PT ................................89
PL ................................110
EN................................130
Publicidad
Capítulos
Tabla de contenido

Manuales relacionados para NORAUTO NS-228 DBT

Resumen de contenidos para NORAUTO NS-228 DBT
- Página 1 NS-228 DBT ART: 2201425 RADIO MP3 CD WMA USB BT AUX-IN DAB FR ........1 NL ........24 ES ........45 IT .........67 PT ........89 PL ........110 EN........130...
-
Página 2: Tabla De Contenido
Sommaire 1 Consignes de sécurité �����������������������������������������������������������������2 2 Préparation ����������������������������������������������������������������������������������5 3 Accessoires ���������������������������������������������������������������������������������6 4 Installation et démontage de l’appareil ����������������������������������������7 Installation de l’appareil ���������������������������������������������������������������7 Démontage de l’appareil ��������������������������������������������������������������7 5 Installation/connexion ������������������������������������������������������������������8 Procédure basique ����������������������������������������������������������������������8 Attention ��������������������������������������������������������������������������������������8 Avertissement ������������������������������������������������������������������������������9 Câblage ������������������������������������������������������������������������������������10 6 Opérations basiques������������������������������������������������������������������12 7 Réglage des fonctions ���������������������������������������������������������������14 Écoute de la radio ����������������������������������������������������������������������17 Écoute de CD/périphérique USB/SD �����������������������������������������18... -
Página 3: Consignes De Sécurité
Consignes de sécurité Ì Avant d’utiliser votre appareil, veuillez attentivement lire ces précautions de sécurité et gardez-les pour de futures références� Si vous donnez cet appareil à des tiers, veuillez aussi leur donner ces consignes de sécurité� Ì Utilisez cet appareil comme décrit dans cette notice d’emploi� Toute mauvaise manipulation et toute utilisation autre que prévue dans cette notice d’emploi n’engagera en aucun cas la responsabilité... - Página 4 Ì Enlevez toute source d’ignition lors de l’utilisation de l’appareil� Ì Gardez l’appareil sec� Ne le plongez pas dans l’eau ni dans tout autre liquide� Ì N’exposez pas cet appareil à des égouttements d’eau ou à des éclaboussures� Ì N’utilisez pas l’appareil dans des endroits exposés à l’humidité, aux intempéries et dans des lieux mouillés�...
- Página 5 appareil en respectant la législation et le code de la route� Ì Faites attention en utilisant cet appareil en conduisant� Ne soyez pas distrait, perturbé lorsque vous utilisez cet appareil lors de la conduite� Un manque de concentration peut provoquer un accident�...
-
Página 6: Préparation
Préparation Procédure d’installation et de démontage de la façade Installation Démontage Ì Évitez d’exposer la façade à la lumière directe du soleil, à tout excès de chaleur et à l’humidité� Évitez également d’installer l’appareil dans un endroit très poussiéreux ou exposé à des projections d’eau�... -
Página 7: Accessoires
Accessoires Vérifier et identifier le contenu de l’emballage : Appareil principal (avec manchon Façade Cadre décoratif de montage) Connecteur mâle Vis mécanique x 1 selon la norme Manuel d’utilisation ISO (A/B) Outil de Capuchon en Vis x 4 désassemblage x 2 caoutchouc x 1 Étui de transport Micro externe... -
Página 8: Installation Et Démontage De L'appareil
Installation et démontage de l’appareil Installation de l’appareil Manchon Pliez les languettes qui de montage conviennent pour fixer correctement le manchon� Cadre décoratif Panneau de commande Avant d’introduire l’appareil dans le manchon, assurez-vous de respecter le sens de l’écusson (larges Tableau de crochets situés sur la bord... -
Página 9: Installation/Connexion
Démontage Cadre décoratif Manchon de montage Démontage Panneau de commande Installation/connexion Procédure basique 1 Retirez la clé de contact du contacteur, puis déconnectez la borne de la batterie du véhicule� 2 Branchez comme il se doit les fils de câblage d’entrée et de sortie�... -
Página 10: Avertissement
Ì Isolez les câbles non branchés à l’aide d’adhésifs en vinyle ou d’un matériel similaire� Afin d’éviter tout court-circuit, ne retirez pas les capuchons fixés sur les bouts des câbles non branchés ou les bornes� Ì Une fois l’installation terminée, prenez soin d’effectuer la mise à la terre du châssis du véhicule�... -
Página 11: Câblage
Ì Le montage et le câblage de l’appareil requièrent savoir-faire et expérience� Par mesure de sécurité, veuillez confier ces tâches à des professionnels� Si vous rencontrez des difficultés pendant l’installation, veuillez contacter votre distributeur NORAUTO� Câblage Télécommande OE (violet) Prise micro externe (noir) Mise à... - Página 12 Tableau de câblage des connecteurs ISO Broche Couleur et fonction Broche Couleur et fonction Haut- Violet parleur Jaune Batterie (+) B1/B2 violet/ arrière noir droit Connectez à la borne du contrôle du système de l’amplificateur Gris Haut- de puissance Bleu B3/B4 parleur gris/...
-
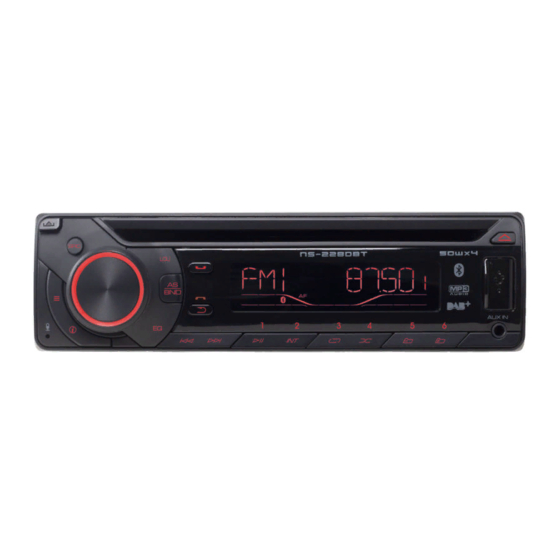
Página 13: Opérations Basiques
Opérations basiques Fente de chargement Pour retirer le panneau Molette de volume de disque Éjecter le disque de commande Prise d’entrée auxiliaire Alimentation/muet Écran Borne USB Tableau des fonctions correspondant à chaque touche : Autoradio Fonctionnement général principal Sélectionner les sources disponibles (RADIO, DAB, BT, USB, SD, AUX IN) Tourner pour augmenter ou baisser le volume�... - Página 14 Autoradio Fonctionnement général principal Faire une pause de lecture ou reprendre la lecture d’un périphérique USB/SD� En mode radio, appuyer pour démarrer la „ recherche automatique ; maintenir enfoncée pour démarrer la recherche manuelle� En mode de lecture multimédia, sauter une piste „...
-
Página 15: Réglage Des Fonctions
Réglage des fonctions 1 Appuyer sur pour ouvrir le mode [AUDIO MENU] ; appuyer longuement pour accéder au [MENU]� 2 Appuyer plusieurs fois sur pour sélectionner l’élément à paramétrer� 3 Tourner la molette du volume d’encodage pour sélection une valeur ou une option� [MENU AUDIO] Élément Paramètres disponibles... - Página 16 Élément Paramètres disponibles Activer/ désactiver Activer/désactiver la fonction affichage de affichage de la la station� station En mode PTY, appuyez sur la touche « Alimentation/muet » pour accéder à un élément du type de programme, puis tournez la molette du volume d’encodage pour sélectionner une catégorie�...
-
Página 17: Paramètres Disponibles
Élément Paramètres disponibles Activé : lorsque vous recevez des „ informations sur le trafic, l’appareil passe en mode radio, quel que soit le mode actif, et démarre la diffusion de TA (informations ces informations� À la fin de la diffusion, sur le trafic routier) l’appareil retourne au mode précédent�... -
Página 18: Écoute De La Radio
Élément Paramètres disponibles Lorsque « RGB COLOR » s’affiche, la couleur par défaut est « RGB SCAN(AUTO) »� Tournez la molette du volume d’encodage pour sélectionner l’une des couleurs du cycle ci-après : « RGB COULEUR RGB SCAN(AUTO) » - « VERT 1 » - «... -
Página 19: Écoute De Cd/Périphérique Usb/Sd
Écoute de CD/périphérique USB/SD Appuyez pour suspendre „ Appuyer une fois pour démarrer la lecture aléatoire des „ Appuyez encore une fois pour reprendre pistes et une seconde fois pour sélectionner de façon „ la lecture� aléatoire un dossier� Appuyer pour passer au dossier suivant/ „... -
Página 20: Écoute D'autres Périphériques Externes
Lecture d’une carte SD 1 Insérez une carte micro SD dans la fente pour carte SD� L’appareil lit automatiquement la carte SD� Écoute d’autres périphériques externes Câble 3,5 mm (non fourni) 1 Appuyez sur SRC pour sélectionner le mode Entrée AUDIO IN� 2 Allumez le périphérique externe et démarrez la lecture�... -
Página 21: Pour Commencer
1 Allumez votre portable et activez le Bluetooth� 2 Recherchez les autres périphériques Bluetooth à portée� 3 Sélectionnez « NS-228 DBT » dans la liste des appareils� 4 Si le couplage est réussi, le message [PAIRED] s’affiche à l’écran, puis le périphérique ainsi couplé se connecte automatiquement à... -
Página 22: Fonctionnement En Mode Dab
2 Appuyez pour décrocher/accepter l’appel� 3 À la fin de la conversation, appuyez sur pour terminer l’appel� Transférer un appel Pendant la conversation, vous pouvez transférer la voix des haut- parleurs vers le portable� Pendant la conversation, appuyez longuement sur pour transférer la voix des haut-parleurs vers le portable�... -
Página 23: Détails Du Produit
RECHERCHE 1 Appuyez sur le bouton (MENU) pour sélectionner la fonction de recherche de station (RECHERCHE) et confirmez en appuyant sur le bouton du commutateur d’alimentation� 2 Le système recherche les stations DAB� 3 Le nombre de stations trouvées s’affiche à l’écran et la première station trouvée est diffusée�... -
Página 24: Périphériques Usb
Sensibilité utilisable : Supérieure à 15 dB pour un rapport signal/ bruit = 30 dB Section de syntonisation AM Plage de fréquences : 522 à 1 620 kHz Sensibilité utilisable : Supérieur à 45 dB pour un rapport signal/ bruit = 26 dB Périphériques USB Mémoire flash SUB : compatible USB 1�1 et 2�0 À... - Página 25 Inhoud 1 Veiligheidsinstructies �����������������������������������������������������������������25 2 Voorbereiding ����������������������������������������������������������������������������28 3 Componenten ����������������������������������������������������������������������������29 4 Installatie en verwijdering van het toestel ����������������������������������30 Het toestel installeren ����������������������������������������������������������������30 Het toestel verwijderen ��������������������������������������������������������������30 5 Installatie / Aansluiting ���������������������������������������������������������������31 Basisprocedure ��������������������������������������������������������������������������31 Waarschuwing ���������������������������������������������������������������������������31 Opgelet ��������������������������������������������������������������������������������������32 Bedrading ���������������������������������������������������������������������������������33 6 Basishandelingen ����������������������������������������������������������������������34 7 Functie-instelling������������������������������������������������������������������������35 Naar de radio luisteren ��������������������������������������������������������������39 Naar een cd / USB / SD-apparaat luisteren �������������������������������39...
-
Página 26: Veiligheidsinstructies
Veiligheidsinstructies Ì Vooraleer uw apparaat te gebruiken moet u deze veiligheidsvoorschriften aandachtig lezen en deze bewaren als referentiemateriaal voor de toekomst� Als u dit apparaat aan derden meegeeft, voeg er dan ook deze veiligheidsvoorschriften bij� Ì Gebruik dit apparaat zoals beschreven in deze handleiding� De fabrikant kan niet aansprakelijk worden gesteld voor elke slechte hantering en elk ander gebruik dan voorzien in deze handleiding�... - Página 27 Ì Houd het apparaat droog� Dompel het niet onder in water en evenmin in enige andere vloeistof� Ì Stel dit apparaat niet bloot aan druip- of spatwater� Ì Gebruik het apparaat niet op plaatsen die zijn blootgesteld aan vochtigheid, aan weer en wind en op vochtige plaatsen� Ì...
- Página 28 Ì Let goed op bij het gebruik van dit apparaat tijdens het rijden� Zorg dat u niet verstrooid of verward bent als u dit apparaat gebruikt tijdens het rijden� Een gebrek aan concentratie kan een ongeval veroorzaken� Vergeet niet dat u meester bent van en verantwoordelijk voor het voertuig dat u bestuurt�...
-
Página 29: Voorbereiding
Voorbereiding Het voorpaneel bevestigen/verwijderen Bevestigen Verwijderen Ì Zorg ervoor dat het voorpaneel niet wordt blootgesteld aan direct zonlicht, overmatige hitte of vochtigheid� Vermijd ook plaatsen met teveel stof of waar er risico is op opspattend water� Ì Bewaar het voorpaneel in de behuizing wanneer het niet bevestigd is�... -
Página 30: Componenten
Componenten Controleer de inhoud van uw pakket: Toestel (met koker) Voorpaneel Afdekplaat Machineschroef x ISO mannelijke Gebruiker- 1 stuk aansluiting (A/B) shandleiding Demontage- Rubberdichting x Schroef x 4 stuks gereedschap (2 stuks) 1 stuk Draagtas Externe microfoon (voor voorpaneel) -
Página 31: Installatie En Verwijdering Van Het Toestel
Installatie en verwijdering van het toestel Het toestel installeren Koker Buig de desbetreffende lipjes om de koker goed op zijn plaats te houden� Afdekplaat Bedieningspaneel Zorg ervoor voordat u de afdekplaat bevestigt dat deze in de juiste richting wordt gemonteerd� Dashboard (Breder haken aan de onderzijde�) -
Página 32: Installatie / Aansluiting
Demontage Afdekplaat Koker Demontage Bedieningspaneel Installatie / Aansluiting Basisprocedure 1 Verwijder de sleutel uit het contactslot, en verwijder dan de klem van de autoaccu� 2 Zorg ervoor dat de draadverbindingen correct worden aangesloten� 3 Installeer het toestel in uw auto� 4 Sluit de klem van de autoaccu opnieuw aan�... -
Página 33: Opgelet
(u mag de voorste en de achterste niet vermengen)� Ì Het monteren en aansluiten van dit product vereist kennis en ervaring� Laat dit werk voor uw veiligheid over aan professionals� Als u problemen ondervindt bij de installatie, neem dan contact op met uw NORAUTO dealer�... -
Página 34: Bedrading
Bedrading OE-afstandsbediening (paars) Externe microfoonaansluiting (zwart) Aarding (zwart) SUB-W ISO-aansluiting RCA-uitgang achterzijde (links) (rechts) Antenneaansluiting (niet meegeleverd) ISO-aansluiting bedradingsdiagram Kleur en functie Kleur en functie Paars Luidspreker Geel Batterij (+) B1/B2 Paars/ rechtsachter Zwart Verbinden met de bedieningsklem van de Grijs Luidspreker Blauw... -
Página 35: Basishandelingen
Basishandelingen Draaibare Verwijder het volumeknop Laadsleuf Schijf uitwerpen bedieningspaneel Aux-In-aansluiting Aan/Uit / Dempen Weergavevenster USB-aansluiting Wanneer u de volgende knop(pen) indrukt of ingedrukt houdt... Toestel Algemene bediening Selecteer de beschikbare bronnen (RADIO, DAB, BT, USB, SD, AUX IN) Draaibare Draai om het volume te verhogen of te verlagen� „... -
Página 36: Functie-Instelling
Toestel Algemene bediening In radiomodus om naar naar de automatische „ zoekmodus te gaan, houd ingedrukt om naar de handmatige zoekmodus te gaan� Bij het afspelen om een nummer/bestand over te „ slaan, houd ingedrukt om snel vooruit/achteruit te gaan� Om naar de audiomenumodus te gaan, houd ingdrukt om naar de systeemmenumodus te gaan�... - Página 37 [AUDIOMENU] Item Selecteerbare instelling INSTELLING BAS BASNIVEAU Pas het niveau aan van -7 tot +7� INSTELLING HOGE TONEN NIVEAU HOGE Pas het niveau aan van -7 tot +7� TONEN Pas de balans tussen de linker- en BALANS rechterluidsprekers aan van 10R (volledig rechts) tot 10L (volledig links)�...
- Página 38 Item Selecteerbare instelling Weergave van De weergave van zender S-functie in- of zender Aan/Uit uitschakelen� Eenmaal in de PTY-modus drukt u op de “Aan/Uit / Dempen”-knop om naar het programmatype te gaan en de volumeknop te verdraaien om naar de categorie naar keuze te gaan�...
- Página 39 Item Selecteerbare instelling AAN: Wanneer de Weergave van de naam van de radiozenders-klok is ingeschakeld, corrigeert de Weergave van de naam van KT (kloktijd) de radiozenders-zender automatisch de systeemklok van de autoradio� UIT: Schakel deze functie uit Om meer radiostations te ontvangen of alleen stations te ontvangen met een LOKAAL AAN/UIT sterk signaal, kunt u de radiogevoeligheid...
-
Página 40: Naar De Radio Luisteren
Naar de radio luisteren Houd ongeveer 2 seconden ingedrukt om de huidige zender op te slaan „ Druk er kort op om het opgeslagen station op te roepen� „ 1 Druk herhaaldelijk op BND voor een bandwijdte (FM1, FM2, FM3, AM1 (MW1) of AM2 (MW2)� 2 Druk op om naar een station te zoeken�... -
Página 41: Naar Andere Externe Componenten Luisteren
Een USB-apparaat afspelen 1 Schuif de USB-afdekking naar rechts� 2 Plaats een USB-apparaat in de USB-sleuf� Het toestel speelt het USB-apparaat automatisch af� Een SD-kaartapparaat afspelen 1 Plaats de micro-SD-kaart in de SD-kaartsleuf� Het apparaat speelt de inhoud van de SD-kaart automatisch af� Naar andere externe componenten luisteren 3,5 mm-kabel (niet meegeleverd) -
Página 42: Bluetooth-Bediening
1 Open uw mobiele telefoon en schakel Bluetooth in� 2 Zoek naar andere bluetooth-apparaten met uw toestel� 3 Selecteer “NS-228 DBT” uit de koppellijst� 4 Er verschijnt [PAIRED] op het paneel als de koppeling is gelukt en het gekoppelde apparaat wordt automatisch aangesloten op het audiosysteem�... - Página 43 Een nummer opnieuw kiezen 1 Druk op op het voorpaneel om een nummer opnieuw te kiezen� 2 Op het toestel verschijnt er [CALLING], en het toestel kiest opnieuw het laatst gevormde nummer� Opmerking: Om een uitgaand gesprek te plaatsen met dit toestel, moet de bluetooth-verbinding tussen het toestel en de telefoon actief zijn�...
-
Página 44: Dab-Bediening
DAB-bediening DAB-RADIO 1 Doorloop de programmabronnen met de SRC-knop tot DAB� 2 Druk herhaaldelijk op de menuknop wanneer het product in de DAB-modus staat om door de menu-opties te bladeren: SCAN=>12V AAN / UIT=PRUNE(DAB RESET)=RE-CON= RGB KLEUR =KLK=BIEP SCAN 1 Druk op de knop (MENU) om de zenderzoekfunctie SCAN te selecteren en bevestig door op de aan/uit-knop te drukken�... -
Página 45: Opruimen
Audiogedeelte Maximumvermogen: 50 W x 4 kanalen Continu vermogen: 28 W x 4 RMS FM-tunergedeelte Frequentiebereik: 87,5-108,0 MHz Bruikbare gevoeligheid: Beter da 15 dB aan S/N 30 dB AM-tunergedeelte Frequentiebereik: 522-1620 KHz Bruikbare gevoeligheid: Beter dan 45 dB aan S/N 26 dB USB-apparaten USB-flashgeheugen: USB 1�1 &... - Página 46 Índice 1 Instrucciones de seguridad��������������������������������������������������������46 2 Preparación �������������������������������������������������������������������������������49 3 Componentes ����������������������������������������������������������������������������50 4 Instalación y desinstalación de la unidad ����������������������������������51 Instalación de la unidad �������������������������������������������������������������51 Extracción de la unidad �������������������������������������������������������������51 5 Instalación / Conexión ���������������������������������������������������������������52 Procedimiento básico ����������������������������������������������������������������52 Advertencia ��������������������������������������������������������������������������������52 Precaución ���������������������������������������������������������������������������������53 Cableado ����������������������������������������������������������������������������������54 6 Operaciones básicas �����������������������������������������������������������������55 7 Configuración de funciones �������������������������������������������������������57...
-
Página 47: Instrucciones De Seguridad
Instrucciones de seguridad Ì Antes de utilizar el aparato, lea atentamente estas instrucciones de seguridad y guárdelas para futuras consultas� Si le da el aparato a un tercero, entréguelo también las instrucciones� Ì Utilice el aparato siguiendo las instrucciones� El fabricante no se hace responsable de un uso incorrecto o de una manipulación errónea�... - Página 48 lugares mojados� Ì No se debe dejar ningún objeto con líquido (por ejemplo, un jarrón) encima del aparato� Ì No cubra este aparato con objetos tales como periódicos, trapos, cortinas, etc� Ì No exponga el aparato directamente a los rayos del sol y al calor intenso�...
-
Página 49: Mantenimiento
seguras (mal tiempo, carreteras peligrosas, circulación densa y complicada, etc�)� Ì Ponga el volumen a un nivel sonoro conveniente; un volumen demasiado elevado el puede impedir oír el ruido del exterior y de la circulación, lo que puede provocar un accidente� Ì... -
Página 50: Preparación
Preparación Cómo montar/desmontar la placa frontal Montar Desmontar Ì No exponga la placa frontal a la luz directa del sol, a la humedad ni a calor excesivo� Asimismo, evite los lugares con demasiado polvo o donde exista la posibilidad de que le salpique agua� Ì... -
Página 51: Componentes
Componentes Compruebe e identifique el contenido del paquete: Unidad principal Panel frontal Embellecedor (con funda) Conector macho Tornillo x 1 ud� Manual del usuario ISO (A/B) Herramienta de Tapa de goma x Tornillo x 4 uds� desmontaje (2 uds�) 1 ud� Funda de transporte Micrófono externo (ara el panel frontal) -
Página 52: Instalación Y Desinstalación De La Unidad
Instalación y desinstalación de la unidad Instalación de la unidad Doble las pestañas Funda correspondientes para sujetar la funda con Embellecedor firmeza� Panel de control Antes de proceder al montaje, compruebe que la dirección del embellecedor es la correcta� (Los ganchos más anchos se Salpicadero encuentran en la parte... -
Página 53: Instalación / Conexión
Desmontaje Embellecedor Funda Desmontaje Panel de control Instalación / Conexión Procedimiento básico 1 Extraiga la llave del contacto y, a continuación, desconecte el terminal de la batería del coche� 2 Realice las conexiones de entrada y salida correspondientes� 3 Instale la unidad en el coche� 4 Vuelva a conectar el terminal de la batería del coche�... -
Página 54: Precaución
(no mezcle terminales delanteros y traseros)� Ì El montaje y cableado de este producto requiere conocimientos y experiencia� Para su seguridad, deje este trabajo a profesionales� Si experimenta problemas durante la instalación, consulte a su distribuidor NORAUTO�... -
Página 55: Cableado
Cableado OE remoto (morado) Toma de micrófono externo (negro) Tierra (negro) SUBWOOFER Conector ISO Salida RCA trasera (izquierda) (derecha) Toma de antena (no incluida) Cuadro de cableado del conector ISO Clavija Color y función Clavija Color y función Violeta Altavoz Amarillo Batería (+) B1/B2 Violeta/... -
Página 56: Operaciones Básicas
Operaciones básicas Extracción del Rueda de control del panel de control volumen Ranura de carga Expulsar el disco Entrada conector auxiliar Pantalla de Encendido/Silencio visualización Terminal USB Al pulsar o mantener pulsado el siguiente botón... Unidad Funcionamiento general principal Seleccionar las fuentes disponibles (RADIO, DAB, BT, USB, SD, AUX IN) Rueda de Gírela para subir o bajar el volumen�... -
Página 57: Unidad Principal
Unidad Funcionamiento general principal Pausa/retoma la reproducción de un dispositivo USB/ SD� Dentro del modo Radio, sirve para entrar en modo „ de Autobúsqueda� Manténgalo pulsado para entrar en el modo de Búsqueda manual� Dentro del modo de Reproducción multimedia, „... -
Página 58: Configuración De Funciones
Configuración de funciones 1 Pulse para acceder al modo [AUDIO MENU]; manténgalo pulsado para entrar en el modo [MENU]� 2 Pulse repetidamente para seleccionar el elemento que desea configurar� 3 Gire la rueda de control del volumen para seleccionar un valor u opción�... - Página 59 Elemento Ajuste seleccionable visualización de la Active o desactive la función de emisora activado/ visualización de la emisora� desactivado Una vez en modo PTY, pulse el botón "Encendido / Silencio" para entrar en el elemento tipo de programa y gire la rueda de control del volumen hasta llegar a la categoría seleccionada�...
- Página 60 Elemento Ajuste seleccionable ON: Cuando se produce un „ anuncio de tráfico, la unidad cambia al modo de sintonización (independientemente del modo actual) y empieza a emitir el IT (información de anuncio acerca de las condiciones tráfico) del tráfico� Cuando el anuncio de tráfico finaliza, regresa al modo anterior�...
-
Página 61: Escuchar La Radio
Elemento Ajuste seleccionable Al ver las palabras "COLO RRGB", el color por defecto es "RGB SCAN(AUTO)"; si gira la rueda de control del volumen para seleccionar el color, este cambiará siguiendo COLOR RGB el orden que se especifica a continuación: "RGB SCAN(AUTO)" "VERDE 1"-"VERDE 2"-"VERDE 3"- "ÁMBAR"-"ROSA 1"-"ROSA 2"- "MORADO 1"-"MORADO 2"-... -
Página 62: Escuchar Un Disco / Dispositivo Usb / Sd
Escuchar un disco / dispositivo USB / SD Pulse para pausar „ Pulse de nuevo para reanudar la Pulse para iniciar la reproducción aleatoria; pulse de „ „ reproducción� nuevo para reproducir de forma aleatoria una carpeta� Pulse para moverse a la carpeta anterior o „... -
Página 63: Reproduciendo Una Tarjeta Sd
Reproduciendo una tarjeta SD 1 Inserte la tarjeta SD en la ranura para tarjetas SD� La unidad reproducirá automáticamente la tarjeta SD� Escuchar otros componentes externos Cable de 3,5 mm (no incluido) 1 Pulse SRC para seleccionar el modo AUDIO IN� 2 Encienda el componente externo y comience la reproducción�... -
Página 64: Introducción
1 Abra el teléfono móvil y conecte el bluetooth� 2 Busque otro dispositivo bluetooth con su dispositivo� 3 Seleccione "NS-228 DBT" en la lista de emparejamiento� 4 Aparecerá el mensaje [PAIRED] en el panel si el emparejamiento se ha realizado con éxito; el dispositivo emparejado se conectará... -
Página 65: Función Dab
2 Pulse para responder / aceptar la llamada� 3 Al finalizar la conversación, pulse para colgar� Transferir una llamada Puede transferir la voz del altavoz al móvil durante la llamada� Mientras habla, mantenga pulsado y la voz se transferirá del altavoz al teléfono móvil�... -
Página 66: Información Del Producto
ESCANEAR 1 Pulse el botón de menú para seleccionar la función de búsqueda de emisoras y confirme pulsando el botón de encendido� 2 El sistema busca emisoras DAB� 3 El número de emisoras encontradas se muestra en la pantalla y se reproduce la primera emisora encontrada� Pulse el botón durante 2 segundos para guardar la emisora en la memoria en el acceso directo establecido (M1-M6)�... -
Página 67: Dispositivos Usb
Sección sintonizador AM Rango de frecuencia: 522-1620 KHz Sensibilidad útil: Mejor que 45 dB a S/N 26 dB Dispositivos USB Memoria flash USB: Compatible con USB 1�1 y 2�0 Acerca de los archivos de audio Sistema de archivos USB o memoria: FAT16, FAT32 „... - Página 68 Contenuto 1 Norme di sicurezza ��������������������������������������������������������������������68 2 Preparazione �����������������������������������������������������������������������������71 3 Componenti �������������������������������������������������������������������������������72 4 Installazione e rimozione dell'unità ��������������������������������������������73 Installazione dell'unità ����������������������������������������������������������������73 Rimozione dell'unità �������������������������������������������������������������������73 5 Installazione/Connessione���������������������������������������������������������74 Procedura di base ���������������������������������������������������������������������74 Avvertenza ���������������������������������������������������������������������������������74 Attenzione ����������������������������������������������������������������������������������75 Connessione dei cavi ���������������������������������������������������������������76 6 Funzioni di base ������������������������������������������������������������������������77 7 Impostazione funzioni ����������������������������������������������������������������79 Ascolto radio ������������������������������������������������������������������������������82 Ascolto di disco/dispositivo USB / SD ���������������������������������������82...
-
Página 69: Norme Di Sicurezza
Norme di sicurezza Ì Prima di utilizzare il dispositivo, leggere attentamente le presenti norme di sicurezza e conservarle come riferimento futuro� Qualora il dispositivo venga ceduto a terzi, si raccomanda di fornirgli anche le norme di sicurezza� Ì Utilizzare il dispositivo secondo le modalità descritte nelle presenti istruzioni�... - Página 70 Ì Conservare il dispositivo in un ambiente asciutto� Non immergere nell'acqua, né in altri liquidi� Ì Non esporre il dispositivo a possibili sgocciolamenti o spruzzi� Ì Non utilizzare il dispositivo in ambienti esposti all’umidità, alle intemperie e in luoghi bagnati� Ì...
- Página 71 raccomanda dunque di utilizzare il dispositivo nel rispetto delle leggi applicabili e del codice della strada� Ì Fare attenzione se si utilizza il dispositivo durante la guida� Evitare che l’uso del dispositivo diventi fonte di distrazione e di disturbo durante la guida� Una scarsa concentrazione può causare incidenti�...
-
Página 72: Preparazione
Preparazione Come attaccare/staccare il frontalino Attaccare Staccare Ì Non esporre il frontalino alla luce diretta del sole, a calore o umidità eccessivi� Evitare luoghi con troppa polvere o con possibilità di spruzzi d'acqua� Ì Riporre il frontalino nella relativa custodia quando è staccato� Ì... -
Página 73: Componenti
Componenti Controllare e verificare i contenuti della confezione: Unità principale Piastra di Pannello frontale (con manicotto) orientamento Connettore maschio 1 vite macchina Manuale dell'utente ISO (A/B) Strumento di 1 estremità in 4 viti smontaggio (2 pezzi) gomma Custodia (per il Microfono esterno pannello frontale) -
Página 74: Installazione E Rimozione Dell'unità
Installazione e rimozione dell'unità Installazione dell'unità Manicotto Piegare le linguette appropriate per mantenere saldamente il manicotto� Piastra di orientamento Pannello di controllo Prima di attaccare questa parte assicurarsi che la rosetta sia corretta� (ganci più grandi in Dashboard basso)� Vite (non inclusa in questa confezione) Manicotto Piastra di... -
Página 75: Installazione/Connessione
Smontaggio Piastra di orientamento Manicotto Smontaggio Pannello di controllo Installazione/Connessione Procedura di base 1 Rimuovere la chiave dalll'interruttore di accensione e scollegare il terminale della batteria dell'auto� 2 Eseguire i corretti collegamenti dei cavi di ingresso e di uscita� 3 Installare l'unità sull'auto� 4 Ricollegare il terminale della batteria dell'auto�... -
Página 76: Attenzione
(non confondere anteriore e posteriore)� Ì Il montaggio e il cablaggio di questo prodotto richiedono abilità ed esperienza� Per motivi di sicurezza, far eseguire questo lavoro a professionisti� Se si verificano problemi durante l'installazione, rivolgersi al rivenditore NORAUTO�... -
Página 77: Connessione Dei Cavi
Connessione dei cavi Controllo remoto OE (viola) Jack microfono esterno (nero) Messa a terra (nero) SUB-W Connettore ISO Uscita RCA posteriore (sinistra) (destra) Jack antenna (non incluso) Grafico cablaggio connettore ISO Colore e funzione Colore e funzione Altoparlante Viola A4 Giallo Batteria (+) B1/B2 posteriore Viola/... -
Página 78: Funzioni Di Base
Funzioni di base Staccare il pannello Manopola del di controllo volume rotante Slot di caricamento Espulsione disco Jack Aux-In Accensione/Silenzioso Finestra display Terminale USB Quando si premono o si tengono premuti i seguenti pulsanti... Unità Funzionamento generale principale Selezionare le sorgenti disponibili (RADIO, DAB, BT, USB, SD, AUX IN) Manopola Ruotarla per aumentare o diminuire il volume�... -
Página 79: Unità Principale
Unità Funzionamento generale principale Mettere in pausa/Riprendere la riproduzione di un dispositivo USB/SD� In modalità Radio per accedere alla modalità di „ ricerca automatica, tenere premuto per accedere alla modalità di ricerca manuale� In modalità Riproduzione multimediale per „ saltare brano/file, tenere premuto per andare avanti indietro veloce�... -
Página 80: Impostazione Funzioni
Impostazione funzioni 1 Premere per accedere alla modalità [AUDIO MENU], tenere premuto per accedere alla modalità [MENU]� 2 Premere ripetutamente per selezionare l'elemento da regolare� 3 Girare la manopola del volume dell'encorder per selezionare un valore/un'opzione� [MENU AUDIO] Elemento Impostazione selezionabile REGOLAZIONE BASSI LIVELLO BASSI... - Página 81 Elemento Impostazione selezionabile visualizzazione nome della Attivare/Disattivare la funzione stazione radio On/ visualizzazione nome della stazione radio� Una volta nella modalità TIP, premere il pulsante "Accensione/Silenzioso" entrare nell'elemento del tipo di programma e ruotare la manopola del volume dell'encoder nella categoria selezionata� Tipo di programma disponibile: „...
- Página 82 Elemento Impostazione selezionabile ATTIVO: Quando l'orologio „ Visualizzazione del nome delle stazioni radio è attivo, la stazione Visualizzazione del nome delle stazioni radio corregge CT (Orologio) automaticamente l'ora di sistema dell'autoradio� DISATTIVATO: Disattiva questa funzione „ Per ricevere più stazioni radio o solo LOCALE ON/OFF stazioni con segnale forte, è...
-
Página 83: Ascolto Radio
Ascolto radio Tenere premuto per circa 2 secondi per memorizzare la stazione corrente� „ Premere brevemente per richiamare la stazione memorizzata� „ 1 Premere ripetutamente BND per una banda (FM1, FM2, FM3, AM1 (MW1) o AM2 (MW2)� 2 Premere per ricercare una stazione� Ascolto di disco/dispositivo USB / SD Premere per mettere in pausa „... -
Página 84: Ascolto Di Altri Componenti Esterni
Riproduzione di un disco Inserire il disco nel relativo alloggiamento con il lato dell'etichetta rivolto verso l'alto e l'unità verrà riprodotta automaticamente� Riproduzione di un dispositivo USB 1 Scorrere il coperchio della presa USB con il marchio sulla destra� 2 Inserire il dispositivo USB nella presa USB� L'unità inizia automaticamente la riproduzione dal dispositivo USB�... -
Página 85: Funzionamento Bluetooth
1 Apri il cellulare e accendi il Bluetooth� 2 Cercare un altro dispositivo bluetooth con il tuo dispositivo� 3 Selezionare "NS-228 DBT" nell'elenco di abbinamento� 4 [PAIRED] verrà visualizzato sul pannello se l'abbinamento è avvenuto correttamente e il dispositivo abbinato si collegherà... - Página 86 Per ricomporre un numero 1 Premere sulla parte anteriore del pannello per ricomporre� 2 L'apparecchio visualizzerà [CALLING] e l'unità inizia a comporre il numero chiamato l'ultima volta� Attenzione: Per effettuare una chiamata in uscita su questa unità, la connessione Bluetooth tra l'unità e il telefono deve essere attiva� Ricevere una chiamata 1 Se vi è...
-
Página 87: Funzionamento In Modalità Dab
Funzionamento in modalità DAB RADIO DAB 1 Scorrere le sorgenti dei programmi con il pulsante SRC e selezionare la modalità DAB� 2 Premere ripetutamente il tasto Menu quando il prodotto è in modalità DAB per scorrere le opzioni del menu: SCANSIONE => 12 V ATTIVAZIONE/DISATTIVAZION = PRUNE (RESET DAB) = RE-CON = COLORE RGB = CLK = BIP... -
Página 88: Informazioni Sul Prodotto
Informazioni sul prodotto Generale Alimentazione: 12 V CC (10,5-14,4 V), messa a terra negativa Fusibile: 15 A Impedenza altoparlante idonea: 4-8 Ω Livello MP3-Link: 500 mV Sezione audio Uscita tensione massima: 4 canali da 50 W Uscita tensione continua: 4 RMS da 28 W Sezione sintonizzatore FM Intervallo di frequenza: 87,5-108,0 MHz Sensibilità... -
Página 89: Smaltimento
Smaltimento Smaltimento selettivo dei rifiuti elettrici ed elettronici� I prodotti elettrici non possono essere smaltiti con gli altri prodotti doemstici� Secondo la Direttiva Europea 2012/19/ UE per lo smaltimento dei materiali elettrici ed elettronici e la sua attuazione nel diritto nazionale, i prodotti elettrici usati devono essere raccolti separatamente e disposti in punti di raccolta previsti a questo scopo�... - Página 90 Índice 1 Conselhos de segurança �����������������������������������������������������������90 2 Preparação ��������������������������������������������������������������������������������93 3 Componentes ����������������������������������������������������������������������������94 4 Instalação e remoção da unidade ���������������������������������������������95 Instalação da unidade ���������������������������������������������������������������95 Remoção da unidade ����������������������������������������������������������������95 5 Instalação / Ligação�������������������������������������������������������������������96 Procedimento básico �����������������������������������������������������������������96 Aviso ������������������������������������������������������������������������������������������96 Advertência ��������������������������������������������������������������������������������97 Ligação de cablagem ���������������������������������������������������������������98 6 Operação básica �����������������������������������������������������������������������99 7 Definições das funções �����������������������������������������������������������101 Ouvir rádio �������������������������������������������������������������������������������104...
-
Página 91: Conselhos De Segurança
Conselhos de segurança Ì Antes de utilizar o seu dispositivo, ler as instruções de segurança e guardá-las para utilização no futuro� Em caso de oferta a terceiros, as instruções de segurança deverão acompanhar o aparelho� Ì Utilizar este dispositivo conforme descrito neste manual de instruções�... - Página 92 Ì Não expor a unidade a salpicos de água� Ì Não utilizar a unidade em locais expostos a humidade ou a intempéries nem em locais molhados� Ì Nenhum objeto com líquidos, por exemplo copos, deve ser colocado em cima da unidade� Ì...
-
Página 93: Manutenção
esquecer que deve dominar e ser responsável pelo veículo que conduz� Ì A unidade não deve ser utilizada se não estiverem reunidas as condições de condução em segurança (mau tempo, estradas perigosas, trânsito denso e complicado, etc�)� Ì O volume sonoro deve estar a um nível adequado; um volume elevado pode impedir que o condutor oiça os ruídos exteriores, o que pode gerar um risco de acidente�... -
Página 94: Preparação
Preparação Como fixar/remover a placa dianteira Fixação Remoção Ì Não exponha a placa dianteira à luz solar direta, a calor excessivo ou a humidade� Evite também locais com demasiada poeira ou onde exista a possibilidade de ocorrerem salpicos de água� Ì... -
Página 95: Componentes
Componentes Verifique e identifique o conteúdo da sua embalagem: Unidade principal Placa de Painel frontal (com manga) acabamento Parafuso de Conector macho Manual de utilizador máquina x 1 unid� ISO (A/B) Ferramenta de Ponta de borracha x desmontagem Parafuso x 4 unid� 1 unid�... -
Página 96: Instalação E Remoção Da Unidade
Instalação e remoção da unidade Instalação da unidade Dobre as patilhas Manga adequadas para manter a manga firmemente na sua Placa de acabamento posição� Painel de controlo Antes de fixar, certifique-se de que a direção do escudo está correta� (Ganchos Painel de mais largos no lado instrumentos... -
Página 97: Instalação / Ligação
Desmontagem Placa de acabamento Manga Desmontagem Painel de controlo Instalação / Ligação Procedimento básico 1 Retire a chave do interruptor da ignição e desligue o terminal da bateria do automóvel� 2 Instale devidamente as ligações de cabos de entrada e de saída� 3 Instale a unidade no seu automóvel�... -
Página 98: Advertência
Ì Certifique-se de que liga novamente esta unidade ao chassis do automóvel (terra) após a instalação� Ì Se a energia não estiver LIGADA, o cabo do altifalante pode entrar em curto-circuito ou tocar o chassis do veículo e a função de proteção pode ser ativada�... -
Página 99: Ligação De Cablagem
Se sofrer alguns problemas durante a instalação consulte o seu representante NORAUTO� Ligação de cablagem OE remoto(Roxo) Ficha mic externa (Preto) Terra (Preto) SUB-W Conector ISO Saída RCA traseira (esquerda) (direita) Ficha antena (não incluída) Tabela de cablagem do conector ISO Pino Cor e função... -
Página 100: Operação Básica
Operação básica Desencaixe o Botão de volume Ranhura de painel de controlo rotativo carregamento Ejetar o disco Ficha Aux-In Ligar/Desligar / Sem som Janela de visualização Terminal USB Quando prime ou mantém premido o(s) botão(ões) seguinte(s)... Unidade Operação geral principal Selecione as fontes disponíveis (RÁDIO, DAB, BT, USB, SD, AUX IN) Botão de... -
Página 101: Unidade Principal
Unidade Operação geral principal Pausa/retoma a reprodução de um dispositivo USB/ SD� No modo Rádio, para entrar no modo de Procura „ automática, prima e mantenha premido para entrar no modo de Procura manual� No modo de Reprodução multimédia, para saltar „... -
Página 102: Definições Das Funções
Definições das funções 1 Prima para aceder ao mod [AUDIO MENU], prima e mantenha premido para entrar no modo [MENU]� 2 Prima repetidamente para selecionar o item a ajustar� 3 Gire o botão de volume do codificador para selecionar um valor / opção�... - Página 103 Item Definição selecionável Ligar/Desligar Ligue ou Desligue a funçãoafixaçao da afixaçao da frequência� frequência No modo PTY, prima o botão "Ligar/ Desligar / Sem som" para ir para o item do tipo de programa e gire o botão do volume do codificador para a categoria selecionada�...
- Página 104 Item Definição selecionável LIGADA: Quando o relógio Exibição „ dos nomes das estações de rádio se encontra ligado, a estação Exibição dos CT ("hora do nomes das estações de rádio corrige relógio") automaticamente o relógio do sistema do rádio do automóvel� DESLIGADA: Desligue esta função „...
-
Página 105: Ouvir Rádio
Ouvir rádio Mantenha premido durante cerca de 2 segundos para memorizar a „ estação atual� Prima rapidamente para obter a estação memorizada� „ 1 Prima BND repetidamente para uma banda (FM1, FM2, FM3, AM1 (MW1) ou AM2 (MW2)� 2 Prima para procurar uma estação�... -
Página 106: Ouvir Outros Componentes Externos
Reproduzir um disco Insira o disco na Ranhura de discos com o lado da etiqueta virado para cima; a unidade iniciará a reprodução automaticamente� Reproduzir um dispositivo USB 1 Deslize a cobertura com o indicador da ranhura USB para a direita�... -
Página 107: Operação De Bluetooth
1 Ligue o seu telemóvel e ative a função Bluetooth� 2 Procure outros dispositivos Bluetooth com o seu dispositivo� 3 Selecione “NS-228 DBT” na lista de emparelhamento� 4 Será exibida a indicação [PAIRED] no painel se o emparelhamento for bem sucedido e o dispositivo emparelhado será... - Página 108 2 Depois de marcar o número é exibida a indicação [CALLING]� Para marcar novamente um número 1 Prima no painel frontal para marcar novamente o número� 2 A unidade exibirá a indicação [CALLING], e a unidade começará a marcar o número mais recente� Nota: Para fazer uma chamada nesta unidade, a ligação Bluetooth entre a unidade e o telefone tem de estar ativa�...
-
Página 109: Operação Dab
Operação DAB RÁDIO DAB 1 Navegue pelas fontes de programas com o botão SRC para DAB� 2 Prima o botão "Menu" repetidamente com o produto no modo DAB para navegar pelas opções do menu: PESQUISAR=>12 V LIGAR/DESLIGAR=PRUNE(REPOR DAB)=RE-CON=Cor RGB =CLK=BIP PESQUISAR 1 Prima o botão (MENU) para selecionar a função de pesquisa de estação "PESQUISAR", e confirme premindo o botão de ligar/... -
Página 110: Eliminação
Secção áudio Potência de saída máxima: 50 W x 4 canais Potência de saída contínua: 28 W x 4 RMS Secção de sintonizador FM Amplitude de frequência: 87,5-108,0 MHz Sensibilidade utilizável: Superior a 15dB em S/N 30dB Secção de sintonizador AM Amplitude de frequência: 522-1620 KHz Sensibilidade utilizável: Superior a 45dB em S/N 26dB Dispositivos USB... - Página 111 Spis treści 1 Bezpieczeństwo����������������������������������������������������������������������� 111 2 Przygotowanie �������������������������������������������������������������������������113 3 Części ��������������������������������������������������������������������������������������114 4 Montaż i demontaż urządzenia������������������������������������������������ 115 Montaż urządzenia ������������������������������������������������������������������115 Demontaż urządzenia ��������������������������������������������������������������115 5 Montaż/podłączanie�����������������������������������������������������������������116 Podstawy obsługi ���������������������������������������������������������������������116 Ostrzeżenie������������������������������������������������������������������������������ 116 Ostrzeżenie������������������������������������������������������������������������������ 117 Podłączenie przewodów ���������������������������������������������������������118 6 Podstawy obsługi���������������������������������������������������������������������119 7 Konfiguracja funkcji �����������������������������������������������������������������121 Słuchanie radia ������������������������������������������������������������������������124 Słuchanie nagrań...
-
Página 112: Środki Ostrożności
Środki ostrożności Ì Przed rozpoczęciem użytkowania urządzenia należy uważnie przeczytać te środki ostrożności i zachować je na przyszłość. Jeśli przekażesz ten produkt osobom trzecim, należy również przekazać im instrukcję obsługi. Ì Należy używać urządzenia w sposób opisany w instrukcji. Niewłaś ciwa obsługa oraz inne zastoso wanie niż podane w instrukcji użytkowania, zwalnia z odpowiedzi alności producenta. - Página 113 Ì Nie przykrywać urządzenia takimi przedmiotami, jak gazety, obrusy, zasłony itp. Ì Nie należy wystawiać urządzenia na działanie promieni słoneczny ch i wysokich temperatur. Ì Jeśli kable i / lub urządzenia są uszkodzone, nie należy korzys tać z urządzenia i zgłosić to do producenta lub obsługi po- sprzedażowej do naprawy lub zamiany.
-
Página 114: Przygotowanie
Przygotowanie Montaż/demontaż panelu Montaż Demontaż Ì Chroń panel przed bezpośrednim nasłonecznieniem, wysokimi temperaturami i wilgocią. Należy unikać miejsc bardzo zapylonych lub miejsc, w których może dojść do zachlapania panelu wodą. Ì Zdemontowany panel należy przechowywać w załączonym etui. Ì Panel jest precyzyjnym komponentem, który może zostać uszkodzony na skutek uderzenia lub wstrząsów. -
Página 115: Części
Części Sprawdź zawartość opakowania i zapoznaj się z podzespołami: Urządzenie główne Panel przedni Ramka (z kieszenią) Złącze męskie Śruba x 1 szt. Instrukcja obsługi ISO (A/B) Przyrząd do Zatyczka gumowa x Śruba x 4 szt. demontażu (2 szt.) 1 szt� Mikrofon zewnętrzny Etui (do panelu) -
Página 116: Montaż I Demontaż Urządzenia
Montaż i demontaż urządzenia Montaż urządzenia Kieszeń Odegnij odpowiednie wypusty, aby kieszeń nie przesuwała się. Ramka Panel sterowania Przed montażem sprawdź czy orientacja ramki jest właściwa. (Szersze zaczepy Deska powinny znajdować rozdzielcza się na spodzie). Śruba (niedołączona do opakowania) Kieszeń Ramka Panel sterowania Demontaż... -
Página 117: Montaż/Podłączanie
Demontaż Ramka Kieszeń Demontaż Panel sterowania Montaż/podłączanie Podstawy obsługi 1 Wyjmij kluczyk ze stacyjki, a następnie odłącz zacisk akumulatora� 2 Podłącz przewody wejściowe i wyjściowe. 3 Zainstaluj urządzenie w samochodzie. 4 Ponownie podłącz zacisk akumulatora� 5 Zresetuj urządzenie. Ostrzeżenie Ì Urządzenie można instalować wyłącznie w pojazdach posiadających zasilanie prądem stałym o napięciu 12 V, gdzie przewód ujemny połączony jest z uziemieniem. -
Página 118: Ostrzeżenie
(nie wykonuj połączenia mieszanego – przód i tył). Ì Montaż i podłączenie urządzenia wymagają odpowiednich umiejętności i doświadczenia. Aby zapewnić bezpieczeństwo, zleć tę pracę profesjonaliście. Jeśli w trakcie instalacji wystąpią problemy, skonsultuj się ze sprzedawcą produktów NORAUTO. -
Página 119: Podłączenie Przewodów
Podłączenie przewodów Kluczyk zdalnego uruchomienia (fioletowy) Zewnętrzny mikrofon (czarny) Uziemienie (czarny) Głośnik SUB-W Złącze ISO Tylne wyjście RCA (lewe) (prawe) Wtyk antenowy (opcjonalny) Przyporządkowanie przewodów złącza ISO Kolor i funkcja Kolor i funkcja Głośnik Fioletowy A4 Żółty Akumulator (+) B1/B2 fioletowy/ tylny, czarny... -
Página 120: Podstawy Obsługi
Podstawy obsługi Zwalnianie panelu sterowania Pokrętło głośności Szczelina na płyty Wysuwanie płyty Gniazdo Aux-In Zasilanie/wyciszanie Okno wyświetlacza Złącze USB Naciśnięcie lub przytrzymanie poniższego przycisku (przycisków) sprawi... Urządzenie Funkcja główne Wybierz spośród dostępnych źródeł (RADIO, DAB, BT, USB, SD, POMOCNICZE) Obróć, aby zwiększyć lub zmniejszyć głośność. Pokrętło „... - Página 121 Urządzenie Funkcja główne Wstrzymanie/wznowienie odtwarzania z urządzenia USB/SD� W trybie radia: przejście do trybu automatycznego „ wyszukiwania; naciśnij i przytrzymaj, aby przejść do trybu wyszukiwania ręcznego. W czasie odtwarzania: pomijanie utworu/pliku; „ naciśnij i przytrzymaj, aby cofnąć/przewinąć do przodu� Dostęp do menu barwy dźwięku; naciśnij i przytrzymaj, aby przejść...
-
Página 122: Konfiguracja Funkcji
Konfiguracja funkcji 1 Naciśnij , aby uruchomić [AUDIO MENU], naciśnij i przytrzymaj, aby uruchomić [MENU]� 2 Kilkakrotnie naciśnij , aby wybrać element do regulacji. 3 Obróć pokrętło głośności, aby wybrać wartość/opcję. [MENU AUDIO] Opcja Ustawienia USTAW BAS POZIOM BASU Zakres regulacji: -7 do +7� USTAW SOPRANY POZIOM Zakres regulacji: -7 do +7�... - Página 123 Opcja Ustawienia Wł./wył. Obsługa Włączanie lub wyłączanie funkcji Obsługa wy ś wietlanie wy ś wietlanie stacji. stacji Po uruchomieniu trybu PTY, naciśnij przycisk „Zasilanie/wyciszanie”, aby przejść do wybierania typów programów, a następnie obróć pokrętło głośności, aby wybrać kategorię. Dostępne typy programów: „...
- Página 124 Opcja Ustawienia WŁ.: Gdy zegar Wyświetlanie nazw „ stacji radiowych jest włączony, stacja CT (Godzina na Wyświetlanie nazw stacji radiowych automatycznie skoryguje godzinę zegarze) systemową radia samochodowego. WYŁ.: Wyłącza tę funkcję „ Aby odbierać większą liczbę stacji WŁ./WYŁ. radiowych lub ograniczyć wybór do stacji o najsilniejszym sygnale, zmień...
-
Página 125: Słuchanie Radia
Słuchanie radia Przytrzymaj przez około 2 sekundy, aby zapamiętać aktualnie „ wybraną stację radiową. Naciśnij krótko, aby przywołać zapamiętane stacje. „ 1 Kilkakrotnie naciśnij BND, aby wybrać zakres częstotliwości (FM1, FM2, FM3, AM1 (MW1) lub AM2 (MW2)� 2 Naciśnij , aby wyszukać stację radiową. Słuchanie nagrań... -
Página 126: Słuchanie Materiału Dźwiękowego Z Innych Urządzeń Zewnętrznych
Odtwarzanie z urządzenia USB 1 Przesuń pokrywę gniazda USB, oznaczoną symbolem która znajduje się z prawej strony. 2 Podłącz urządzenie USB do gniazda USB. Materiał zgromadzony na urządzeniu USB zostanie odtworzony automatycznie� Odtwarzanie z karty SD 1 Włóż kartę SD do gniazda karty SD. Urządzenie automatycznie rozpocznie odtwarzanie z karty SD�... -
Página 127: Obsługa Bluetooth
1 Włącz telefon komórkowy i włącz połączenia Bluetooth w telefonie. 2 Uruchom w telefonie wyszukiwanie nowych urządzeń Bluetooth. 3 Z listy wykrytych urządzeń wybierz „NS-228 DBT”� 4 Jeżeli parowanie zakończy się sukcesem, na panelu pojawi się wskazanie [PAIRED], a sparowane urządzenie automatycznie połączy się... - Página 128 2 Po zakończeniu wybierania numeru pojawi się wskazanie: [CALLING]� Ponowne wybieranie numeru 1 Aby ponownie wybrać numer, naciśnij na panelu przednim� 2 Urządzenie wyświetli wskazanie [CALLING] i rozpocznie się wybieranie ostatniego numeru� Uwaga: aby możliwe było wykonywanie połączeń wychodzących za pośrednictwem niniejszego urządzenia, należy nawiązać...
-
Página 129: Obsługa Dab
3 Aby przejść do poprzedniej/następnej ścieżki, naciśnij � Obsługa DAB RADIO DAB 1 Przełączaj między źródłami programów za pomocą przycisku SRC, aż do DAB. 2 By przełączać opcje menu w trybie DAB, naciśnij wielokrotnie przycisk menu: WYSZUKIWANIE => 12 V WŁ. -
Página 130: Utylizacja
Parametry audio Maksymalna moc wyjściowa: 50 W x 4 kanały Ciągła moc wyjściowa: 28 W x 4 RMS Tuner FM Zakres częstotliwości: 87,5-108,0 MHz Czułość użytkowa: powyżej 15 dB przy stosunku sygnału do szumu=30 dB Tuner AM Zakres częstotliwości: 522-1620 KHz Czułość... - Página 131 Contents 1 Safety instructions �������������������������������������������������������������������131 2 Preparation ������������������������������������������������������������������������������134 3 Components ����������������������������������������������������������������������������135 4 Installing and removing the unit �����������������������������������������������136 Installing the unit ����������������������������������������������������������������������136 Removing the unit ��������������������������������������������������������������������136 5 Installation/Connection ������������������������������������������������������������137 Basic Procedure ����������������������������������������������������������������������137 Warning �����������������������������������������������������������������������������������137 Caution ������������������������������������������������������������������������������������138 Wiring Connection ������������������������������������������������������������������139 6 Basic Operation �����������������������������������������������������������������������140 7 Function Setting�����������������������������������������������������������������������141 Listening to the Radio ��������������������������������������������������������������144 Listening to a Disc/USB/SD device �����������������������������������������145...
-
Página 132: Safety Instructions
Safety instructionsSAFETY INSTRUCTIONS Ì Before using your car audio system, please read these safety precautions thoroughly and keep them for future reference� If you give this car audio system to someone else, please also give them these safety instructions� Ì Use this car audio system as described in this instruction manual�... - Página 133 Ì Objects filled with liquids, such as vases, must not be placed on the unit� Ì Do not cover the unit with newspaper, cloths, curtains or other similar objects� Ì Do not directly expose the unit to sunlight or heat� Ì...
- Página 134 Keep the volume at a suitable level� Excessive volume may prevent you from hearing noises from your surroundings, which may result in a risk of accidents� Ì Prolonged exposure to high volumes (especially with headphones) can damage your hearing� Avoid setting the volume too high or using the unit for too long�...
-
Página 135: Preparation
Preparation How to attach/detach the faceplate Attach Detach Ì Do not expose the faceplate to direct sunlight, excessive heat, or humidity� Also avoid places with too much dust or the possibility of water splashing� Ì Keep the faceplate in its casing while detached� Ì... -
Página 136: Components
Components Check and identify the contents of your package: Main unit Front Panel Trim Plate (with sleeve) Machine Screw x ISO male User manual 1pcs connector(A/B) Disassembly tool Screw x 4pcs Rubber End x 1pcs (2pcs) Carrying case External Mic (for front panel) -
Página 137: Installing And Removing The Unit
Installing and removing the unit Installing the unit Sleeve Bend the appropriate tabs to hold the sleeve firmly in place� Trim plate Control panel Before attaching, make sure the direction of the escutcheon is correct� (Wider hooks on the Dashboard bottom side�) Screw (not included in this packing) -
Página 138: Installation/Connection
Disassembly Trim plate Sleeve Disassembly Control panel Installation/Connection Basic Procedure 1 Remove the key from the ignition switch, then disconnect the terminal of the car battery� 2 Make proper input and output wire connections� 3 Install the unit to your car� 4 Reconnect the terminal of the car battery�... -
Página 139: Caution
(do not mix front and rear)� Ì Mounting and wiring this product requires skills and experience� For safety’s sake, leave this work to professionals� If you experience problems during installation, consult your NORAUTO dealer�... -
Página 140: Wiring Connection
Wiring Connection OE Remote(Purple) External Mic Jack (Black) Ground (Black) SUB-W ISO Connector Rear RCA Output (Left) (Right) Antenna Jack (not included) ISO Connector Wiring Chart Color and function Color and function Violet Right rear A4 Yellow Battery (+) B1/B2 Violet/ speaker Black... -
Página 141: Basic Operation
Basic Operation Detach the Rotatory Volume control panel Knob Loading slot Eject the disc Aux-In jack Power/Mute Display window USB terminal When you press or hold the following button(s)... Main unit General operation Select the available sources (RADIO, DAB, BT, USB, SD, AUX IN) Rotatory Rotate it to increase or decrease the volume�... -
Página 142: General Operation
Main unit General operation Under Radio mode to enter into the Auto Seek „ mode, press and hold to enter into the Manual Seek mode� Under Media playback mode to skip track/file, „ press and hold to fast forward/backward� To access into the Audio Menu mode, press and hold to enter into the System Menu mode�... - Página 143 Item Selectable Setting TREBLE ADJUST TREBLE LEVEL Adjust the level -7 to +7� Adjust the balance between the right and BALANCE left speakers from 10R (full right) to 10L (full left)� Adjust the fader between the front and rear FADER speakers from 10R (full rear) to 10F (full front)�...
- Página 144 Item Selectable Setting ON: The unit will be searches for „ another station with stronger signal, but AF (Alternate with the same program identification as Frequencies) the current station automatically� OFF: Cancel „ ON: When there is traffic announcement, „ the unit switches to the tuner mode (regardless of the current mode) and begins to broadcast the announcement...
-
Página 145: Listening To The Radio
Item Selectable Setting When seeing the Words of “RGB COLOR”, the default color is “RGB SCAN(AUTO)”, rotating encoder volume knob to select the color, the color will change in the following RGB COLOR order :”RGB SCAN(AUTO)” “GREEN 1”-”GREEN 2”-”GREEN 3”- ”AMBER”-”PINK 1”-”PINK 2”-”PURPLE 1”-”PURPLE 2”-”BLUE 1”... -
Página 146: Listening To A Disc/Usb/Sd Device
Listening to a Disc/USB/SD device Press to pause� „ Press to start random play, press again to random a „ Press again to resume playback� folder� „ Press to move next/previous a folder� Press to select a track/file� „ Press and hold for fast forward/backward� „... -
Página 147: Listening To The Other External Components
Playing a SD card device 1 Insert the SD card into the SD card slot� The unit will play the SD card automatically� Listening to the other external components 3�5 mm Cable (not included) 1 Press the SRC to select AUDIO IN mode� 2 Turn on the external component and start playing�... -
Página 148: Getting Started
1 Open your mobile phone and switch bluetooth on� 2 Search for other bluetooth device with your device� 3 Select “NS-228 DBT” in the pairing list� 4 [PAIRED] will be displayed on the panel if pairing is successful, and the paired device will connect to the car audio system automatically�... -
Página 149: Dab Operation
Call Transfer You can transfer voice from loudspeaker to mobile phones during call� During talking, press and hold voice transfers from loudspeaker to mobile phone� Bluetooth Audio Streaming A2DP If the connected Bluetooth device supports Advanced Audio Distribution Profile (A2DP), you can listen to the music stored on the device through the unit�... -
Página 150: Product Information
4 Press repeatedly until the required station / frequency is shown� Antenna amplification ON / OFF 1 Select ON if a DAB antenna with 12V antenna amplification is used� 2 Select OFF if a passive DAB antenna or DAB antenna with an external power supply is used�... -
Página 151: Disposal Of The Product
MP3/WMA bit rate: 32-320kbps and varible bit rate „ MP3 sampling frequencies: 8-48 KHz „ WMA sampling frequencies: 32 KHz, 44�1 KHz, 48 KHz „ ID3 tag v1�0 or later „ Support WAV, FLAC, AAC, WMA, MP3 „ Disposal of the product This marking indicates that this product should not be disposed of with other household wastes throughout EU�... - Página 152 De volledige tekst van de EU-conformiteitsverklaring kan worden geraadpleegd op het volgende internetadres : www�MGTS�com� Por la presente, Norauto, declara que el tipo de equipo radioeléctrico 29913-2201425-MW102 CD DAB/DAB+ / A�RADIO NS 228 DBT es conforme con la Directiva 2014/53/UE�...
- Página 153 Norauto, declara que o presente tipo de equipamento de rádio 29913-2201425-MW102 CD DAB/DAB+ / A�RADIO NS 228 DBT está em conformidade com a Diretiva 2014/53/UE� O texto integral da declaração de conformidade está disponível no seguinte endereço de Internet : www�MGTS�com�...
- Página 154 Noroto España SAU Centre Comercial Alban Carretera de Ademuz km 2,9 46100 BURJASSOT Norauto Italia SPA Corso Savona 85/10024 MONCALIERI Norauto Portugal LDA Av� dos Cavaleiros, n°49 Alfragide 2794-057 CARNAXIDE Norauto Polska Sp z o�o�, ul� Jubilerska 10, 04-190 Warszawa www�norauto�com / www�atu�eu Made in P�R�C / Fabricado en/na R�P�C / Fabriqué...