Publicidad
Idiomas disponibles
Idiomas disponibles
Enlaces rápidos
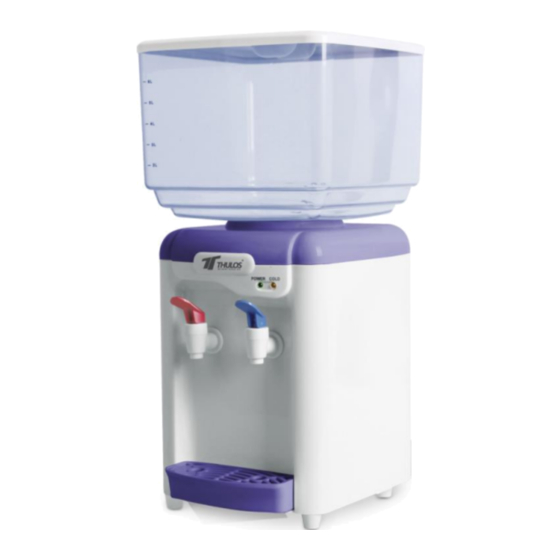
DISPENSADOR DE AGUA 7L
Manual de Instrucciones
TH-DL07
POR FAVOR, LEA ESTE MANUAL DE INSTRUCCIONES Y GUÁRDELO PARA FUTURAS
CONSULTAS.
Para evitar incendios, choques eléctricos, quemaduras y otros daños personales, hay que respetar
unas medidas básicas de seguridad cuando utilice aparatos eléctricos.
Por su propia seguridad y para que pueda efectuar un uso correcto, por favor, lea este manual con atención
antes de utilizar su calefactor por primera vez
Publicidad

Resumen de contenidos para Thulos TH-DL07
- Página 1 DISPENSADOR DE AGUA 7L Manual de Instrucciones TH-DL07 POR FAVOR, LEA ESTE MANUAL DE INSTRUCCIONES Y GUÁRDELO PARA FUTURAS CONSULTAS. Para evitar incendios, choques eléctricos, quemaduras y otros daños personales, hay que respetar unas medidas básicas de seguridad cuando utilice aparatos eléctricos.
- Página 2 INTRODUCCIÓN. Agradecemos la confianza depositada en nosotros al adquirir este producto THULOS. Nuestro principal empeño es ofrecer artículos excelentes, manteniendo los más estrictos controles de calidad y cumpliendo todas las normativas vigentes de seguridad, con el objetivo de presentar un producto perfecto y seguro para el uso domestico.
- Página 3 ACCESORIOS Y ADAPTADORES DEL DISPENSADOR. (1) ADAPTADOR PARA BOTELLAS DE LITRO Y MEDIO. (2) ADAPTADOR PARA GARRAFAS DE 5 LITROS. (3) ADAPTADOR SOPORTE PARA DISPENSADOR. (5) DEPÓSITO DE 7 LITROS. (6) VÁLVULA PARA DEPÓSITO DE 7 LITROS. (7) BANDEJA RECOGE DERRAMES DE AGUA.
- Página 4 MONTAJE PASO A PASO. **** PARA BOTELLA DE UN LITRO Y MEDIO (Ó BOQUILLA PEQUEÑA). 1. Quitar el tapón a la botella. 2. Poner el adaptador(1) para boquillas pequeñas. 3. Enroscar bien el adaptador(1) a la botella. 4. Poner el adaptador de dispensador(3) al dispensador. 5.
-
Página 5: Advertencias Para El Llenado En Cualquiera De Los Casos
**** PARA PONER EL DEPÓSITO DE 7 LITROS. Para colocar el depósito de 7 litros en el dispensador seguimos los siguientes pasos: 1. Coger el depósito(5) y enroscar la válvula(6) de llenado y corte. 2. Ajustar el depósito con la válvula puesta directamente al dispensador sin adaptadores. 3. - Página 6 MANTENIMIENTO Y LIMPIEZA. - Antes de proceder a su limpieza, siempre desenchufar de la corriente eléctrica. - Siempre mantenga el espacio alrededor del dispensador limpio de polvo y despejado. - Para evitar y prevenir el crecimiento de moho, no coloque el dispensador en lugares expuestos de forma directa a la luz del sol y/o a corrientes de aire caliente.
-
Página 7: Normas De Protección Del Medio Ambiente
CONDICIONES DE GARANTÍA. 1. ESTE APARATO ESTA CUBIERTO CONTRA CUALQUIER DEFECTO DE FÁBRICA. 2. EL APARATO SE CAMBIARÁ SIEMPRE Y CUANDO ESTÉ DENTRO DEL PLAZO DE CAMBIO Y SE DEVUELVA CON TODOS SUS ACCESORIOS Y EMBALAJE. 3. LA GARANTÍA SERÁ VÁLIDA SIEMPRE Y CUANDO EL APARATO VAYA ACOMPAÑADO DE SU FACTURA Ó... - Página 8 WATER DISPENSER ( 7 LITERS ) Instructions Manual TH-DL07 PLEASE READ THIS INSTRUCTION MANUAL AND KEEP IT FOR FUTURE REFERENCE. To avoid fires, electric shocks, burns and other personal injuries, basic safety precautions must be followed when using electrical appliances.
- Página 9 INTRODUCTIÓN. We appreciate the trust placed in us when purchasing this THULOS product. Our main effort is to offer excellent items, maintaining the strictest quality controls and complying with all current safety regulations, in order to present a perfect and safe product for domestic use.
- Página 10 ACCESORIOS Y ADAPTADORES DEL DISPENSADOR. (1) ADAPTER FOR BOTTLES OF 1’5 LITERS (SMALL NOZZLE). (2) ADAPTER FOR CARAFE OF 5 LITERS (BIG NOZZLE). (3) ADAPTER SUPPORT FOR DISPENSER. (5) DEPOSIT OF 7 LITERS. (6) VALVE FOR 7 LITERS DEPOSIT. (7) TRAY COLLECTS WATER SPILLS.
- Página 11 ASSEMBLY STEP BY STEP. **** FOR BOTTLES OF LITER AND A HALF (OR SMALL NOZZLE). 1. Remove the cap to the bottle. 2. Put the adapter (1) for small nozzles. 3. Screw the adapter (1) firmly onto the bottle. 4. Put the dispenser adapter (3) to the dispenser. 5.
- Página 12 **** TO PUT THE 7 LITERS DEPOSIT. To place the 7-liter tank in the dispenser, we follow the following steps: 1. Take the tank (5) and screw the filling and cutting valve (6). 2. Adjust the tank with the valve directly to the dispenser without adapters. 3.
- Página 13 COMPLETED EMPTY OF THE DISPENSER. - To completely empty the dispenser, remove the bottle, carafe or reservoir. - Operate the taps until the water stops flowing. - Drain the possible remains of water at the bottom of the tank. To do this remove the rubber stopper that has the dispenser underneath in the base and wait for all the water to come out.
- Página 14 WARRANTY CONDITIONS. 1. This appliance is covered against any factory defects. 2. The device is changed for a new one as long as it is within the change period and is returned with all accessories and packaging in good condition. 3.
