Tabla de contenido
Publicidad
Idiomas disponibles
Idiomas disponibles
Enlaces rápidos
USE AND CARE GUIDE
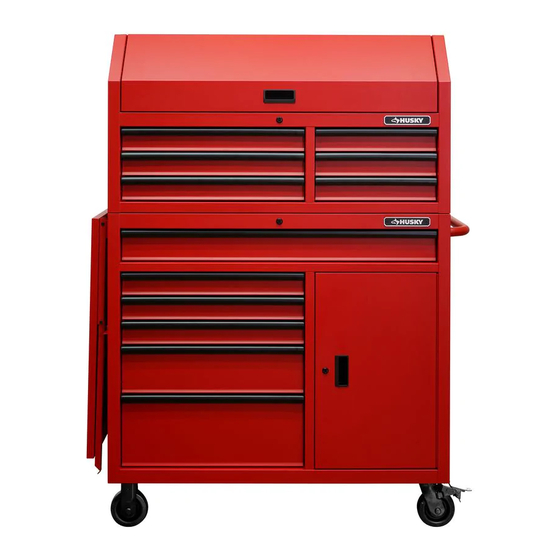
Husky HD 44 in 12-Drawer Ext Deep Tool Chest/Cabinet
with Extended Side Table, Matte Red
Questions, problems, missing parts?
Before returning to the store, call
Husky Customer Service
8 a.m.- 7 p.m., EST, Monday-Friday
9 a.m.- 6 p.m., EST, Saturday
1-888-HD-HUSKY
HUSKYTOOLS.COM
We appreciate the trust and confidence you have placed in Husky through the purchase of this chest/cabinet. We strive to continually
create quality products designed to enhance your home. Visit us online to see our full line of products available for your home
THANK YOU
improvement needs. Thank you for choosing Husky!
SKU #1004 350 353
THD.com #1004 207 287
Model #HOTC4412BN1S
Publicidad
Capítulos
Tabla de contenido

Manuales relacionados para Husky HOTC4412BN1S


Resumen de contenidos para Husky HOTC4412BN1S
- Página 1 THANK YOU We appreciate the trust and confidence you have placed in Husky through the purchase of this chest/cabinet. We strive to continually create quality products designed to enhance your home. Visit us online to see our full line of products available for your home...
-
Página 2: Tabla De Contenido
Table of Contents Table of Contents..............2 Assembly................6 Safety Information..............2-3 Operation................9 Warranty..................3 Maintenance..............10 Pre-Assembly................4 Care and Cleaning............10 Service Parts..............11 Tools Required................4 Hardware Included..............4 Specifications................4 Package Contents..............5 Safety Information 1. Do not open more than one drawer at a time. DANGER: Do not stand on this product. You 2. -
Página 3: Safety Information
The manufacturer specifically disclaims any liability and shall not be liable for any consequential or incidental loss or damage, including but not limited to any labor/expense costs involved in the replacement or repair of said product. Contact the Customer Service Team at 1-888-43 HUSKY or visit www huskytools com. -
Página 4: Pre-Assembly
Pre-assembly TOOLS REQUIRED Phillips Safety screwdriver goggles HARDWARE INCLUDED NOTE: Hardware not shown to actual size. Part Description Quantity Screw M4x10L Bolt M6x15L Bolt M6x12L Bolt M8x15L 10 mm / 13 mm Wrench SPECIFICATIONS 120 lbs. Maximum capacity (per drawer) 800 lbs. -
Página 5: Package Contents
Pre-assembly (continued) PACKAGE CONTENTS Part Description Quantity Gas lift Part Description Quantity Top chest Lock Bracket Cord bracket (set) Side handle Drawer Liner Rolling cabinet Grommet Power strip Swivel caster with brake Shelf clips Drawer slide (pair) Shelf Regular caster Supporting leg holder Drawer Extendable side table... -
Página 6: Assembly
Assembly Attaching the side handle Installing the casters □ Attach the side handle (D) to the rolling cabinet (E) CAUTION: Do not over tighten the screws. using four bolts (BB). □ Ensure all cabinet drawers are securely locked into NOTE: The holes in the cabinet are tapped and do not place using the key lock on the rolling cabinet (E). - Página 7 Assembly (continued) Installing the drawer liner Installing the cord brackets □ Place the drawer liners (M) in appropriately sized drawers NOTE: The holes in the cabinet are tapped and do not and the chest lid area to protect the surface. require nuts.
- Página 8 Assembly (continued) Installing the shelf clips Installing the shelf □ Install the shelf (Q) inside the storage area so that it sits □ Install the four shelf clips (P) inside the storage area at the desired shelf height location. on top of the four shelf clips (P) flush and level. □...
-
Página 9: Operation
Operation Locking and unlocking the unit Removing the drawers □ Fully extend and empty the drawer. IMPORTANT : The drawers must be fully closed before □ Depending on the slide, either lift or lower the locking / unlocking the unit. release lever on both sides so the slides can ride over the stops. -
Página 10: Maintenance
Maintenance Maintaining the casters Maintaining the drawers □ Periodically clean the drawer trim, and □ Grease the casters annually using high quality inside the drawers with a mild detergent and water . bearing grease . □ Remove grease and oil with a standard, nonflammable cleaning fluid. -
Página 11: Service Parts
Service Parts Part Description Quantity Part Description Quantity Cord bracket (set) Gas lift Drawer Liner Bracket Side handle Grommet Swivel caster with brake Power strip Drawer slide (pair) Shelf clips Regular caster Shelf Key (set) Supporting leg holder Lock Extendable side table HUSKYTOOLS.COM Pleas e contact 1-888-43-HUSK Y fo r furthe r assistanc... - Página 12 Questions, problems, missing parts? Before returning to the store, call Husky Customer Service 8 a.m.-7 p.m., EST, Monday-Friday, 9 a.m. - 6 p.m. EST Saturday 1-888-HD-HUSKY HUSKYTOOLS.COM Retain this manual for future use.
- Página 13 Apreciamos la confianza que has depositado en Husky al comprar esta caja/gabinete. Nos esforzamos para continuamente crear productos de calidad diseñados para mejorar tu hogar. Visítanos por Internet para ver nuestra línea completa de productos disponibles para las necesidades de mejoras de tu hogar. ¡Gracias por elegir Husky!
- Página 14 Tabla de contenido Tabla de contenido..............2 Ensamblaje................6 Información de seguridad.............2-3 Funcionamiento...............9 Garantía..................3 Mantenimiento..............10 Preensamblaje................4 Mantenimiento y limpieza...........10 Piezas de repuesto............11 Herramientas necesarias............4 Herrajes incluidos..............4 Especificaciones................4 Contenido del paquete...............5 Información de seguridad No abras más de un cajón a la vez. ADVERTENCIA: Mantén el producto sobre una superficie nivelada.
-
Página 15: Información De Seguridad
Comuníquese con el equipo de servicio al cliente por el 1-888-HD-HUSKY o visite www.huskytools.com. HUSKYTOOLS.COM... -
Página 16: Preensamblaje
Preensamblaje HERRAMIENTAS NECESARIAS Destornillador Gafas de Phillips seguridad HERRAJES INCLUIDOS NOTA: No se muestra el tamaño real de los herrajes. Pieza Descripción Cantidad Tornillo M4x10L Perno M6x15L Perno M6x12L Perno M8x15L Llave de 10 mm/13 mm ESPECIFICACIONES Capacidad máxima (por cajón) 54.4 kg Capacidad máxima (cajón del baúl) 362.8 kg... -
Página 17: Contenido Del Paquete
Gabinete con ruedas Barra multicontacto Rueda giratoria con freno Presilla para repisa del Corredera del cajón (par) gabinete Repisa del gabinete Rueda regular Soporte de pata de apoyo Cajón Mesa lateral extensible Llave (juego) HUSKYTOOLS.COM Para obtener asistencia, llama al 1-888-HD-HUSKY. -
Página 18: Ensamblaje
Ensamblaje Cómo colocar el asa lateral Cómo instalar las ruedas □ Instala el asa lateral (D) en el gabinete con ruedas (E) usando PRECAUCIÓN: No aprietes demasiado los tornillos. 4 pernos (BB). □ Asegúrate de que todos los cajones del gabinete estén NOTA: Los orificios en el gabinete están rellenos y no firmemente cerrados en su lugar, usando la cerradura □... -
Página 19: Cómo Instalar Los Soportes De Cable
(CC). (CC) en cada lado y apretar enseguida los tornillos.No aprietes demasiado. □ Empujar la mesa lateral de extensión (S) hacia abajo e insertar otro tornillo (CC) a cada lado para asegurarla. HUSKYTOOLS.COM Para obtener asistencia, llama al 1-888-HD-HUSKY. -
Página 20: Cómo Instalar Las Presillas De La Repisa
Ensamblaje (continuación) Cómo instalar la repisa Cómo instalar las presillas de la repisa □ Instala los cuatro presillas de la repisa (P) dentro del □ Instala la repisa (Q) dentro del área de almacenaje de área de almacenaje a la altura deseada de la repisa. manera que se asiente sobre las cuatro presillas correspondientes (P) al ras y nivelada. -
Página 21: Funcionamiento
Tirar del soporte y de su pata de apoyo hacia arriba □ Empuja lentamente el cajón hasta que esté completamente primero y dejarlo caer lentamente. cerrado y enganche en la corredera. □ Abre el cajón y ciérralo para verificar que funcione correctamente. HUSKYTOOLS.COM Para obtener asistencia, llama al 1-888-HD-HUSKY. -
Página 22: Mantenimiento
Mantenimiento Cómo dar mantenimiento a las ruedas Cómo dar mantenimiento a los cajones □ Limpia periódicamente la moldura del cajón y dentro de □ Engrasa las ruedas anualmente usando grasa de alta calidad para cojinetes de bola. los cajones con un detergente suave y agua. □... -
Página 23: Piezas De Repuesto
Asa lateral Rueda giratoria con freno Barra multicontacto Presilla para repisa del Corredera del cajón (par) gabinete Rueda regular Repisa del gabinete Llave (juego) Soporte de pata de apoyo Cerradura Mesa lateral extensible HUSKYTOOLS.COM Para obtener asistencia, llama al 1-888-HD-HUSKY. - Página 24 ¿Preguntas, problemas o piezas faltantes? Antes de devolver a la tienda, llama al Servicio al cliente de Husky, de lunes a viernes, entre 8:00 a.m. y 7:00 p.m. (hora estándar del Este), y los sábados de 9:00 a.m. a 6:00 p.m. (hora estándar del Este).