Tabla de contenido
Publicidad
Idiomas disponibles
Idiomas disponibles
Enlaces rápidos
Publicidad
Tabla de contenido

Resumen de contenidos para Waldbeck 10032298
- Página 1 Akku-Kompressor 10032298...
-
Página 3: Tabla De Contenido
Geräteübersicht 5 Español 17 Français 24 Inbetriebnahme und Bedienung 6 Italiano 31 Reinigung und Pflege 9 Hinweise zur Entsorgung 9 TECHNISCHE DATEN Artikelnummer 10032298 Netzspannung 12 V Leistung 120 W Akkukapazität 1500 mAh Maximale Stromspannung 10 A Genauigkeit des Druckmessers... -
Página 4: Sicherheitshinweise
SICHERHEITSHINWEISE • Das Gerät ist zur gelegentlichen Verwendung vorgesehen. Das Aufpumpen über einen längeren Zeitraum kann zum Überhitzen des Druckluftkompressors führen, wodurch Schäden verursacht werden können. • Das Gerät sollte maximal 15 Minuten am Stück verwendet werden. Nach Ablauf der 15 Minuten sollte das Gerät ausgeschaltet werden und vor der erneuten Verwendung mindestens 15 Minuten lang abkühlen. -
Página 5: Geräteübersicht
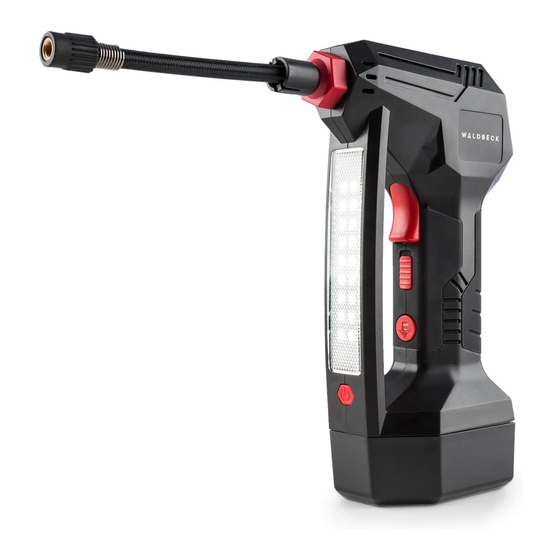
GERÄTEÜBERSICHT Feststellvorrichtung Auslöser Feststell- taste für den Auslöser Akku- LED Notfallbeleuchtung Freigabe- Taste Ein-/Ausschaltknopf LED Akku Aufsatz 1 12-Volt-Adapter Ladegerät fürs Auto Aufsatz 2 Aufsatz 3 Tasche Akku Docking- Netzteil mit Kabel... -
Página 6: Inbetriebnahme Und Bedienung
INBETRIEBNAHME UND BEDIENUNG Reifen mit Druckluft befüllen 1. Lockern Sie die Feststellvorrichtung, indem Sie diese ungefähr drei Mal gegen den Uhrzeigersinn drehen (vgl. Abb. 3). Entfernen Sie die Feststellvorrichtung nicht vollständig. 2. WICHTIG: Fügen Sie den Luftschlauch mit Gewindeanschluss in die Feststellvorrichtung ein. - Página 7 8. Vergewissern Sie sich, dass der Sicherungsschalter des Auslösers entriegelt ist und drücken Sie den Auslöser. 9. Das Gerät beginnt, den Reifen bis zu dem von Ihnen eingestellten Reifendruck zu befüllen und schaltet sich, sobald der voreingestellte Reifendruck erreicht ist, automatisch ab. 10.
- Página 8 So verwenden Sie das Zubehör • Aufsatz 1 kann zum Aufpumpen von diversen Bällen, wie beispielsweise Basketball, Fußball etc. verwendet werden. • Aufsatz 2 kann zum Befüllen von Ballons, Luftpolstern etc. verwendet werden. • Aufsatz 3 kann zum Befüllen von Fahrradschläuchen verwendet werden. Gegenstände mit Hilfe zusätzlicher Düsenadapter mit Druckluft befüllen 1.
-
Página 9: Reinigung Und Pflege
REINIGUNG UND PFLEGE • Bewahren Sie das Gerät an einem sicheren Ort auf. Wenn das Gerät über einen längeren Zeitraum nicht verwendet wird, sollte es an einem trockenen, für Kinder unzugänglichen Ort aufbewahrt werden. • Halten Sie zur Gewährleistung der maximalen Geräteleistung und Sicherheit das Gerät sauber. -
Página 10: English
Product and Accessories 12 França Italiano Use and Operation 13 Españo Care and Cleaninig 16 Hints on Disposal 16 TECHNICAL DATA Item number 10032298 Voltage 12 V Power 120 W Battery Capacity 1500 mAh Maximum current 10 A Max pressure... -
Página 11: Safety Instructions
SAFETY INSTRUCTIONS • The air compressor is designed for occasional use. Inflation over a long period will overheat the air compressor and may cause damage. • The air compressor should not operate for more than 15 minutes at a time, after which it must be switched off and set aside to cool for at least 15 minutes before restarting. -
Página 12: Product And Accessories
PRODUCT AND ACCESSORIES Attachment Lock Trigger Trigger Lock Battery LED Emergency Light release button LED On/Off button Power Pack Attachment 12V Adapter Car charger Attachment Attachment Lithium Battery Pedestal... -
Página 13: Use And Operation
USE AND OPERATION Inflating Tires 1 . Loosen the attachment lock approximately 3 rotations counterclockwise (See Fig 3). Do not remove lock completely. 2. IMPORTANI‘: Insert the air hose with threaded connector into the attachment lock. Press in firmly while screwing clockwise until it can go no further. - Página 14 8. Being sure trigger lock is in unlock position, press the trigger. 9. The unit will begin to infl ate the tire to the set pressure level, and shut off automatically when reached. 10. When done, press the trigger once to tum off, and slide trigger lock to lock position.
- Página 15 Accessories • Attachment 1 function Is suitable ball lnflator. For example: basketball, football and so on. • Attachment 2 function is suitable balloon, air cushion and so on. • Attachment 3 can be used to inflate bicycle hoses. Inflating Items with Additional Tips 1.
-
Página 16: Hints On Disposal
CARE AND CLEANINIG • Store air compressor in a secure location. If the air compressor is going to be unused for long periods of time, it should be stored in a dry place inaccessible to children. • Keep the air compressor clean to maintain maximum output and safety. Examine the plug, charger and cable pack on a regular basis and have them repaired by qualified technicians if they are damaged. -
Página 17: Datos Técnicos
Indicaciones de seguridad 18 Descripción del aparato 19 Puesta en marcha y uso 20 Limpieza y cuidado 23 Retirada del aparato 23 DATOS TÉCNICOS Número de artículo 10032298 Tensión de red 12 V Potencia 120 W Capacidad 1500 mAH Tensión de corriente máxima 10 A Exactitud del manómetro... -
Página 18: Indicaciones De Seguridad
INDICACIONES DE SEGURIDAD • El aparato se ha concebido para un uso esporádico. El inflado mediante un periodo de tiempo prolongado puede hacer que se sobrecaliente el compresor de aire a presión, lo cual puede provocar daños. • El aparato debe utilizarse durante un máximo de 15 minutos. Transcurridos esos 15 minutos, se debe apagar el aparato y esperar otros 15 minutos a que se enfríe para utilizarlo de nuevo. -
Página 19: Descripción Del Aparato
DESCRIPCIÓN DEL APARATO Dispositivo de bloqueo Disparador Botón de bloqueo para el disparador Botón de Iluminación de liberación emergencia LEDg de la batería Botón ON / OFF del LED Batería Accesorio 1 Adaptador de 12 voltios Cargador para coche Accesorio 2 Accesorio 3 Bolsa Batería... -
Página 20: Puesta En Marcha Y Uso
PUESTA EN MARCHA Y USO Hinchar los neumáticos con aire a presión 1. Suelte el mecanismo de bloqueo girándolo unas tres veces en el sentido contrario de las agujas del reloj (véase ilustración 3). No retire completamente el mecanismo de bloqueo. 2. - Página 21 8. Asegúrese de que el mecanismo de seguridad del disparador esté desbloqueado y presione el disparador. 9. El aparato comienza a hinchar el neumático con la presión de aire que ha confi gurado previamente y se apaga automáticamente en cuanto haya alcanzado la presión seleccionada.
- Página 22 Cómo utilizar los complementos • El complemento 1 puede utilizarse para hinchar distintas pelotas, como de baloncesto, fútbol, etc. • El complemento 2 puede utilizarse para hinchar globos, colchones de aire, etc. • El complemento 3 puede utilizarse para hinchar cámaras de bicicletas. Hinchar los objetos con aire a presión con ayuda del adaptador adicional para boquillas.
-
Página 23: Limpieza Y Cuidado
LIMPIEZA Y CUIDADO • Guarde el aparato en un lugar seguro. Si no utiliza el aparato durante un periodo prolongado de tiempo, debe guardarlo en un lugar seco e inaccesible para los niños. • Mantenga el aparato limpio para garantizar una máxima eficiencia y seguridad. -
Página 24: Fiche Technique
SOMMAIRE Consignes de sécurité 25 Aperçu de l‘appareil 26 Nettoyage et entretien 30 Conseils pour le recyclage 30 FICHE TECHNIQUE Numéro d’article 10032298 Tension d'alimentation 12 V Puissance 120 W Capacité de la batterie 1500 mAh Intensité maximale 10 A Précision du manomètre... -
Página 25: Consignes De Sécurité
CONSIGNES DE SÉCURITÉ • L‘appareil est destiné à un usage occasionnel. Pomper de l‘air pendant une longue durée peut provoquer une surchauffe du compresseur d‘air, ce qui peut provoquer des dégâts. • L‘appareil ne doit pas être utilisé plus de 15 minutes d‘affilée. Au bout de ces 15 minutes, vous devriez éteindre l‘appareil et le laisser refroidir au moins 15 minutes avant de l‘utiliser à... -
Página 26: Aperçu De L'appareil
APERÇU DE L‘APPAREIL Dispositif de verrouillage Déclencheur Touche de verrouillage pour le déclencheur Bouton de Éclairage de secours LED dégage- ment de la batterie Bouton ON / OFF de la LED Batterie Accessoire 1 Adaptateur 12 Volt Chargeur de voiture Accessoire 2 Accessoire 3 Sacoche... -
Página 27: Mise En Service Et Utilisation
MISE EN SERVICE ET UTILISATION Pomper des pneus avec le compresseur 1. Desserrez le verrouillage en le tournant environ trois fois en sens antihoraire (voir illustration 3). Ne retirez pas entièrement le dispositif de verrouillage. 2. IMPORTANT : Insérez le tuyau d‘air avec le branchement fileté dans le dispositif de verrouillage. - Página 28 8. Assurez-vous que l‘interrupteur de sécurité du déclencheur est déverrouillé et appuyez sur le déclencheur. 9. L‘appareil commence à gonfl er le pneu jusqu‘à la valeur de pression que vous avez réglée et s‘arrête automatiquement dès que cette valeur de pression de pneu est atteinte.
- Página 29 Pour utiliser les accessoires • L‘accessoire 1 peut être utilisé pour gonfler divers ballons comme un ballon de basket, de football etc. • L‘accessoire 2 peut être utilisé pour gonfler des ballons de baudruche, des coussins gonflables, etc. • L‘accessoire 3 peut être utilisé pour gonfler des boyaux de vélo. Gonfler des objets au compresseur en utilisant l‘adaptateur de buse 1.
-
Página 30: Nettoyage Et Entretien
NETTOYAGE ET ENTRETIEN • Conservez l‘appareil en lieu sûr. Si l‘appareil ne sert pas pendant une période prolongée, conservez-le dans un endroit sec et hors de portée des enfants. • Maintenez l‘appareil propre pour garantir sa puissance optimale et sa sécurité... -
Página 31: Italiano
INDICE Avvertenze di sicurezza 32 Descrizione del prodotto 33 Messa in funzione e utilizzo 34 Pulizia e manutenzione 37 Smaltimento 37 DATI TECNICI Articolo numero 10032298 Tensione 12 V Potenza 120 W Capacità batteria 1500 mAh Corrente massima 10 A... -
Página 32: Avvertenze Di Sicurezza
AVVERTENZE DI SICUREZZA • Il dispositivo è per un uso occasionale. L´uso per un periodo di tempo prolungato può surriscaldare il compressore e causare danni. • Il dispositivo deve essere utilizzato per un massimo di 15 minuti alla volta. Trascorsi 15 minuti, spegnere il dispositivo e farlo raffreddare per almeno 15 minuti prima di utilizzarlo di nuovo. -
Página 33: Descrizione Del Prodotto
DESCRIZIONE DEL PRODOTTO Meccanismo di blocco Interruttore Tasto di blocco interruttore Pulsante Illuminazione emergenza di sblocco a LED della batteria Pulsante ON / OFF del LED Batteria Accessorio 1 Adattatore 12 Volt Caricabatteria per auto Accessorio 2 Accessorio 3 Custodia Batteria Alimentatore –... -
Página 34: Messa In Funzione E Utilizzo
MESSA IN FUNZIONE E UTILIZZO Gonfiare i pneumatici con aria compressa 1. Allentare il meccanismo di blocco ruotandolo circa tre volte in senso antiorario (vedere Fig. 3). Non rimuovere completamente il meccanismo di blocco. 2. IMPORTANTE: inserire il tubo dell‘aria con il raccordo filettato nel meccanismo di blocco. - Página 35 8. Assicurarsi che il tasto di blocco sia sbloccato e premere l´interruttore. 9. Il dispositivo inizia a gonfi are il pneumatico fi no alla pressione impostata e si spegne automaticamente al raggiungimento del valore. 10. Al termine, premere una volta l´interruttore per spegnere il dispositivo e posizionare il tasto in posizione di blocco.
- Página 36 Come usare gli accessori • L‘accessorio 1 può essere usato per gonfiare palloni da basket, calcio, ecc. • L‘accessorio 2 può essere usato per gonfiare palloncini, cuscini ad aria, ecc. • L‘accessorio 3 può essere usato per gonfiare i tubi della bicicletta. Gonfiare gli oggetti con aria compressa tramite adattatori per ugelli aggiuntivi 1.
-
Página 37: Pulizia E Manutenzione
PULIZIA E MANUTENZIONE • Conservare il dispositivo in un luogo sicuro. In caso di inutilizzo prolungato del dispositivo, conservarlo in un luogo asciutto e lontano dalla portata dei bambini. • Mantenere il dispositivo pulito per garantirne la massima sicurezza e potenza.