Publicidad
Idiomas disponibles
Idiomas disponibles
Enlaces rápidos
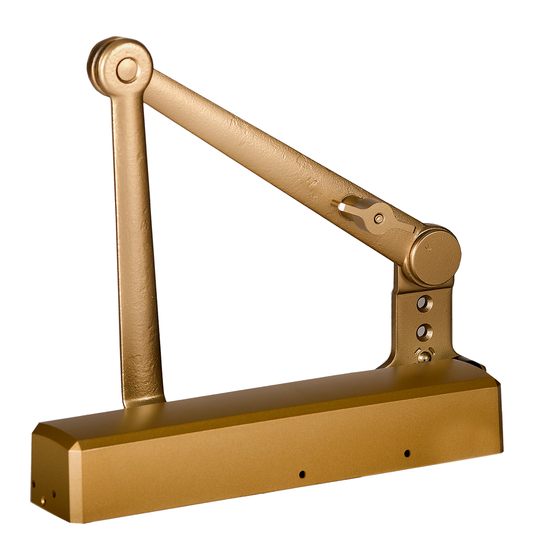
Parallel arm (push side) mounting.
1
-1/16
(27)
DOOR
STOP
B
SPEED
ADJUSTING
VALVE
A
D
RIGHT
HAND
DOOR
13/16
(20.5)
C
3/4
(19)
Dim. A
Door Opening
75°
5-1/2
(140)
80°
4-3/4
(121)
85°
4
(102)
90°
3-3/8
(86)
95°
2-3/4
(70)
100°
2-1/8
(54)
105°
2-1/8
(54)
110°
2-1/8
(54)
9-1/8
(232)
70°
8-3/8
(213)
75°
7-5/8
(194)
80°
7
(178)
85°
6-3/8
(162)
90°
5-3/4
(146)
95°
5-1/8
(130)
100°
105°
4-3/4
(121)
110°
5-1/4
(133)
1.
Using dimensions from the appropriate diagram above, mark four (4) holes on door for door closer and four (4) holes on frame for paral-
2.
lel bracket.
Drill pilot holes in door and frame, drill 7/32" (5.5mm) diameter holes for wood screws or drill and tap #7 (.201" diameter)
for 1/4-20 machine screws.
4.
FROM HINGE SIDE.
Refer to the BRACKET ADJUSTMENT section, to adjust bracket for proper hand of door before proceeding to next
5.
step.
Install the Parallel Bracket to frame using screws provided.
Secure tightly with arm screw.
closing time from a 90° open position is 5 to 7 seconds - evenly divided between main closing (sweep) speed and latching speed. Adjust
the CLOSING speed first, then adjust the LATCHING speed.
tial to the proper operation of the SUPER RIGID PARALLEL ARM. Use just enough to prevent arm from striking the stop with impact.
9.
Snap pinion cap over shaft at botttom of closer or install (optional) cover, using small screws provided.
1
-11/16
(42.5)
LEFT
HAND
DOOR
7/16
13/16
(11)
(20.5)
C
3/4
(19)
1
-11/16
1
-1/16
(42.5)
(27)
DOOR
STOP
7/16
(11)
B
SPEED
ADJUSTING
VALVE
D
A
Inches (mm)
Dim. B
Dim. C
Dim. D
7-1/8
(181)
2-15/16
(75)
12
7-1/8
(181)
2-15/16
(75)
12
7-1/8
(181)
2-15/16
(75)
12
7-1/8
(181)
2-15/16
(75)
12
7-1/8
(181)
2-15/16
(75)
12
6-5/8
(168)
2-15/16
(75)
12
5-3/4
(146)
2-15/16
(75)
12
4-3/4
(121)
2-15/16
(75)
12
(92)
2-7/8
(73)
9-1/16
3-5/8
(92)
2-7/8
(73)
9-1/16
3-5/8
(92)
2-7/8
(73)
9-1/16
3-5/8
(92)
2-7/8
(73)
9-1/16
3-5/8
(92)
2-7/8
(73)
9-1/16
3-5/8
(92)
2-7/8
(73)
9-1/16
3-1/2
(89)
2-7/8
(73)
9-1/16
2-7/8
(73)
2-7/8
(73)
9-1/16
1-7/8
(48)
2-7/8
(73)
9-1/16
3.
Mount closer on door using screws provided. SPEED ADJUSTING VALVE MUST BE POSITIONED AWAY
7.
Adjust door's closing speed and power, see page 4. Notes: Do not allow door to slam into frame. A standard
HOLD OPEN CONTROL HANDLE
(HOLD OPEN ARM)
All brackets are shipped assembled for left hand door. The following adjustments must be
(305)
made before installing bracket to top frame.
(305)
(305)
(305)
(305)
(305)
(305)
(305)
(230)
(230)
(230)
(230)
(230)
(230)
(230)
(230)
(230)
6.
Place main arm on closer pinion shaft, see Arm Mounting Detail.
8.
ADJUST BACK CHECK FUNCTION, see page 4. This function is essen-
Publicidad

Manuales relacionados para Stanley QDC-200 Serie

Resumen de contenidos para Stanley QDC-200 Serie
- Página 1 Parallel arm (push side) mounting. -11/16 (42.5) -1/16 (27) LEFT DOOR HAND DOOR STOP 7/16 13/16 (11) (20.5) SPEED ADJUSTING VALVE HOLD OPEN CONTROL HANDLE (19) (HOLD OPEN ARM) -11/16 -1/16 (42.5) RIGHT (27) DOOR HAND DOOR STOP 13/16 7/16 (20.5) (11) SPEED...
- Página 2 Français - Instructions d'installation pour QDC-200 et 300 séries avec Bras Cush ou L'ajustement ou l'installation incorrect a pu causer des dommages ou des dommages physiques. Lisez Bras de Retenue Cush et suivez les instructions soigneusement. Détails du montage du bras Montage du bras parallèle (côté...
- Página 3 Español - Instrucciones de instalación para QDC-200 y 300 series con Brazo Acolchado La incorrecta instalación o el ajuste incorrecta podría causar daño o lesión. Lea o Brazo de Soporte Acolchado y siga las instrucciones cuidadosamente. Detalle del Montaje del Brazo Montaje de brazo paralelo (lado de empujar).