Tabla de contenido
Publicidad
Idiomas disponibles
Idiomas disponibles
Enlaces rápidos
Publicidad
Tabla de contenido

Manuales relacionados para Steren STV-037


Resumen de contenidos para Steren STV-037
-
Página 2: Soporte Para Pantalla De Plasma
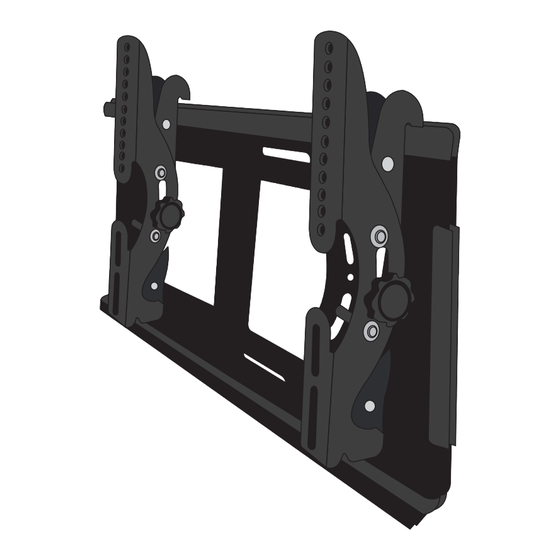
Soporte para pantalla de plasma/LCD/LED de 20 a 37”. Por favor, revíselo completamente para estar seguro de cómo utilizar apropiadamente el producto. Para apoyo, compras y todo lo nuevo que tiene Steren, visite nuestro sitio web: www.steren.com La información que se muestra en este manual sirve únicamente como referencia sobre el producto. -
Página 3: Características
IMPORTANTE - Durante el montaje, utilice sólo las piezas suministradas y fije todas las piezas firmemente. - No olvide ninguna pieza durante el montaje. Instale todas las piezas tal como se indica. - No altere ni modifique ninguna pieza. - Hay que tener cuidado especial cuando se instala en una pared a causa de su peso. - Cuando la instale en una pared de concreto asegúrese de utilizar taquetes. - Página 4 CONTENIDO 4 Rondanas redondas...
-
Página 5: Instalación Del Soporte De Pantalla
INSTALACIÓN DEL SOPORTE DE PANTALLA 1. Localice el lugar donde desea instalar la pantalla. 2. Coloque la placa de soporte en la pared y marque los lugares donde se van a realizar las perforaciones, de forma que la placa quede completamente fija. 3. - Página 6 4. Arme el soporte. Coloque el tornillo para sujetar que permite el movimiento horizontal. De la misma manera coloque el seguro que permite el movimiento vertical. 5. Coloque los seguros de las barras de movimiento en las barras de sujeción como se muestra en la figura, asegúrese de que el tornillo embone bien en la entrada cuadrada.
- Página 7 7. Coloque el soporte en la pared e inserte los tornillos a los taquetes apretando firmemente. Pantalla...
-
Página 8: Ajuste De Ángulos Después De La Instalación
8. Apriete los tornillos que permiten el movimiento horizontal para que el soporte quede perfectamente ajustado. Pantalla Ajuste de ángulos después de la instalación 1. Una vez que instaló la pantalla y está firmemente sujeta, localice el seguro de movimiento vertical de las barras de ajuste. 2. - Página 9 3. Coloque la pantalla en el ángulo que desee. 4. Vuelva a apretar los seguros. Steren no se hace responsable por daños materiales, ni personales causados por mal uso o mala instalación. Es responsabilidad del usuario asegurarse de su correcta instalación y uso, así...
-
Página 10: Póliza De Garantía
1.- Para hacer efectiva la garantía, presente esta póliza y el producto, en donde fue adquirido o en Electrónica Steren S.A. de C.V. 2.- Electrónica Steren S.A de C.V. se compromete a reparar el producto en caso de estar defectuoso sin ningún cargo al consumidor. Los gastos de transportación serán cubiertos por el proveedor. - Página 12 STV-037 Thank You on purchasing your new Steren product. This manual includes all the feature operations and troubleshooting necessary to install and operate your new Steren´s 20 to 37” plasma/LCD/LED wall mounting bracket. Please review this manual thoroughly to ensure proper installation and operation of this product.
- Página 13 IMPORTANT -Only use the supplied pieces and fasten them tightly. -Do not forget to use all pieces. Install all pieces as shown on this manual. -Do not try to modify any piece. -Take care about the weight of the bracket while mounting in a wall. -If you mount the bracket in a concrete wall, make sure to use the supplied anchors.
-
Página 14: Package Content
PACKAGE CONTENT 4 washers... - Página 15 HOW TO INSTALL THE WALL BRACKET 1 . Locate the place where you want to install the screen. 2 . Place the backplate on the wall and mark the places where you have to drill. 3 . Once you made the holes, insert anchors in each one.
- Página 16 4. Assemble the bracket. Place the screw which allows horizontal movement. Similarly place the knob that allows vertical movement. 5. Place the movement bars knobs in the fastening bars as shown on the image; make sure the screw fits right into the square entry. The knobs must be place in the exterior part of the fastening bars, so you can adjust them without any trouble.
- Página 17 7. Place the backplate on the wall, insert the screws in the anchors and tighten then firmly. 8. Place the screen on the backplate. LCD screen...
- Página 18 9. Tighten the screws so that the bracket is properly fixed. LCD screen Adjusting the view angle after installation 1. Once the screen is installed and firmly attached, locate the knob on the adjustment bars. 2. Loosen them slightly so that the screen moves.
- Página 19 3. Adjust the screen at the desired angle. 4. Tight the knob. Steren is not responsible for material damages, nor personal injuries caused by wrong use or wrong installation. The user is responsible of correct installation and continuous check. Product design and specifications are subject to change without...
- Página 20 Part number: STV-037 Brand: Steren WARRANTY This Steren product is warranted under normal usage against defects in workmanship and materials to the original purchaser for one year from the date of purchase. CONDITIONS 1. This warranty card with all the required information, invoice, product box or package, and product, must be presented when warranty service is required.