Tabla de contenido
Publicidad
Idiomas disponibles
Idiomas disponibles
Enlaces rápidos
Home NetWerks
SIMPLE SOLUTIONS FOR A SMARTER HOME
Questions, problems, missing parts? Before returning to your retailer, call our customer service department
at 1-877-319-3757, 7:30 a.m. - 4:30 p.m., CST, Monday - Friday.
Amazon, Alexa and all related logos are trademarks of Amazon.com, Inc. or its affiliates.
The Bluetooth word mark and logos are owned by Bluetooth SIG, Inc. Other third-party brands and names are the property of their respective owners.
Home NetWerks, Homewerks, Homewerks Worldwide, the Homewerks house design, and all related logos are trademarks owned by
Homewerks Worldwide, LLC
U.S. Pat. No. 9,398,357
Homewerks.com
READ AND SAVE THESE INSTRUCTIONS
BATHROOM VENTILATION FAN
WITH ALEXA BUILT-IN, LED LIGHT,
AND BLUETOOTH
SMARTVENT
SPEAKERS
®
MODEL #7148-01-AX
Español p. 16
08/10/2020
Publicidad
Capítulos
Tabla de contenido
Solución de problemas

Manuales relacionados para Home NetWerks 7148-01-AX

Resumen de contenidos para Home NetWerks 7148-01-AX
- Página 1 The Bluetooth word mark and logos are owned by Bluetooth SIG, Inc. Other third-party brands and names are the property of their respective owners. Home NetWerks, Homewerks, Homewerks Worldwide, the Homewerks house design, and all related logos are trademarks owned by Homewerks Worldwide, LLC U.S.
-
Página 2: Tabla De Contenido
Preparation ............................4 Installation Instructions ........................6 Wall Switch Operation ........................8 Setting Up and Pairing Your Alexa Bath Fan to the Home NetWerks Connect App ......9 Operating the Bath Fan Using Alexa Commands ................9 Connecting your BLUETOOTH Device to the Speaker ..............10 ®... -
Página 3: Package Contents
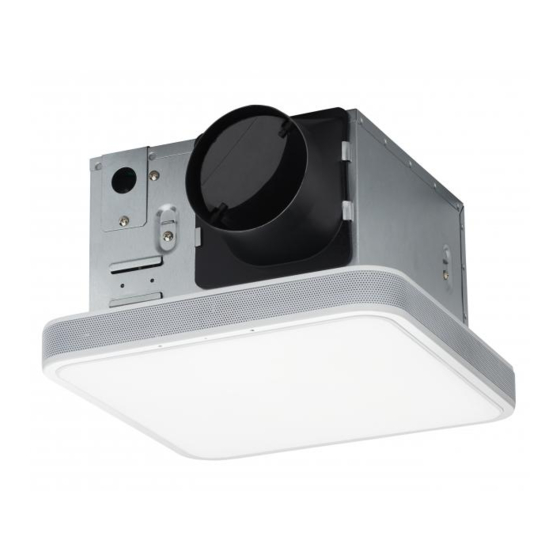
PACKAGE CONTENTS PART DESCRIPTION PART DESCRIPTION Suspension Bracket Fan Housing with BLUETOOTH ® Speakers Suspension Bracket 4 in. Duct Adapter Grille with Amazon Alexa and LED Light Wall Switch Suspension Bracket HARDWARE CONTENTS (not actual size) Wood Screw Machine Screw M4 x 30 M4 x 10 Qty. -
Página 4: Safety Information
SAFETY INFORMATION Please read and understand this entire manual before attempting to assemble, operate or install the product. • Always disconnect the power supply prior to servicing WARNING: To reduce the risk of fire, electric shock, the fan, motor or junction box. or injury to persons, observe the following: •... - Página 5 PREPARATION (Continued) WARNING: RISK OF ELECTRIC SHOCK! Ensure the electricity to the wires you are working on is shut off. Either remove the fuse or turn off the circuit breaker before removing the existing bath fan or installing the new one. Before removing your current ventilation fan, verify the wall switch box has the required wires necessary for this installation.
-
Página 6: Installation Instructions
INSTALLATION INSTRUCTIONS BEFORE INSTALLATION WARNING: RISK OF ELECTRIC SHOCK! Ensure the electricity to the wires you are working on is shut off. Either remove the fuse or turn off the circuit breaker before removing the existing bath fan or installing the new one. 1. - Página 7 INSTALLATION INSTRUCTIONS (Continued) 5. Position the fan housing (A) so the bottom edge of the fan housing (A) is flush with the ceiling board. Do not the flush mount the fan housing (A) to the joist. Attach the end of each of the suspension brackets (C, D, E) to the ceiling joists using wood screws (AA).
-
Página 8: Wall Switch Operation
INSTALLATION INSTRUCTIONS (Continued) 9. Connect a 4 in. circular duct to the fan housing (A), securing it with duct tape or a clamp. Vent the duct to the outside. 10. Join the connectors from the fan housing (A) to the grille (B). The grille (B) must be connected BEFORE turning on power to the fan. -
Página 9: Setting Up And Pairing Your Alexa Bath Fan To The Home Netwerks Connect App
14. When the next Amazon Alexa screen says “Alexa is ready”, click “Next” and then “Next” again. 15. In order to pair the bath fan to the Home NetWerks Connect app, you will need to create a User ID and Password for the app. -
Página 10: Spotify Connect
Home NetWerks Connect app. Download and ® open the Home NetWerks Connect app and follow the steps in the prior section to pair your Alexa bath fan to the Home NetWerks Connect app. To switch to a WiFi connection, just speak “Alexa..” and the device will automatically switch back to a WiFi connection. -
Página 11: Care And Cleaning
CARE AND CLEANING CAUTION: Before attempting to clean the fixture, disconnect the power to the fixture by turning the breaker off or removing the fuse from the fuse box. • See safety information before proceeding. Routine maintenance should be done at least once a year. •... -
Página 12: Troubleshooting
CARE AND CLEANING (Continued) 4. Join the connectors from the fan housing (A) to the grille (B). Attach the grille (B) by pinching the mounting springs and inserting them into the narrow rectangular slots in the fan housing (A). Turn on the power source. Test the unit. 5-hole 3-hole 4-hole... - Página 13 Follow the steps in Pairing your Alexa Bath Fan to connection to the Home NetWerks Connect app. the Home NetWerks Connect App on page 9. Sign out of the Amazon Alexa and Home NetWerks The Amazon Alexa and Home NetWerks Connect Connect apps. Sign into each again using the apps are logged into different accounts.
-
Página 14: Warranty
FAN – LIMITED 3-YEAR WARRANTY If the fan fails due to a defect in materials or workmanship at any time during the first THREE years of ownership, the manufacturer will replace it free of charge, postage-paid at their option. This warranty does not cover products that have been abused, altered, damaged, misused, cut or worn. - Página 15 AMAZON ALEXA – LIMITED 1-YEAR WARRANTY (Continued) LIMITATION: TO THE EXTENT PERMITTED BY LAW, THE WARRANTY AND REMEDIES SET FORTH ABOVE ARE EXCLUSIVE AND IN LIEU OF ALL OTHER WARRANTIES AND REMEDIES, AND WE SPECIFICALLY DISCLAIM ALL STATUTORY OR IMPLIED WARRANTIES, INCLUDING, BUT NOT LIMITED TO, WARRANTIES OF MERCHANTABILITY, FITNESS FOR A PARTICULAR PURPOSE AND AGAINST HIDDEN OR LATENT DEFECTS.
-
Página 16: Conserve Este Manual Para Uso Futuro
Bluetooth SIG, Inc. Otras marcas y nombres de terceros son propiedad de sus respectivos dueños. ® Home NetWerks, Homewerks, Homewerks Worldwide, el diseño de la casa Homewerks y todos los logotipos relacionados son marcas comerciales propiedad de Homewerks Worldwide, LLC. -
Página 17: Especificaciones Del Producto
Preparación .............................19 Instrucciones de installación ......................21 Funcionamiento del interruptor de pared..................23 Configuración y emparejamiento del ventilador Alexa con la aplicación Home NetWerks Connect ... 24 Funcionamiento del ventilador con los comandos de Alexa .............24 Conexión de su dispositivo BLUETOOTH a los altavoces .............25 ®... -
Página 18: Contenido Del Paquete
CONTENIDO DEL PAQUETE PIEZA DESCRIPCIÓN CANTIDAD PIEZA DESCRIPCIÓN CANTIDAD Soporte de suspensión Caja del ventilador con altavoz BLUETOOTH ® Soporte de suspensión Adaptador de conducto Rejilla con Amazon Alexa de 4 pulg. y luz LED Interruptor de pared Soporte de suspensión MATERIALES INCLUIDOS (Los materiales no se ilustran en tamaño real) Tornillo para Tornillo para... -
Página 19: Información Sobre Seguridad
INFORMACIÓN SOBRE SEGURIDAD Por favor, lea y comprenda este manual en su totalidad antes de intentar de ensamblar, operar o instalar el producto. • Siempre desconecte la fuente de alimentación antes de ADVERTENCIA: Para reducir el riesgo de incendio, darle servicio al ventilador, motor o caja eléctrica. choque eléctrico o lesiones a las personas, respete •... -
Página 20: Importante
PREPARACIÓN (Continuación) IMPORTANTE: Se requiere una conexión Wi-Fi de 2.4 GHz y una cuenta de Amazon Alexa para una funcionalidad completa. ADVERTENCIA: RIESGO DE DESCARGA ELECTRICA. Asegurese de cortar el suministro electrico en los cables con los que trabajara. Extraiga los fusibles o apague el cortacircuitos antes de quitar el ventilador de baño existente o instalar uno nuevo. -
Página 21: Instrucciones De Installación
INSTRUCCIONES DE INSTALACIÓN PREVIO A LA INSTALACIÓN ADVERTENCIA: ¡RIESGO DE DESCARGA ELECTRICA! Asegurese de cortar el suministro electrico en los cables con los que trabajara. Extraiga los fusibles o apague el cortacircuitos antes de quitar el ventilador de baño existente o instalar uno nuevo. - Página 22 INSTRUCCIONES DE INSTALACIÓN (Continuación) 5. Coloque la caja del ventilador (A) de modo que el borde inferior de la caja del ventilador (A) quede al ras con la placa del techo. No monte al ras la caja del ventilador (A) en la viga. Fije el extremo de cada uno de los soportes de suspensión (C, D, E) a las vigas del techo con tornillos para madera (AA).
-
Página 23: Funcionamiento Del Interruptor De Pared
INSTRUCCIONES DE INSTALACIÓN (Continuación) 9. Conecte un conducto circular de 4 pulg. y ventile hacia el fuera. Asegure con cinta adhesiva o abrazadera. 10. Une los conectores de la caja del ventilador (A) a la rejilla (B). La rejilla (B) debe estar conectada ANTES de encender el ventilador. -
Página 24: Configuración Y Emparejamiento Del Ventilador Alexa Con La Aplicación Home Netwerks Connect
Ha completado con éxito el proceso de configuración y su ventilador Home NetWerks SmartVent está listo para usar. ¡Ahora puede decirle sus comandos o preguntas a Alexa, controlar el ventilador a través de la aplicación Home NetWerks Connect o usar el interruptor de pared incluido! FUNCIONAMIENTO DEL VENTILADOR CON LOS COMANDOS DE ALEXA Una vez que se completa el proceso de configuración inicial, nombre del ventilador se actualizará... -
Página 25: Conexión De Su Dispositivo Bluetooth ® A Los Altavoces
Home NetWerks Connect. ® Descargue y abra la aplicación Home NetWerks Connect y siga los pasos de la sección anterior para emparejar su ventilador Alexa con la aplicación Home NetWerks Connect. 8. Para cambiar a una conexión WiFi, solo diga "Alexa .." y el dispositivo cambiará automáticamente a una conexión WiFi. -
Página 26: Cuidado Y Limpieza
CUIDADO Y LIMPIEZA PRECAUCIÓN: Antes de limpiar el aparato, desconecte el suministro electrico hacia este apagando el cortacircuitos o extrayendo el fusible de la caja de fusibles. • Consulte informacion sobre seguridad antes de proceder. Se debe hacer mantenimiento de rutina al menos una vez al ano. •... -
Página 27: Solución De Problemas
CUIDADO Y LIMPIEZA (Continuación) 4. Una los conectores de la caja del ventilador (A) a la rejilla (B). Sujete la rejilla (B) presionando los resortes de montaje e insértelos en las ranuras rectangulares estrechas en la caja del ventilador (A). Apague la fuente de alimentación. - Página 28 (Ahora en modo de configuración). Siga los La aplicación Home NetWerks pasos en la sección “Emparejamiento de su ventilador Connect no puede descubrir Alexa con la aplicación Home NetWerks Connect” en la el ventilador Home NetWerks. página 24. Asegúrese de que su dispositivo inteligente esté...
-
Página 29: Garantía
VENTILADOR – GARANTÍA LIMITADA DE 3 AÑOS Si el ventilador falla debido a un defecto en el material o la mano de obra en cualquier momento durante los primeros TRES años de poseerlo, elfabricante lo reemplazará sin cargos y con el franqueo pagado a su discreción. Esta garantía no cubre productos que hayan sido objeto de abuso, alteración, daño, mal uso, corte o desgaste. - Página 30 AMAZON ALEXA - GARANTÍA LIMITADA DE 1 AÑO (Continuación) Limitaciones. EN LA MEDIDA PERMITIDA POR LA LEY, LA GARANTÍA Y LOS RECURSOS ESTABLECIDOS ANTERIORMENTE SON EXCLUSIVOS Y EN LUGAR DE TODAS LAS OTRAS GARANTÍAS Y RECURSOS, Y NOSOTROS NEGAMOS ESPECÍFICA- MENTE TODAS LAS GARANTÍAS ESTATUTARIAS O IMPLÍCITAS, INCLUYENDO, PERO SIN LIMITARSE A, LAS GARANTÍAS DE COMERCIABILIDAD, PROPÓSITO PARTICULAR Y CONTRA DEFECTOS OCULTOS O LATENTES.