
Manuales relacionados para Hisense HGH641SS

Resumen de contenidos para Hisense HGH641SS
- Página 1 MANUAL DE FUNCIONAMIENTO PARA EL USUARIO Parrilla de empotre Modelo Nro.: HGH641SS HGH751SS HGH961SS...
-
Página 2: Vista Detallada
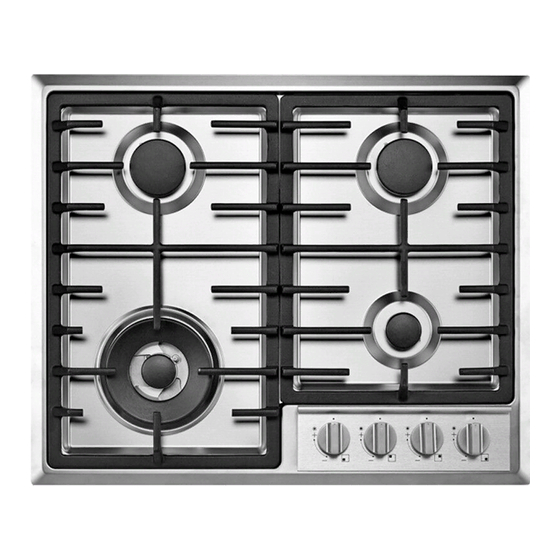
Felicitaciones por elegir el electrodoméstico, el cual usted verá que es confiable y fácil de usar. Le recomendamos que lea este manual para un mejor desempeño y extender la vida útil de su electrodoméstico. Gracias. VISTA DETALLADA Quedamos de tres anillos Quemador semi-rápido Quemador Auxiliar Quemador rápido... - Página 3 Cómo Usar Su Electrodoméstico La posición del correspondiente quemador de gas se indica en cada perilla de control. QUEMADORES DE GAS Los quemadores difieren en tamaño y capacidad. Elija el más apropiado para el diámetro de la olla que será usada. El quemador puede regularse con la correspondiente perilla de control usando uno de los siguientes ajustes: Está...
-
Página 4: Limpieza Y Mantenimiento
LIMPIEZA Y MANTENIMIENTO GENERAL La limpieza y mantenimiento debería llevarse a cabo con el electrodoméstico frío, especialmente cuando se limpien las partes esmaltadas. Evite dejar sustancias alcalinas o ácidas (jugo de limón, vinagre, etc.) sobre las superficies. Evite usar productos de limpieza ácidos o con base de cloro. - Página 5 LIMPIEZA DEL QUEMADOR DE TRES ANILLOS Preste especial atención a este quemador: los cuatro agujeros alrededor de la parte externa de la corona deben siempre mantenerse limpios. Al limpiar, retire el divisor de llama (figura. 4) y use un hisopo de algodón, un cepillo de dientes o algún otro item para limpiar cualquier incrustación o sucio que esté...
-
Página 6: Recomendaciones Para La Instalación
RECOMENDACIONES PARA LA INSTALACIÓN IMPORTANTE: El electrodoméstico debe ser instalado, regulado y adaptado para que funcione con otros tipos de gas por un TÉCNICO DE INSTALACIÓN CALIFICADO. El incumplimiento de esta condición invalidará la garantía. El electrodoméstico debe instalarse cumpliendo las regulaciones vigentes en su país y siguiendo las instrucciones del ... -
Página 7: Habitación Para La Instalación
INSTALACIÓN EN UN GABINETE DE COCINA CON PUERTA (fig.8) La instalación debe hacerse de acuerdo con los requisitos específicos de modo de evitar que los quemadores de gas se apaguen, aún cuando la llama esté encendida en el mínimo, debido a los cambios de presión al abrir y cerrar las puertas del gabinete. Se recomienda dejar una abertura de 30 mm entre el tope de cocina y la instalación de la superficie (fig 8). -
Página 8: Tipos De Gases
- Coloque el tope de cocina en la ranura de la unidad y acomódelo. - Coloque el tope de cocina en el descanso y asegurelo con las abrazaderas como se muestra en la fig.12 (para un tope de 3-4 cm de grueso). Campana extractora para los productos de... - Página 9 ORIENTACIÓN del CODO El electrodoméstico viene con una conexión de gas orientada hacia el centro del quemador a gas empotrado. La conexión a la fuente de gas debe ser llevada a cabo sólo por este lado o en una posición vertical al girar el codo hacia abajo. Para gira el cod, siga las siguientes instrucciones: Afloje la tuerca ...
-
Página 10: Sección Eléctrica
el tornillo dentro de la tapa hasta que se logre el ajuste deseado. En válvulas de gas que cuentan con un tornillo de ajuste en el cuerpo de la válvula (fig.15): √ Gire el tornillo “A” al ajuste correcto con el destornillador. Por lo general para el gas G30, apriete completamente el tornillo de ajuste. LUBRICACIÓN DE LAS TOMAS DE GAS Si la toma de gas se pone dura, es necesario desmontarla, limpiarla adecuadamente con gasolina y regar un poco de grasa resistente a altas temperaturas en la toma. - Página 11 En caso de que la instalación necesite modificaciones al sistema principal de cableado o si el enchufe no es apto para el tipo de punto de...
- Página 12 USER’S OPERATION MANUAL Built-in Gas Hob Model No.: HGH641SS HGH751SS HGH961SS...
- Página 13 Congratulations on choosing appliance, which you will find is dependable and easy to use. We recommend that you read this manual for best performance and to extend the life of your appliance. Thank you. CLOSE-UP VIEW Triple ring burner Semi-rapid burner Auxiliary Burner Rapid burner Igniter for Gas Burners...
- Página 14 How To Use Your Appliance The position of the corresponding gas burner is indicated on each control knob. GAS BURNERS The burners differ in size and power. Choose the most appropriate one for the diameter of the cookware being used. The burner can be regulated with the corresponding control knob by using one of tile following settings: It is prohibited to adjust the flame in the range between the Burner OFF and Burner ON large flame positions.
-
Página 15: General Advice
CLEANING AND MAINTENANCE GENERAL Cleaning and maintenance should be carried out with the appliance cold especially when cleaning the enameled parts. Avoid leaving alkaline or acid substances (lemon juice, vinegar etc.) on the surfaces. Avoid using acid or chlorine-based cleaning products. To extend the life of the built-in gas hob, it is absolutely indispensable that it be cleaned carefully and thoroughly on a frequent basis, keeping in mind the following: ENAMELLED PARTS... - Página 16 CLEANING THE TRLPLE RING BURNER Pay special attention to this burner: the four holes around the outside of the crown must always be kept clean. When cleaning ,remove the flame divider (fig.4) and use a cotton bud, toothbrush or some other item to clean out any incrustations or dirt from the four holes marked “H”...
- Página 17 ADVICE FOR INSTALLATION IMPORTANT: The appliance should be installed, regulated and adapted to function with other types of gas by a QUALIFIED INSTALLATION TECHNICIAN. Failure to comply with this condition will render the guarantee invalid. The appliance must be installed in compliance with regulations in force in your country and in observation of the manufacturer’s instructions.
-
Página 18: Installation Room
INSTALLATION IN KITCHEN CABINET WITH DOOR (fig.8) The fixture has to be made according to specific requirements in order to prevent the gas burners from going out, even when the flame is turned down to minimum, due to pressure changes while opening or closing the cupboard doors. It is recommended that a 30 mm clearance be left between the cooker top and the fixture surface (fig.8). -
Página 19: Gas Connection
-Slot the cooker top into the unit and position. -Position the cooker top in the recess and secure by means of the brackets as shown in fig.12 (for 3 or 4 cm thick work top). GAS SECTION TYPES OF GASES The gases normally used may be grouped, in view of their features in three families: 2,75 kPa -L.P.G. - Página 20 ORIENTATION of the ELBOW The appliance is supplied with a gas connection oriented towards the centre of the built-in gas hob. The connection to the gas supply must be effected only from this side or in vertical position by turning the elbow downwards. To turn the elbow, follow these operations: Loosen the nut ...
- Página 21 inside the tap until the correct setting is obtained. On gas valves provided with adjustment screw on the valve body (fig.15): √ Turn the screw “A” to the correct setting with a screwdriver.Normally for G30 gas, fully tighten the adjustment screw. LUBRICATION OF THE GAS TAPS If the gas tap becomes stiff, it is necessary to dismount it accurately clean it with gasoline and spread a bit of special grease resistant to high temperatures on it.
- Página 22 In the event that installation should require modifications to the mains supply wiring system or if the power plug is not suitable for the type 552x470 mm 685x470 mm 827x470 mm...
- Página 24 辈革暗暗盟串串 Hisense México S. de R.L. de C.V. Blvd. Miguel de Cervantes Saavedra, No. 301 Torre Norte, Piso 2, Col. Ampliación Granada, Municipio o Demarcación Territorial Miguel Hidalgo, C.P. 11520, Ciudad de México, R.F.C. HME110512IY3 www.hisense.com.mx...