Publicidad
Idiomas disponibles
Idiomas disponibles
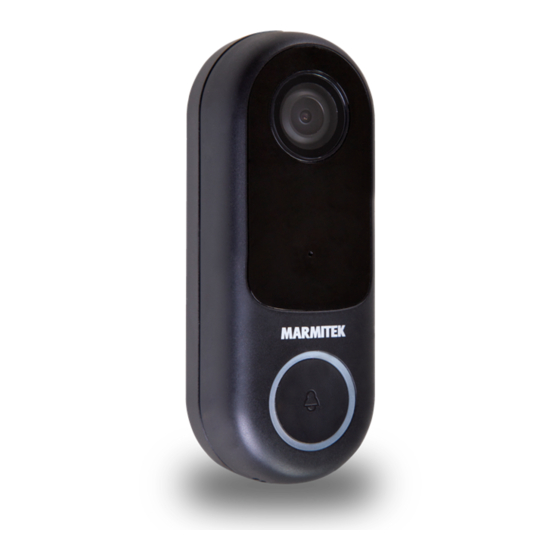
Buzz LO
Smart Wi-Fi
Video doorbell
HD 1080p camera
motion detection
intercom
Package content
1 x Video doorbell
1 x Bracket
1 x Angle Wall Mount
1 x Doorbell kit
1 x Quick install guide
Marmitek Smart me app
Bell ME
Wireless Chime
(Sold separately)
1 x Screws (3 kinds)
1 x Screwdriver
1 x Reset pin
1 x 3M
Multi language user guide
Publicidad
Tabla de contenido

Resumen de contenidos para Marmitek Buzz LO
- Página 1 1 x Screws (3 kinds) 1 x Bracket 1 x Screwdriver 1 x Angle Wall Mount 1 x Reset pin 1 x Doorbell kit 1 x 3M 1 x Quick install guide Marmitek Smart me app Multi language user guide...
- Página 2 (NL) 3M dubbelzijdige tape (NL) Gebruiksaanwijzing (DE) 3M doppelseitiges Klebeband (DE) Gebrauchsanleitung (FR) Ruban adhésif double face 3M (FR) Notice d’utilisation (ES) 3M Cinta adhesiva de dos caras (ES) Modo de empleo (IT) 3M Nastro biadesivo (IT) Guida utente © MARMITEK...
- Página 3 Connections (NL) Aanlsluitingen, (DE) Anschlüsse, (FR) Connexions, (ES) Conexiones, (IT) Collegamenti Buzz LO and Bell ME...
-
Página 4: Safety Instructions
2. Remove the existing doorbell push button at the door, 1. Connect the Buzz LO to the 2 wires from step 1 and the Buzz LO will be connected to it later. -
Página 5: Technical Specifications
Smart me products. Technical specifications Declaration of Conformity Hereby, Marmitek BV, declares that the Buzz LO and Bell ME are in compliance with the essential requirements of the 2014/53/EU Directives. Full Declaration of Conformity is available at www.marmitek.com/en/declarations-of-conformity/ More detailed user guide and instructions are available on our website at www.marmitek.com... - Página 6 Buzz LO op aangesloten. 3. Sluit de meegeleverde deurbel kit parallel aan op de 1. Sluit de Buzz LO aan op de 2 draden uit stap 1 en bestaande mechanische gong, het maakt niet uit welke schakel daarna de voeding in (van de bestaande draad op de + of –...
- Página 7 • Bestaande deurbel - UIT: notificatie via Smart me app en (indien aangesloten) via draadloze gong (Bell ME). Verklaring van overeenstemming Marmitek BV verklaart hierbij dat de Buzz LO en Bell ME voldoen aan de essentiële eisen van de 2014/53/EU richtlijnen. De volledige conformiteitsverklaring is beschikbaar op www.marmitek.com/en/declarations-of-conformity/ Meer gedetailleerde gebruikershandleiding en instructies zijn beschikbaar op onze website op www.marmitek.com...
- Página 8 Gong an. Es spielt keine Rolle, welches Kabel an das + oder - 1. Schließen Sie den Buzz LO 1 an die 2 Drähte aus angeschlossen wird. (Möglicherweise müssen Sie die Schritt an und schalten Sie dann die Schutzhülle vorübergehend von Ihrem mechanischen...
- Página 9 Einstellungen (Stift rechts oben) > und wählen Sie Klingeleinstellung‘. Konformitätserklärung Marmitek BV erklärt hiermit, dass das Buzz LO und Bell ME die grundlegenden Anforderungen der Richtlinien 2014/53/EU erfüllt. Die vollständige Konformitätserklärung ist verfügbar unter www.marmitek.com/en/declarations-of-conformity/ Detailliertere Bedienungsanleitungen und Anweisungen finden Sie auf unserer Website unter www.marmitek.com...
- Página 10 Buzz LO y sera connectée ultérieurement. 1. Connectez la Buzz LO aux 2 fils de l'étape 1, puis 3. Connectez le kit de sonnette fourni en parallèle au mettez sous tension (de la sonnette existante ou carillon mécanique existant, peu importe quel fil est...
- Página 11 (Bell ME). Déclaration de conformité Marmitek BV déclare par la présente que le Buzz LO et Bell ME sont conformes aux exigences essentielles des directives 2014/53/EU. La déclaration de conformité complète est disponible sur www.marmitek.com/en/declarations-of-conformity/...
-
Página 12: Instrucciones De Seguridad
Paso 2: Montaje del Buzz LO en el sitio deseado sistema durante mucho tiempo. Cuando pone las Instala el Buzz LO con o sin el soporte de sujeción pilas, presta atención a la polaridad (+ / -): Si no son suministrado. -
Página 13: Especificaciones Técnicas
Smart me. Declaración de conformidad Marmitek BV declara que Buzz LO y Bell ME cumple con los requisitos esenciales de las directivas 2014/53/UE. La Declaración de Conformidad completa está disponible en www.marmitek.com/en/declarations-of-conformity/ Un manual de usuario más detallado e instrucciones están disponibles en nuestro sitio web en... - Página 14 Buzz LO verrà collegato a questo in seguito. 3. Collegare il kit del campanello video in dotazione in 1. Collegare Buzz LO ai 2 fili dal passo 1 e quindi parallelo al campanello meccanico esistente, non accendere l'alimentatore (del campanello esistente o importa quale filo sia collegato al + o -.
- Página 15 Smart me, il campanello esistente e (se collegato) tramite il campanello senza fili (Bell ME). Dichiarazione di conformità Marmitek BV dichiara che Buzz LO e Bell ME sono conformi ai requisiti essenziali delle direttive 2014/53/UE. La dichiarazione di conformità completa è disponibile all'indirizzo www.marmitek.com/en/declarations-of-conformity/ Un manuale utente più...
- Página 16 Schrauben an die Wand (FR) Vissez le support d'angle au mur avec les vis fournies (ES) Atornillar el soporte de sujeción con los tornillos suministrados en la pared (IT) Avvitare la staffa angolare alla parete utilizzando le viti in dotazione. © MARMITEK...
- Página 17 (IT) Avvitare la piastra per montaggio alla staffa angolare utilizzando le viti in dotazione. (EN) Connect the wires (8~16 VAC) by screwing both to the back of the Buzz LO, the order does not matter. (NL) Sluit de draden (8~16 VAC) aan door beide vast te schroeven op de achterzijde van de Buzz LO, de volgorde maakt niet uit.
- Página 18 (FR) Vissez la plaque de montage sur le mur avec les vis fournies (ES) Atornillar la placa de montaje con los tornillos suministrados en la pared (IT) Avvitare la piastra per montaggio alla parete utilizzando le viti in dotazione. © MARMITEK...
- Página 19 (EN) Connect the wires (8~16 VAC) by screwing both to the back of the Buzz LO, the order does not matter. (NL) Sluit de draden (8~16 VAC) aan door beide vast te schroeven op de achterzijde van de Buzz LO, de volgorde maakt niet uit.
- Página 20 20701/20200811 | Buzz LO™ Bell ME™ all rights reserved © MARMITEK marmitek.com stay connected...

