Publicidad
Idiomas disponibles
Idiomas disponibles
Enlaces rápidos
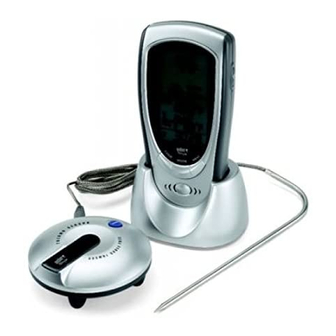
AUDIBLE MEAT THERMOMETER
Weber Style
™
Audible Meat Thermometer
NOTE Please keep this manual handy as you use your new product. It contains
practical step-by-step instructions, as well as technical specifications and
warnings you should know about.
OVERVIEW: MAIN UNIT FRONT VIEW
1. MEAT: Select meat type
2. POWER: Activate / deactivate unit
3. LANG: Select voice prompt language
2
4. COOK: Select doneness level
5. Speaker
1
3
4
5
OVERVIEW: MAIN UNIT BACK VIEW
1. Belt Clip
2. RESET
1
7
3. °C / °F: Select temperature unit
8
4. Battery compartment
9
5. VOLUME: Select volume level
10
6. Battery compartment lever
2
7. START / STOP: Begin / end the
stopwatch; reset timer to zero
3
8. HR: Select hours for timer
4
5
9. MIN: Select minutes for timer
6
10.SEC: Select seconds for timer
OVERVIEW: LCD SCREEN
1. Meat type
2. Language icons
3. Low battery indicator
4. Signal reception icon
5. Stopwatch icon
6. Doneness level
7. Target temperature
8. Current temperature
9. Stopwatch time
OVERVIEW: TRANSMITTER & PROBE
1. LED indicator
3
2. RESET: Reset unit
1
3. POWER: Activate transmitter
4
4. Connector jack for probe
5. Battery compartment
2
5
1. Probe connector wire
2. Probe tip
1
2
GETTING STARTED
INSTALLING THE BATTERIES
In the main unit
1. Release and lift up cover to access the battery compartment.
2. Place two AA batteries in the compartment as indicated
by the polarity symbols (+ and -).
3. Replace the cover.
indicates when the batteries are low.
SET AUDIO LANGUAGE
When the unit is first activated, or after changing batteries, the language needs to be set.
1. Press POWER to activate the main unit. The language icons will flash.
2. Press LANG to toggle to the desired language.
NOTE The audio language options are: DE (German), DN (Danish), EN (English),
ES (Spanish) and FR (French).
STAND
Place the unit into the stand
provided and place on a table
or work surface for easy viewing
and access.
TRANSMITTER
To set up the transmitter
1. Remove the battery
compartment cover and insert
2 AAA batteries into the compartment as indicated by the polarity symbols (+ and
-).
2. Press RESET and replace the battery compartment door.
3. The LED indicator will flash to indicate the transmitter is activated.
indicates when the batteries are low.
TRANSMITTER DATA
TRANSMISSION
Place the transmitter within
100 m (300 ft) of the main unit.
The sensor reception icon
indicates the status.
NOTE The LED indicator blinks
during transmission. If the
transmitter is moved out of range, the unit will beep three times.
OPERATION: COOKING
L
CAUTION The probe is a sharp metal object, and will become hot during cooking.
Take care when handling.
1. Plug the probe connector into the transmitter jack and insert the probe into the
meat. To prevent the lid from crimping the probe wire on gas grills, feed the wire
L
out through the slot (1) on the side of the cookbox. Use the monitor's stand for
easy viewing. For charcoal grilling, (2) route the probe wire away from the direct
heat of the charcoal briquettes.
(1)
L
2. Press MEAT to select the meat type. The voice announcement and LCD icon
indicate the meat type.
L
Hamburger
Beef
Chicken
Lamb
Pork
Turkey
3. Press COOK to select the doneness level (Rare, Medium Rare, Medium or Well
Done). The LCD and talking announcement indicate your selection.
4. The target temperature appears on the LCD screen. Begin cooking.
5. The cooking alerts will sound depending on the temperature:
• Nearly Done Alert: 2 beeps followed by "It's nearly done" when the meat is
nearing the target temperature.
• Done Alert: 4 beeps followed by "It's done" when the meat has reached the
target temperature.
S
• Overcook alert: The LCD screen will flash and continue beeping until a button
is pressed.
6. Press any button to silence the alert.
NOTE The maximum operating temperature for the probe is 380°C (716°F).
S
When the probe temperature exceeds the maximum display temperature
(199°C / 199°F) the LCD will flash.
AFTER COOKING
• Once cooking is finished, remove the probe using an oven gloves.
• Clean the probe with water and a mild detergent. To clean the main unit and
sensor, wipe with a damp cloth.
NOTE Do not clean the probe in a dishwasher or immerse the main unit or sensor
in water.
S
OPERATION: UNIT
COUNTDOWN / COUNT-UP TIMER
The count down and count-up timer operate independently of the temperature sensor.
To set a countdown time:
Use HR, MIN and SEC to set the countdown time.
S
To set a count-up timer:
If no countdown time is set, the timer will act as a count-up timer.
To start timer:
1. Press START / STOP to begin.
2. Press START / STOP again to pause.
3. Press and hold START / STOP to reset to zero.
4. Once a countdown has finished, the unit will beep. To silence the alert,
press any button.
TEMPERATURE UNIT
Slide °C / °F to select the temperature unit.
VOLUME
Slide VOLUME to Hi or Lo to select the speaker volume level.
AUTO KEYLOCK
If no button is pressed for 5 seconds auto keylock will engage. Press any button
to unlock.
BACKLIGHT
Press any button to illuminate the screen for 5 seconds.
PRECAUTIONS
This product is engineered to give you years of satisfactory service if you handle it
carefully. Here are a few precautions:
• Do not subject the unit to excessive force, shock, dust, temperature or humidity,
which may result in malfunction, shorter electronic life span, battery damaged or
deterioration of parts.
• Placement of this product on wood surfaces with certain types of finishes,
such as clear varnish, may result in damage to the finish. Consult the furniture
manufacturer's care instructions for direction as to the types of objects that may
safely be placed on the wood surface. Weber-Stephen Products Co. shall not be
responsible for any damage to wood surfaces from contact with this product.
• Do not immerse the unit in water. If you spill liquid over it, dry it immediately with a
soft, lint-free cloth.
• Do not clean the unit with abrasive or corrosive materials.
• Do not tamper with the unit's internal components. Doing so will invalidate the
warranty on the unit and may cause unnecessary damage. The unit contains no
user-serviceable parts.
• Only use fresh batteries as specified in the user's instructions. Do not mix new
and old batteries.
• Due to printing limitations, the displays shown in this manual may differ from the
actual display.
• The contents of this manual may not be reproduced without the permission of the
manufacturer.
NOTE The technical specifications for this product and the contents of the user
manual are subject to change without notice.
L
MAIN UNIT
L x W x H
L
Weight
Temperature unit
Max. operating
temperature
Temperature
Resolution
Signal frequency
L
Power
FCC STATEMENT
This device complies with Part 15 of the FCC Rules. Operation is subject to the
L
(2)
following two conditions: (1) This device may not cause harmful interference, and
(2) This device must accept any interference received, including interference that
may cause undesired operation.
WARNING Changes or modifications not expressly approved by the party
responsible for compliance could void the user's authority to operate the
equipment.
NOTE This equipment has been tested and found to comply with the limits for
a Class B digital device, pursuant to Part 15 of the FCC Rules. These limits
are designed to provide reasonable protection against harmful interference in a
residential installation.
This equipment generates, uses and can radiate radio frequency energy and, if
not installed and used in accordance with the instructions, may cause harmful
Fish
interference to radio communications. However, there is no guarantee that
interference will not occur in a particular installation. If this equipment does cause
harmful interference to radio or television reception, which can be determined
by turning the equipment off and on, the user is encouraged to try to correct the
S
interference by one or more of the following measures:
Veal
• Realign or relocate the receiving antenna.
• Increase the distance between the equipment and receiver.
• Connect the equipment into an outlet on a circuit different from that to which the
receiver is connected.
S
• Consult the dealer or an experienced radio / TV technician for help.
The following information is not to be used as contact for support or sales. Please
call our customer service number (listed on our website at www.weber.com, or on
the warranty card for this product) for all inquiries instead.
We declare that the product
Name:
Address:
S
Telephone No.: 1-800-446-1071
Product No.:
Product Name: Weber Style
Manufacturer: IDT Technology Limited
S
Address:
is in conformity with Part 15 of the FCC Rules. Operation is subject to the following
two conditions:
1) This device may not cause harmful interference. 2) This device must accept any
interference received, including interference that may cause undesired operation.
This symbol indicates that the
product cannot be disposed
of with household refuse. For
instructions regarding proper
disposal of this product in
Europe, please visit www.weber.
com
listed for your country. If you do
not have internet access, contact your dealer for the importer's name,
address and telephone number.
Weber-Stephen Products Co., (Weber
PURCHASER of this Audible Meat Thermometer, that it will be free from defects
in material and workmanship from the date of purchase as follows: 2 year(s) when
assembled, and operated in accordance with the printed instructions accompanying it.
Weber may require reasonable proof of your date of purchase. THEREFORE, YOU
SHOULD RETAIN YOUR SALES RECEIPT OR INVOICE AND RETURN THE
WEBER LIMITED WARRANTY REGISTRATION CARD IMMEDIATELY.
This Limited Warranty shall be limited to the repair or replacement of parts that prove
defective under normal use and service and which on examination shall indicate,
to Weber's satisfaction, that they are defective. If Weber confirms the defect and
approves the claim, Weber will elect to repair or replace such parts without charge.
If you are required to return defective parts, transportation charges must be prepaid.
Weber will return parts to the purchaser, freight or postage prepaid.
This Limited Warranty does not cover any failures or operating difficulties due to
accident, abuse, misuse, alteration, misapplication, vandalism, improper installation
or improper maintenance or service, or failure to perform normal and routine
maintenance. Deterioration or damage due to severe weather conditions such
as hail, hurricanes, earthquakes or tornadoes, discolouration due to exposure
to chemicals either directly or in the atmosphere, is not covered by this Limited
Warranty. Weber shall not be liable under this or any implied warranty for incidental
or consequential damages. This warranty gives you specific legal rights, and you
may also have other rights, which vary from state to state.
SPECIFICATIONS
REMOTE UNIT
142 x 70 x 39 mm
L x W x H
86 x 86 x 31 mm
(5.6 x 2.75 x 1.53 in)
(3.4 x 3.4 x 1.2 in)
186 g (6.5 oz) with
Weight
75 g (2.6 oz) with
battery
battery
°C / °F
Transmission
100 m (300 ft)
range
unobstructed
60°C (140°F)
Power
2 x UM-4 AAA 1.5V
batteries
1°C (2°F)
433MHz
PROBE
2 x UM-3 AA 1.5 V
Max. operating
380°C (716°F)
batteries
temperature
DECLARATION OF CONFORMITY
Weber-Stephen Products Company
200 East Daniels Road
Palatine, IL 60067-6266 USA
6439
™
Audible Meat Thermometer
Block C, 9/F, Kaiser Estate,
Phase 1,41 Man Yue St.,
Hung Hom, Kowloon, Hong Kong
, and contact the importer
®
®
) hereby warrants to the ORIGINAL
Publicidad

Manuales relacionados para Weber Style


Resumen de contenidos para Weber Style
- Página 1 Weber’s satisfaction, that they are defective. If Weber confirms the defect and If no button is pressed for 5 seconds auto keylock will engage. Press any button approves the claim, Weber will elect to repair or replace such parts without charge. to unlock.
-
Página 2: Caractéristiques Techniques
Pour tout renseignement, contactez notre service • Alerte de surcuisson: L’écran LCD clignote et des bips sont émis de façon clientèle (au numéro indiqué sur notre site Web www.weber.com ou sur la carte de continue jusqu’à l’activation d’une touche. - Página 3 Teilen, die sich unter normalem Gebrauch und Service als mangelhaft aktiviert. Drücken Sie eine beliebige Taste, um die Tastensperre aufzuheben. erwiesen haben und die sich bei einer Prüfung in der Überzeugung von Weber als zeigt an, wenn die Batterien zu schwach sind.
- Página 4 Jos Weber vahvistaa vian ja hyväksyy korvausvaatimuksen, ÄÄNENVOIMAKKUUS: Weber korjaa tai korvaa kyseiset osat veloituksetta. Jos viallisia osia on palautet- Valitse äänenvoimakkuus siirtämällä kytkin asentoon Hi tai Lo. tava, kuljetuskulut on maksettava etukäteen. Weber palauttaa osat ostajalle ja maksaa rahti- tai postikulut etukäteen.
- Página 5 Trykk på hvilken som helst knapp for å låse opp. viser seg, til Webers tilfredsstillelse, å være defekt. Hvis Weber bekrefter defekten og INSTALLERING AV BATTERIER...
- Página 6 Det er nødvendigt at indstille sproget, når enheden er aktiveret, eller efter Weber-Stephen Products Co. kan ikke holdes ansvarlig for nogen form for skader på batterierne er udskiftet.
- Página 7 (+ och -). Knapplåset träder in om ingen knapp trycks på inom 5 sekunder. Tryck på valfri betalas i förskott. Weber returnerar delarna till köparen med frakt eller porto betalt 3. Sätt tillbaka batteriluckan. knapp för att låsa upp.
- Página 8 Weber vast- toetsenvergrendeling inschakelen. Druk op een willekeurige knop om dit op te In de hoofdeenheid gestelde richtlijnen, dat deze defect zijn. Als Weber het defect bevestigt en de claim heffen. goedkeurt, zal Weber dergelijke onderdelen zonder kosten repareren of vervangen.
- Página 9 Questo prodotto è realizzato per funzionare perfettamente per molti anni, che, in modo diretto o in quanto presenti nell’atmosfera. La Weber non potrà essere indica quando le batterie sono scariche.
-
Página 10: Especificaciones
• Alerta de que está hecho: 4 pitidos seguidos del mensaje “Está hecho” cuando la 8. Temperatura actual que aparece en nuestro sitio Web (www.weber.com) y en la tarjeta de garantía de carne alcanza la temperatura fijada. 9. Tiempo del cronómetro Declaramos que el producto •... - Página 11 Existem algumas precauções: indicado pelos símbolos de polaridade (+ e -). cliente. A Weber devolverá as peças ao comprador, com o frete ou despesas de • Não sujeite a unidade força excessiva, choques, pó, temperatura ou humidade 3.
- Página 12 Naciśnij dowolny przycisk, aby podświetlić ekran na 5 sekund. naprawy lub wymiany tych części bez opłaty. Jeżeli wymagany jest zwrot części INSTALACJA BATERII wadliwych, koszt opłaty transportowe pokrywa z góry nabywca. Weber zwróci ZALECENIA OBSŁUGI W urządzeniu głównym części nabywcy pokrywając części transportu.
- Página 13 включается блокировка клавиатуры. Для разблокирования нажмите любую кнопку. дефектном состоянии. Если компания Weber подтверждает дефект и признает 3. Поставьте крышку на место. иск, то компания Weber заменит такие детали бесплатно. Если Вам необходимо ПОДСВЕТКА показывает низкий уровень зарядки батарей. возвратить дефектные детали, то необходимо выполнить предоплату за...