Tabla de contenido
Publicidad
Idiomas disponibles
Idiomas disponibles
Enlaces rápidos
INTRODUCTION
Thank you for purchasing the RCC Clock . Please read carefully through the following
information and keep these instructions, in case you need to refer to them in the future. If you
pass the product on to someone else, please also include these instructions.
The Radio-Controlled Clock (RCC Clock) displays:
- indoor temperature
- date / time / weekday
- alarm
The RCC Clock is unsuitable for commercial use in weather forecasting or in temperature data
measurement.
PACKAGE CONTENTS
AAA batteries
for main unit x 2
Main unit
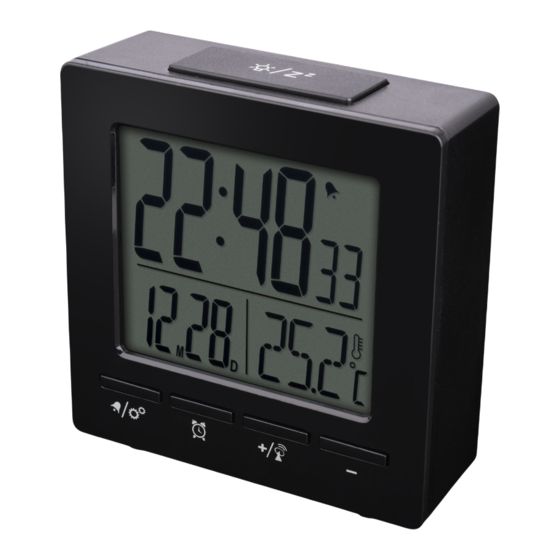
OVERVIEW
1:
Press to activate the snooze functon,backlight .
2:
In Date mode, press to turn on/off zone. In Alarm time
mode, press to turn on/off alarm. Press and hold to enter time
and date setting.
3:
Press to show alarm time of Alarm 1-5 and Alarm 6-7.
Press and hold to enter alarm setting.
4:
Press to switch between Temperature and Week Day
display. Press and hold to start RCC signal receiving. In
setting mode, press to increase one unit, press and hold
to increase rapidly.
5:
Press to switch between Date and the nearest coming
Alarm time.In setting mode, press to decrease one unit,
press and hold to decrease rapidly.
6:Battery compartment. Slide down to open.
LCD DISPLAY
1: Time Display
2: Date display or Alarm time display
3: Temperature display or Week Day display
RCC signal received
Alarm ON
DST ON
Snooze Activated
Low battery indicator
Temperature mode
GETTING STARTED
INSERT BATTERIES
1: Remove the battery door from the back
2: Insert 2 R03 (AAA)/ 1.5V batteries. Please ensure the polarities (+/-) of the batteries
match upon installation.
3: Reattach the battery door.
NOTE: Replace batteries when
displays, or when the display is dim.
CLOCK
CLOCK RECEPTION
1: Replace batteries or press
button will initiate RCC receiving.
2: RCC receiving can be worked in both Date Mode and Alarm Mode.
3: The receiving process duration is 7 minutes.
4: During receiving process, the RCC signal logo
5: During receiving process, press
button to quit receiving, press other buttons
can work normally.
6: If process is successful, completed RCC logo
7 minutes, RCC setting will be quit automatically.
7: RCC receiving will automatically start at 2:03, 3:03, 4:03 , 5:03 every night. Auto
receiving function will cease if it is successful.
Different model receives different RCC signal:
Region
Signal
EU
DCF
UK
MSF
SET THE CLOCK MANUALLY
1. Press and hold
button, enter time and date setting
2. Sequence of setting: Week Day Language
Month
Date
Hour
Minute
3. During setting, the setting parameter will flash.
4. Press
button to confirm setting and enter to next parameter
5. Press
button once, the figure will increase 1 unit (when setting minute, second will reset to
0). Press and hold the
button, the figures will increase rapidly.
6. Press
button once, the figure will decrease 1 unit (when setting minute, second will reset to
0). Press and hold the
button, the figures will decrease rapidly.
7.If there is no action in 20 seconds, the setting will be saved and will exit the setting mode.
Five languages Week Day display: GER, ENG, FRE, ITA, DUT.
Symbol
Monday
Tuesday
German
GER
MON
DIE
English
ENG
MON
TUE
France
FRE
LUN
MAR
Italian
ITA
LUN
MAR
Dutch
DUT
MAA
DIN
flashes.
will be shown in display. If it fails within
12/24 Hr
Year (2000 – 2099)
Zone
exit
℃/℉
Wednesday
Thursday
Friday
Saturday
MIT
DON
FRE
SAM
WED
THU
FRI
SAT
MER
JEU
VEN
SAM
MER
GIO
VEN
SAB
WOE
DON
VRI
ZAI
Date format
Sunday
SON
SUN
DIM
DOM
ZON
Publicidad
Tabla de contenido

Manuales relacionados para Oregon Scientific RM511


Resumen de contenidos para Oregon Scientific RM511
- Página 1 INTRODUCTION GETTING STARTED INSERT BATTERIES Thank you for purchasing the RCC Clock . Please read carefully through the following 1: Remove the battery door from the back information and keep these instructions, in case you need to refer to them in the future. If you 2: Insert 2 R03 (AAA)/ 1.5V batteries.
- Página 2 ALARM SETTING/ADJUSTING ALARM TIME 1. Press and hold button, enter alarm setting Do not expose the batteries to any extreme conditions by e.g. placing them on a radiator or 2. Sequence of setting: weekday hour weekday minute weekend hour weekend under direct sunlight.
-
Página 3: Lcd-Anzeige
EINFÜHRUNG ERSTE SCHRITTE BATTERIEN EINLEGEN Vielen Dank für den Kauf der Funkuhr. Lesen Sie die folgenden Informationen bitte sorgfältig 1: Batteriefachabdeckung an der Rückseite entfernen. durch und bewahren Sie diese Anleitung gut auf, damit sie Ihnen bei Bedarf jederzeit zur 2: 2 Micro-Batterien (R03/AAA/1,5 V) einlegen. - Página 4 WECKER Einstellen/Ändern der Weckzeit 1. Halten Sie die Taste gedrückt, um die Weckzeit einzustellen. 2. Einstellreihenfolge: Werktag Stunde Werktag Minute Wochenende Stunde Setzen Sie die Batterien keinen extremen Bedingungen aus, indem Sie sie z. B. auf einem Wochenende Minute Beenden Heizkörper oder unter direkter Sonneneinstrahlung positionieren.
-
Página 5: Vue D'ensemble
INTRODUCTION MISE EN ROUTE INSERTION DES PILES Nous vous remercions d'avoir acheté cette horloge radio-pilotée. Veuillez lire attentivement les 1: Enlevez le couvercle du compartiment à piles situé à l'arrière. informations suivantes et conservez ces instructions, au cas où vous auriez besoin de vous y 2: Insérez 2 piles R03 (AAA) / 1,5 V. - Página 6 ALARME CONFIGURATION / RÉGLAGE DE L'HEURE D'ALARME 1. Appuyez et maintenez la touche , puis entrez le réglage d'alarme. Ne pas exposer les piles à des conditions extrêmes, par exemple en les plaçant sur un radiateur 2. Séquence de réglage : heure du lundi au vendredi minute du lundi au vendredi heure en ou à...
-
Página 7: Introducción
INTRODUCCIÓN PRIMEROS PASOS INTRODUZCA LAS PILAS Gracias por adquirir este reloj RCC. Lea atentamente la siguiente información y conserve este 1: Retire la tapa del compartimento de las pilas de la parte posterior. manual en caso de que necesite consultarlo en un futuro. Si cede a un tercero este producto, 2: Introduzca 2 pilas R03 (AAA)/ de 1,5 V Asegúrese de que coloca las pilas incluya también estas instrucciones. -
Página 8: Funcionamiento
ALARMA AJUSTE DE HORA DE LA ALARMA 1. Mantenga pulsado el botón para entrar en el modo de ajuste de la alarma 2. Secuencia del modo de ajuste: hora (lunes a viernes) minuto (lunes a viernes) hora (fin No exponga las pilas a condiciones extremas, por ejemplo colocándolas sobre un radiador o de semana) minuto (fin de semana) salir... - Página 9 INTRODUZIONE INTRODUZIONE INSERIRE LE BATTERIE Grazie per aver acquistato l'orologio RCC. Leggere attentamente le seguenti informazioni e 1: Rimuovere lo sportellino della batteria dal retro conservarle per riferimento futuro in caso di necessità. 2: Inserire 2 batterie R03 (AAA)/1,5 V. Accertarsi di inserire le batterie con la corretta L'orologio radiocontrollato (orologio RCC) visualizza la temperatura interna.
- Página 10 SVEGLIA Posizionare l'orologio RCC unicamente in un luogo asciutto e protetto. IMPOSTAZIONE/REGOLAZIONE ORARIO SVEGLIA Rimuovere le batterie dall'orologio RCC una volta esaurite o se non si intende utilizzare 1. Premere e tenere premuto il pulsante , immettere le impostazioni della sveglia l'orologio RCC per un lungo periodo di tempo.
- Página 11 INTRODUCTION GETTING STARTED INSERT BATTERIES Thank you for purchasing the RCC Clock . Please read carefully through the following 1: Remove the battery door from the back information and keep these instructions, in case you need to refer to them in the future. you pass the 2: Insert 2 R03 (AAA)/ 1.5V batteries.
- Página 12 ALARM SETTING/ADJUSTING ALARM TIME 1. Press and hold button, enter alarm setting Do not expose the batteries to any extreme conditions by e.g. placing them on a radiator or 2. Sequence of setting: weekday hour weekday minute weekend hour weekend under direct sunlight.