Tabla de contenido
Publicidad
Idiomas disponibles
Idiomas disponibles
Enlaces rápidos
Built-In Central Cleaning System
MODEL: CV850
Examples . . . . . . . . . . . . . . . . . . . . . . . . . . . . . . . . . . . . . . . . . . . .2
Locating the Power Unit . . . . . . . . . . . . . . . . . . . . . . . . . . . . . . . . .3
Tubing and Wall Inlet Location . . . . . . . . . . . . . . . . . . . . . . . . . . .3
Locating Access Keys in Existing Construction . . . . . . . . . . . . . . .3
INSTALLATION IN NEW CONSTRUCTION . . . . . . . . . . . . . . . .4-8
Wall Inlet Rough-In . . . . . . . . . . . . . . . . . . . . . . . . . . . . . . . . . . . .4
Installing the Tubing . . . . . . . . . . . . . . . . . . . . . . . . . . . . . . . . . . . .5
Models CI370 & 360 Wall Inlets . . . . . . . . . . . . . . . . . . . . . . . . .6
Model 330 Wall Inlet . . . . . . . . . . . . . . . . . . . . . . . . . . . . . . . . .6
Model CI390 Wall Inlet (Electrified Inlet) . . . . . . . . . . . . . . . . . .7
POWER UNIT INSTALLATION . . . . . . . . . . . . . . . . . . . . . . . . . . .8
Dimensional Chart . . . . . . . . . . . . . . . . . . . . . . . . . . . . . . . . . . . .8
Mounting . . . . . . . . . . . . . . . . . . . . . . . . . . . . . . . . . . . . . . . . . . .8
Tubing Connections at Power Unit . . . . . . . . . . . . . . . . . . . . . . .8
Wiring . . . . . . . . . . . . . . . . . . . . . . . . . . . . . . . . . . . . . . . . . . . . . .8
INSTALLATION IN EXISTING CONSTRUCTION . . . . . . . . . . .9-10
Models CI370 & 360 Wall Inlets . . . . . . . . . . . . . . . . . . . . . . . . .9
Model 330 Wall Inlet . . . . . . . . . . . . . . . . . . . . . . . . . . . . . . . .10
FLOOR INLET INSTALLATION . . . . . . . . . . . . . . . . . . . . . . .10-11
FINAL SYSTEM CHECK . . . . . . . . . . . . . . . . . . . . . . . . . . . . . . . .11
WARRANTY . . . . . . . . . . . . . . . . . . . . . . . . . . . . . . . . . . . . . . . . .12
. . . . . . . . . . . . . . . . . . . . . .2
INSTALLATION
INSTRUCTIONS
Publicidad
Capítulos
Tabla de contenido

Manuales relacionados para NuTone CV850

Resumen de contenidos para NuTone CV850
-
Página 1: Tabla De Contenido
INSTALLATION INSTRUCTIONS Built-In Central Cleaning System MODEL: CV850 SYSTEM PLANNING AND LAYOUT ..... .2 Examples ..........2 Locating the Power Unit . -
Página 2: System Planning And Layout
SYSTEM PLANNING AND LAYOUT The NuTone Central Cleaning System consists of a Power Unit, Generally, an installation will require 3 to 4 inlets and 16 to 20 PVC Tubing and Fittings, Wall Inlets, a flexible Hose and various feet of tubing per inlet. It is suggested that a floor plan be used to cleaning Attachments. -
Página 3: Locating The Power Unit
LOCATING ACCESS KEYS IN LOCATING THE POWER UNIT EXISTING CONSTRUCTION • Locate the power unit away from the general living area in an accessible location for changing the soil bag and periodically Let's say, for example, you have a two-story house and you want cleaning the secondary filter. -
Página 4: Installation In New Construction
INSTALLATION IN NEW CONSTRUCTION WALL INLET ROUGH-IN Once the locations for wall inlets have been determined, mount all inlet brackets. 1. Choose the appropriate mounting bracket for the inlet being installed. (See chart.) MODEL 361 SIDE FACE MOUNTING MOUNTING NuT one Inlet Rough-in 330 Series 360 Series... -
Página 5: Installing The Tubing
INSTALLATION IN NEW CONSTRUCTION (continued) INSTALLING THE TUBING MODEL 361 MOUNTING Use the following installation guidelines when installing tubing. " DIA. HOLE Start tubing installation at farthest inlet and work toward the THROUGH SOLE PLATE power unit. " " Tubing run to the power unit should be as straight as possible. -
Página 6: Wall Inlet Installation
TERMINAL WALL INLET INSTALLATION Your CV850 Power Unit is designed especially for model CI370 Series Indicating Inlets. These inlets include a LED to remind you after 25 hours of operation that it is time to change the filter bag in your power unit. - Página 7 NOTE: All electrical devices such as the electrified inlet should be reported to the construction electrician for listing on the inspection report for building inspection purposes. NOTE: Plumb inlet to tubing using NuTone Model 382-S 90° Ell fitting. FIGURE 25...
-
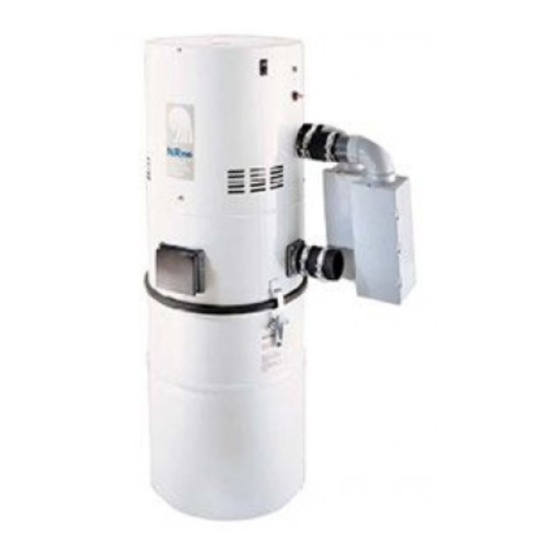
Página 8: Power Unit Installation
(2) mufflers that may be TUBING CONNECTIONS AT POWER UNIT positioned up, down or horizontally 1. The CV850 is designed with dual independent exhaust. Separate exhaust lines are recommended. 2. Using rubber couplings and hose clamps to connect intake and 12" MINIMUM TO CEILING exhaust tubing. -
Página 9: Installation In Existing Construction
INSTALLATION IN EXISTING CONSTRUCTION Use the following procedures for installation in existing construction. Starting from farthest wall inlet location, install each inlet as described below. Working back toward power unit, connect each inlet line and branch line into main trunk line. See page 5. Complete low voltage wiring BASEBOARD as main trunk line is continued back to power unit. - Página 10 INSTALLATION IN EXISTING CONSTRUCTION (continued) MODEL 330N WALL INLET INSTALLATION (329 Rough-in) 1. Make cutout according to dimensions in Figure 35. 5. Connect 2-conductor low voltage wire to terminal screws on 2. Refer to Figure 36. Break off nail plate at scored line. back of wall inlet.
-
Página 11: Floor Inlet Installation
CI370 Indicating Inlet, be sure LED on inlet is green when hose is inserted/switched on. If Central Cleaning hose is not available Now it’s time to enjoy the benefits of a NuTone Central Cleaning at the time, a short piece of wire can be used to short contacts in System. -
Página 12: Warranty
WARRANTIES OF MERCHANTABILITY OR FITNESS FOR A PARTICULAR PURPOSE. During this two year period, NuTone will, at its option, repair or replace, without charge, any product or part which is found to be defective under normal use and service. THIS WARRANTY DOES NOT EXTEND TO FLUORESCENT LAMP STARTERS OR TUBES, FILTERS, DUCT, ROOF CAPS, WALL CAPS AND OTHER ACCESSORIES FOR DUCTING. - Página 13 D’INSTALLATION Système Central d’Aspiration Intégré MODELE: CV850 PLANIFICATION ET DISPOSITION DU SYSTEME ...2 Exemples ..........2 Emplacement du Groupe d’Aspiration .
-
Página 14: Planification Et Disposition Du Systeme
PLANIFICATION ET DISPOSITION DU SYSTEME Le système central d'aspiration intégré de NuTone comprend un groupe Généralement une installation requiert de 3 à 4 prises avec 5 à 6 mètres de tuyauterie par prise d'aspiration. Il est suggéré qu'un plan soit utilisé... -
Página 15: Emplacement Du Groupe D'aspiration
EMPLACEMENT DES POINTS D'ACCES EMPLACEMENT DU GROUPE D’ASPIRATION DANS UNE CONTRUCTION EXISTANTE • Installez le groupe d'aspiration éloigné de la zone d'habitation dans Disons, par exemple, que vous avez une maison à un étage et que un lieu facile d'accès pour changer le sac à poussière et nettoyer vous voulez installer le groupe d'aspiration au sous-sol. -
Página 16: Installation Dans Une Nouvelle Construction
INSTALLATION DANS UNE NOUVELLE CONSTRUCTION ENCASTREMENT DE PRISE MURALE Une fois l'emplacement des prises murales déterminé, mettez en place tous les supports de prise. 1. Choisissez les supports de fixation appropriés pour la prise à installer. (Voyez le tableau). MODEL 361 INSTALLATION SIDE INSTALLATION... -
Página 17: Installation De La Tuyauterie
INSTALLATION DANS UNE NOUVELLE CONSTRUCTION (suite) INSTALLATION DE LA TUYAUTERIE MODEL 361 MOUNTING INSTALLATION MODÈLE 361 Suivez les lignes directrices ci-dessous lors de la mise en place de la ORIFICE DE 6,36 cm DE " DIA. HOLE tuyauterie. DIAMÈTRE À TRAVERS LA THROUGH SOLE PLATE PLAQUE D’ASSISE Commencez l'installation de la tuyauterie par la prise la plus éloignée... -
Página 18: Installation Des Prises Murales
DEL pour vous rappeler que, après chaque 25 heures FIL À d'utilisation, il est temps de changer le sac de votre groupe d'aspiration. RAYURES Toutes les autres prises de NuTone peuvent être tout aussi bien utilisées. ROUGES CAPUCHON MODELE CI370 PRISE MURALE (ENCASTREMENT 361) - Página 19 être signalés à l'électricien de construction pour les lister sur le rapport d'inspection dans le but d'une inspection de construction. NOTA: Mettez la prise en ligne avec la tuyauterie en utilisant le raccord de coude Modèle 382-S 90° de NuTone. FIGURE 25...
-
Página 20: Installation Du Groupe D'aspiration
RACCORDS DE LA TUYAUTERIE AU NIVEAU DU HAUT, BAS OU HORIZONTALEMENT GROUPE D’ASPIRATION Le CV850 est conçu avec une double évacuation indépendante. Des conduites d'évacuation séparées sont conseillées. A 30,5 cm MINIMUM DU PLAFOND 2. Au moyen de raccords de caoutchouc et de bride de tuyau, raccordez les tuyaux d'admission et d'évacuation à... -
Página 21: Installation Dans Une Construction Existante
INSTALLATION DANS UNE CONSTRUCTION EXISTANTE Utilisez les procédures suivantes pour une installation dans une construction existante. En commençant par la prise murale la plus éloignée, installez chaque prise tel qu' il vous est décrit ci-dessous. Travaillez vers le groupe d'aspiration; connectez chaque ligne de prise et ligne secondaire à... -
Página 22: Installation Dans Une Construction Existante (Suite)
INSTALLATION DANS UNE CONSTRUCTION EXISTANTE (suite) INSTALLATION DE PRISE MURALE MODELE 330N (ENCASTREMENT 329) 1. Faites la découpe en accord avec les dimensions de la Figure 35. l'arrière de la prise murale. 2. Voyez la Figure 36. Détachez la plaque suivant les pointillés. 6. -
Página 23: Installation Des Prises Au Sol
à établir le contact entre les Il est maintenant temps de profiter des bénéfices du Système Central deux contacts de la prise murale pour vous permettre d'activer le groupe d'Aspiration de NuTone. -
Página 24: Garantie Limitée De Deux Ans
MARCHANDIBILITÉ OU D'ADAPTATION À UN USAGE PARTICULIER. Pendant cette période de deux ans, NuTone procédera au remplacement ou à la réparation sans aucuns frais, mais à sa propre discrétion, de tout produit ou pièce jugé défectueux dans le cadre d'une utilisation normale. CETTE GARANTIE NE VISE PAS LES DISPOSITIFS D'AMORÇAGE NI LES TUBES DES LUMINAIRES FLUORESCENTS. Cette garantie ne couvre pas (a) l'entretien et le service courants ni (b) les produits et les pièces ayant fait l'objet d'un usage abusif, de négligence, d'un accident, d'un entretien ou d'une réparation non... - Página 25 INSTRUCCIONES DE INSTALACION Sistema de aspiración central empotrado MODELO: CV850 PLANIFICACION Y DIAGRAMAS ......2 Ejemplos ..........2 Ubicación de la unidad de potencia .
-
Página 26: Planificacion Y Diagramas
PLANIFICACION Y DIAGRAMAS El Sistema de aspiración central de NuTone consiste de una Para la instalación se requieren entre 3 y 4 enchufes y entre 16 unidad de potencia, entubado y conectores de PVC, enchufes y 20 pies (5 a 6 metros) de entubado por cada enchufe. Se de pared, una manguera flexible y varios accesorios de recomienda usar una vista superior para determinar más... -
Página 27: Ubicación De La Unidad De Potencia
UBICACION DE LA UNIDAD DE UBICACION DE LAS LLAVES DE POTENCIA ACCESO EN CONSTRUCCION EXISTENTE • Coloque la unidad de potencia fuera de la parte habitada, en un lugar donde sea posible tener acceso para cambiar la Digamos por ejemplo que tiene una casa de dos pisos y quiere bolsa de polvo y limpiar periódicamente el filtro secundario. -
Página 28: Instalacion En Nueva Construccion
INSTALACION EN NUEVA CONSTRUCCION ENCASTRAMIENTO DE LOS ENCHUFES DE PARED Una vez determinadas las ubicaciones de los enchufes de pared, monte todos los encastramientos de entrada. 1. Elija el encastramiento de montaje apropiado para el enchufe MODEL 361 que se instale. (Véase diagrama) MODELO 361 MONTAJE MONTAJE... -
Página 29: Instalación Del Entubado
INSTALACION EN NUEVA CONSTRUCCION (continuado) INSTALACION DEL ENTUBADO MODEL 361 MOUNTING MONTAJE DEL MODELO 361 Use la siguiente guía de instalación para instalar el entubado. " DIA. HOLE Comience la instalación del entubado a la conexión más AGUJERO DE 6,3 cm DE THROUGH SOLE PLATE lejana y vaya desde ahí... -
Página 30: Instalación De Los Enchufes De Pared
TERMINAL INSTALACION DE LOS ENCHUFES DE TORNILLO DE PARED Su unidad de potencia CV850 está diseñada especialmente para los enchufes indicadores de la serie CI370. Estos enchufes incluyen un diodo electroluminiscente para recordarle después de 25 horas de ALAMBRE operación que es hora de cambiar la bolsa de filtración en su unidad CON RAYAS de potencia. - Página 31 FIGURA 25 construcción para que se enumeren en el reporte de inspección para la inspección del edificio. NOTA: Aplome el enchufe al entubado con el accesorio de codo de 90° de NuTone modelo 382-S.
-
Página 32: Instalacion De La Unidad De Potencia
UNIDAD DE POTENCIA hacia arriba, abajo, u horizontalmente 1. La CV850 está diseñada con dos escapes independientes. Se recomiendan líneas de escape separadas. 30,5 cm 2. Use acoplamientos de caucho y abrazaderas de manguera para MINIMO AL conectar el entubado de entrada y escape. -
Página 33: Instalacion En Construccion Existente
INSTALACION EN CONSTRUCCION EXISTENTE Use los siguientes procedimientos para la instalación en construcción existente. A partir de la ubicación del enchufe de pared más lejano, instale cada enchufe como se describe abajo. Moviéndose en dirección a la unidad de potencia, conecte cada línea de entrada y secundaria a la línea central principal. -
Página 34: Instalacion De Enchufes De Piso En Construcciones Nuevas Y Existentes
INSTALACION EN CONSTRUCCION EXISTENTE (continuado) INSTALACION DEL ENCHUFE DE PARED PARA EL MODELO 330N (Encastramiento 329) 5. Conecte el alambre de bajo voltaje de 2 conductores a los 1. Haga un recorte conforme a las dimensiones en la Figura 35. tornillos terminales en la parte trasera del enchufe de pared. -
Página 35: Instalacion De Enchufes De Piso
INSTALACION DE ENCHUFES DE PISO CORTAR AL CUT TO LARGO FLOOR ENCHUFE LENGTH APROPIADO DE PISO INLET EXTENSIÓN DE INLET ENCHUFE EXTENSION EXTENSION MANGUITO DE EXTENSIÓN SLEEVE 6,5 cm " " 7,7 cm FLOOR PISO DEBAJO DEL PISO SUB-FLOOR MOUNTING BRIDA DE BRACKET ABRAZADERA... -
Página 36: Garantía Limitada De Dos Años
NO LIMITADAS A, GARANTÍAS NO EXPRESADAS DE MERCANTIBILIDAD O ADAPTABLES A UN PROPÓSITO EN PARTICULAR. Durante este período de dos años, NuTone reparará o reemplazará a su opción y sin costo, cualquier producto o parte que se encuentre defectuoso bajo condiciones normales de uso y servicio.