Tabla de contenido
Publicidad
Idiomas disponibles
Idiomas disponibles
Enlaces rápidos
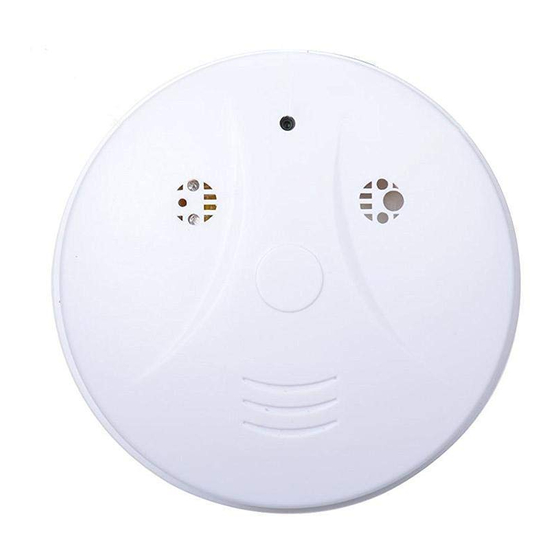
I. Product Overview
1. Power Switch
2. USB Port
3. Micro SD Card Slot
4. Camera Lens
5. Blue Indicator Light
II. What's in the Box
-1× Smoke Detector Camera
-1× USB Cable
-1× DC 5V Charging Adapter
-1× 2.4 GHz Remote Controller
DVR-0031-1080P
User Guide
6. Red Indicator Light
7. Power Button
8. Camera Button
9. Video Recording Button
10. Motion Detection Recording Button
-1× 16GB Micro SD Card (fitted into the Micro
SD card slot already)
Publicidad
Tabla de contenido

Manuales relacionados para Wiseup DVR-0031-1080P

Resumen de contenidos para Wiseup DVR-0031-1080P
- Página 1 DVR-0031-1080P User Guide I. Product Overview 1. Power Switch 6. Red Indicator Light 2. USB Port 7. Power Button 3. Micro SD Card Slot 8. Camera Button 4. Camera Lens 9. Video Recording Button 5. Blue Indicator Light 10. Motion Detection Recording Button II.
-
Página 2: Power On/Off
III. Operation >> Before using, make sure that the smoke detector camera is fully recharged. >> Please make sure the Micro SD card (4GB-32GB, format it for the first usage) is securely fitted into the camera’s SD card slot, or it will not work. A SDHC Class 10 Micro SD card is recommended. If the Micro SD card cannot be read, the camera will not respond correctly to your operation. - Página 3 Button for 3 seconds. The blue indicator light will stay illuminated, indicating the camera has entered into standby mode automatically. 3.3.2. Press the Camera Button once to take a photo. The blue indicator light will flash once and then stay illuminated, indicating the camera is back to standby mode. 3.4.
- Página 4 5.6. Restart the camera and the system will upgrade the program automatically. VI. Charging 6.1. Connect the smoke detector camera to an outlet AC power socket by using the USB cable and charging adapter provided. 6.2. The blue indicator light will be illuminated during the charging process. 6.3.
- Página 5 DVR-0031-1080P Benutzerhandbuch I. Produktübersicht 1. Netzschalter 2. USB-Anschluss 3. Micro-SD-Kartensteckplatz 4. Kamera-Objektiv 5. Blau-Anzeigelampe 6. Rote Anzeigelampe 7. Ein- / Ausschalter 8. Kamerataste 9. Videoaufnahmetaste 10. Bewegungserkennung Aufnahmetaste...
- Página 6 II. Was ist in der Box -1 × Rauchmelder-Kamera -1 × USB-Kabel -1 × DC 5V Ladeadapter -1 × 2,4 GHz Fernbedienung -1 × 16GB Micro SD-Karte (in den Steckplatz Micro SD-Karte ausgestattet bereits) III. Betrieb >> Vor der Verwendung, stellen Sie sicher, dass der Rauchmelder-Kamera vollständig aufgeladen ist.
- Página 7 3.2.2. Drücken Sie die Videoaufnahme-Taste einmal, um das Video aufzunehmen. Die blaue Anzeigeleuchte blinkt zweimal und erlischt dann. 3.2.3. Drücken Sie die Videoaufnahmetaste erneut zu stoppen Videoaufzeichnung. Die blaue Anzeigelampe bleibt beleuchtet, was die Kamera in den Standby-Modus ist wieder da. [Notizen]: 1).
- Página 8 IV. Video / Bilddateien Uploads 4.1. Schalten Sie die Kamera aus, entfernen Sie die Micro SD-Karte und in einen Kartenleser ein. 4.2. Setzen Sie den Kartenleser in einen PC-Computer. 4.3. Die SD-Micro-Karte wird als Wechsellaufwerk erkannt werden. 4.4. Alle Dateien können im Ordner "DCIM" zugegriffen werden. V.
-
Página 9: Aperçu Du Produit
DVR-0031-1080P Mode d'emploi I. Aperçu du produit 1. Commutateur d'Alimentation 2. Port USB 3. Slot de Carte SD Mémoire 4. Objetif de Caméra 5. Voyant bleu 6. Voyant lumineux rouge 7. Bouton d'alimentation 8. Bouton de l'appareil photo 9. Bouton d'enregistrement vidéo... -
Página 10: Qu'y A-T-Il Dans La Boite
II. Qu'y a-t-il dans la boite -1 × Détecteur de fumée caméra -1 × Câble USB -1 × DC 5V adaptateur de charge -1 × Télécommande 2,4 GHz -1 × 16GB Carte SD Mémoire (insérée dans la fente pour Carte SD Mémoire déjà) III. - Página 11 bleu clignote deux fois puis s'éteint. 3.2.3. Appuyez sur le bouton d'enregistrement vidéo une nouvelle fois pour arrêter l'enregistrement vidéo. Le voyant lumineux bleu restera allumé, indiquant que l'appareil est en mode veille. [Notes]: 1). Les fichiers vidéos seront générés et enregistrés tous les 10 minutes automatiquement. 2).
- Página 12 de carte. 4.2. Insérez le lecteur de carte dans l'ordinateur. 4.3. La Carte SD Mémoire sera reconnu comme un lecteur de disque amovible. 4.4. Tous les fichiers peuvent être consultés dans le dossier "DCIM". V. Réglage Heure / Date Stamp 5.1.
-
Página 13: Guida Utente
DVR-0031-1080P Guida Utente I. Descrizione del prodotto 1. Potere Interruttore 2. Porta USB Slot 3. Micro SD Card 4. Telecamera Lente 5. Indicatore luminoso blu 6. Spia Rossa Pulsante 7. Potenza Pulsante 8. Camera Pulsante 9. Registrazione Video Pulsante 10. Registrazione Rilevamento Movimento... -
Página 14: Cosa C'è Nella Scatola
II. Cosa c'è nella scatola -1 × Camera rilevatore di fumo -1 × Cavo USB -1 × adattatore di ricarica DC 5V -1 × 2,4 GHz Remote Controller -1 × 16GB Micro SD Card (montato nello slot per schede Micro SD già) III. - Página 15 3.2.3. Premere il pulsante di registrazione video ancora una volta per interrompere la registrazione del video. La spia blu rimarrà illuminato, indicando la fotocamera è in modalità standby. [Note]: 1). Un file video viene generato e salvato automaticamente ogni 10 minuti. 2).
- Página 16 4.3. La scheda Micro SD verrà riconosciuta come unità disco rimovibile. 4.4. Tutti i file sono accessibili nella cartella "DCIM". V. Impostazione di ora / data timbro 5.1. Spegnere la fotocamera, rimuovere la scheda Micro SD e inserirla in un lettore di schede. 5.2.
-
Página 17: Visión General Del Producto
DVR-0031-1080P Guía del Usuario I. Visión general del producto 1. Interruptor de Potencia 2. Puerto USB 3. Ranura tarjeta Micro SD 4. Lente de la cámara 5. Indicador de luz azul 6. Luz roja del indicador 7. Botón de alimentación 8. -
Página 18: Qué Hay En La Caja
II. Qué hay en la caja -1 × La cámara del detector de humos -1 × Cable USB -1 × DC 5V adaptador de carga -1 × 2,4 GHz controlador remoto -1 × 16GB tarjeta micro SD (encajado en la ranura para tarjetas Micro SD ya) III. -
Página 19: Grabacion Detección De Movimiento De Vídeo
parpadeará dos veces y luego se apagará. 3.2.3. Pulse el botón de grabación de vídeo, una vez más para detener la grabación de vídeo. La luz indicadora azul permanece encendida, indica que la cámara está de vuelta al modo de espera. [Notas]: 1). - Página 20 4.1. Apague la cámara, retire la tarjeta Micro SD e insertarla en un lector de tarjetas. 4.2. Inserte el lector de tarjetas en un ordenador PC. 4.3. La tarjeta Micro SD será reconocida como una unidad de disco extraíble. 4.4. Todos los archivos se puede acceder en la carpeta "DCIM". V.
- Página 21 DVR-0031-1080P ユーザーガイド I.製品の概要 1.電源スイッチ 2. USB ポート 3.マイクロ SD カードスロット 4.カメラレンズ 5.ブルーインジケータライト 6.レッドインジケータライト 7.電源ボタン 8.カメラボタン 9.ビデオ録画ボタン 10.モーション検知録画ボタン...
- Página 22 II.ボックスの中身に -1×煙探知器型カメラ -1× USB ケーブル -1× DC 5V 充電アダプター -1× 2.4 GHz のリモートコントローラー-1× 3 メートルの USB ケーブル -1×16GB のマイクロ SD カード(すでにマイクロ SD カードスロットに装着されますれます) III.操作 >>使用する前に、煙探知器型カメラが完全に充電されていることを確認してください。 >>マイクロ SD カード(最大 4GB-32GB、初めてのご使用の前にそれをフォーマットしてくたさ い)がしっかりとカメラの SD カードスロットに装着されていることを確認してください、または それが動作しません。 SDHC クラス 10 マイクロ SD カードをお勧めします。マイクロ SD カード を読み取ることができない場合は、カメラがあなたの操作に正しく応答しません。...
- Página 23 ライトは、カメラが戻ってスタンバイモードにあることを示す、着いたままになります。 [注意]: 1).ビデオファイルが生成され、10 分ごとに自動的に保存されます。 2).煙探知器型カメラは、フル充電で 2.5 時間連続した映像を記録することができます。 3).ビデオ解像度:1920×1080P ビデオフォーマット:AVI 3.3.カメラ/静止画撮影 3.3.1. ON の位置に電源スイッチをスライドさせてくたさい。 3 秒間電源ボタンを押してカメラの 電源をオンにします。 青色のインジケータライトは、カメラが自動的にスタンバイモードに入った ことを示す、着いたままになります。 3.3.2.写真を撮るために、一回カメラのボタンを押してください。青色のインジケータランプが一 回点滅し、その後カメラが戻ってスタンバイモードにあることを示す、着いたままになります。 3.4.モーション検知録画 3.4.1. ON の位置に電源スイッチをスライドさせてくたさい。 3 秒間電源ボタンを押してカメラの 電源をオンにします。 青色のインジケータライトは、カメラが自動的にスタンバイモードに入った ことを示す、着いたままになります。 3.4.2. モーション検知録画ボタンを 1 回押して、モーション検知録画モードに入ります。 青いイ ンジケータライトが 2 回点滅してから消灯します。 3.4.3.動きが検出されると、青色のインジケータランプが一回点滅し、カメラが自動的にビデオの 録画を開始します 3.4.4.モーション検知録画モードを終了し、再びモーション検知録画ボタンを押してください。青 色のインジケータライトは、...
- Página 24 V.時刻/日付スタンプを設定する 5.1.カメラの電源をオフにし、マイクロ SD カードを取り外し、カードリーダーに挿入してくたさ い。 5.2. パソコンにカードリーダーを挿入してくたさい。 5.3.リムーバブルディスクドライブのフォルダが表示されます。 5.4.ルートディレクトリのドライブをクリックして、ルートディレクトリの中に、 「time.txt "という 名前のファイルを作成します。 5.5.正しい形式で「time.txt」ファイル内の現在の日付と時刻を書きます: YYYY.MM.DD HH:MM:SS(例:2016 年 4 月 12 日午後 02 時 24 分 32 秒) 。このファイルを保 存してくたさい。 5.6.カメラを再起動し、システムが自動的にプログラムをアップグレードします。 VI.充電 6.1. USB ケーブルを使用して、提供アダプターを充電することによって、コンセントの AC 電源 ソケットに煙探知器型カメラを接続します。 6.2.青色のインジケータライトは、充電プロセス中に点灯します。 6.3.これは、フル充電を取得するために 5 時間かかります。 6.4.