Tabla de contenido
Publicidad
Idiomas disponibles
Idiomas disponibles
Enlaces rápidos
Publicidad
Tabla de contenido

Manuales relacionados para Axis P5512–E


Resumen de contenidos para Axis P5512–E
- Página 1 AXIS P5512–E PTZ Dome Network Camera Installation Guide...
- Página 2 2 . Every care has been taken in the preparation of this • Low Voltage (LVD) Directive 2006/95/EC. See Safety document. Please inform your local Axis office of any on page 3 . inaccuracies or omissions. Axis Communications AB cannot •...
- Página 3 FAQ database. Japan Search by product, category, or phrase この装置は、クラスB 情報技術装置です。この装置 • report problems to Axis support staff by logging in to は、家庭環境で使用することを目 的としています your private support area が、この装置がラジオやテレビジョン受信機に近 • chat with Axis support staff 接して使用されると、...
-
Página 5: Safety Information
AXIS P5512–E PTZ Dome Network Camera Safety Information Read through this Installation Guide carefully before installing the product. Keep the Installation Guide for future reference. Hazard Levels DANGER Indicates a hazardous situation which, if not avoided, will result in death or serious injury. -
Página 6: Safety Instructions
Battery The Axis product uses a 3.0 V BR/CR2032 lithium battery as the power supply for its internal real-time clock (RTC). Under normal conditions this battery will last for a minimum of five years. Low battery power affects the operation of the RTC, causing it to reset at every power-up. When the battery needs replacing, a log message will appear in the product’s server report. -
Página 7: Dome Cover
AXIS P5512–E PTZ Dome Network Camera Dome Cover NO TICE TICE TICE • Be careful not to scratch, damage or leave fingerprints on the dome cover because this could decrease image quality. If possible, keep the protective plastic on the dome cover until the installation is complete. -
Página 9: Installation Steps
AXIS P5512–E PTZ Dome Network Camera Installation Guide This Installation Guide provides instructions for installing AXIS P5512–E PTZ Dome Network Camera on your network. For other aspects of using the product, see the User Manual available at www.axis.com Installation Steps 1. -
Página 10: Hardware Overview
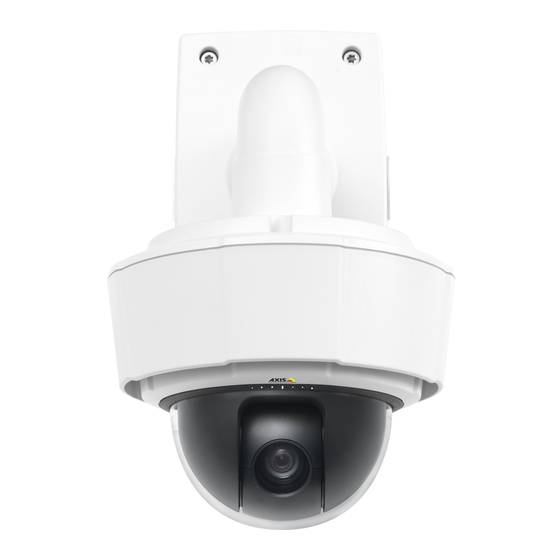
AXIS P5512–E PTZ Dome Network Camera Hardware Overview Control button SDHC card slot Status indicator LED Restart button Part number (P/N) & serial number (S/N). Serial number may be required during installation. Screws (3) Sunshield Hook for safety wire Top cover screws (4) 10. -
Página 11: Led Indicators
AXIS P5512–E PTZ Dome Network Camera Dome Cover Sealing ring Top cover Dome cover Dome ring Screws (8) LED Indicators Note • The Status LED can be configured to flash while an event is active. Status LED Indication Unlit Connection and normal operation. -
Página 12: Connectors And Buttons
• Resetting the product to factory default settings. See page 16. • Connecting to an AXIS Video Hosting System service or AXIS Internet Dynamic DNS Service. For more information about these services, see the User Manual. Restart Button Press the restart button to restart the product. -
Página 13: Operating Conditions
The sunshield must be removed to install/remove an SD card, see Install an SD Card on page 15. • To install the product using a compatible bracket from AXIS T91A Mounting Accessories (sold separately), see Install the Camera on a Bracket Mount (sold separately) on page 15. Remove the Protective Packaging... -
Página 14: Replace The Dome Cover
AXIS P5512–E PTZ Dome Network Camera 1. Loosen the four top cover screws and remove the top cover. 2. Remove the protective packaging. Protective packaging 3. If replacing the clear/smoked dome cover or installing an SD card, see page 14 and page 15. -
Página 15: Install An Sd Card
To comply with the IP66-rated design of the camera and maintain the IP66 protection, the supplied RJ45 Push-pull Connector (IP66) shall be used. Alternatively, use the RJ45 IP66-rated cable with premounted connector which is available from your Axis reseller. Do not remove the plastic network connector shield from the camera. -
Página 16: Access The Product
IP address, to the factory default values. Note The installation and management software tools are available on the CD supplied with the product and from the support pages on www.axis.com/techsup To reset the product to the factory default settings:... -
Página 17: Further Information
Further Information The User Manual is available at www.axis.com Visit www.axis.com/techsup to check if there is updated firmware available for your network product. To see the currently installed firmware version, go to Setup > About. Visit Axis learning center www.axis.com/academy for useful trainings, webinars, tutorials and guides. -
Página 19: Informations Sur La Sécurité
AXIS P5512–E PTZ Dome Network Camera Informations sur la sécurité Lisez attentivement ce guide d'installation avant d'installer l'appareil. Conservez le guide d'installation pour toute référence ultérieure. Niveaux de risques DANGER Indique une situation dangereuse qui, si elle n'est pas évitée, entraînera le décès ou des blessures graves. -
Página 20: Consignes De Sécurité
éviter d'endommager le produit. Batterie Le produit Axis utilise une batterie au lithium BR/CR2032 3,0 V comme alimentation de son horloge en temps réel interne (RTC). Dans des conditions normales, cette batterie a une durée de vie minimale de cinq ans. -
Página 21: Couvercle De Dôme
AXIS P5512–E PTZ Dome Network Camera AVERTISSEMENT • Risque d'explosion si la batterie est remplacée de façon incorrecte. • Remplacez-la uniquement par une batterie identique ou une batterie recommandée par Axis. • Mettez au rebut les batteries usagées conformément aux réglementations locales ou aux instructions du fabricant de la batterie. -
Página 23: Procédures D'installation
AXIS P5512–E PTZ Dome Network Camera Guide d'installation Ce guide d'installation explique comment installer la caméra dôme réseau AXIS P5512–E PTZ sur votre réseau. Pour toute autre information relative à l’utilisation du produit, consultez le manuel de l’utilisateur disponible sur le site www.axis.com Procédures d’installation... - Página 24 AXIS P5512–E PTZ Dome Network Camera Aperçu du matériel Bouton de commande Logement de carte SDHC Voyant d’état Bouton de redémarrage Référence (P/N) et numéro de série (S/N). Le numéro de série peut être requis pendant l’installation. Vis (3) Pare-soleil Crochet pour câble de sécurité...
- Página 25 AXIS P5512–E PTZ Dome Network Camera Couvercle de dôme Anneau d’étanchéité Couvercle supérieur Couvercle de dôme Garniture pour caméra dôme Vis (8) Voyants Note • Le voyant d'état peut clignoter lorsqu'un événement est actif. Indication Voyant d’état Branchement et fonctionnement normal.
-
Página 26: Connecteurs Et Boutons
• Réinitialisation du produit aux paramètres d’usine par défaut. Cf. page 31. • Connexion au service du Système d'hébergement vidéo AXIS ou au service AXIS Internet Dynamic DNS. Pour plus d'informations sur ces services, reportez-vous au Manuel de l'utilisateur. Bouton de redémarrage... -
Página 27: Caractéristiques Techniques
Storage > SD Card (Configuration > Options du système > Stockage > Carte SD) et cliquez sur Unmount (Démonter). Cet appareil est compatible avec une carte SD/SDHC/SDXC (non incluse). Pour obtenir des conseils sur la carte SD, rendez-vous sur www.axis.com Caractéristiques techniques Conditions d’utilisation... -
Página 28: Retirez L'emballage De Protection
SD. Reportez-vous à Installation d'une carte SD page 29. • Pour installer l'appareil à l'aide d'un support compatible à partir des accessoires de montage AXIS T91A (vendus séparément), reportez-vous à Installation de la caméra sur un support mural (vendu séparément) page 30. Retirez l’emballage de protection Pour connaître l'emplacement des composants, consultez Aperçu du matériel page 24. -
Página 29: Remplacement Du Couvercle Du Dôme
AXIS P5512–E PTZ Dome Network Camera Remplacement du couvercle du dôme Important Ce produit est équipé d'une membrane de déshumidification qui permet de maintenir des niveaux d'humidité bas à l'intérieur du dôme. Pour éviter toute condensation, ne démontez pas la caméra par temps pluvieux ou humide. -
Página 30: Installation De La Caméra Sur Un Support Mural (Vendu Séparément)
RJ45 fourni (conforme à la norme IP66). Sinon, utilisez le câble RJ45 compatible norme IP66 avec connecteur préinstallé, disponible auprès d'un revendeur Axis. Ne retirez pas le blindage en plastique du connecteur réseau de la caméra. -
Página 31: Accès Au Produit
Pour obtenir plus de renseignements Le Manuel de l’utilisateur est disponible à l’adresse suivante : www.axis.com Consultez le site www.axis.com/techsup pour vérifier si des mises à jour des logiciels sont disponibles pour votre appareil réseau. Pour connaître la version du micrologiciel actuellement installée, reportez-vous à... -
Página 32: Informations Sur La Garantie
AXIS P5512–E PTZ Dome Network Camera Informations sur la garantie Pour obtenir de plus amples informations sur la garantie du produit AXIS et des renseignements connexes, allez sur le site www.axis.com/warranty/... -
Página 33: Sicherheitsinformation
AXIS P5512–E PTZ Dome Network Camera Sicherheitsinformation Lesen Sie das Installationshandbuch sorgfältig durch bevor sie das Produkt installieren. Bewahren Sie das Installationshandbuch für zukünftige Zwecke auf. Gefährdungsstufen GEFAHR Weist auf eine gefährliche Situation hin, welche, falls nicht verhindert, zu Tod oder schweren Verletzungen führt. - Página 34 Produkts, wenn ein Batteriewechsel erforderlich ist. Weitere Informationen über den Serverbericht finden Sie auf den Setup-Seiten des Produkts, oder wenden Sie sich an den Axis-Support. Die Batterie sollte nur bei Bedarf ersetzt werden. Wenden Sie sich in diesem Fall an den Axis Support unter www.axis.com/techsup.
- Página 35 AXIS P5512–E PTZ Dome Network Camera WARNUNG • Explosionsgefahr bei fehlerhaftem Batteriewechsel. • Die Batterie darf nur durch eine identische Batterie oder eine von Axis empfohlene Batterie ersetzt werden. • Verbrauchte Batterien sind gemäß den örtlichen Vorschriften oder den Anweisungen des Herstellers zu entsorgen.
-
Página 37: Lieferumfang
AXIS P5512–E PTZ Dome Network Camera Installationsanleitung In dieser Anleitung wird die Installation der AXIS P5512–E PTZ-Dome-Netzwerk-Kamera in Ihrem Netzwerk beschrieben. Weitere Informationen zur Verwendung dieses Produkts finden Sie im Benutzerhandbuch unter www.axis.com. Installationsschritte 1. Stellen Sie sicher, dass die Packungsinhalte, Werkzeuge und andere notwendige Materialien für die Installation in Ordnung sind. -
Página 38: Übersicht Über Die Hardware
AXIS P5512–E PTZ Dome Network Camera Übersicht über die Hardware Steuertaste SDHC-Speicherkarteneinschub LED-Statusanzeige Neustart-Taste Bestellnummer (P/N) und Seriennummer (S/N). Die Seriennummer wird möglicherweise für die Installation benötigt. Schrauben (3) Sonnenschutz Haken für Sicherheitsdraht Schrauben für obere Abdeckung (4) 10. Kamerabefestigungen (3) - Página 39 AXIS P5512–E PTZ Dome Network Camera Kuppelabdeckung Dichtungsring Obere Abdeckung Kuppelabdeckung Kuppelring Schrauben (8) LEDs Beachten • Die Status-LED kann so eingestellt werden, dass sie blinkt, wenn ein Ereignis aktiv ist. Status-LED Bedeutung Leuchtet nicht Anschluss und Normalbetrieb Grün Leuchtet bei Normalbetrieb nach Abschluss des Startvorgangs 10 Sekunden lang grün.
-
Página 40: Anschlüsse Und Tasten
Die Steuertaste hat folgende Funktionen: • Zurücksetzen des Produkts auf Werkseinstellungen. Siehe Seite 45. • Verbinden mit einem AXIS Video Hosting System-Service oder einem AXIS Internet Dynamic DNS-Service. Weitere Informationen zu diesen Diensten finden Sie in der Bedienungsanleitung. Neustart-Taste Drücken Sie die Neustart-Taste, um das Produkt neu zu starten. -
Página 41: Technische Daten
AXIS P5512–E PTZ Dome Network Camera Dieses Produkt unterstützt SD-/SDHC-/SDXC-Karten (separat erhältlich). Empfehlungen zu SD-Karten finden Sie unter www.axis.com. Technische Daten Betriebsbedingungen Produkt Klassifikation Temperatur Luftfeuchtigkeit AXIS P5512–E IEC 60721-4-3 -20 °C bis 50 °C Relative Luftfeuchtigkeit 15 bis Klasse 3K3, 3M3... -
Página 42: Entfernen Sie Die Transportsicherung
AXIS P5512–E PTZ Dome Network Camera • Weitere Informationen zur Installation des Produkts mit einer kompatiblen Halterung des AXIS T91A Montagezubehörs (separat erhältlich) finden Sie unter Anbringen der Kamera an einer Halterung (separat erhältlich) auf Seite 44. Entfernen Sie die Transportsicherung Die Position der Komponenten finden Sie unter Übersicht über die Hardware auf Seite 38. -
Página 43: Installation Einer Sd-Karte
Der Austausch der Kuppelabdeckung ist nur erforderlich, wenn Sie die Rauchglas-Kuppelabdeckung verwenden möchten, die Kuppelabdeckung zerkratzt ist oder Risse hat. Getönte Kuppelabdeckungen oder klare Ersatzabdeckungen können über Ihren Axis Händler erworben werden. Die Position der Komponenten finden Sie unter Übersicht über die Hardware auf Seite 38. -
Página 44: Anbringen Der Kamera An Einer Halterung (Separat Erhältlich)
IP66-Schutzart der Kamerabauweise einzuhalten und den IP66-Schutz beizubehalten. Sie können auch das RJ45-Kabel mit IP66-Rating und vorbelegtem Stecker verwenden. Dieses erhalten Sie bei Ihrem Axis Händler. Entfernen Sie nicht die Kunststoffabschirmung des Anschlusses von der Kamera. 1. Installieren Sie die ausgewählte Halterung entsprechend der Halterungsanleitung. Falls das Bohren von Löchern erforderlich ist, stellen Sie sicher, dass die Bohrer, Schrauben... -
Página 45: Zugriff Auf Das Produkt
Zugriff auf das Produkt Verwenden Sie die bereitgestellten Tools der Installations- und Management-Software-CD, um eine IP-Adresse zuzuordnen, ein Passwort einzurichten und auf den Videostream zuzugreifen. Diese Information finden Sie ebenso auf den Support-Seiten unter www.axis.com/techsup/ Zurücksetzen auf Werkseinstellungen Wichtig Das Zurücksetzen auf die Werkseinstellungen sollte mit Vorsicht verwendet werden. Beim Zurücksetzen auf die Werkseinstellungen werden alle Einstellungen einschließlich der... - Página 46 AXIS P5512–E PTZ Dome Network Camera Gewährleistung Informationen zur Gewährleistung der Axis Produkte und hierzu verbundene Informationen, finden Sie unter www.axis.com/warranty/...
-
Página 47: Procedure Di Sicurezza
AXIS P5512–E PTZ Dome Network Camera Procedure di sicurezza Leggere con attenzione questa Guida all'Installazione prima di installare il dispositivo. Conservare la Guida all'Installazione per usi futuri. Livelli di pericolo PERICOLO Indica una situazione pericolosa che, se non evitata, provoca morte o lesioni gravi. -
Página 48: Informazioni Di Sicurezza
• Durante il trasporto del prodotto Axis, utilizzare l'imballaggio originale o equivalente per evitare danni al prodotto. Batteria Il prodotto Axis utilizza una batteria al litio da 3,0 V BR/CR2032 come alimentazione per il suo real-time clock (RTC) interno. In condizioni normali questa batteria avrà una durata minima di cinque anni. -
Página 49: Cupola Di Protezione
• Rischio di esplosione se la batteria viene sostituita in modo errato. • Sostituire solo con una batteria identica o una batteria consigliata da Axis. • Smaltire le batterie usate in base alle normative locali o alle istruzioni del produttore della batteria. -
Página 51: Guida All'installazione
Guida all'installazione La presente Guida all'installazione fornisce le istruzioni necessarie per installare la telecamera di rete a cupola AXIS P5512–E PTZ nella rete in uso. Per ulteriori informazioni sull’utilizzo del dispositivo, consultare la Guida per l'utente disponibile all'indirizzo www.axis.com Procedura di installazione 1. -
Página 52: Panoramica Dell'hardware
AXIS P5512–E PTZ Dome Network Camera Panoramica dell'hardware Pulsante di comando Alloggiamento scheda SDHC Indicatore LED di stato Pulsante di Riavvio Codice dispositivo (P/N) e numero di serie (S/N). Il numero di serie può essere richiesto durante l'installazione. Viti (3) -
Página 53: Coperchio Della Cupola
AXIS P5512–E PTZ Dome Network Camera Coperchio della cupola Guarnizione ad anello Coperchio superiore Coperchio della cupola Anello cupola Viti (8) Indicatori LED Nota • Il LED di stato può essere configurato per lampeggiare quando un evento è attivo. LED di stato... -
Página 54: Connettori E Pulsanti
• Ripristino del prodotto alle impostazioni predefinite di fabbrica. Consultare pagina 58. • Collegamento a un servizio AXIS Video Hosting System o AXIS Internet Dynamic DNS Service. Per ulteriori informazioni su questi servizi, consultare il Manuale Utente. Pulsante di riavvio Premere il pulsante di riavvio per riavviare il dispositivo. -
Página 55: Dati Tecnici
AXIS P5512–E PTZ Dome Network Camera Questo dispositivo supporta schede di memoria SD/SDHC/SDXC (scheda di memoria non inclusa). Per i consigli sulla scheda SD, visitare il sito Web www.axis.com. Dati tecnici Condizioni di funzionamento Dispositivo Classificazione Temperatura Umidità AXIS P5512–E IEC 60721-4-3 da -20 °C a 50 °C... -
Página 56: Sostituzione Del Coperchio Della Cupola
AXIS P5512–E PTZ Dome Network Camera Rimozione dell'imballo protettivo Consultare Panoramica dell'hardware alla pagina 52 per la posizione dei componenti. 1. Allentare le quattro viti della copertura superiore e rimuoverla. 2. Rimuovere l'imballo protettivo. Imballo protettivo 3. Se si deve sostituire la copertura a cupola chiara/oscurata o installare una scheda SD, consultare pagina 56 e pagina 57. -
Página 57: Installazione Di Una Scheda Sd
IP66 della telecamera. In alternativa, utilizzare il cavo RJ45 di classe IP66 con connettore premontato disponibile presso il proprio rivenditore Axis. Non rimuovere la schermatura in plastica del connettore di rete dalla telecamera. -
Página 58: Accedere Al Prodotto
Utilizzare le utility contenute nel CD del software d'installazione e configurazione per assegnare un indirizzo IP, impostare la password ed accedere al flusso video. Queste informazioni sono disponibili anche sulle pagine dedicate all'assistenza sul sito www.axis.com/techsup/ Ripristino dei valori predefiniti di fabbrica Importante Il ripristino delle impostazioni di fabbrica deve essere usato con cautela. -
Página 59: Ulteriori Informazioni
Setup (Impostazioni) > About (Informazioni su). Visitare il Centro di apprendimento Axis alla pagina www.axis.com/academy per servizi di formazione utili, webinar, tutorial e guide. Informazioni sulla garanzia Per informazioni sulla garanzia del dispositivo Axis e informazioni ad esso relative, consultare la pagina www.axis.com/warranty/... -
Página 61: Información De Seguridad
AXIS P5512–E PTZ Dome Network Camera Información de seguridad Lea esta Guía de instalación con atención antes de instalar el producto. Guarde la Guía de instalación para poder consultarla en otro momento. Niveles de peligrosidad PELIGRO Indica una situación peligrosa que, si no se evita, provocará... -
Página 62: Instrucciones De Seguridad
Batería Este producto de Axis utiliza una batería de litio BR/CR2032 de 3,0 V como fuente de alimentación del reloj interno en tiempo real. En condiciones normales, esta batería durará un mínimo de cinco años. -
Página 63: Cubierta Del Domo
ADVERTENCIA • La sustitución incorrecta de la batería implica riesgo de explosión. • Sustituya la batería con una batería idéntica u otra batería recomendada por Axis. • Deseche las baterías usadas de conformidad con la normativa local o las instrucciones del fabricante. -
Página 65: Pasos De La Instalación
AXIS P5512–E PTZ Dome Network Camera Guía de instalación Esta Guía de instalación incluye instrucciones para instalar la cámara domo de red AXIS P5512–E en su red. Para conocer otros aspectos de uso del producto, consulte el Manual del usuario disponible en www.axis.com. -
Página 66: Información General Del Hardware
AXIS P5512–E PTZ Dome Network Camera Información general del hardware Botón de control Ranura para tarjetas SDHC Indicador LED de estado Botón de reinicio Número de pieza (P/N) y número de serie (S/N). Puede necesitarse el número de serie durante la instalación. -
Página 67: Indicadores Led
AXIS P5512–E PTZ Dome Network Camera Cubierta del domo Anillo de sellado Cubierta superior Cubierta del domo Anillo del domo Tornillos (8) Indicadores LED Nota • Se puede configurar el LED Estado para que parpadee mientras haya un evento activo. -
Página 68: Conectores Y Botones
Restablecer el producto a la configuración predeterminada de fábrica. Vea página 73. • Conectarse a un servicio AXIS Video Hosting System o al Servicio de DNS dinámico de Internet de AXIS. Para obtener más información sobre estos servicios, consulte el Manual del usuario. -
Página 69: Especificaciones
> Storage > SD Card (Configuración > Opciones del sistema > Almacenamiento > Tarjeta SD) y haga clic en Unmount (Desmontar). Este producto admite tarjetas SD/SDHC/SDXC (no incluidas). Para conocer las recomendaciones de tarjeta SD, consulte www.axis.com. Especificaciones Condiciones de funcionamiento... -
Página 70: Retirada Del Embalaje De Protección
• Para instalar el producto utilizando un soporte compatible de los accesorios de montaje AXIS T91A (se venden por separado), vea Instalación de la cámara en un montaje con soporte (se vende por separado) en la página 72. Retirada del embalaje de protección Vea Información general del hardware en la página 66 para conocer la ubicación de los componentes. -
Página 71: Sustitución De La Cubierta Del Domo
La sustitución de la cubierta del domo solo es necesaria si desea usar una cubierta del domo ahumada o si la cubierta del domo se ha arañado o dañado. Su distribuidor de Axis puede proporcionarle las cubiertas del domo ahumadas y las normales de repuesto. -
Página 72: Instalación De La Cámara En Un Montaje Con Soporte (Se Vende Por Separado)
RJ45 con clasificación IP66 con el conector montado previamente disponible en su distribuidor de Axis. No retire la protección del conector de red de plástico de la cámara. 1. Instale el soporte seleccionado según las instrucciones que le acompañan. Si es necesario perforar, asegúrese de usar brocas, tornillos y tacos adecuados para el material. -
Página 73: Acceso Al Producto
Más información El Manual de usuario se encuentra disponible en www.axis.com. Visite www.axis.com/techsup para comprobar si existe un firmware actualizado disponible para su producto de red. Para ver la versión del firmware instalado actualmente, vaya a Setup > About (Configuración > Acerca de). -
Página 74: Información De Garantía
AXIS P5512–E PTZ Dome Network Camera Información de garantía Para obtener más detalles sobre la garantía del producto Axis y la información relacionada con ella, consulte www.axis.com/warranty/... - Página 75 AXIS P5512–E PTZ Dome Network Camera 安 安 安 全 全 全 情 情 情 報 報 報 本製品を設置する前に、このインストールガイドをよくお読みください。 インス トールガイドは、後で参照できるように保管しておいてください。 危 危 危 険 険 険 レ レ レ ベ ベ ベ ル ル ル 回避しない場合、死亡または重傷につながる危険な状 危 危 危 険 険 険...
- Página 76 AXIS P5512–E PTZ Dome Network Camera 安 安 安 全 全 全 手 手 手 順 順 順 注 注 注 記 記 記 • 本製品は、お使いになる地域の法律や規制に準拠して使用してください。 • 本製品は乾燥した換気のよい環境に保管してください。 • 本製品に衝撃または強い圧力を加えないでください。 • 本製品を不安定なブラケット、表面、または壁に設置しないでください。 • 本製品を設置する際には、適切な工具のみを使用してください。 電動工具を 使用して過剰な力をかけると、製品が損傷することがあります。 • 化学薬品、腐食剤、噴霧式クリーナーは使用しないでください。 • 清掃には、きれいな水に浸した清潔な布を使用してください。...
- Página 77 AXIS P5512–E PTZ Dome Network Camera 警 警 警 告 告 告 • バッテリーは、正しく交換しないと爆発する危険があります。 • 交換用バッテリーとしては、同一品またはAxisが推奨するバッテリーのみを 使用してください。 • 使用済みバッテリーは、地域の規制またはバッテリーメーカーの指示に 従って廃棄してください。 ド ド ド ー ー ー ム ム ム カ カ カ バ バ バ ー ー ー 注 注 注 記 記 記...
- Página 79 AXIS P5512–E PTZ Dome Network Camera イ イ イ ン ン ン ス ス ス ト ト ト ー ー ー ル ル ル ガ ガ ガ イ イ イ ド ド ド このインストールガイドでは、AXIS P5512–E PTZドームネットワークカメラをお 使いのネットワークにインストールする手順について説明します。 製品の使用の www.axis.com 詳細については、Axisのホームページ ( ) でユーザーズマニュアルを...
- Página 80 AXIS P5512–E PTZ Dome Network Camera ハ ハ ハ ー ー ー ド ド ド ウ ウ ウ ェ ェ ェ ア ア ア の の の 概 概 概 要 要 要 コントロールボタン SDHCカードスロット ステータスインジケーターLED 再起動ボタン 型番 (P/N) とシリアル番号 (S/N)。 インストール時にシリアル番号...
- Página 81 AXIS P5512–E PTZ Dome Network Camera ド ド ド ー ー ー ム ム ム カ カ カ バ バ バ ー ー ー 密閉リング 上蓋 ドームカバー ドームリング ネジ (8) LED イ イ イ ン ン ン ジ ジ ジ ケ ケ ケ ー ー ー タ タ タ ー ー ー...
- Página 82 コ コ コ ン ン ン ト ト ト ロ ロ ロ ー ー ー ル ル ル ボ ボ ボ タ タ タ ン ン ン 80ページの、ハードウェアの概要 コントロールボタンの位置については、 を参 照してください。 コントロールボタンは、以下の用途で使用します。 87ページ 製品を工場出荷時の設定にリセットする。 を参照してください。 • AXIS Video Hosting SystemサービスまたはAXIS Internet Dynamic DNSサービ • スに接続する。 これらのサービスの詳細については、ユーザーズマニュ アルを参照してください。 再 再 再 起 起 起 動 動 動 ボ ボ ボ タ タ タ ン ン ン 再起動ボタンを押すと、製品が再起動します。...
- Página 83 AXIS P5512–E PTZ Dome Network Camera SD カ カ カ ー ー ー ド ド ド ス ス ス ロ ロ ロ ッ ッ ッ ト ト ト 注 注 注 記 記 記 • SDカード損傷の危険があります。 SDカードの挿入と取り外しの際には、鋭 利な工具を使用したり、過剰な力をかけないでください。 • データ損失の危険があります。 データが破損しないように、SDカードは...
- Página 84 AXIS P5512–E PTZ Dome Network Camera カメラの取付前に緩衝材を取り除きます。 • 本製品には透明ドームカバー (装着済み) とスモーク透明カバーとが同梱さ • 85ページの、ドームカ れています。 ドームカバーの交換方法については、 バーの交換 を参照してください。 標準または大容量のSDカード (非付属品) を使用すると、ローカルに録画を • 行えます。 SDカードのインストール/取り出し前には、サンシールドの取り 85ページの、SDカードの装着 外しが必要です。 を参照してください。 AXIS T91A取り付けアクセサリーの互換ブラケット (別売) を使用した製品の • 86ページの、ブラケット (別売) へのカメラの取り 設置方法については、 付け を参照してください。 緩 緩 緩 衝 衝 衝 材 材 材 を を を 取 取 取 り り り 除 除 除 く く く...
- Página 85 AXIS P5512–E PTZ Dome Network Camera ド ド ド ー ー ー ム ム ム カ カ カ バ バ バ ー ー ー の の の 交 交 交 換 換 換 重要 本製品は、除湿膜を使用してドーム内の湿度を低く保っています。 結露を予 防するために、カメラを雨の中または湿った状況で分解しないでください。 注意 ドームカバーに傷が付いたり、損傷したりしないよう注意してください。 可能であれば、設置が完了するまでドームカバーに保護プラスチックを付...
- Página 86 AXIS P5512–E PTZ Dome Network Camera 4. トップカバーを元の位置に配置し、対角にある2本のネジをまず締め (トル ク0.7 Nm未満)、その後に残りのネジを締めます。 5. サンシールドを元の位置に取り付け、ネジを締めます。 ブ ブ ブ ラ ラ ラ ケ ケ ケ ッ ッ ッ ト ト ト ( ( ( 別 別 別 売 売 売 ) ) ) へ へ へ の の の カ カ カ メ メ メ ラ ラ ラ の の の 取 取 取 り り り 付 付 付 け け け...
- Página 87 AXIS P5512–E PTZ Dome Network Camera 製 製 製 品 品 品 へ へ へ の の の ア ア ア ク ク ク セ セ セ ス ス ス IPアドレスの割り当て、パスワードの設定、ビデオストリームへのアクセスを行うに は、インストール・管理ソフトウェアCDに収録されているツールを使用します。 こ www.axis.com/techsup/ の情報は、Axisのサポートページ ( ) にも掲載されています。 工 工 工 場 場 場 出 出 出 荷 荷 荷 時 時 時 の の の 設 設 設 定 定 定 に に に リ リ リ セ セ セ ッ ッ ッ ト ト ト す す す る る る...
- Página 88 AXIS P5512–E PTZ Dome Network Camera 保 保 保 証 証 証 情 情 情 報 報 報 www.axis.com/warranty/ Axisの製品保証と関連情報については、 をご覧ください...
- Página 90 Installation Guide Ver. M2.2 AXIS P5512–E PTZ Dome Network Camera Date: May 2015 © Axis Communications AB, 2015 Part No. 1467736...