Tabla de contenido
Publicidad
Idiomas disponibles
Idiomas disponibles
Enlaces rápidos
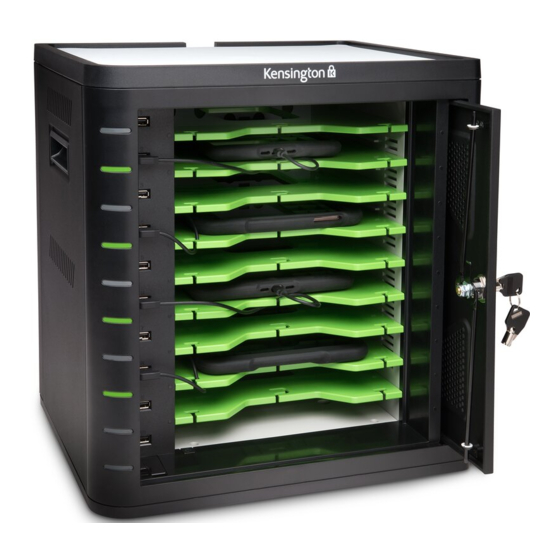
Charge and Sync Cabinet, Universal tablet
For 10 Tablets
INSTRUCTION GUIDE
GUIDE D'INSTRUCTIONS
BEDIENUNGSANLEITUNG
HANDLEIDING
ISTRUZIONI
MANUAL DE INSTRUCCIONES
Register Now!
Enregistrer maintenant !
Jetzt registrieren!
Nu registreren
Registrar ahora
Registra adesso
HASZNÁLATI ÚTMUTATÓ
PŘÍRUČKA S POKYNY
INSTRUKCJA OBSŁUGI
РУКОВОДСТВО ПОЛЬЗОВАТЕЛЯ
MANUAL DE INSTRUÇÕES
register.kensington.com
Regisztràljon most!
Zaregistrujte se nyní!
Zarejestruj się!
Зарегистрироваться!
Registe-se agora!
Publicidad
Tabla de contenido

Manuales relacionados para Kensington Charge and Sync Cabinet, Universal tablet


Resumen de contenidos para Kensington Charge and Sync Cabinet, Universal tablet
- Página 1 Charge and Sync Cabinet, Universal tablet For 10 Tablets HASZNÁLATI ÚTMUTATÓ INSTRUCTION GUIDE PŘÍRUČKA S POKYNY GUIDE D’INSTRUCTIONS INSTRUKCJA OBSŁUGI BEDIENUNGSANLEITUNG РУКОВОДСТВО ПОЛЬЗОВАТЕЛЯ HANDLEIDING ISTRUZIONI MANUAL DE INSTRUÇÕES MANUAL DE INSTRUCCIONES Regisztràljon most! Register Now! Zaregistrujte se nyní! Enregistrer maintenant ! Zarejestruj się!
- Página 2 English Français Deutsch Nederlands Italiano Español Magyar Čeština Polski Русский Português...
- Página 3 CODICE DELLA CHIAVE / IMPORTANTE: REGISTRE EL CÓDIGO DE LA LLAVE / FONTOS! REGISZTRÁLJA A KULCSKÓDJÁT! / DŮLEŽITÉ! REGISTRUJTE KÓD SVÉHO KLÍČE! / WAŻNE! ZAREJESTRUJ KOD KLUCZYKA! / ВАЖНО! ЗАРЕГИСТРИРУЙТЕ СВОЙ КОД КЛЮЧА! / IMPORTANTE! FAÇA O REGISTO DO SEU CÓDIGO CHAVE! register.kensington.com...
- Página 4 English Contents Components Charge and Sync Cabinet Slots for tablets USB Cable LED Status Lights Instruction Guide Sync Button and LED D Warranty Card M USB Ports Safety Information N Fan Power Cable O USB Ports G Screws (2X) Power Switch H Keys (2X) Q Power Connector Bolts...
- Página 5 Install Cabinet Securing Option 1 Remove all shelves from the cabinet. Mark holes for drilling onto surface (30mm maximum thickness). Insert four bolts (M6 - not provided) from inside the cabinet and fasten with four hex nuts and washers (not provided). 5.5 in (140.6 mm) Front...
- Página 6 4x M6 bolts 4x M6x5 hex nuts 4x M6 washers (Not provided) Bolt lengths to be 30 mm + table Thickness. When selecting bolt length, round up. Option 2 Desktop and Peripherals Locking Kit sold separately. K64615...
- Página 7 Option 3 Stacking Remove the silicone pad from the cabinet. Lower the second unit on top of the secured base unit. Fasten the top unit with four screws (M6X40 - provided). M6x40...
- Página 8 Use a cable lock to lock the units together and tether them to an anchor. NOTE: Up to two Charge and Sync Cabinets can be stacked together. Locking...
- Página 9 Set Up the Cabinet for Your Tablets Power On 1 Connect the power cable. 2 Turn the power switch to On. Load the Tablets 1 Insert one tablet into each slot.
- Página 10 2 Plug the USB end of the dock connector cable into the USB port on the Charge and Sync Cabinet. Cables sold separately: K67864WW - Lightning, 10pk K67865WW - 30 Pin, 10pk K67866WW - Micro USB, 10pk 3 Plug the other end of the cable into the dock connector on the tablet. For larger cases, remove shelves and insert vertically...
- Página 11 Charge the Tablets Charging automatically begins when the dock connector is plugged into the iPad. NOTE: The Charge and Sync Cabinet will not charge and sync the tablets at the same time. LED Status Green = Charged Red = Charging in progress Red and Green Flashing = Sync in process Red Flashing = Over current protection NOTE: Remove the Device and turn off the AC power for over current reset.
- Página 12 Prepare the iTunes library with apps and media that you intend to sync to the iPads. iPad Setup Configure each iPad before starting the syncing process. This can be done by connecting the iPad directly to the host computer or by inserting it into the Charge and Sync Cabinet. If connecting through the cabinet, only one iPad can be configured at a time.
- Página 13 In the iTunes sidebar, select the iPad under Devices. Click on the Summary tab, select Open iTunes when this iPad is connected and Sync only checked songs and videos. Verify Manually managed music and videos is not selected (this function would require you to drag and drop your selections to each iPad).
- Página 14 Ready to Sync Insert one iPad into each slot. NOTE: If the iPads are new, they should be fully charged before attempting to sync. Plug the USB connectors into the Charge and Sync Cabinet and the iPads. All the iPads loaded in the Charge and Sync Cabinet will appear under Devices in iTunes.
- Página 15 3 Press the Sync Button to start the sync process. Sync disabled Sync enabled 4 iTunes will launch and syncing will start automatically. 5 When syncing is completed, an Eject icon will appear next to each device. Click on the Eject icon or close iTunes to safely eject the iPad. 6 Unplug the USB cable from the computer so charging can begin.
-
Página 16: Technical Support
To sync an Android device, please refer to the manufacturer’s instructions. Technical Support Technical support is available to all registered users of Kensington products. Technical Support contact information can be found on the back page of this manual. Web Support You may find the answer to your problem in the Frequently Asked Questions (FAQ) section of the Support area on the Kensington Website: www.support.kensington.com. - Página 17 Kensington and the ACCO name and design are registered trademarks of ACCO Brands. The Kensington Promise is a service mark of ACCO Brands. iPad is a registered trademark of Apple Inc., registered in the U.S. and other countries.
- Página 18 Français Contenu Composants Armoire de chargement et de Emplacements pour tablettes synchronisation Voyants LED d’état Câble USB Boutons de synchronisation et LED Mode d’emploi M Ports USB D Carte de garantie N Ventilateur Consignes de sécurité O Ports USB Câble d’alimentation Interrupteur G Visserie (2X) Q Connecteur d’alimentation...
-
Página 19: Installation Du Coffret
Installation du coffret Sécurisation Option 1 Enlevez toutes les étagères du coffre. Marquez les trous de forage sur la surface (30 mm maximum d’épaisseur). Insérez quatre boulons (M6 - non fournis) depuis l’intérieur du coffret et fixez-les à l’aide de quatre écrous hexagonaux et rondelles (non fournis). 5,5 in (140,6 mm) Avant... - Página 20 4 boulons M6 4 écrous hexagonaux M6x 4 rondelles M6 (Non fournis) Les boulons doivent présenter une longueur de 30 mm + l’épaisseur de la table Choisissez des boulons d’une longueur légèrement supérieure. Option 2 Kit de verrouillage pour bureau et périphériques vendu séparément. K64615...
- Página 21 Option 3 Empilage 1 Retirez la couche en silicone du coffret. 2 Positionnez la deuxième unité sur l’unité de base sécurisée. Fixez l’unité supérieure à l’aide de quatre vis (M6x40 - fournies) . M6x40...
- Página 22 Utilisez un câble de sûreté pour bien fixer les unités et attachez-les à un bloc d’ancrage. REMARQUE : Vous pouvez empiler jusqu’à deux armoires de chargement et de synchronisation. Verrouillage...
-
Página 23: Mise En Marche
Installation du coffret pour vos tablettes Mise en marche 1 Branchez le câble d’alimentation. 2 Allumez l’interrupteur. Installation des tablettes 1 Insérez une tablette dans chaque emplacement. - Página 24 Branchez l’extrémité USB du câble de connexion de la station dans le port USB de l’armoire de chargement et synchronisatio. Câbles vendus séparément : K67864WW - Lightning, 10pk K67865WW - 30 Pin, 10pk K67866WW - Micro USB, 10pk 3 Branchez l’autre extrémité du câble dans le connecteur situé sur l’iPad. Dans le cas de boîtiers plus grands, enlevez les étagères et insérez verticalement...
- Página 25 Chargement des tablettes Le chargement débute automatiquement, dès que vous branchez le connecteur de la station à l’iPad. REMARQUE : L’armoire de chargement et de synchronisation ne peut pas simultanément charger et synchroniser les tablettes. Etat LED Vert = chargé Rouge = chargement en cours Clignotement rouge et vert = synchronisation en cours Rouge clignotant = protection contre les surtensions REMARQUE : Retirez l’appareil et coupez l’alimentation de la prise secteur pour une...
- Página 26 Cliquez sur l’onglet “Appareils” et assurez-vous que toutes les options sont désélectionnées. Préparez la bibliothèque iTunes avec l’ensemble des applications et fichiers multimédias que vous souhaitez copier sur les iPad. Configuration des iPad Configurez chaque iPad avant de lancer le processus de synchronisation. Pour cela, connectez directement chaque iPad à...
- Página 27 Insérez un iPad dans l’armoire de chargement et synchronisation. Dans la barre latérale d’iTunes, sélectionnez l’iPad sous “Appareils”. Cliquez sur l’onglet “Résumé”, sélectionnez “Ouvrir iTunes lorsque cet iPad est connecté” et “Synchroniser uniquement les morceaux et vidéos sélectionnés”. Vérifiez que la case “Musiques et vidéos gérées manuellement” n’est pas sélectionnée (cette fonction vous obligerait à...
- Página 28 Répétez les étapes 3 à 6 pour chaque iPad que vous prévoyez de placer dans l’armoire de chargement et synchronisation. Prêt pour la synchronisation Insérez un iPad dans chaque emplacement. REMARQUE : S’il s’agit de nouveaux iPad, vous devez entièrement les recharger avant de lancer une synchronisation.
-
Página 29: Multiples Armoire Connexion De Synchronisation
Appuyez sur le bouton “Synchroniser” pour lancer la synchronisation. Synchronisation Synchronisation désactivée activée iTunes se lance et la synchronisation démarre automatiquement. Une fois la synchronisation terminée, l’icône “Ejecter” apparaît au niveau de chaque appareil. Cliquez sur l’icône “Ejecter” ou fermez iTunes pour retirer l’iPad en toute sécurité. -
Página 30: Assistance Technique
Synchronisation des tablettes Android Pour synchroniser un appareil Android, reportez-vous aux instructions du fabricant. Assistance technique Une assistance technique est disponible pour tous les utilisateurs de produits Kensington enregistrés. Les coordonnées de l’assistance technique sont disponibles au dos de ce manuel. - Página 31 Kensington, ainsi que le nom et le design ACCO, sont des marques déposées d’ A CCO Brands. The Kensington Promise est une marque de service d’ A CCO Brands. iPad est une marque déposée d’ A pple Inc., enregistrée aux Etats-Unis et dans d’autres pays.
- Página 32 Deutsch Inhalt Komponenten Lade- und Synchronisierungs-Kabinett Tablets-Einschubfächer USB-Kabel LED-Statusanzeigeleuchten Anleitung Synchronisierungstasten und LED D Garantiekarte M USB-Anschlüsse Sicherheitsinformation N Lüfter Netzkabel O USB-Anschlüsse G Schrauben (2X) Netzschalter H Schlüssel (2X) Q Netzanschluss Schrauben...
- Página 33 Montieren des Kabinetts Sichern Option 1 Entfernen Sie sämtliche Zwischenböden aus dem Kabinett. Zeichnen Sie die Positionen der zu bohrenden Löcher anhand der angegebenen Maße an. Stecken Sie vier Schrauben von der Innenseite des Kabinetts durch die Löcher und ziehen Sie die vier Sechskantmuttern an. 5,5 in (140,6 mm) Vorderseite...
- Página 34 4 x M6 Schrauben 4 x M6x5 Sechskantmuttern 4 x M6 Unterlegscheiben (Nicht mitgeliefert) Die Schrauben müssen 30mm plus die Tischstärke lang sein. Runden Sie beim Berechnen der Schraubenlänge auf. Option 2 Das Schließsystem für Desktop und Peripheriegeräte ist separat erhältlich. K64615...
- Página 35 Option 3 Stapeln Entfernen Sie die Silikonabdeckung vom Kabinett. Stellen Sie die zweite Einheit auf die fest geschraubte Grundeinheit. Befestigen Sie die obere Einheit mit vier Schrauben (M6x40 – mitgeliefert). M6x40...
- Página 36 Schließen Sie die Einheiten mit einem Kabelschloss zusammen an einer Sicherheitsverankerung an. HINWEIS: Sie können bis zu zwei Lade- und Synchronisierungs-Kabinette aufeinander stapeln. Abschließen...
- Página 37 Einrichten des Kabinetts für Ihre Tablets Einschalten 1 Stecken Sie das Netzkabel ein. 2 Schalten Sie das Gerät am Netzschalter ein. Einschieben der Tablets 1 Schieben Sie ein Tablet in jedes Fach.
- Página 38 Stecken Sie den USB-Stecker des Dock-Anschlusskabels in den USB-Anschluss des Lade- und Synchronisierungs-Kabinetts. Kabel sind separat erhältlich: K67864WW - Lightning, 10pk K67865WW - 30 Pin, 10pk K67866WW - Micro USB, 10pk 3 Stecken Sie das andere Kabelende in den Dock-Anschluss des iPad. Falls die Tablets größer sind, nehmen Sie die Zwischenböden heraus und schieben die Tablets hochkant hinein.
- Página 39 Laden der Tablets Der Ladevorgang beginnt automatisch, sobald der Dock-Anschluss am iPad eingesteckt wird. HINWEIS: Im Lade- und Synchronisierungs-Kabinett werden die Tablets nicht gleichzeitig geladen und synchronisiert. LED-Status Grün = Geladen Rot = Ladevorgang läuft Rot und Grün blinken = Synchronisierung läuft Rot blinken = Überstromschutz HINWEIS: Entfernen Sie das Gerät und trennen Sie die Netzstromversorgung, um ein Reset wegen Überstrom durchzuführen.
- Página 40 Klicken Sie auf den Bereich „Geräte“ und stellen Sie sicher, dass alle Optionen deaktiviert sind. Laden Sie die Apps und Medien, die Sie auf die iPads kopieren möchten, in die iTunes Mediathek. Einrichten der iPads Konfigurieren Sie jeden einzelnen iPad, bevor Sie die Synchronisierung starten. Dazu schließen Sie das iPad entweder direkt an den Host-Computer an oder schieben es in das Lade- und Synchronisierungs-Kabinett.
- Página 41 Schieben Sie ein iPad in das Lade- und Synchronisierungs-Kabinett. Wählen Sie in der iTunes Seitenleiste unter „Geräte“ das iPad aus. Klicken Sie auf den Bereich „Übersicht“ und aktivieren Sie die Optionen „iTunes öffnen, wenn dieses iPad angeschlossen wird“ und „Nur markierte Titel und Videos synchronisieren“.
- Página 42 Wiederholen Sie die Schritte 3 bis 6 für jedes iPad, das mit dem Lade- und Synchronisierungs-Kabinett verwendet werden soll. Bereit zur Synchronisierung Schieben Sie ein iPad in jedes Fach. HINWEIS: Wenn die iPads neu sind, sollten sie vor dem Synchronisierungsvorgang vollständig aufgeladen werden.
- Página 43 Drücken Sie die Synchronisierungstaste, um den Synchronisierungsvorgang zu starten. Synchronisierung Synchronisierung deaktiviert aktiviert iTunes wird gestartet, und die Synchronisierung beginnt automatisch. Nach Abschluss der Synchronisierung wird neben jedem Gerät ein Auswurfsymbol angezeigt. Klicken Sie auf das Auswurfsymbol oder beenden Sie iTunes, um das iPad sicher entnehmen zu können.
-
Página 44: Technischer Support
Mit Ausnahme von eventuellen Ferngesprächsgebühren entstehen keine Kosten für die technische Unterstützung. Die Geschäftszeiten der telefonischen Unterstützung entnehmen Sie bitte unserer Website www.kensington.com. In Europa sind wir telefonisch für Sie da: von Montag bis Freitag zwischen 9:00 und 18:00 Uhr. - Página 45 Bedingungen: (1) Das Gerät darf keine ungünstigen Interferenzen verursachen und (2) das Gerät muss alle eingehenden Interferenzen tolerieren, dies gilt auch für Interferenzen, die Betriebsstörungen verursachen. Gemäß Abschnitt 2.909 der FCC-Vorschriften ist die Kensington Computer Products Group, 333 Twin Dolphin Drive, 6th Floor, Redwood Shores, CA 94065, USA, für das Gerät verantwortlich.
- Página 46 Nederlands Inhoud Componenten Oplaad- en synchronisatiekast Sleuven voor tablets USB-kabel LED-statuslampjes Instructiehandleiding Synchronisatieknoppen en LED D Garantiekaart M USB-poorten Veiligheidsinformatie N Ventilator Voedingskabel O USB-poorten G Schroeven (2X) Netschakelaar H Sleutels (2X) Q Voedingsaansluiting Schroeven...
- Página 47 Kast installeren Beveiligen Optie 1 Verwijder alle planken uit de kast. Markeer gaten voor het boren op de behuizing (maximale dikte 30 mm). Plaats vanuit de binnenkant van de kast vier schroeven (M6 - niet bijgeleverd) en draai deze vast met vier zeskantmoeren en sluitringen (niet bijgeleverd).
- Página 48 4x M6 bouten 4x M6x5 zeskantmoeren 4x M6 ringen (niet bijgeleverd) Boutlengte is 30 mm + tafeldikte. Naar boven afronden bij selecteren | van boutlengte. Optie 2 De Vergrendelkit voor desktop en randapparaten wordt apart verkocht. K64615...
- Página 49 Optie 3 Stapelen Verwijder alle planken uit de kast. Plaats de tweede eenheid boven op de beveiligde basiseenheid. Bevestig de bovenste eenheid met vier schroeven (M6x40 - bijgeleverd). M6x40...
- Página 50 Gebruik een kabelslot om de eenheden aan elkaar te vergrendelen en ze aan een anker te bevestigen. OPMERKING: er kunnen maximaal twee oplaad- en synchronisatiekasten op elkaar worden geplaatst. Vergrendelen...
-
Página 51: De Tablets Plaatsen
De kast voorbereiden voor uw tablets Inschakelen 1 Sluit de voedingskabel aan. 2 Zet de netschakelaar in de stand Aan. De tablets plaatsen 1 Plaats in elke sleuf één tablet. - Página 52 Sluit het USB-uiteinde van de dockconnectorkabel aan op de USB-poort van de oplaad- en synchronisatiekast. Kabels los verkrijgbaar: K67864WW - Lightning, 10pk K67865WW - 30 Pin, 10pk K67866WW - Micro USB, 10pk 3 Sluit het andere uiteinde van de kabel aan op de dockconnector op de iPad. Verwijder de rekken verwijderen en plaats de tablets verticaal bij grote hoezen...
-
Página 53: De Tablets Opladen
De tablets opladen Het opladen begint automatisch wanneer de dockconnector wordt aangesloten op de iPad. OPMERKING: de tablets in de oplaad- en synchronisatiekast worden niet tegelijkertijd opgeladen en gesynchroniseerd. LED-status Groen = opladen voltooid Rood = bezig met opladen Rood en groen knipperen = synchroniseren in proces Rood flitsen = overstroombeveiliging OPMERKING: Verwijder de iPad en zet de stroom uit en weer aan. - Página 54 Klik op het tabblad “Devices” (Apparaten) en zorg ervoor dat alle opties uitgeschakeld zijn. Bereid de iTunes-bibliotheek voor met apps en media die u naar de iPads wilt kopiëren. iPad instellen Configureer alle iPads voordat u het synchronisatieproces start. U kunt dat doen door de iPad direct aan te sluiten op de hostcomputer of door deze in de oplaad- en synchronisatiekast te plaatsen.
- Página 55 Plaats één iPad in de oplaad- en synchronisatiekast. Selecteer op de zijbalk van iTunes de optie iPad onder “Devices” (Apparaten). Klik op het tabblad “Summary” (Overzicht), schakel “Open iTunes when this iPad is connected” (iTunes openen wanneer deze iPad wordt aangesloten) en “Sync only checked songs and videos”...
- Página 56 Herhaal stap 3 tot en met 6 voor elke iPad die wordt gebruikt in de oplaad- en synchronisatiekast. Gereed voor synchronisatie Plaats in elke sleuf één iPad. OPMERKING: als de iPads nieuw zijn, moeten ze volledig zijn opgeladen voordat u probeert ze te synchroniseren.
- Página 57 Druk op de synchronisatieknop om het synchronisatieproces te starten. Sync Sync uitgeschakeld ingeschakeld iTunes wordt gestart en de synchronisatie begint automatisch. Als de synchronisatie is voltooid, wordt het pictogram “Eject” (Uitwerpen) weergegeven naast elk apparaat. Klik op het pictogram “Eject” (Uitwerpen) of sluit iTunes om de iPad veilig uit te werpen.
-
Página 58: Technische Ondersteuning
Bekijk de instructies van de fabrikant als u een Android-apparaat wilt synchroniseren. Technische ondersteuning Technische ondersteuning is beschikbaar voor alle geregistreerde gebruikers van Kensington-producten. Contactinformatie voor technische ondersteuning treft u aan op de achterzijde van deze handleiding. Ondersteuning via internet... - Página 59 Kensington en de naam en het ontwerp van ACCO zijn gedeponeerde handelsmerken van ACCO Brands. The Kensington Promise is een servicemerk van ACCO Brands. iPod is een handelsmerk van Apple Inc., dat is gedeponeerd in de VS en overige landen. Alle overige gedeponeerde en niet-gedeponeerde handelsmerken zijn eigendom van hun respectieve eigenaars.
- Página 60 Italiano Contenuto Componenti Armadietto di ricarica e sincronizzazione Slot per tablet Cavo USB Luci di stato a LED Manuale di istruzioni Pulsanti e LED per la sincronizzazione D Scheda di garanzia M Porte USB Informazioni sulla sicurezza N Ventola Cavo di alimentazione O Porte USB G Viti (2X) Interruttore di alimentazione...
- Página 61 Installazione dell’armadietto Fissaggio Opzione 1 Rimuovere tutti i ripiani dall’armadietto. Contrassegnare la posizione dei fori sulla superficie (spessore massimo: 30 mm) Inserire quattro bulloni (M6, non forniti) dall’interno dell’armadietto e fissare utilizzando dadi esagonali e rondelle (non forniti). 5,5 in (140,6 mm) Frontale...
- Página 62 4x bulloni M6 4x dadi esagonali M6x5 4x rondelle M6 (Non forniti) Lunghezza dei bulloni: 30 mm + spessore del tavolo. Durante la selezione della lunghezza, arrotondare il valore. Opzione 2 Il kit di bloccaggio per desktop e periferiche è venduto separatamente. K64615...
- Página 63 Opzione 3 SovrapposizioneImpilaggio di più unità Rimuovere il cuscinetto in silicone dalla parte superiore dell’armadietto. Adagiare la seconda unità al di sopra di quella fissata. Avvitare l’unità superiore con quattro viti (M6x40, fornite). M6x40...
- Página 64 Utilizzare un cavo di fissaggio per bloccare insieme le unità e legarle a un punto di ancoraggio. NOTA: è possibile impilare fino a due armadietti di ricarica e sincronizzazione. Bloccaggio...
- Página 65 Impostazione dell’armadietto per i tablet Accensione 1 Collegare il cavo di alimentazione. 2 Girare l’interruttore di alimentazione su ON. Caricamento dei tablet 1 Inserire un tablet in ogni slot.
- Página 66 Collegare l’estremità USB del cavo del connettore dock nella porta USB dell’armadietto di ricarica e sincronizzazione. Cavi venduti separatamente: K67864WW - Lightning, 10pk K67865WW - 30 Pin, 10pk K67866WW - Micro USB, 10pk 3 Collegare l’altra estremità del cavo al connettore dock dell’iPad. Per armadietti più...
- Página 67 Ricarica dei tablet La ricarica inizia automaticamente quando il connettore dock è collegato all’iPad. NOTA: l’armadietto di ricarica e sincronizzazione non consentirà di effettuare contemporaneamente le operazioni di ricarica e sincronizzazione dei tablet. LED di stato Verde = Carico Rosso = Ricarica in corso Rosso e verde lampeggiante = Sincronizzazione in corso Rosso lampeggiante = Protezione da sovracorrente NOTA: rimuovere il dispositivo e scollegare l’alimentazione CA per la reimpostazione da...
- Página 68 Fare clic sulla scheda “Dispositivi”, assicurandosiverificando che tutte le opzioni siano deselezionate. Preparare la Libreria iTunes con le applicazioni e le funzionalità multimediali che si desidera copiare negli iPad. Installazione Configurazione dell’iPad Prima di iniziare il processo di sincronizzazione, configurare ciascun iPad. L’operazione può essere effettuata collegando direttamente l’iPad al computer host oppure inserendolo nell’armadietto di ricarica e sincronizzazione.
- Página 69 Inserire un iPad nell’armadietto di ricarica e sincronizzazione. Nella barra laterale di iTunes, selezionare iPad sotto “Dispositivi”. Fare clic sulla scheda “Riepilogo”, selezionare “Apri iTunes quando iPad è collegato”, quindi “Sincronizza solo brani e video contrassegnati”. Verificare che l’opzione “Gestisci manualmente la musica e i video”...
- Página 70 Ripetere i passaggi da 3 a 6 per ciascun iPad che sarà utilizzato nell’armadietto di ricarica e sincronizzazione. Sincronizzazione Inserire un iPad in ciascun slot. NOTA: nel caso di nuovi iPad al primo utilizzo, prima di procedere con la sincronizzazione, dovrà essere effettuata una ricarica completa. Collegare i connettori dock USB all’armadietto di ricarica e sincronizzazione e agli iPad.
- Página 71 Premere il pulsante “Sincronizza” per avviare il processo di sincronizzazione. Sincronizzazione Sincronizzazione disattivata attivata iTunes verrà avviato e la sincronizzazione inizierà automaticamente. Una volta completata la sincronizzazione, comparirà un’icona “Espelli” accanto a ciascun dispositivo. Fare clic sull’icona “Espelli” o chiudere iTunes per espellere l’iPad in maniera sicura.
-
Página 72: Supporto Tecnico
Per sincronizzare un dispositivo Android, seguire le istruzioni fornite dal produttore. Supporto tecnico Per tutti gli utenti registrati dei prodotti Kensington è disponibile il supporto tecnico. Sul retro di queste istruzioni sono riportate le informazioni per contattare il servizio di supporto tecnico. - Página 73 è stato acquistato il prodotto. Kensington e il nome e il motivo ACCO sono marchi registrati di ACCO Brands. The Kensington Promise è un marchio di servizio di ACCO Brands. iPod è un marchio di Apple Inc., registrato negli Stati Uniti e in altri paesi. Tutti gli altri marchi, registrati e non registrati, sono di proprietà...
-
Página 74: Componentes
Español Contenido Componentes Mueble de carga y sincronización Ranuras para tabletas Cable USB LED indicadores de estado Manual de instrucciones Botones de sincronización y LED D Tarjeta de garantía M Puertos con USB Información de seguridad N Ventilador Cable de alimentación O Puertos USB G Tornillos (2X) Interruptor de alimentación... -
Página 75: Instalación Del Mueble
Instalación del mueble Protección Opción 1 Extraiga todos los estantes del mueble. Marque orificios para perforar sobre la superficie (grosor máximo: 30 mm). Inserte cuatro tornillos (M6, no suministrados) desde el interior del mueble y sujételos con cuatro tuercas hexagonales y arandelas (no suministrados). 5,5 in (140,6 mm) Frente... - Página 76 4 tornillos M6 4 tuercas hexagonales M6x5 4 arandelas M6 (No suministrados) La longitud de los tornillos debe ser 30 mm + el grosor de la mesa. Si no encuentra tornillos de la longitud exacta, úselos más largos. Opción 2 Los kits de seguridad para ordenador de sobremesa y periféricos se venden por separado.
-
Página 77: Apilamiento
Opción 3 Apilamiento Quite el protector de silicona del mueble. Coloque la segunda unidad encima de la unidad de base atornillada. Sujete la unidad superior con cuatro tornillos (M6x40, suministrados). M6x40... - Página 78 Utilice un cable de retención para bloquear y mantener juntas las unidades, fijándolas a un elemento de anclaje. NOTA: Es posible apilar hasta dos muebles de carga y sincronización. Bloqueo...
-
Página 79: Configuración Del Mueble Para Las Tabletas
Configuración del mueble para las tabletas Encendido 1 Conecte el cable de alimentación. 2 Accione el interruptor de alimentación y póngalo en posición de encendido (“ON”). Inserte las tabletas 1 Inserte una tableta en cada ranura. -
Página 80: Si Las Tabletas No Caben Con Funda, Extraiga Los Estantes E Insértelas En Vertical
Conecte el extremo del conector USB de cada cable de conexión a la base en el puerto USB del mueble de carga y sincronización. Los cables se venden por separado: K67864WW - Lightning, 10pk K67865WW - 30 Pin, 10pk K67866WW - Micro USB, 10pk 3 Conecte el otro extremo del cable en el puerto del iPad destinado a la conexión con la base. -
Página 81: Cargue Las Tabletas
Cargue las tabletas La carga se inicia automáticamente al enchufar el conector de la base al iPad. NOTA: El mueble de carga y sincronización no puede cargar y sincronizar las tabletas al mismo tiempo. Estado de los indicadores LED Verde = Cargado Rojo = Cargando Rojo y verde parpadeando = Sincronizando Rojo intermitente = Protección contra exceso de corriente... - Página 82 Haga clic en la ficha “Dispositivo” y compruebe que todas las opciones aparecen desmarcadas. Prepare la Biblioteca de iTunes con las apps y los contenidos multimedia que quiera copiar en los iPads. Configuración de los iPads Tiene que configurar cada iPad antes de iniciar el proceso de sincronización. Se puede hacer conectando directamente cada iPad al ordenador o insertándolo en la ranura correspondiente del mueble de carga y sincronización.
- Página 83 Inserte un iPad en el mueble de carga y sincronización. En la barra lateral de iTunes, seleccione el iPad entre los “Dispositivos”. Haga clic en la ficha “Resumen” y seleccione la opción para abrir iTunes cuando el iPad se conecte y la opción para sincronizar solamente las canciones y los vídeos marcados. Compruebe que no esté...
- Página 84 Repita los pasos 3 a 6 para cada iPad que vaya a utilizar con el mueble de carga y sincronización. Todo preparado para la sincronización Inserte un iPad en cada ranura. NOTA: Si los iPads son nuevos, para proceder a la sincronización deberían estar totalmente cargados.
- Página 85 Pulse el botón de sincronización para dar inicio al proceso. Sincronización Sincronización desactivada activada Se abrirá iTunes y la sincronización empezará de forma automática. Cuando haya concluido la sincronización, aparecerá un icono “Expulsar” junto a cada dispositivo. Para retirar el iPad con seguridad, haga clic en el icono “Expulsar” o cierre iTunes.
-
Página 86: Sincronización De Tabletas Android
Para sincronizar un dispositivo Android, siga las instrucciones del fabricante. Asistencia técnica Existe asistencia técnica para todos los usuarios registrados de los productos de Kensington. Puede encontrar la información de contacto para asistencia técnica en el reverso del manual. Asistencia en la Web Es posible que encuentre la solución a su problema en la sección de preguntas... - Página 87 Kensington y el nombre y el diseño ACCO son marcas comerciales registradas de ACCO Brands. The Kensington Promise es marca de servicio de ACCO Brands. iPod es marca comercial de Apple Inc., registrada en EE. UU. y otros países. El resto de marcas comerciales, registradas y sin registrar, son propiedad de sus respectivos propietarios.
- Página 88 Magyar Tartalom Alkatrészek Töltő és szinkronizáló szekrény Nyílások az készülékek számára USB-kábel LED állapotlámpák Használati utasítás Szinkronizáló gombok és LED D Garanciakártya M USB-portok N Ventilátor Biztonsági információ O USB-portok Tápkábel G Csavarok (2X) Főkapcsoló H Kulcsok (2X) Q Tápcsatlakozó Csavarok...
- Página 89 A szekrény összeszerelése Rögzítés 1. lehetőség Távolítsa el az összes polcot a szekrényből. Jelölje be a furatok helyeit az ábrán látható jelzések szerint. Illesszen a furatokba négy csavart a szekrény belseje felől, és rögzítse négy hatlapfejű csavaranyával. 5.5 in (140.6 mm) Elölnézet...
- Página 90 4 db M6 csavar 4 db M6x5 hatlapfejű csavaranya 4 db M6 alátét (nem tartozék) A csavarok hossza 30 mm + az asztal vastagsága. A csavarhossz kiválasztásakor felfelé kerekítsen. 2. lehetőség Az asztali számítógéphez és perifériákhoz tartozó zárkészletet külön lehet megvásárolni. K64615...
- Página 91 3. lehetőség Szekrények egymásra építése 1 Távolítsa el a szilikonalátétet a szekrényről. 2 Helyezze a második egységet a rögzített alapegység tetejére. Rögzítse a felső egységet négy csavarral (M6x40 – mellékelve). M6x40...
- Página 92 Kábeles zárral rögzítse egymáshoz az egységeket, és pányvázza azokat valamilyen nem mozdítható tárgyhoz. MEGJEGYZÉS: Legfeljebb két töltő és szinkronizáló szekrényt lehet egymásra építeni. Zárolás...
- Página 93 A szekrény beállítása a táblagépekhez Kapcsolja be 1 Csatlakoztassa a tápkábelt. 2 Kapcsolja be a főkapcsolót (On). A táblagépek töltése 1 Helyezzen be egy-egy táblagépet minden nyílásba.
- Página 94 2 Dugja a dokkolócsatlakozó kábel USB-csatlakozós végét a töltő és szinkronizáló szekrényen lévő USB-portba. A kábeleket külön kell megvásárolni: K67864WW - Lightning, 10pk K67865WW - 30 Pin, 10pk K67866WW - Micro USB, 10pk 3 Dugja a kábel másik végét az iPad készüléken lévő dokkolócsatlakozóba. Nagyobb táskák esetén távolítsa el a polcokat, és függőlegesen helyezze be.
- Página 95 Töltse fel a táblagépeket A töltés automatikusan megkezdődik, amikor a dokkolócsatlakozót bedugja az iPad készülékbe. MEGJEGYZÉS: A töltő és szinkronizáló szekrény nem tölti és szinkronizálja egyszerre a táblagépeket. LED állapot Zöld = feltöltve Piros = töltés folyamatban Piros és zöld villogó = szinkronizálás folyamatban Villogó...
- Página 96 Kattintson a “Device” (Eszköz) fülre, győződjön meg róla, hogy minden beállítás mellől törölve van a pipa. Töltse fel az iTunes Library (könyvtár) elemet az iPad készülékre másolandó alkalmazásokkal és médiával. iPad beállítása Konfiguráljon minden iPad készüléket a szinkronizálás megkezdése előtt. Ezt úgy lehet megtenni, hogy az iPad készüléket közvetlenül a gazdaszámítógéphez csatlakoztatja, vagy a töltő...
- Página 97 Helyezzen be egy iPad készüléket a töltő és szinkronizáló szekrénybe. Az iTunes oldalsávon válassza az iPad elemet a “Devices” (Készülékek) alatt. Kattintson a “Summary” (Összegzés) fülre, pipálja ki az “Open iTunes when this iPad is connected” (iTunes megnyitása, amikor ezt az iPad készüléket csatlakoztatják) és “Sync only checked songs and videos”...
- Página 98 Ismételje meg 3.-6. lépést minden olyan iPad készüléken, amelyet a töltő és szinkronizáló szekrényben fog használni. Felkészülés a szinkronizálásra Helyezzen be egy-egy iPad készüléket minden nyílásba. MEGJEGYZÉS: Ha az iPad készülékek újak, a szinkronizálás megkísérlése előtt azokat teljesen fel kell tölteni. Dugja be az USB dokkolócsatlakozókat a töltő...
- Página 99 A “Sync Button” (Szinkronizáló gomb) gombot megnyomva indítsa el a szinkronizálást. Szinkronizálás Szinkronizálás letiltva engedélyezve Az iTunes elindul, és a szinkronizálás automatikusan elkezdődik. A szinkronizálás befejezése után “Eject” (Kidobás) ikon jelenik meg az egyes készülékek mellett. Az “Eject” ikonra kattintva vagy az iTunes programot bezárva veheti ki az iPad készüléket.
-
Página 100: Műszaki Támogatás
Androidos táblagépek szinkronizálása Androidos eszköz szinkronizálásához tekintse meg a gyártó utasításait. Műszaki támogatás A műszaki támogatást a Kensington-termékek összes regisztrált felhasználója igénybe veheti. A műszaki támogatást nyújtó részleg kapcsolattartási adatai a kézikönyv hátoldalán találhatók. Webes támogatás Elképzelhető, hogy a problémájára a megoldást megtalálja a „Gyakran feltett kérdések”... - Página 101 értékesítő üzletet. A Kensington és az ACCO név és embléma az ACCO Brands bejegyzett védjegye. A Kensington Promise az ACCO Brands védjegyoltalom alatt álló szolgáltatása. Az iPad az Apple Inc. bejegyzett védjegye az Egyesült Államokban és más országokban.
- Página 102 Čeština Obsah Součásti Nabíjecí a synchronizační skříňka Zásuvky na tablety Kabel USB Stavové kontrolky Návod k použití Tlačítko a kontrolka synchronizace D Záruční informace M Porty USB N Ventilátor Bezpečnostní pokyny O Porty USB Napájecí kabel G Šrouby (2X) Vypínač H Klíče (2X) Q Napájecí...
- Página 103 Instalace skříně Připevnění 1. možnost Vyjměte ze skříně všechny police. Podle uvedených vzdáleností si označte místa pro navrtání otvorů. Z vnitřní strany skříně vložte čtyři šrouby a utáhněte je pomocí čtyř šestihranných matic. 5,5 in (140,6 mm) Přední strana...
- Página 104 4 šrouby M6 4 šestihranné matice M6x5 4 podložky M6 (Nejsou součástí balení) Délka šroubů musí být 30 mm + tloušťka stolu. Při volbě délky šroubů zaokrouhlujte nahoru. 2. možnost Sada pro zamykání stolního počítače a periferních zařízení se prodává samostatně.
- Página 105 3. možnost Skládání na sebe 1 Ze skříně sejměte silikonovou podložku. 2 Položte druhou jednotku na horní část první připevněné jednotky. Horní jednotku připevněte pomocí čtyř šroubů (M6x40, jsou součástí balení). M6x40...
- Página 106 Uzamkněte jednotky dohromady pomocí kabelového zámku a připevněte je ke kotvicímu bodu. POZNÁMKA: Na sebe můžete poskládat nejvýše dvě nabíjecí a synchronizační skříňky. Zamykání...
- Página 107 Příprava skříně pro tablety Zapnutí 1 Připojte napájecí kabel. 2 Přepněte vypínač do polohy Zapnuto. Vložení tabletů 1 Vložte do každé zásuvky jeden tablet.
- Página 108 Připojte konektor USB dokovacího kabelu k portu USB na nabíjecí a synchronizační skříňce. Kabely jsou prodávány samostatně: K67864WW - Lightning, 10pk K67865WW - 30 Pin, 10pk K67866WW - Micro USB, 10pk 3 Připojte druhý konektor kabelu k dokovacímu konektoru na tabletu iPad. V případě...
- Página 109 Nabíjení tabletů Po připojení dokovacího konektoru k tabletu iPad se automaticky zahájí nabíjení. POZNÁMKA: Nabíjecí a synchronizační skříňka nebude tablety současně nabíjet a synchronizovat. Stav kontrolky Zelená = nabito Červená = probíhá nabíjení Bliká červený a zelený indikátor = probíhá synchronizace Blikající...
- Página 110 Klikněte na kartu „Zařízení“ a zkontrolujte, zda žádné z polí možností není zaškrtnuté. Připravte si knihovnu služby iTunes s aplikacemi a médii, kterou chcete zkopírovat do tabletů iPad. Nastavení tabletu iPad Dříve, než zahájíte synchronizaci, je třeba jednotlivé tablety iPad nakonfigurovat. Konfiguraci můžete provést tak, že tablet iPad připojíte přímo k hostitelskému počítači nebo jej vložíte do nabíjecí...
- Página 111 Vložte jeden tablet iPad do nabíjecí a synchronizační skříňky. Na postranním panelu aplikace iTunes vyberte požadovaný tablet iPad ve skupině „Zařízení“. Klikněte na kartu „Souhrn“, vyberte možnosti „Po připojení tohoto tabletu iPad otevřít aplikaci iTunes“ a „Synchronizovat pouze zaškrtnuté skladby a videa“. Ověřte, zda není vybrána možnost „Ručně...
- Página 112 Opakujte kroky 3 až 6 u každého tabletu iPad, který budete používat v nabíjecí a synchronizační skříňce. Vše je připraveno k synchronizaci Vložte do každé zásuvky jeden tablet iPad. POZNÁMKA: Pokud jsou tablety iPad nové, bude třeba je před zahájením synchronizace plně...
- Página 113 Stisknutím tlačítka „Synchronizovat“ spusťte synchronizaci. Synchronizace je Synchronizace je zakázána povolena Spustí se aplikace iTunes a synchronizace bude automaticky zahájena. Po dokončení synchronizace se u jednotlivých zařízení zobrazí ikona „Vysunout“. Chcete-li tablet iPad bezpečně vysunout, klikněte na ikonu „Vysunout“ nebo zavřete aplikaci iTunes. Odpojte kabel USB od počítače, abyste zahájili nabíjení.
-
Página 114: Technická Podpora
Chcete-li synchronizovat zařízení Android, postupujte podle pokynů od výrobce. Technická podpora Technická podpora je k dispozici všem registrovaným uživatelům produktů společnosti Kensington. Informace o kontaktech na technickou podporu můžete nalézt na zadní straně této příručky. Podpora na webu Odpověď na svůj problém můžete nalézt v části Frequently Asked Questions (FAQ – často kladené... - Página 115 (2) zařízení musí přijmout veškeré přijaté interference včetně těch, které mohou mít nežádoucí vliv. Podle části 2.909 předpisů FCC je stranou odpovědnou za toto zařízení společnost Kensington Computer Products Group, 333 Twin Dolphin Drive, Redwood Shores, CA 94065, USA.
-
Página 116: Zawartość Zestawu
Polski Zawartość zestawu Elementy Skrzynka do ładowania i synchronizowania Gniazda do podłączania tabletów Przewód USB Diody LED stanu Instrukcja obsługi Przyciski synchronizacji i dioda LED D Karta gwarancyjna M Porty USB N Wentylator Informacje dotyczące bezpieczeństwa O Porty USB Przewód zasilania G Wkręty (2X) Wyłącznik zasilania H Kluczyki (2X) - Página 117 Instalacja szafki Zabezpieczanie Opcja 1 Wyjmij wszystkie półki z szafki. Oznacz otwory na powierzchni do wiercenia (maks. grubość: 30 mm) Włóż cztery śruby (typu M6; nie wchodzą w skład zestawu) do środka szafy z czterema nakrętkami sześciokątnymi i podkładkami (nie wchodzą w skład zestawu) 5,5 in (140,6 mm) Przód...
- Página 118 4 śruby M6 4 nakrętki M6x5 4 podkładki M6 (nie wchodzą w skład zestawu) Wymagana długość śrub to 30 mm + grubość stołu. Ustalając długość śruby, należy zaokrąglić tę wartość w górę. Opcja 2 Zestaw zabezpieczający Desktop and Peripherals Locking Kit jest sprzedawany oddzielnie.
- Página 119 Opcja 3 Układanie urządzeń jedno na drugim Zdejmij silikonową podkładkę z szafki. Ustaw drugie urządzenie na przymocowanym pierwszym urządzeniu. Przymocuj górną jednostkę czterema śrubami (M6x40 — wchodzą w skład zestawu). M6x40...
- Página 120 Przeciągnij linkę zabezpieczającą przez otwory we wspornikach. Zaczep linkę do punktu mocowania. UWAGA: Można ustawić na sobie maksymalnie dwie szafki do synchronizowania i ładowania. Mocowanie...
-
Página 121: Włączenie Zasilania
Przygotowanie szafki do tabletów Włączenie zasilania 1 Podłącz przewód zasilania. 2 Włącz wyłącznik zasilania. Wkładanie tabletów 1 Włóż jeden tablet do każdego gniazda. - Página 122 Podłącz wtyczkę USB przewodu złącza dokowania do portu USB w skrzynce do ładowania i synchronizowania. Przewody są sprzedawane oddzielnie: K67864WW - Lightning, 10pk K67865WW - 30 Pin, 10pk K67866WW - Micro USB, 10pk 3 Podłącz drugi koniec przewodu do złącza dokowania w tablecie iPad. Przy większych szafkach należy zdjąć...
- Página 123 Ładowanie tabletów Ładowanie rozpoczyna się automatycznie po podłączeniu złącza dokowania do tabletu iPad. UWAGA: Szafka do ładowania i synchronizowania nie umożliwia jednoczesnego ładowania i synchronizowania tabletów. Stan diody LED Zielony — naładowany Czerwony — trwa ładowanie Miga na czerwono i zielono — trwa synchronizacja Migający czerwony —...
- Página 124 Kliknij kartę „Device” (Urządzenie) i upewnij się, że żadna z opcji nie jest zaznaczona. Przygotuj bibliotekę iTunes z aplikacjami i plikami multimedialnymi, które mają być skopiowane na tablety iPads. Konfiguracja tabletu iPad Należy skonfigurować każdy tablet iPad przed rozpoczęciem procesu synchronizacji. Można to zrobić, podłączając tablet iPad bezpośrednio do komputera lub do skrzynki doładowania i synchronizowania.
- Página 125 Umieść jeden tablet iPad w gnieździe skrzynki do ładowania i synchronizowania. W pasku bocznym aplikacji iTunes wybierz tablet iPad w sekcji „Devices” (Urządzenia). Kliknij kartę „Summary” (Podsumowanie), wybierz opcję „Open iTunes when this iPad is connected” (Otwórz aplikację iTunes po podłączeniu tego tabletu iPad) i „Sync only checked songs and videos”...
- Página 126 Powtarzaj czynności z punktów 3–6 dla każdego tabletu iPad, który będzie podłączony do skrzynki do ładowania i synchronizowania. Stan gotowości do synchronizacji Umieść jeden tablet iPad w każdym gnieździe. UWAGA: baterie nowych tabletów iPad należy naładować do pełna przed przystąpieniem do synchronizowania.
- Página 127 Naciśnij przycisk „Sync” (Synchronizuj), aby rozpocząć proces synchronizacji. Synchronizacja Synchronizacja wyłączona włączona Zostanie uruchomiona aplikacja iTunes, a synchronizacja rozpocznie się w sposób automatyczny. Po zakończeniu synchronizacji obok każdego z urządzeń pojawi się ikona „Eject” (Wysuń). Kliknij ikonę „Eject” (Wysuń) lub zamknij aplikację iTunes, aby bezpiecznie odłączyć tablet iPad.
-
Página 128: Pomoc Techniczna
Pomoc techniczna Z pomocy technicznej mogą korzystać wszyscy zarejestrowani użytkownicy produktów firmy Kensington. Dane kontaktowe działu pomocy technicznej znajdują się na tylnej okładce tej instrukcji. Witryna WWW Rozwiązanie problemu można znaleźć w części z odpowiedziami na często zadawane pytania (Frequently Asked Questions (FAQ)) w obszarze pomocy technicznej w witrynie internetowej firmy Kensington: www.support.kensington.com. - Página 129 Stanów Zjednoczonych i innych krajów. Wszystkie inne znaki towarowe i zastrzeżone znaki towarowe stanowią własność ich odpowiednich właścicieli. © 2014 Kensington Computer Products Group, oddział firmy ACCO Brands. Kopiowanie, powielanie lub reprodukcja w inny sposób niniejszych materiałów bez pisemnej zgody firmy Kensington Computer Products Group jest surowo zabroniona.
- Página 130 Русский Содержание Компоненты Корпус для зарядки и синхронизации Слоты для планшетов Кабель USB Индикаторы состояния Учебное руководство Кнопки синхронизации и индикаторы D Карта с гарантией M Порты USB N Вентилятор Сведения технике безопасности O Порты USB Кабель питания G Винты (2X) Выключатель...
- Página 131 Установка станции Защита Вариант 1 Извлеките все полки из шкафа. Отметьте места для свереления на поверхности (макс. толщина 30 мм). Установите четыре винта (M6 - не входят в комплект) внутри станции и затяните четырьмя шестигранными гайками с шайбами (не входят в комплект). 5,5 in (140,6 mm) Порт...
- Página 132 4 винта M6 4 шестигранные гайки M6x5 4 шайбы M6 (не входят в комплект) Длина винтов — 30 мм + толщина стола. При выборе длины винтов выполните округление. Вариант 2 Набор для защиты настольного компьютера и периферийных устройств продается отдельно. K64615...
- Página 133 Вариант 3 Размещение Извлеките из шкафа силиконовую подушечку. Установите второй блок на закрепленную основу. Закрепите верхний блок с помощью четырех винтов (M6x40 - входят в комплект). M6x40...
- Página 134 С помощью кабеля с замком закрепите устройства вместе и привяжите их к креплению. ПРИМЕЧАНИЕ. Вместе можно использовать до двух станций для зарядки и синхронизации. Блокировка...
-
Página 135: Включение Питания
Установка станции для планшетных компьтеров Включение питания 1 Подсоедините кабель питания. 2 Включите выключатель питания. Установка планшетов 1 Установите один планшет в каждый слот. - Página 136 2 Подсоедините разъем USB кабеля подключения док-станции к порту USB на корпусе для зарядки и синхронизации. Кабели продаются отдельно: K67864WW - Lightning, 10pk K67865WW - 30 Pin, 10pk K67866WW - Micro USB, 10pk 3 Подсоедините другой конец кабеля к разъему док-станции на устройстве iPad. Для...
- Página 137 Зарядка планшетов Зарядка автоматически начнется при подключении разъема док-станции к устройству iPad. ПРИМЕЧАНИЕ. Станция для зарядки и синхронизации не заряжиет и не синхронизирует все планшетные компьютеры одновременно Состояние индикатора Зеленый = заряжено Красный = выполняется зарядка Индикация красным и зеленым цветом = выполняется синхронизация Мигающий...
- Página 138 Щелкните вкладку “Device” (Устройства) и убедитесь, что установлены все параметры. Подготовьте библиотеку iTunes Library с приложениями и мультимедиа, которые необходимо скопировать на устройства iPad. Установка iPad Настройте каждое устройство iPad перед началом процесса синхронизации. Для этого необходимо подключить iPad напрямую к целевому компьютеру или установить его в корпус...
- Página 139 Установите одно устройство iPad в корпус для зарядки и синхронизации. На боковой панели iTunes в разделе “Devices” (Устройства) выберите iPad. Щелкните вкладку “Summary” (Сводка), выберите “Open iTunes when this iPad is connected” (Открыть iTunes при подключении этого устройства iPad) и “Sync only checked songs and videos”...
- Página 140 Повторите шаги 3 - 6 для каждого устройства iPad, которое будет использоваться в корпусе для зарядки и синхронизации. Все готово к синхронизации Установите каждое устройство iPad в соответствующий слот. ПРИМЕЧАНИЕ. При использовании новых устройств iPad перед синхронизацией они должны быть полностью заряжены. Подсоедините...
- Página 141 Нажмите “Sync Button” (Кнопка синхронизации) для запуска процесса синхронизации. Синхронизация Синхронизация отключена включена Запустится iTunes, и синхронизация начнется втоматически. По завершении синхронизации рядом с каждым устройством появится значок “Eject” (Извлечь). Щелкните значок “Eject” (Извлечь) или закройте iTunes для безопасного извлечения iPad. Отсоедините...
-
Página 142: Техническая Поддержка
Сведения о синхронизации устройства Android см. в инструкциях производителя. Техническая поддержка Техническая поддержка доступна для всех зарегистрированных пользователей изделий компании Kensington. Контактная информация о технической поддержке имеется на обратной стороне обложки данного руководства. Веб-поддержка Вы можете найти ответ на ваш вопрос на странице ответов на часто задаваемые... - Página 143 данное устройство не должно быть источником вредного излучения; (2) данное устройство должно принимать все получаемое излучение, включая излучение, могущее привести к нежелательной работе. Как определено в Параграфе 2.909 Правил ФКС, стороной, отвечающей за данное устройство, является Kensington Computer Products Group, 333 Twin Dolphin Drive, Redwood Shores, CA 94065, USA (США).
- Página 144 Português Conteúdos Componentes Armário de carregamento e sincronização Aberturas para tablets Cabo USB Luzes de estado do LED Manual de instruções Botões de sincronização e LED D Certificado de garantia M Portas USB Informações de segurança N Ventoinha Cabo de alimentação O Portas USB G Parafusos (2X) Interruptor de ligar/desligar...
- Página 145 Armário de instalação Segurança Opção 1 Retire todas as parteleiras do armário. Marque furos na superfície para perfuração (30 mm de espessura máxima). Insira quatro parafusos (M6 - não fornecidos) no interior do armário e aperte-os com quatro porcas sextavadas e anilhas (não fornecidas). 5,5 in (140,6 mm) Frente...
- Página 146 4x Parafusos M6 4x Porcas sextavadas M6x5 4x Anilhas M6 (Não fornecidos) Os parafusos devem de ter comprimentos de 30 mm + a espessura da mesa. Ao escolher o comprimento do parafuso, arredonde para cima. Opção 2 Conjunto de bloqueio para secretária e periféricos vendido em separado. K64615...
- Página 147 Opção 3 Empilhamento 1 Retire a superfície de silicone do armário. 2 Coloque a segunda unidade por cima da unidade-base segura. Aperte a unidade de cima com quatro parafusos (M6x40 - fornecidos). M6x40...
- Página 148 Use um cadeado de cabo para bloquear as unidades e prenda-as a uma âncora. NOTA: Podem ser empilhados até dois armários de carregamento e sincronização. Bloqueio...
- Página 149 Configuração do armário para os seus tablets Ligar 1 Ligue o cabo de alimentação. 2 Ligue o interruptor de ligar/desligar. Carregue os tablets 1 Introduza um tablet em cada abertura.
-
Página 150: Para Capas Maiores, Remova As Prateleiras E Insira-As Verticalmente
Ligue a extremidade USB do cabo de ligação na porta USB do armário de carregamento e sincronização. Cabos vendidos em separado: K67864WW - Lightning, 10pk K67865WW - 30 Pin, 10pk K67866WW - Micro USB, 10pk 3 Ligue a outra extremidade do cabo no conector do iPad. Para capas maiores, remova as prateleiras e insira-as verticalmente... - Página 151 Carregue os tablets O carregamento automático tem início quando o conector é ligado ao iPad. NOTA: O armário de carregamento e sincronização não carrega e sincroniza os tablets ao mesmo tempo. Estado do LED Verde = Carregamento concluído Vermelho = A carregar Vermelho e verde intermitentes = sincronização em processo Vermelho intermitente = proteção de sobrecorrente NOTA: Remover o dispositivo e desligue a energia AC para reset de sobrecorrente.
- Página 152 Clique no separador “Dispositivo”, certifique-se de que todas as opções estão desmarcadas. Prepare a biblioteca do iTunes com aplicações e multimédia que pretende copiar para os iPads. Configuração dos iPad Configure cada iPad antes de iniciar o processo de sincronização. Isso pode ser feito ligando o iPad directamente ao computador anfitrião ou introduzindo-o no armário de carregamento e sincronização.
- Página 153 Introduza um iPad no armário de carregamento e sincronização. Na barra lateral do iTunes, seleccione o iPad em “Dispositivos”. Clique no separador “Resumo”, seleccione “Abrir o iTunes quando este iPad estiver conectado” e “Sincronizar apenas músicas e vídeos marcados”. Certifique-se de que a opção “Música e vídeos manualmente geridos”...
- Página 154 Repita os passos 3 a 6 para cada iPad a ser utilizado no armário de carregamento e sincronização. Pronto para sincronizar Introduza um iPad em cada abertura. NOTA: Se os iPads forem novos, devem ser totalmente carregados antes de tentar sincronizar.
- Página 155 Prima o “botão Sincronizar”, para iniciar o processo de sincronização. Sincronização Sincronização desactivada activada O iTunes irá iniciar e a sincronização irá começar automaticamente. Quando a sincronização estiver concluída, aparecerá um ícone “Ejectar” ao lado de cada dispositivo. Clique no ícone “Ejectar” ou feche o iTunes, para ejectar o iPad em segurança.
-
Página 156: Sincronizar Tablets Android
Sincronizar tablets Android Para sincronizar um dispositivo Android, consulte as instruções do fabricante. Assistência técnica A assistência técnica está disponível para todos os utilizadores dos produtos Kensington registados. Pode encontrar informações sobre como contactar a assistência técnica na última página deste manual. - Página 157 área ou a loja onde adquiriu o produto. Kensington, o nome e o design da ACCO são marcas registadas da ACCO Brands. The Kensington Promise é uma marca de serviço da ACCO Brands. iPod é uma marca comercial da Apple Inc., registada nos EUA e noutros países. Todas as outras marcas registadas e não registadas são propriedade dos respectivos proprietários.
- Página 158 CNPJ: 44.990.901/0001-43 Corredor Industrial Toluca Lerma, Vitacura, C.P. 7640870 Rua Aimorés, 6-9 – Bauru/SP – Brasil Lerma México Cp. 52004 Santiago, Chile CEP 17013-900 R.F.C. AME640229-1W3 www.kensington.com.br Designed in California, U.S.A. by Kensington Made in Taiwan www.kensington.com Patents Pending K67862 901-2905-00...