Tabla de contenido
Publicidad
Idiomas disponibles
Idiomas disponibles
Enlaces rápidos
Publicidad
Tabla de contenido

Manuales relacionados para Nilox DPW-210P

Resumen de contenidos para Nilox DPW-210P
-
Página 2: Tabla De Contenido
ITALIANO: AVVERTENZE ..............................3 PANORAMICA DI PRODOTTO ............................5 REQUISITI DI SISTEMA ................................5 CONTENUTO DELLA CONFEZIONE ..........................5 INSTALLAZIONE SOFTWARE (Ambienti Windows) ..................... 5 Installazione dei driver/utility ............................. 5 Rimozione dei driver/utility ..............................6 INSTALLAZIONE HARDWARE E VERIFICA ......................6 Installazione .................................... - Página 3 CONNECT TO A NETWORK ............................15 Windows (8-7-Vista-XP-2K) .............................. 15 Available Network and Connection ..........................16 APPENDIX A: Connect to a network using Windows client ................17 Windows 8 ....................................17 Windows 7 ....................................17 Windows VISTA ..................................17 Windows XP ..................................... 18 APPENDIX B: IP Address in DHCP Client Mode ......................
-
Página 4: Italiano: Avvertenze
Nilox. Tutti i nomi di produttori e dei prodotti e qualsiasi marchio, registrato o meno, menzionati in questo manuale sono usati al solo scopo identificativo e rimangono proprietà... - Página 5 Utilizzare esclusivamente l’antenna(e) fornita(e) a corredo. Antenne diverse e/o con guadagno differente potrebbero violare le normative vigenti. Nilox si intende sollevata da ogni responsabilità in caso di utilizzo di accessori (antenne e/o alimentatori) non contenuti nell’imballo. Lasciare almeno 30cm di distanza tra l’antenna del dispositivo e l’utilizzatore.
-
Página 6: Panoramica Di Prodotto
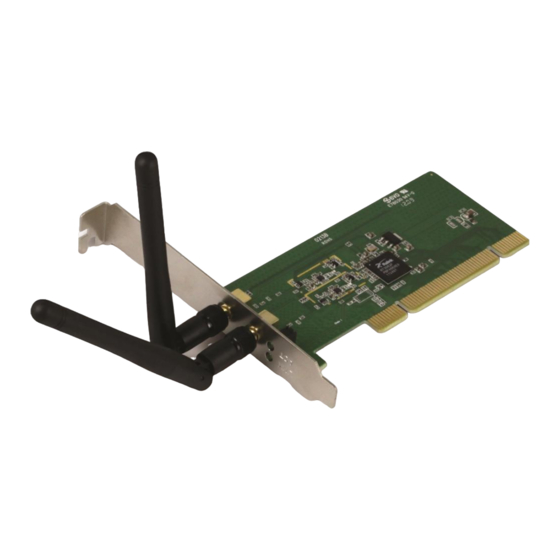
Grazie per aver scelto l’adattatore PCI Wireless N Nilox. Questo manuale fornisce una rapida panoramica sul prodotto e la sua installazione, si prega di conservarlo per consultazioni future. PANORAMICA DI PRODOTTO Compatibile con lo standard IEEE 802.11n (retrocompatibile con 802.11b/g) per una velocità di link sino a 150/300Mbps ed una copertura più... -
Página 7: Rimozione Dei Driver/Utility
Spegnere il PC (sconnetterlo dalla rete elettrica di alimentazione) e rimuovere la copertura esterna. Localizzare uno slot PCI non utilizzato Posizionare l’adattatore PCI Wireless N Nilox nello slot PCI precedentemente localizzato e premere delicatamente sino ad inserire a fondo l'adattatore ... -
Página 8: Connessione
Chiusura. L'utility inoltre permette la configurazione di tutti i parametri necessari al corretto funzionamento dell’adattatore PCI Wireless N Nilox, di attivare funzionalità avanzate quali il supporto WPS e di visualizzare informazioni sulle reti senza fili rilevate in prossimità dal dispositivo. -
Página 9: Creazione Profilo Di Connessione
Dopo qualche secondo la scheda dovrebbe connettersi all'AP. E' possibile a questo punto leggere maggiori dettagli circa il link e lo stato della scheda di rete wireless (SSID, Velocità, Canale, IP, SubnetMask). L’adattatore PCI Wireless N Nilox dovrebbe automaticamente connettersi utilizzando il profilo appena creato ad ogni riavvio del PC. -
Página 10: Appendice A: Connessione Usando Il Client Di Windows
APPENDICE A: C ONNESSIONE USANDO IL LIENT DI INDOWS In tutti i sistemi operativi Microsoft è incluso un client che permette la gestione di un adattatore wireless (necessitando dell'installazione dei soli driver) al pari delle Utility di Configurazione precedentemente mostrate. INDOWS ... -
Página 11: Windows Vista
Di seguito è indicata la procedura su come disabilitare il servizio Zero Configuration di Windows XP. Seguire questa procedura per poter gestire adattatore Wireless N Nilox tramite l’utility fornita a corredo: Cliccare su Start e poi su Pannello di Controllo ... -
Página 12: Appendice B: Configurazione Indirizzo Ip In Dhcp Client
APPENDICE B: C DHCP C ONFIGURAZIONE INDIRIZZO LIENT Questo capitolo fornisce alcune indicazioni su come impostare l’indirizzo IP alla scheda Wireless usata in modalità DHCP client. INDOWS Andare su Start poi Pannello di Controllo (cliccare sulla voce Icone Piccole o Grandi) e qui cliccare due volte sull’icona Centro Connessione di rete e Condivisione, poi cliccare su Modifica Impostazione Scheda ... -
Página 13: English: Warning
Corp. Pentium is trademark of Intel. All copyright ® reserved. The Nilox logo is a registered trademark. All other names mentioned may be trademarks or registered trademarks of their respective owners. Subject to change without notice. No liability for technical errors and/or omissions. Environmental information This product may contain substances that can be hazardous to the environment or to human health if it is not disposed of properly. - Página 14 WEEE BIN Logo ( ),in some devices, isn’t fully compliant with minimum dimensions requirement to European Directive due to limited sticker area. Nilox suggests to visit the web site www.nilox.com in order to retrieve update manual, tech details and driver.
-
Página 15: Product Overview
Thank you for purchasing Nilox Wireless N PCI Card that provides the easiest way to wireless networking. This document describes how to install your Wireless Adapter and set up basic wireless connectivity on your Wireless Local Area Network (WLAN). Please keep this manual for future reference. -
Página 16: Hardware Installation
Power the computer off. Now you can remove the PCI Card. HARDWARE INSTALLATION ARDWARE NSTALLATION Follow these steps, to safely install the Wireless N PCI Card: Power the computer off, unplug the power cord and remove the chassis cover ... -
Página 17: Available Network And Connection
VAILABLE ETWORK AND ONNECTION In Site Survey [ ] page, the software will display surrounding APs data, obtained with the last scan. Displayed data includes SSID, Signal, Channel, Encryption algorithm, and Network type as shown in picture. Rescan [ ]:issue a rescan command to the wireless NIC, to update available data about surrounding wireless networks. Add to Profile [ ]: select an AP profile, click Add to Profile. -
Página 18: Appendix A: Connect To A Network Using Windows Client
APPENDIX A: C ONNECT TO A NETWORK USING INDOWS CLIENT Windows 8/7 can manage the USB/PCI client with its embedded utility for wireless networks; Windows 2000/Vista/XP requires an external management utility (provided on the CD) to set and manage the USB/PCI wireless client. INDOWS ... -
Página 19: Windows Xp
INDOWS Double click on Wireless network icon in the system tray (see picture) Select the wireless network SSID and click Connect Windows XP provides wireless configuration utility named windows zero configuration which provides basic configuration function for Wireless N PCI Card. Right after the installation, please follow the steps below to activate the Windows XP Zero Configuration: Go to “Control Panel”... -
Página 20: Appendix B: Ip Address In Dhcp Client Mode
APPENDIX B: IP A DHCP C DDRESS IN LIENT INDOWS Go to Start / Control Panel (select Large/Small Icon). In the Control Panel, double-click on Network and Sharing Center icon Click Change Adapter Settings then double-click Local Area Connection/Wireless and click Properties ... -
Página 21: Español: Aviso
A pesar de ello, no podemos garantizar la ausencia de estos. Nilox no se hacen responsable de daños o pérdidas directas o indirectas, incluidos, pero sin limitación, los daños causados por la imposibilidad su uso, la pérdida de datos o software y/o los daños o pérdidas causados por el uso o funcionamiento incorrecto del equipo y accesorios. - Página 22 Esta garantía se refiere a la situación en la cual se MANIFIESTE UN DEFECTO DE CONFORMIDAD, por lo que concierne las características del producto. • Soporte al producto y garantía Para más detalles ir a www.nilox.com área SOPORTE Y DESCARGA Limitaciones de Garantía : la sobredicha garantía no tiene validez si: •...
-
Página 23: Principales Características
Gracias por haber comprado la llave inalámbrica (PCI Wireless N Nilox) la cual proporciona la forma más fácil de conectarse a una red inalámbrica. La llave inalámbrica permite a los usuarios dotados de aparatos inalámbricos de navegar o compartir sus ficheros con gran facilidad y seguridad gracias al uso de los robustos protocolos de encriptación WPA/ WPA2. -
Página 24: Desinstalación
ESINSTALACIÓN Para desinstalar la llave inalámbrica PCI debe de seguir el siguiente procedimiento: Cerrar todas las aplicaciones activas. Pinchar sobre el icono Mi PC y después sobre el Panel de Control Pinchar sobre Agregar o quitar programas y seleccionar Ralink Wireless LAN Card y pinchar en Quitar para confirmar el procedimiento de desinstalación ... -
Página 25: Conexión ( Site Survey)
Este producto es compatible con Windows XP/VISTA/7/8, y es capaz de funcionar en modalidad Ad-Hoc (PC a PC), ® infraestructura (PC a Punto de Acceso) y como Punto de Acceso. ONEXIÓN URVEY Para hacer arrancar la aplicación hago doble clic sobre el icono o pinche con el botón derecho y seleccione Launch Config Utilities. -
Página 26: English: Appendix A: Technical Specifications
ENGLISH: APPENDIX A: TECHNICAL SPECIFICATIONS Code 16NX050130001 16NX0501CQ001 Standards IEEE 802.11b/g/n Interface PCI 32bit Chipset Ralink 3062F Ralink 3060F ® ® 2 (Link, ACT) WPS HW/SW NO/YES Antenna 2*2dBi antennas (R-SMA) 1*2dBi antenna (R-SMA) Frequency Band 2412 ~ 2472 MHz Transmission Rate Up to 300Mbps (auto-sense with auto Up to 150Mbps (auto-sense with auto...