Capítulos
Tabla de contenido

Manuales relacionados para Nostalgia Electrics Vintage Serie


Resumen de contenidos para Nostalgia Electrics Vintage Serie
- Página 1 All products are trademarks of Nostalgia Products Group, LLC. Worldwide design & utility patented or patents pending. © 2011 Nostalgia Products Group, LLC. www.nostalgia electrics.com (rev. 11/28/11)
- Página 2 Vintage Series Old Fashioned Commercial ™ Cotton Candy Maker Série d'antan Machine à barbe à papa commerciale à l'ancienne Instructions and Recipes Instrucciones y recetas Instructions et recettes...
-
Página 4: Tabla De Contenido
Make everyday a party! Visit www.nostalgiaelectrics.com for more fun products. CONTENTS IMPORTANT PRECAUTIONS ......3 IMPORTANT SAFEGUARDS . -
Página 5: Important Precautions
IMPORTANT PRECAUTIONS NEVER use a scouring pad on the unit. NEVER leave unit unattended while in use. NEVER place anything other than the intended sugar in the Extractor Head. NEVER pour water or any other liquid into the Extractor Head. NEVER put fingers on or near the Extractor Head or Heating Element while machine is on, nor while it is still hot. -
Página 6: Introduction
15. Check the Extractor Head for foreign objects before switching to ON position. 16. The Extractor Head will get hot. Avoid contact until fully cooled. 17. A short power supply cord is provided to reduce the risk resulting from becoming entangled or tripping over a long cord. 18. -
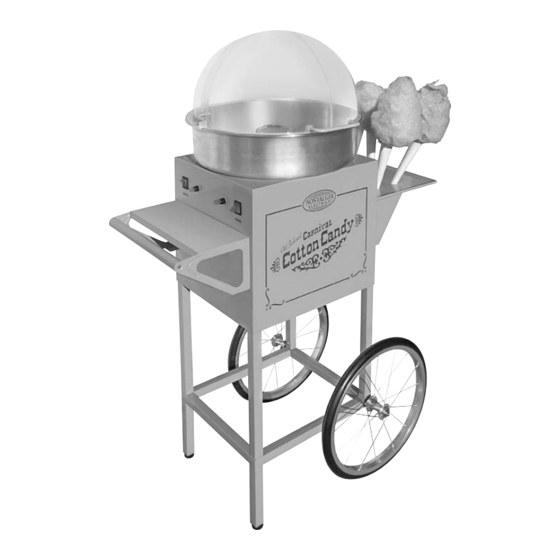
Página 7: Parts & Assembly
PARTS & ASSEMBLY HARDWARE #1 Screw (10mm) #2 Bolt (10mm) #3 Axle Bolt (95mm) Qty. 8 Qty. 8 Qty. 2 #4 Bolt (60mm) #5 Small Flat Washer #6 Large Flat Washer #7 Nut Cap Qty. 2 Qty. 10 Qty. 4 Qty. - Página 8 (E) Push Handle (F) Wheels (G) Base Support (H) Leg Assembly (I) Cross Bar (J) Screwdriver (K) Wrench #1 (L) Wrench #2 ASSEMBLY OF BASE SUPPORT Insert Cross Bar (I) into the square inserts on the inside of Base Support (G) and secure from below with two #2 Bolts and two #5 Flat Washers.
- Página 9 ASSEMBLY OF THE WHEELS Insert #3 Axle Bolt into Base Support (G). Put on #6 Flat Washer. Slide one Wheel (F) into #3 Axle Bolt and add a #5 Flat Washer and a #7 Nut Cap. Use #2 Wrench (L) to tighten the #7 Nut Cap. Insert the second #3 Axle Bolt to the other side of Base Support (G), add #6 Flat Washer, second Wheel (F), another #5 Flat Washer, and #7 Nut Cap to the other side of the #3 Axle Bolt, following the directions above.
- Página 10 CHANGING EXTRACTOR HEAD Before changing the Extractor Head, make sure that the machine is turned OFF, unplugged, and that the Extractor Head has cooled completely. Use #1 Wrench (K) to remove the center bolt. Use pliers to loosen and remove the red and black wires from the bottom of the Extractor Head.
- Página 11 Place the new Extractor Head with wires attached onto the shaft and replace center bolt. Tighten the center bolt using the #1 Wrench (K). CHANGING THE KRYPTOL The Kryptol is the connection point that powers the heating element on the extractor head.
- Página 12 Remove Kryptol Housing Cover using (K) Wrench #1. Pull Kryptol out of Housing and replace with new Kryptol. Kryptol Replace Kryptol Housing cover and tighten with #1 Wrench (K). Repeat steps 3, 4 and 5 with the other Kryptol Housing. Replace Collar and tighten screws using Screwdriver.
-
Página 13: How To Operate
HOW TO OPERATE First, position OLD FASHIONED COMMERCIAL COTTON CANDY MAKER close to an electrical outlet before starting. Make sure the cord is away from any water source. It is acceptable to use an extension cord if needed. Plug in unit at the OFF position. Turn both power switch and heater switch to ON position and allow unit to run for at least 10 minutes before adding sugar. -
Página 14: Cleaning & Maintenance
CLEANING & MAINTENANCE When you have finished making cotton candy, run unit for about five minutes until all sugar has been released through the extractor head. When all remaining sugar is gone, unplug unit and allow to cool down before cleaning. Make sure the unit is unplugged and has had time to cool down before cleaning. -
Página 15: Returns & Warranty
RETURNS & WARRANTY SHOULD YOUR UNIT NOT WORK OR IS DAMAGED WHEN YOU FIRST TAKE IT OUT OF THE BOX PLEASE RETURN IT TO THE PLACE OF PURCHASE IMMEDIATELY. Vintage Series™ Old Fashioned Commercial Cotton Candy Maker / CCM600 Should you have any questions, please contact us via email or at the customer service number listed below between the hours of 8:00 AM and 5:00 PM, Monday through Friday, Central Standard Time. - Página 16 ¡Convierta todos los días en una fietsa! Visite www.nostalgiaelectrics.com para ver más productos divertidos. CONTENIDO PRECAUCIONES IMPORTANTES ......15 MEDIDAS IMPORTANTES .
-
Página 17: Precauciones Importantes
PRECAUCIONES IMPORTANTES NUNCA utilice un estropajo en la unidad. NUNCA deje la unidad sin atención mientras se encuentra en uso. NUNCA ponga nada en la Boca de Entrada del Extractor salvo el azúcar previsto. NUNCA vuelque agua ni ningún otro líquido en la Boca del Extractor. NUNCA ponga los dedos sobre la Boca de Entrada del Extractor ni cerca del mismo ni del Elemento para Calentar mientras la máquina se encuentra encendida ni mientras aún permanezca caliente. -
Página 18: Introducción
13. NO utilice el aparato de otro modo que no sea para su uso pretendido. 14. No deje la unidad sin atención mientras esté en uso o enchufada a un tomacorriente. 15. Controle la Boca de Entrada del Extractor para comprobar que no haya objetos extraños antes de ENCENDER la unidad. -
Página 19: Piezas Y Ensamblaje
PIEZAS Y ENSAMBLAJE HARDWARE N°1 - 8 Tornillos N°2 - 8 Pernos N°3 - 2 Pernos de 10mm de 10mm Eje de 95mm N°4 - 2 Pernos N°5 - 10 Arandelas N°6 - 4 Arandelas N°7 - 4 Tuercas de 60mm Planas Pequeñas Planas Grandes Ciegas... - Página 20 (E) Manija para Empujar (F) Ruedas (G) Soporte Base (H) Ensamble de las Patas (I) Barra transversal (J) Destornillador (K) Llave N° 1 (L) Llave N° 2 ARMADO DEL SOPORTE BASE Introduzca la Barra Transversal (I) en las inserciones cuadradas que se encuentran en la parte interior del Soporte Base (G) y sujete desde abajo con dos Pernos N°2 y dos Arandelas Planas N°5.
- Página 21 ARMADO DE LAS RUEDAS Introduzca el Perno Eje N°3 en el Soporte Base (G). Coloque la Arandela Plana N°6. Deslice una Rueda (F) por el Perno Eje N°3 y agregue una Arandela Plana N°5 y una Arandela Ciega N°7. Utilice la Llave N°2 (L) para ajustar la Arandela Ciega N°7. Introduzca el segundo Perno Eje N°3 del otro lado del Soporte Base (G), agregue la Arandela Plana N°6, la segunda Rueda (F), otra Arandela Plana N°5 y la Arandela Ciega N°7 del otro lado del Perno Eje N°3, siguiendo las instrucciones anteriores.
- Página 22 hacia adentro y gire en sentido de las agujas del reloj para trabar el fusible en su lugar. CÓMO CAMBIAR LA BOCA DEL EXTRACTOR Antes de cambiar la Boca del Extractor, asegúrese de que la máquina esté APAGADA, desenchufada y que la Boca del Extractor se haya enfriado completamente. Utilice la Llave N°1 (K) para quitar el perno del centro.
- Página 23 Coloque la nueva Boca del Extractor con los cables sujetos al eje y cambie el perno del centro. Ajuste el perno del centro utilizando la Llave N°1 (K). CÓMO CAMBIAR EL KRYPTOL El Kryptol es el punto de conexión que le da energía al elemento de calefacción de la boca del extractor.
- Página 24 Extraiga la Tapa de la Estructura del Kryptol utilizando la Llave N°1 (K). Tire del Kryptol para retirarlo de la Estructura y reemplácelo por uno nuevo. Kryptol Cambie la tapa de la Estructura del Kryptol y sujete con la Llave N°1 (K). Repita los pasos 3, 4 y 5 con la otra Estructura del Kryptol.
-
Página 25: Cómo Funciona
CÓMO FUNCIONA Primero, coloque la FÁBRICA DE ALGODÓN DE AZÚCAR COMERCIAL ESTILO ANTIGUO cerca de un tomacorriente eléctrico antes de comenzar. Asegúrese que el cable esté lejos de cualquier fuente de agua. Se puede utilizar un prolongador si es necesario. Enchufe la unidad en posición OFF (APAGADO). -
Página 26: Limpieza Y Mantenimiento
LIMPIEZA Y MANTENIMIENTO Cuando haya terminado de elaborar el algodón de azúcar, deje funcionar la unidad durante cinco minutos hasta que haya salido el azúcar completamente por la boca del extractor. Cuando haya salido todo el remanente de azúcar, desenchufe la unidad y deje enfriar antes de limpiar. -
Página 27: Devoluciones Y Garantía
DEVOLUCIONES Y GARANTÍA SI SU UNIDAD NO TRABAJA O ESTÁ DAÑADA CUANDO LA EXTRAE POR PRIMERA VEZ DE LA CAJA DEVUÉLVALA INMEDIATAMENTE AL LUGAR DONDE LA COMPRÓ. Vintage Series™ Fábrica de Algodón de Azúcar Comercial Estilo Antiguo / CCM600 Si tiene preguntas, contacte con nosotros por correo electrónico o por el número telefónico de servicio al cliente que aparece a continuación en el horario de 8:00 AM a 5:00 PM, de lunes a viernes, Hora Estándar del Este. - Página 28 Faire une fête tous les jours! Visiter le site Web www.nostalgiaelectrics.com pour d’autres produits agréables. TABLE DES MATIÈRES PRÉCAUTIONS IMPORTANTES ......27 MISES EN GARDE SÉCURITAIRES IMPORTANTES .
-
Página 29: Précautions Importantes
PRÉCAUTIONS IMPORTANTES NE JAMAIS utiliser de tampon à récurer sur l'appareil. NE JAMAIS laisser l'appareil sans surveillance lorsqu'il est utilisé. NE JAMAIS placer autre chose que le sucre prévu dans la Tête de l'extracteur. NE JAMAIS verser d'eau ou tout autre liquide dans la Tête de l'extracteur. NE JAMAIS mettre les doigts sur la Tête de l'extracteur ou l'Élément chauffant ou à... -
Página 30: Introduction
10. NE PAS placer des pièces sur un brûleur au gaz ou électrique ou à leur proximité ou dans un four chaud. 11. Faire preuve d'une extrême prudence au moment de déplacer le présent appareil. 12. Le présent appareil doit être posé sur une surface plane pour fonctionner correctement. 13. -
Página 31: Pièces Et Assemblage
PIÈCES ET ASSEMBLAGE QUINCAILLERIE Vis nº 1 (10 mm) Boulon nº 2 (10 mm) Boulon essieu nº 3 (95 mm) Qté 8 Qté 8 Qté 2 Boulon nº 4 (60 mm) Petites rondelles Grandes rondelles Chapeau d'écrou nº 7 Qté 2 plates nº... - Página 32 (E) Poignée-poussoir (F) Roues (G) Base (H) Élément inférieur (I) Barre transversale (J) Tournevis (K) Clé nº 1 (L) Clé nº 2 ASSEMBLAGE DE LA BASE Insérer la Barre transversale (I) dans les fiches carrées à l'intérieur de la Base (G), puis fixer solidement en dessous avec deux Boulons nº...
- Página 33 ASSEMBLAGE DES ROUES Insérer le Boulon essieu nº 3 dans la Base (G). Poser une Rondelle plate nº 6. Glisser une roue (F) sur le Boulon essieu nº 3, puis ajouter une Rondelle plate nº 5 et un Chapeau d'écrou nº 7. Utiliser la Clé...
- Página 34 REMPLACER LA TÊTE DE L'EXTRACTEUR Avant de remplacer la Tête de l'extracteur, s'assurer que la machine est éteinte, débranchée et que la Tête de l'extracteur s'est complètement refroidie. Utiliser la Clé (K) nº 1 pour enlever le boulon central. Utiliser des pinces pour desserrer et enlever les fils rouge et noir du fond de la Tête de l'extracteur.
- Página 35 Poser la nouvelle Tête de l'extracteur avec les fils fixés sur l'arbre, puis reposer boulon central. Serrer le boulon central à l'aide de la Clé (K) nº 1. REMPLACEMENT DU KRYPTOL Le Kryptol est le point de connexion qui alimente l'élément chauffant sur la tête de l'extracteur.
- Página 36 Déposer le Couvercle (K) du boîtier de Kryptol nº 1. Retirer le Kryptol du Boîtier et le remplacer par le nouveau. Kryptol Remettre le couvercle du Boîtier du Kryptol et le serrer à l'aide de la Clé (K) nº 1. Refaire les étapes 3, 4 et 5 avec l'autre Boîtier du Kryptol.
-
Página 37: Comment Faire Fonctionner
COMMENT FAIRE FONCTIONNER Premièrement, placer la MACHINE À BARBE À PAPA près d'une prise électrique avant son utilisation. S'assurer que le cordon est éloigné de toute source d'eau. Vous pouvez utiliser une rallonge, s'il y a lieu. Brancher l'appareil alors qu'il est à la position OFF (arrêt). Mettre l'interrupteur d'alimentation et l'élément chauffant à... -
Página 38: Nettoyage Et Entretien
NETTOYAGE ET ENTRETIEN Lorsque vous aurez terminé, faire tourner l'appareil pendant environ cinq minutes jusqu'à ce que tout le sucre se dégage de la tête de l'extracteur. Lorsqu'il ne restera plus aucun sucre, débrancher l'appareil et le laisser refroidir avant le nettoyage. S'assurer que l'appareil est débranché... -
Página 39: Retours De La Marchandise Et Garanties
RETOURS DE LA MARCHANDISE ET GARANTIES SI VOTRE APPAREIL NE FONCTIONNE PAS OU EST ENDOMMAGÉ LORSQUE VOUS LE SORTEZ DE LA BOÎTE, VEUILLEZ LE RETOURNER IMMÉDIATEMENT À L'ENDROIT OÙ VOUS L'AVEZ ACHETÉ. Série d'antan Machine à barbe à papa commerciale à l'ancienne / CCM600 Pour toutes autres questions pertinentes, veuillez contacter le service à...