Publicidad
Idiomas disponibles
Idiomas disponibles
Enlaces rápidos
7W97 – Tool Cabinet Kit
Assembly Steps
2001933
Rubbermaid Incorporated,
Huntersville, NC U.S.A. 28078-1801
U.S.A. 1-888-895-2110
Canada 1-866-595-0525
www.rubbermaid.com
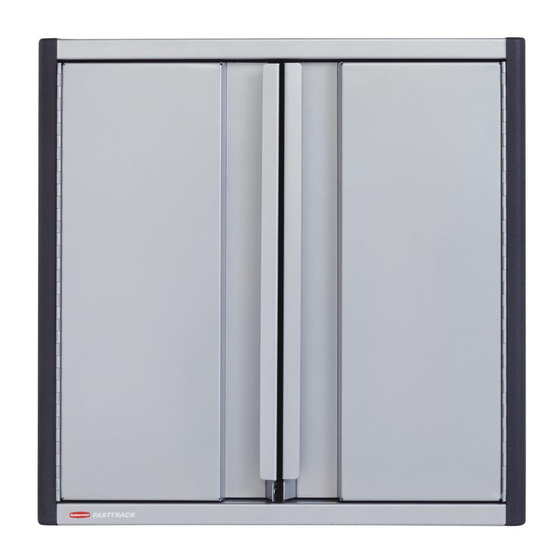
Pieces
A
Right Side Panel
B
Left Side Panel
C
Right Door
5/16" & 1/8
Qty
Pieces
D
1
Left Door
E
1
Top
F
1
Bottom
Qty
1
1
1
PKG0000638735
Publicidad

Manuales relacionados para Rubbermaid FASTTRACK 7W97 2001933


Resumen de contenidos para Rubbermaid FASTTRACK 7W97 2001933
- Página 1 7W97 – Tool Cabinet Kit Assembly Steps 2001933 Rubbermaid Incorporated, Huntersville, NC U.S.A. 28078-1801 U.S.A. 1-888-895-2110 Canada 1-866-595-0525 www.rubbermaid.com 5/16" & 1/8 Pieces Pieces Right Side Panel Left Door Left Side Panel Right Door Bottom PKG0000638735...
- Página 2 Pieces Pieces Back Extrusion Panel Hinge & Keeper Bracket Screws M2.9 x 19mm Keeper Brackets Magnet Screws Magnet #6 x ½" Wall Anchor Screw Wall Anchor #10 x 2" Back Panel Screw (Black) Side Panel Screws #6 x ¾" #10-32 x ¾"...
- Página 3 STEP 1 INSTALL DOOR PANEL TO SIDE PANEL Hinge screw locations indicate front edge of side panels (A & B). Place right door (C) into position, align TOP hinge hole with right side panel (A) screw boss. HINT: Use the other side panel (B) to hold the door up to the level for ease of alignment. You will need six hinge screws (H) for assembly of each door panel.
- Página 4 STEP 3 INSTALL BOTTOM PANEL TO SIDE PANELS Position bottom panel (F) into side panel groove and align. Using two side panel screws (K) install the FRONT screws only in the order shown. CAUTION: Do not over-tighten screws. STEP 4 INSERT BACK EXTRUSION PANELS Place first end of back extrusion (G) into groove of side panel (B) at the bottom of the cabinet, then align and insert the other end into the groove of the other side panel (A).
- Página 5 STEP 5 FINISH INSTALLATION OF BOTTOM PANEL TO SIDE PANELS Install the last two screws (K) that connect the bottom to the side panels (A & B) (this keeps the back extrusions (G) in the slots for installing their fasteners). CAUTION: Do not over-tighten screws.
- Página 6 STEP 7 INSTALL MAGNET Install the magnet (I) using the two magnet screws (J) and align its position so the doors (C & D) close flush with the bottom panel (F). STEP 8 INSTALLING THE CABINET TO THE RAIL NOTE: FastTrack rail is sold separately. Place unit onto the rail in the location desired.
- Página 7 STEP 9 STEP 10 PREPARE FOR CABINET MOUNTING MOUNT CABINET TO WALL Mark the hole location at the back of the bottom panel Remove the unit from the rail and install the wall anchor (M) using a 5/16" drill bit, or (Located underneath bottom panel).
- Página 8 Trousse pour armoire à outils - 7W97 Étapes d’assemblage 2001933 Rubbermaid Incorporated, Huntersville, NC, États-Unis 28078 - 1801 U.S.A. 1-888-895-2110 Canada 1-866-595-0525 www.rubbermaid.com 5/16" & 1/8 Pièces Qté. Pièces Qté. Panneau latéral droit Porte gauche Panneau latéral gauche Haut Porte droite...
- Página 9 Pièces Qté. Pièces Qté. Panneau d'extrusion Vis pour charnière et support de retenue arrière M2.9 x 19mm Supports de retenue Vis pour l’aimant Aimant 6 - 32 x 1.27 cm (½ po) Vis pour l’ancrage mural Ancrage mural 10 x 5 cm (2 po) Vis pour panneau arrière (noir) Vis du panneau latéral 6 - 32 x 2 cm (¾...
- Página 10 ÉTAPE 1 FIXER LE PANNEAU DE PORTE AU PANNEAU LATÉRAL Les emplacements des vis de charnière indiquent le bord avant des panneaux latéraux (A et B). Placez la porte droite (C) en position, alignez le trou SUPÉRIEUR de la charnière avec le panneau latéral comprenant le bossage pour vis (A).
- Página 11 ÉTAPE 3 INSTALLER LE PANNEAU INFÉRIEUR AUX PANNEAUX LATÉRAUX Positionnez le panneau inférieur (F) dans la rainure du panneau latéral et alignez-le. À l'aide de deux vis de panneau latéral (K), installez les vis AVANT uniquement dans l'ordre indiqué. ATTENTION : Ne pas trop serrer les vis. ÉTAPE 4 FIXER LES PANNEAUX D’EXTRUSION ARRIÈRE Placez la première extrémité...
- Página 12 ÉTAPE 5 TERMINER DE FIXER LE PANNEAU INFÉRIEUR AUX PANNEAUX LATÉRAUX Installez les deux dernières vis (K) qui relient le bas aux panneaux latéraux (A et B) (ceci maintient les extrusions arrière (G) dans les fentes pour installer leurs attaches). ATTENTION : Ne pas trop serrer les vis.
- Página 13 ÉTAPE 7 INSTALLER L’AIMANT Installez l'aimant (I) à l'aide des deux vis pour l’aimant (J) et alignez sa position afin que les portes (C & D) ferment bien contre le panneau inférieur (F). ÉTAPE 8 FIXER LE CASIER AU RAIL REMARQUE : Le rail FastTrack est vendu séparément.
- Página 14 ÉTAPE 9 ÉTAPE 10 PRÉPARATION POUR L’ASSEMBLAGE DE L’AR- FIXER L’ARMOIRE AU MUR MOIRE Retirez l’unité du rail et installez l’ancre murale (M) à l’aide d’un foret de 9,5 mm (5/16 Marquez l’emplacement du trou à l’arrière du panneau inférieur po), ou percez un trou pilote de 3 mm (1/8 po) si un montant est aligné...
-
Página 15: 7W97 - Kit De Herramientas Para Gabinete Pasos Para El Armado
7W97 - Kit de herramientas para gabinete Pasos para el armado 2001933 Rubbermaid Incorporated, Huntersville, NC U.S.A. 28078-1801 Estados Unidos 1-888-895-2110 Canadá 1-866-595-0525 www.rubbermaid.com 5/16" & 1/8 Piezas Cantidad Piezas Cantidad Panel lateral derecho Puerta izquierda Panel lateral izquierdo Parte superior... - Página 16 Piezas Cantidad Piezas Cantidad Panel de extrusión Bisagra y tornillos para sujeción de soportes posterior M2.9 x 19 mm Sujeciones de soportes Tornillos magnéticos Imán #6 x ½" Tornillo de anclaje de pared Anclaje de pared #10 x 2" Tornillo de panel posterior (negro) Tornillos de panel lateral #6 x ¾"...
- Página 17 PASO 1 INSTALLAR EL PANEL DE PUERTA PARA PANEL LATERAL La ubicación de los tornillos en la bisagra indica el borde frontal de los paneles laterales (A y B). Colocar la puerta derecha (C) en su posición, alinear el orificio de la bisagra SUPERIOR con el tornillo de refuerzo del panel lateral derecho (A).INDICACIÓN: Utilizar el otro panel lateral (B) para mantener la puerta por encima del nivel y facilitar la alineación.
- Página 18 PASO 3 INSTALAR EL PANEL INFERIOR EN LOS PANELES LATERALES Colocar el panel inferior (F) en la ranura del panel lateral y alinear. Utilizar dos tornillos de panel lateral (K) e instalar los tornillos FRONTALES solo en el orden que se indica. PRECAUCIÓN: No ajustar demasiado los tornillos.
- Página 19 PASO 5 FINALIZAR LA INSTALACIÓN DEL PANEL INFERIOR EN LOS PANELES LATERALES Colocar los últimos dos tornillos (K) que conectan la parte inferior a los paneles laterales (A y B) (esto mantiene las extrusiones posteriores (G) en las ranuras para la instalación de sus sujetadores). PRECAUCIÓN: No ajustar demasiado los tornillos.
- Página 20 PASO 7 INSTALAR IMÁN Instalar el imán (I) con los dos tornillos magnéticos (J) y alinear su posición para que las puertas (C y D) se cierren en línea con el panel inferior (F). PASO 8 INSTALACIÓN DEL GABINETE EN EL RIEL NOTA: El riel FastTrack se vende por separado.
- Página 21 PASO 9 PASO 10 PREPARAR PARA EL MONTAJE DEL GABINETE MONTAR EL GABINETE EN LA PARED Marcar la ubicación del orificio en la parte posterior del panel Sacar la unidad del riel e instalar el anclaje de pared (M) con una broca de 5/16", o inferior perforar un orificio guía de 1/8"...