
Manuales relacionados para MD SPORTS BL096Y22006


Resumen de contenidos para MD SPORTS BL096Y22006
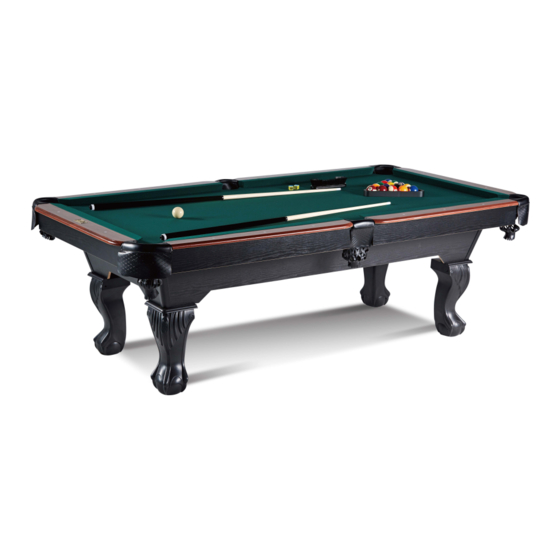
- Página 1 MODEL/MODELO BL096Y19009 MODEL/MODELO BL096Y22006 Assembly Instructions Instrucciones De Ensamblaje 877-472-4296 www.medalsports.com...
- Página 2 WE ARE READY ESTAMOS LISTOS TO HELP AYUDA DO NOT RETURN TO STORE NO DEVOLVERLO A LA TIENDA Please Contact Por favor Contactar MD SPORTS Customer Service Servicio al Cliente Toll Free Llamada Gratuita 877-472-4296 Mon.-Fri., Lunes a Viernes, 9:00 a.m. to 5:00 p.m. EST 9:00 a.m.
-
Página 3: Tools Required
No usar o guardar el producto en el exterior. Solo para uso en interior. No utilizar ni guardar el producto en lugares húmedos o mojados. BL096Y22006 (Continued on the next page.) (Continúe en la siguiente página.) www.medalsports.com... -
Página 4: Identificador De Piezas
FOR FIG. 13 Tablero End Top Nivelador Adjustable Corchete Glue Pegamento Leg Leveler superior final de pata regulable Board Bracket ACCESSORIES ACCESORIOS Taco Chalk Tiza Triangle Triángulo Brush Cepillo BL096Y22006 (Continued on the next page.) (Continúe en la siguiente página.) www.medalsports.com... -
Página 5: Piezas Preinstaladas
FOR FIG. 1 FOR FIG. 7 FOR FIG. 13 M8 “T” - Nut Tuerca - “T” M8 M8x10mm Nut Tuerca M8x10mm M5 “T” - Nut Tuerca - “T” M5 BL096Y22006 (Continued on the next page.) (Continúe en la siguiente página.) www.medalsports.com... -
Página 6: Before Assembly
ASSEMBLY MONTAJE FIG. 1 Pre-installed FIG. 2 Note: Do NOT tighten the bolts (A1) until FIG. 11. Nota: Que No apretes los pernos (A1) hasta la FIG. 11. BL096Y22006 (Continued on the next page.) (Continúe en la siguiente página.) www.medalsports.com... - Página 7 Please ensure that the legs are firmly locked together. Nota: Escuchará un sonido "clic" cuando las piernas están chasqueadas correctamente. Asegúrese de que las piernas estén firmemente bloqueadas. BL096Y22006 (Continued on the next page.) (Continúe en la siguiente página.) www.medalsports.com...
-
Página 8: Important
A ésto se indicará que las piernas están bloqueadas firmemente en su lugar. Si no oye un sonido "CLIC", las piernas NO ESTAN BLOQUEADAS. BL096Y22006 (Continued on the next page.) (Continúe en la siguiente página.) www.medalsports.com... -
Página 9: Importante
IMPORTANTE: Escuchará un sonido “CLIC” cuando las piernas están chasqueadas correctamente. A ésto se indicará que las piernas están bloqueadas firmemente en su lugar. Si no oye un sonido "CLIC", las piernas NO ESTAN BLOQUEADAS. BL096Y22006 (Continued on the next page.) (Continúe en la siguiente página.) www.medalsports.com... - Página 10 English Español ASSEMBLY MONTAJE FIG. 6 FIG. 2 Assembly / Ensamblaje FIG. 2 FIG. 5 Assembly / Ensamblaje FIG. 5 FIG. 3 Assembly / Ensamblaje FIG. 3 BL096Y22006 (Continued on the next page.) (Continúe en la siguiente página.) www.medalsports.com...
- Página 11 Nota: La flecha sobre la parte trasera de la abrazadera de esquina muestra / Nota: Alineado con delantar la dirección para deslizar la abrazadera de esquina hacia abajo. BL096Y22006 (Continued on the next page.) (Continúe en la siguiente página.) www.medalsports.com...
- Página 12 AGAINST APRONS before inserting screws. Nota: Asegúrese los protectores “FLAPS” sobre los paneles de la pata superior estén A RAS CONTRA LOS FALDONES antes de insertar los tornillos. BL096Y22006 (Continued on the next page.) (Continúe en la siguiente página.) www.medalsports.com...
- Página 13 / Ensamblaje FIG. 6 Note: After this step, tighten the bolts (A1) (See FIG. 2). Nota: Después de este paso, apretes los pernos (A1) (Vea la Fig. 2). BL096Y22006 (Continued on the next page.) (Continúe en la siguiente página.) www.medalsports.com...
- Página 14 Voltee la mesa. 3. Place it on all feet at the same time on the ground. 3. Coloque las patas de la mesa sobre el piso al mismo tiempo. BL096Y22006 (Continued on the next page.) (Continúe en la siguiente página.) www.medalsports.com...
- Página 15 Note: Please note that adjustable bracket (21) and support boards (16) must be parallel with each other. Nota: Favor notar que los corchete regulable (21) y las placas de soporte (16) deben venire enparalelo. BL096Y22006 (Continued on the next page.) (Continúe en la siguiente página.) www.medalsports.com...
- Página 16 English Español ASSEMBLY MONTAJE FIG. 14 SIDE VIEW / VISTA LATERAL BL096Y22006 (Continued on the next page.) (Continúe en la siguiente página.) www.medalsports.com...
- Página 17 English Español ASSEMBLY MONTAJE FIG. 15 BL096Y22006 (Continued on the next page.) (Continúe en la siguiente página.) www.medalsports.com...
- Página 18 HOW TO LEVEL YOUR CÓMO NIVELAR TABLE SU MESA STEP 1 Level (Not Included) / Nivel (No incluido) Lower Raise / Bajar / Subir / Abaisser / Soulever BL096Y22006 (Continued on the next page.) (Continúe en la siguiente página.) www.medalsports.com...
- Página 19 Nota: Debajo del unidad principal (1), ajuste los corchete regulable (21) por el orden de nivel del campo de juego del unidad principal. ADJUST CONCAVE TABLE ADJUST CONVEX TABLE / AJUSTAR LA MESA CÓNCAVA / AJUSTAR LA MESA CONVEXA BL096Y22006 (The last page) (La ultima página) www.medalsports.com...
- Página 20 www.medalsports.com...