Tabla de contenido
Publicidad
Idiomas disponibles
Idiomas disponibles
Enlaces rápidos
• FIDC N403
• FIDC X403
• FIDC N405
• FIDC X405
User Instructions
OVENS
Mode d'emploi
FOURS
Istruzioni per l'uso
FORNI
Kullanıcı Talimatları
FIRINLAR
Mode d'emploi
FOURS
Istruzioni per l'uso
FORNI
Instrucciones de uso
HORNOS
CANDY HOOVER GROUP Via Comolli 16 Brugherio – Italy
EN
2
CZ
15
SL
28
TR
41
FR
56
IT
69
ES
82
Publicidad
Tabla de contenido
Solución de problemas

Manuales relacionados para Candy FIDC N403


Resumen de contenidos para Candy FIDC N403
- Página 1 • FIDC X403 • FIDC N405 • FIDC X405 User Instructions OVENS Mode d’emploi FOURS Istruzioni per l’uso FORNI Kullanıcı Talimatları FIRINLAR Mode d’emploi FOURS Istruzioni per l’uso FORNI Instrucciones de uso HORNOS CANDY HOOVER GROUP Via Comolli 16 Brugherio – Italy...
-
Página 2: Tabla De Contenido
Summary Safety Indications General Instructions Product description Display description Cooking Modes General notes on cleaning Maintenance Troubleshooting Installation EN 2... -
Página 3: Safety Indications
Safety Indications • During cooking, moisture may condense inside the oven cavity or on the glass of the door. This is a normal condition. To reduce this effect, wait 10-15 minutes after turning on the power be- fore putting food inside the oven. ln any case, the condensation disappears when the oven reaches the cooking temperature. - Página 4 and cause the glass to shatter. • The oven must be switched off before removing the removable parts. After cleaning, reassemble them according the instruc- tions. • Only use the meat probe recommended for this oven. • Do not use a steam cleaner or high pressure spray for cleaning operations.
- Página 5 of incompatibility between the socket and the appliance plug, ask a qualified electrician to substitute the socket with another suitable type. The plug and the socket must be conformed to the current norms of the installation country. Connection to the power source can also be made by placing an omnipolar break- er, with contact separation compliant to the requirements for overvoltage category III, between the appliance and the pow-...
- Página 6 inserted completely into the cavity. • When inserting the grid tray pay attention that the anti-slide edge is positioned rearwards and upwards. • WARNING: Do not line the oven walls with aluminium foil or sin- gle-use protection available from stores. Aluminium foil or any other protection, in direct contact with the hot enamel, risk melting and deteriorating the enamel of the insides.
-
Página 7: General Instructions
General Instructions We thank you for choosing one of our products. For the best results with your oven, you should read this manual carefully and retain it for future reference. Before installing the oven, take note of the serial number so that you can give it to customer service staff if any repairs are required. Having removed the oven from its packaging, check that it has not been damaged during trans- portation. - Página 8 The grounding wire connected to the oven’s earth terminal must be connected to the earth ter- minal of the power supply. WARNING Before connecting the oven to the power supply, ask a qualified electrician to check the conti- nuity of the power supply’s earth terminal. The manufacturer accepts no responsibility for any accidents or other problems caused by failure to connect the oven to the earth terminal or by an earth connection that has defective continuity.
-
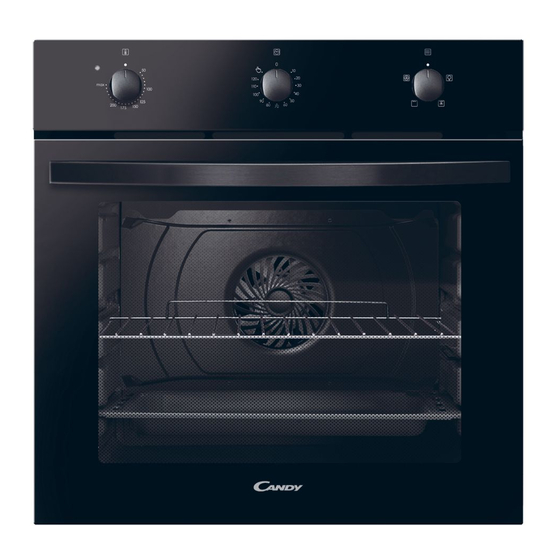
Página 9: Product Description
Product description 1. Control panel 2. Shelf positions (lateral wire grid if included) 3. Grids 4. Trays 5. Fan (if present) 6. Oven door 7. Lateral wire grids (if present: only for flat cavity) 8. Serial number ACCESSORIES Drip tray Metal grid Collects residues that drip when cooking food Holds baking trays and plates. -
Página 10: Display Description
Display description 1. Thermostat selector knob 2. Cooking time 3. Function selector knob This control enables to set the desired cooking time (max. 120 min.) the oven will automatically switch off at the end of the set time. The timer will count down from the set time return to the O position and switch off automatically. - Página 11 HOW TO FUNCTION HOW TO ACTIVATE WHAT IT DOES WHY IT IS NEEDED DEACTIVATE Child Lock function Child Lock function is activated by is deactivated by touching Set (+) touching touchpad for a minimum of 5 Set (+) again for a mi- seconds.
-
Página 12: Cooking Modes
Cooking Modes T °C T °C Symbol Function default range LAMP: Turns on the oven light. GRILL + FAN : use the turbo-grill with the door closed. The top heating element is used with the fan circulating the air inside the oven. -
Página 13: General Notes On Cleaning
General notes on cleaning The lifecycle of the appliance can be extended damp sponge. through regular cleaning. Wait for the oven to cool before carrying out manual cleaning op- ACCESSORIES erations. Never use abrasive detergents, steel Clean accessories with a wet, soapy sponge wool or sharp objects for cleaning, so as to not before rinsing and drying them: avoid using irreparably damage the enamelled parts. -
Página 14: Troubleshooting
Waste management and environmental protection This appliance is labelled in SAVING AND RESPECTING THE ENVIRON- accordance with European Di- MENT rective 2012/19/EU regarding Where possible, avoid pre-heating the oven electric and electronic appli- and always try to fill it. Open the oven door as ances (WEEE). - Página 15 Shrnutí Bezpečnostní pokyny Obecné pokyny Popis výrobku Popis displeje Režimy vaření Čištění a údržba trouby Údržba Řešení potíží Installation CZ 15...
-
Página 16: Bezpečnostní Pokyny
Bezpečnostní pokyny • Během vaření může v dutině trouby nebo na skle dvířek docházet ke kondenzaci vlhkosti. • Jedná se o normální stav. Chcete-li tento efekt omezit, počke- jte po zapnutí napájení 10–15 minut, než vložíte jídlo do trouby. Kondenzace v každém případě zmizí, jakmile trouba dosáhne teploty vaření. - Página 17 • K čištění skla dvířek trouby nepoužívejte hrubé nebo abrazivní prostředky ani ostré kovové škrabky, protože mohou poškrábat povrch a způsobit rozbití skla. • Před odstraněním odnímatelných částí musí být trouba vyp- nutá. • Po provedení čištění je znovu sestavte podle pokynů. •...
- Página 18 ností kontaktů vyhovující požadavkům na kategorii přepětí III, který je umístěn mezi spotřebičem a síťovým napájením, je di- menzován na maximální připojené zatížení a je v souladu s plat- nými právními předpisy. Žlutozelený zemnicí kabel by neměl být přerušen jističem. Zásuvka a vícepólový jistič používané pro připojení...
- Página 19 fólie nebo jakákoli jiná ochrana v přímém kontaktu se zahřátým smaltem představuje riziko roztavení a poškození smaltu ve vnitřním prostoru. • VAROVÁNÍ: Neodstraňujte těsnění dvířek trouby. • POZOR: Nedoplňujte na dno dutiny vodu během vaření nebo když je trouba horká. •...
-
Página 20: Obecné Pokyny
Obecné pokyny Děkujeme Vám, že jste si zvolili jeden z našich výrobků. Pro dosažení nejlepších výsledků s trou- bou byste si měli pečlivě přečíst tento návod a uschovat jej pro budoucí použití. Před instalací trouby si poznamenejte výrobní číslo, abyste jej mohli poskytnout pracovníkům zákaznických služeb v případě... - Página 21 VAROVÁNÍ Před připojením trouby k elektrické síti požádejte kvalifikovaného elektrikáře o kontrolu spoji- tosti zemnicí svorky elektrického napájení. Výrobce nenese žádnou odpovědnost za nehody nebo jiné problémy způsobené nepřipojením trouby k zemnící svorce nebo uzemněním, které má vadnou spojitost. POZNÁMKA: protože trouba může vyžadovat údržbu, je vhodné mít k dispozici další elektrickou zásuvku, ke které...
-
Página 22: Popis Výrobku
Popis výrobku 1. Ovládací panel 2. Polohy roštu (podélného drátěného roštu, je-li součástí dodávky) 3. Rošty 4. Plechy 5. Ventilátor (pokud je ve výbavě) 6. Dvířka trouby 7. Boční drátěné rošty (pokud se používají; pouze pro plochý vnitřní prostor) 8. Sériové číslo PŘÍSLUŠENSTVÍ... -
Página 23: Popis Displeje
Popis displeje 1- Volič funkcí 2- Časovač 3- Volič teploty Tento ovladač umožňuje nastavit dobu přípravy (max. 120 min.), po které se trouba automaticky vypne. Časovač odpočítává od nastavené doby do pozice “O” a automaticky se vypne. Pro běžné použití trouby nastavte časovač do pozice . - Página 24 FUNKCE JAK AKTIVOVAT JAK VYPNOUT CO TO DĚLÁ VÝHODY Dětský zámek Dětský zámek Fun- Funkce se aktivuje kce je deaktivována dotykem Set (+) po dotykem tlačítka dobu minimálně 5 Set (+) opět na sekund. Od tohoto minimálně 5 sekund. okamžiku se u všech Od této chvíle jsou ostatních funkcích možnosti všech fun-...
- Página 25 Režimy vaření Volič T °C T °C Funkce funkc výchozí ozmezí SVĚTLO: Zapne světlo v troubě. GRIL + VENTILÁTOR: používejte turbo-gril se zavřenými dvířky. Horní topné těleso se používá spolu s ventilátorem dmýchajícím vzduch uvnitř trouby. Předehřev je nezbytný u tmavých mas, ale nikoli u bílých mas.
- Página 26 Čištění a údržba trouby Životnost spotřebiče můžete prodloužit TĚSNĚNÍ OKNA TROUBY prostřednictvím pravidelného čištění. Před Je-li těsnění znečištěné, můžete jej vyčistit prováděním ručního čištění počkejte, až trou- mírně navlhčenou houbičkou. ba vychladne. Nikdy nepoužívejte při čištění brusné mycí prostředky, drátěnku nebo ostré PŘÍSLUŠENSTVÍ...
-
Página 27: Řešení Potíží
Odpadové hospodářství a ochrana životního prostředí Tento spotřebič je označen nový spotřebič, můžete starý odevzdat v souladu s evropskou směr- obchodníkovi, který musí bezplatně přijmout nicí 2012/19/EU o odpadních jeden starý spotřebič za jeden nový prodaný elektrických a elektronických spotřebič, pokud se jedná o ekvivalentní typ zařízeních (OEEZ). - Página 28 Sommario Varnostna Navodila Splošna navodila Opis izdelka Opis zaslona Načini kuhanja Čiščenje in vzdrževanje pečice Vzdrževanje Odpravljanje težav Installation SL 28...
-
Página 29: Varnostna Navodila
Varnostna Navodila • Med kuhanjem lahko vlaga kondenzira znotraj odprtine pečice ali na steklu vrat. To je normalno stanje. Za zmanjšanje tega učinka počakajte 10–15 minut po vklopu napajanja, preden hra- no vstavite v pečico. V vsakem primeru kondenzacija izgine, ko pečica doseže temperaturo za kuhanje. - Página 30 • Pred odstranjevanjem delov, ki jih je mogoče odstraniti, je peči- co treba izklopiti. • Po končanem čiščenju, ponovno sestavite dele po priloženih navodilih. • Uporabljajte samo sondo za meso, ki je priporočena za to peči- • Za čiščenje ne uporabljajte parnega čistilnika ali visokotlačnega pršila.
- Página 31 Vtičnica in vtikač morata izpolnjevati veljavne norme v državi, kjer bo naprava priklopljena v omrežje. Priključitev na vir napa- janja lahko izvedemo tudi tako, da med napravo in vir energije, ki prenaša največjo priključno obremenitev, v skladu z veljavno zakonodajo namestimo omnipolarni odklopnik z ločitvijo kon- taktov, ki ustreza zahtevam za prenapetostno kategorijo III.
- Página 32 • OPOZORILO: Sten pečice na oblagajte z aluminijasto foli- jo ali zaščito za enkratno uporabo, ki je na voljo v trgovinah. Aluminijasta folija ali katera koli druga zaščita, ki je v neposred- nem stiku z vročim emajlom, predstavlja tveganje topljenja in slabšanja kakovosti emajla v notranjosti.
-
Página 33: Splošna Navodila
Splošna navodila Zahvaljujemo se vam za izbiro enega od naših izdelkov. Za najboljše rezultate z vašo pečico pozorno preberite navodila in jih shranite za poznejšo uporabo. Pred namestitvijo pečice si za- beležite serijsko številko, tako da jo lahko posredujete osebju službe za stranke, če potrebujete kakšna popravila. - Página 34 tinuiteto oskrbe ozemljitvenega priključka napajanja. Proizvajalec ne prevzema odgovornosti za morebitne nesreče ali druge težave, ki jih povzroči neupoštevanje povezave pečice na ozemljit- veni priključek ali ozemljeno povezavo, ki ima moteno kontinuiteto. OPOMBA: Ker so na pečici lahko potrebna vzdrževalna dela je priporočljivo, da imate na voljo drugo stensko vtičnico, da lahko pečico povežete z le-to, če jo odstranite iz prostora, v katerega je nameščena.
-
Página 35: Opis Izdelka
Opis izdelka 1. Nadzorna plošča 2. Položaji polic (bočna žična mreža, če je vkl- jučena) 3. Mreže 4. Pladnji 5. Ventilator (če je prisoten) 6. Vrata pečice 7. Stranske žične mreže (če obstajajo: samo za ravno votlino) 8. Serijska številka Dodatna oprema Ponev Kovinska rešetka... -
Página 36: Opis Zaslona
Prvo Upotreba Pred prvo uporabo pečico očistite. Obrišite vse zunanje površine z vlažno krpo. Operite vso opremo in obrišite notranjost pečice z raztopino vode in detergenta za pomivanje posode. Vklopite prazno pečico za približno 1 uro na najvišjo temperaturo, da odstranite vonj po novem. Pred tem poskrbite za zračenje prostora! Opis zaslona 1. - Página 37 FUNKCIJA AKTIVIRANJE DEAKTIVIRANJE DELOVANJE NAMEN Funkcijo Zaklepanja Funkcijo zaklepanja za varnost otrok ak- za varnost otrok tivirate tako, da vsaj lahko deaktivirate 5 sekund pritiskate tako, da ponovno na tipko Set (+). vsaj 5 sekund priti- Od tega trenutka skate na tipko Set dalje so vse druge (+).
-
Página 38: Načini Kuhanja
Načini kuhanja Gumb Gumb Funkcije Funkcije termost. termost. Za prižiganje luči v pečici Samodejno se aktivira tudi ventilator za hlajenje (modeli z ventilator- jem) ŽAR + VENTILATOR: pri zaprtih vratih pečice. Grelec segreva zrak, ki s pomočjo ventilatorja kroži okoli živila. Za rdeče meso je potrebno predhodno ogrevanje pečice. -
Página 39: Čiščenje In Vzdrževanje Pečice
Čiščenje in vzdrževanje pečice Življenjski cikel aparata se lahko podaljša z red- DODATNA OPREMA nim čiščenjem. Pred izvajanjem čiščenja počaka- Pred spiranjem in sušenjem očistite dodatke jte, da se pečica ohladi. Za čiščenje nikoli ne up- z vlažno gobico z milom: izogibajte se uporabi orabljajte abrazivnih čistil, jeklene volne ali ostrih abrazivnih detergentov. -
Página 40: Ravnanje Z Odpadki In Varstvo Okolja
Ravnanje z odpadki in varstvo okolja Ta naprava je označena v skladu PRIHRANEK NA ENERGIJI IN SPOŠTOVANJE z določili Evropske direktive DO OKOLJA 2012/17/EU o odpadni ele- Če je le mogoče, se izognite predgrevanju pečice ktrični in elektronski opremi in pečico kar se da napolnite z živili. Vrata pečice (OEEO). - Página 41 Özet Güvenlik uyarıları Genel Açıklamalar Ürün açıklaması Gösterge açıklaması Pişirme Modları Fırının Temizlenmesi ve Bakımı Bakım Sorun Giderme Kurulum TR 41...
-
Página 42: Güvenlik Uyarıları
Güvenlik uyarıları • Pişirme sırasında fırın bölmesinde veya kapağın camında nem yoğunlaşabilir. Bu normal bir durumdur. Bu etkiyi azaltmak için yemeği fırının içine yerleştirmeden önce ve gücü açtıktan sonra 10-15 dakika bekleyin. Her durumda, fırın pişirme sıcaklığına ul- aştığında yoğunlaşma geçer. •... - Página 43 Temizlendikten sonra parçaları talimatlara göre yeniden takın. • Yalnızca bu fırın için tavsiye edilen et probunu kullanın. • Temizlik işlemleri için buharlı temizleyici veya yüksek basınçlı sprey kullanmayın. • FIRIN, TIPASIZ OLARAK ÜRETİCİ TARAFINDAN SAĞLANIRSA: CİHAZ FİŞ VEYA SOKETLER KULLANILARAK GÜÇ KAYNAĞI- NA BAĞLANMAMALIDIR, ANCAK DOĞRUDAN ELEKTRİK ŞE- BEKESİNE BAĞLANMALIDIR.
- Página 44 ma kablosu devre kesici tarafından kesintiye uğratılmamalıdır. Priz veya bağlantı için kullanılan omnipolar devre kesici, cihazın kurulumu yapıldığında kolayca erişilebilir durumda olmalıdır. Bağlantı, fişin erişilebilir durumda tutulması veya kablolama kurallarına uygun şekilde sabit kablo tesisatına bir anahtarın eklenmesi yoluyla kesilebilir. •...
- Página 45 suyla tekrar dolmayın. • Cihazı nominal frekanslarda çalıştırmak için başka işleme/ayara gerek yoktur. • Fırın, dikey mutfak mobilyasında yükseğe veya bir tezgahın altına yerleştirilebilir. Sabitlemeden önce, soğutma ve iç kısımların ko- runması için gerekli olan temiz havanın düzgün sirkülasyonunu sağlamak için fırın boşluğunda iyi bir havalandırma temin et- melisiniz.
-
Página 46: Genel Açıklamalar
Genel Açıklamalar Ürünlerimizden birini tercih ettiğiniz için teşekkür ederiz. Fırınınızdan en iyi sonuçları almak için bu kılavuzu dikkatle okuyun ve daha sonra başvurmak için saklayın. Fırının montajından önce, herhangi bir onarım gerekmesi halinde müşteri hizmetleri personeline vermek üzere seri numarasını not edin. Fırını... - Página 47 liliğini kontrol etmesi için kalifiye bir elektrikçiye başvurun. Fırının topraklama klemensine bağlan- maması veya topraklama bağlantısının sürekliliğinde bir sorun olması sonucunda ortaya çıkabilecek her türlü kaza veya zararda imalatçı herhangi bir sorumluluk kabul etmemektedir. NOT: fırında bazı bakım işlemleri yapılması gerektiğinden, montajın yapılmış olduğu alandan çıkarıl- ması...
-
Página 48: Ürün Açıklaması
Ürün açıklaması 1. Kontrol Paneli 2. Raf konumları (varsa yan tel ızgara) 3. Izgara 4. Tepsi 5. Fan (varsa) 6. Fırın kapısı 7. Yan tel ızgarası (varsa: sadece düz boşluk için) 8. Seri numarası AKSESUARLAR Tepsi Izgara Yiyeceklerin ızgara üzerinde pişirilmesi sırasın- Pişirme tepsilerini ve tabaklarını... - Página 49 Gösterge açıklaması 1. Sıcaklık seçiçi düğme 2. Saat ayarı 3. Fonksiyon seçiçi düğme Bu kontrol istenen pişirme süresinin ayarlanmasını sağlar (maks. 120 dk.) Fırın otomatik olarak ayarlanan süre sonunda kapanacaktır. Zamanlayıcı ayarlanan zamandan “O” pozisyonuna geri sayar ve otomatik olarak kapanır. Zaman ayarı...
- Página 50 DEVREDEN PROGRAM DEVREYE SOKULMASI İŞLEVİ NE İÇİN KULLANILDIĞI ÇIKARILMASI Çocuk kilidi Çocuk kilidi fonksiyo- fonksiyonu dokun- nu tekrar dokunmatik matik ekrandaki (+) ekrandaki (+) sem- sembolüne en az 5 bolüne en az 5 sa- saniye dokunarak niye dokunarak iptal aktif hale getirilir. Bu edilir.
- Página 51 Pişirme Modları Fonsiyon Varsayılan Sıcaklık Fonksiyon ikonu sıcaklık °C aralığı °C LAMBA: Fırın lambasını yakar. IZGARA + FAN: fırın kapağı kapalı iken bu fonksiyonu kullanın. Üst ısıtıcı eleman kullanılır, fan fırının içindeki havanın sirkülasyonunu sağlar. Kırmızı etler için ön ısıtma gereklidir, ancak beyaz etler için gerekmez.
- Página 52 Fırının Temizlenmesi ve Bakımı Düzenli temizlik ile cihazın kullanım ömrü uza- temizlenebilir. tılabilir. Elle temizlik işlemlerini yapmadan önce fırının soğumasını bekleyin. Temizlik için asla AKSESUARLAR aşındırıcı deterjanlar, çelik tel veya keskin nesnel- Aksesuarları sabunlu su ile ıslatılmış bir sünger- er kullanmayın, aksi takdirde emaye parçalarda le temizleyin, ardından durulayın ve kurutun: onarılamaz hasarlar oluşabilir.
-
Página 53: Sorun Giderme
Atık yönetimi ve çevrenin korunması Bu cihaz, 2012/19/EU Atık cihazla aynı tipte olması ve aynı işlevlere sahip Elektrikli ve Elektronik Ciha- olması durumunda eski cihazı ücretsiz olarak zlar (WEEE) hakkında Avrupa bire bir kabul etmesi gereken satıcıya iade ede- Yönergesine göre etiketlen- bilirsiniz. - Página 54 Candy Hoover Euroasia tarafından sağlanan garanti şartları aşağıdaki koşullarda geçersiz olacaktır. • Ürüne, yetkili servis dışındaki kişiler tarafından müdahale edilmesi, elektrik-su kesintisi ve üründen kaynaklanmayan kaçaklar garanti kapsamı dışındadır.
-
Página 55: Garanti̇ Belgesi̇
şahıslar tarafından bakımı, onarımı veya başka bir nedenle müdahale edilmemiş olması şartıyla bütün parçaları dahil olmak üzere tamamı malzeme, işçilik ve üretim hatalarına karşı ürünün teslim tarihinden itibaren 3 ( ÜÇ ) YIL SÜRE İLE CANDY HOOVER EUROASIA A.Ş. TARAFINDAN GARANTİ EDİLMİŞTİR. Malın bütün parçaları dahil olmak üzere tamamı garanti kapsamındadır. - Página 56 Sommaire Conseils De Sécurité Instructions Générales Description du produit Description de l’affichage Mode de cuisson Nettoyage du four et maintenance Entretien Dépannage Installation FR 56...
-
Página 57: Conseils De Sécurité
Conseils De Sécurité • Pendant la cuisson, de l’humidité peut se condenser à l’intérieur de la cavité ou sur la vitre de la porte. Il s’agit d’un phénomène normal. Pour réduire cet effet, attendez 10-15 minutes après avoir allumé l’appareil avant de mettre les aliments au four. La condensation disparaîtra de toutes façons dès que le four aura atteint la température de cuisson. - Página 58 • Le nettoyage et l’entretien ne doivent pas être effectués par des enfants sans surveillance. • N’utilisez pas de matériaux rugueux ou abrasifs ou de racloirs métalliques acérés pour nettoyer les vitres des portes des fours, car cela pourrait rayer la surface et provoquer la rupture de la vitre.
- Página 59 • SI LE FOUR EST FOURNI PAR LE FABRICANT AVEC FICHE: La prise doit être adaptée à la charge indiquée sur l’étiquette et doit avoir un contact de terre connecté et en fonctionnement. Le conducteur de mise à la terre est jaune et vert. Cette opéra- tion doit être effectuée par un professionnel qualifié.
-
Página 60: Une Coupure De Courant Prolongée Durant Une Phase De Cui
• Une coupure de courant prolongée durant une phase de cui- sson peut engendrer un dysfonctionnement de l’écran. Dans ce cas, veuillez contacter le service après-vente. • L’appareil ne doit pas être installé derrière une porte décorative, pour éviter la surchauffe. •... -
Página 61: Instructions Générales
Instructions Générales Nous vous remercions d’avoir choisi un de nos produits. Pour obtenir les meilleurs résultats avec votre four, vous devez lire attentivement ce manuel et le conserver pour toute consultation ul- térieure. Avant d’installer le four, notez le numéro de série, il vous sera demandé par le support technique si des réparations sont nécessaires. - Página 62 Le fil de protection du cordon (vert/jaune) relié à la Borne Terre de l’appareil doit être relié à la Borne Terre de l’installation. ATTENTION Faire vérifier la continuité de la terre de l’installation avant de procéder au raccordement. Le fabricant décline toute responsabilité en cas d’accidents ou d’autres problèmes qui pourraient survenir à...
-
Página 63: Description Du Produit
Description du produit 1. Panneau de commande 2. Positions de la grille (grille métallique latérale si celle-ci est incluse) 3. Grilles 4. Plateaux 5. Ventilateur (si présent) 6. Porte du four 7. Grilles latérales (si présent: uniquement pour cavité plate) 8. -
Página 64: Description De L'affichage
Description de l’affichage 1- Manette de température 2- Durèe de cuisson 3- Manette des fonctions Il est possible de programmer la durée de la cuisson et l’extinction auto- matique du four (max. 120 minutes). A l’expiration du temps désigné, la manette sera en position O, une son- nerie retentira et le four s’arrêtera automatiquement. - Página 65 FON- COMMENT LE COMMENT L’ACTIVER A QUOI CA SERT POURQUOI EST-CE UTILE CTIONS DESACTIVER Régler la manette Tourner la manette du programmateur sur la position off. sur la position Mise à l’heure. À partir de ce moment, la LED Utiliser les touches de sécurité...
-
Página 66: Mode De Cuisson
Mode de cuisson Bouton de T °C T°C Fonction par défaut intervalle sélection L’AMPOULE: Allumage de l’éclairage du four TURBO-GRIL: l’utilisation de la position turbo-gril se fait porte fermée. Un préchauffage est nécessaire pour les viandes rouges et inutile pour les viandes blanches. Idéal pour les cuissons de vol- ume épais, des pièces entières telles que rôti de porc, volailles etc... -
Página 67: Nettoyage Du Four Et Maintenance
Nettoyage du four et maintenance Le cycle de vie de l’appareil peut être éten- une éponge légèrement humide. du grâce à un nettoyage régulier. Attendez le ACCESSOIRES refroidissement du four avant de procéder à Nettoyer les accessoires avec une éponge et des opérations de nettoyage manuel. - Página 68 fourni. MENT Problemes Cause possible Solution sont corrects FR 68...
-
Página 69: Installation
Sommario Indicazioni di Sicurezza Avvertenze Generali Descrizione del Prodotto Descrizione del display Modalità di cottura Pulizia e manutenzione del forno Manutenzione Risoluzione dei Problemi Garanzie Installation IT 69... -
Página 70: Indicazioni Di Sicurezza
Indicazioni di Sicurezza • Durante la cottura, l’umidità può condensarsi all’interno del vano cottura o sul vetro della porta. Questa è una condizione normale. Per ridurre questo effetto, attendere 10-15 minuti dopo l’accensione prima di mettere gli alimenti all’interno del forno. -
Página 71: Se Il Forno È Fornito Dal Produttore Con Spina
in sicurezza, comprendendo i rischi che derivano dall’uso dello stesso. • Le operazioni di pulizia e manutenzione non devono essere ef- fettuate dai bambini senza sorveglianza. • Non utilizzare materiali ruvidi, abrasivi o raschietti metallici affi- lati per pulire le porte in vetro del forno, dato che possono graf- fiare la superficie e causare la frantumazione del vetro. - Página 72 La presa deve essere adatta al carico indicato sulla targhetta e deve avere il contatto di terra collegato e in funzione. Il condut- tore di terra è giallo-verde. Questa operazione deve essere ese- guita da un professionista adeguatamente qualificato. In caso di incompatibilità...
- Página 73 ma della pulizia. • L’interruzione prolungata dell’alimentazione durante una fase di cottura potrebbe causare un guasto del monitor. In tal caso contattare il servizio clienti. • L’elettrodomestico non deve essere installato dietro a una por- ta a scopo ornamentale per evitarne il surriscaldamento. •...
-
Página 74: Avvertenze Generali
Avvertenze Generali Vi ringraziamo per aver scelto uno dei nostri prodotti. Per utilizzare il forno in modo ottimale è consigliabile leggere con attenzione questo manuale e conservarlo con cura per ogni ulteriore consultazione. Prima di installare il forno, prendere nota del numero di serie in modo da poterlo comunicare al personale del servizio di assistenza in caso di richiesta di intervento. - Página 75 ATTENZIONE Prima di collegare il forno alla rete elettrica, far controllare la continuità della messa a terra della rete elettrica ad un elettricista qualificato. Il produttore declina ogni responsabilità per eventuali incidenti o altri problemi derivanti dal mancato collegamento a terra del forno o dal suo collega- mento ad una messa a terra con una continuità...
-
Página 76: Descrizione Del Prodotto
Descrizione del Prodotto 1. Pannello di controllo 2. Posizioni dei ripiani (griglia metallica laterale se inclusa) 3. Griglie 4. Vassoi 5. Ventola (se presente) 6. Sportello del forno 7. Griglie metalliche laterali (se presenti: solo per cavità piane) 8. Numero di serie ACCESSORI Vassoio di gocciolamento Griglia metallica... -
Página 77: Descrizione Del Display
Descrizione del display 1. Manopola della temperatura 2. Tempo di cottura 3. Manopola delle funzioni Con questo meccanismo è possibile programmare la durata espressa in minuti della cottura e quindi lo spegnimento automatico del forno al ter- mine del tempo desiderato (max. 120 minuti). Allo scadere del tempo prescelto, la manopola raggiungerà... - Página 78 FUNZIONE COME SI ATTIVA COME SI DISATTIVA COSA FA A COSA SERVE Tenere premuto per Tenere premuto per 5 secondi il tasto (+), 5 secondi il tasto (+). Da questo momento Da questo momento lo schermo visualizza tutle le funzioni sono alternativamente riabilitate.
-
Página 79: Modalità Di Cottura
Modalità di cottura Mano- T° pola Intervallo preimpo- Funzione commu- di T° stata tatore LAMPADA: accende la luce interna. GRILL + VENTOLA: l’utilizzo del turbo-grill richiede la porta chiusa. Utilizzando la ventilazione e la resistenza grill contemporaneamente, si cuociono perfettamente grandi porzioni di cibo, come arrosti, pol- 50 ÷... -
Página 80: Pulizia E Manutenzione Del Forno
Pulizia e manutenzione del forno La vita di servizio dell’apparecchio si allunga se Se sporca, la guarnizione può essere pulita con questo viene pulito ad intervalli regolari. Atten- una spugna leggermente inumidita. dere che il forno si raffreddi prima di effettuare le operazioni di pulizia manuali. -
Página 81: Risoluzione Dei Problemi
Gestione dei rifiuti e rispetto dell’ambiente Questo apparecchio è con- Quando si acquista un nuovo apparecchio, quel- trassegnato in conformità alla lo vecchio potrebbe essere restituito al rivendi- Direttiva europea 20 12/19/EU tore che deve acquisirlo gratuitamente su base sulle apparecchiature elettriche singola, sempre che l’apparecchio sia del tipo ed elettroniche (WEEE). - Página 82 Índice Indicaciones de seguridad Advertencias Generales Descripción del producto Descripción general Modalidades de cocción Limpieza y mantenimiento del horno Mantenimiento Solución de problemas Installation ES 82...
-
Página 83: Indicaciones De Seguridad
Indicaciones de seguridad • Durante la cocción, podría condensarse humedad dentro de la cavidad del horno o en el cristal de la puerta. Esto es normal. Para reducir este efecto, espere de 10 a 15 minutos antes de introducir alimentos en el horno una vez que lo encienda. De todos modos, la condensación desaparece cuando el horno al- canza la temperatura de cocción. - Página 84 por niños sin supervisión. • No utilice materiales rugosos o abrasivos ni rasquetas metáli- cas afiladas para limpiar las puertas de vidrio del horno, ya que pueden rayar la superficie y agrietar el vidrio. • Apague el horno antes de sacar las partes extraíbles. •...
-
Página 85: Esta Operación Debe Realizarla Un Profesional Debidamente
da en la etiqueta y debe tener la conexión a tierra conectada y en funcionamiento. El conductor de tierra es de color amaril- lo-verde. Esta operación debe realizarla un profesional debid- amente cualificado. En caso de incompatibilidad entre la toma de corriente y la clavija del electrodoméstico, solicite a un elec- tricista cualificado que sustituya la toma de corriente por otra del tipo adecuado. -
Página 86: No Es Necesario Llevar A Cabo Operaciones/Configuraciones
• Una interrupción prolongada de la corriente durante una fase de cocción puede causar una avería en el monitor. Póngase en contacto con el servicio de atención al cliente si esto ocurre. • El electrodoméstico no debe instalarse detrás de una puerta decorativa para evitar que se caliente en exceso. -
Página 87: Advertencias Generales
Advertencias Generales Le agradecemos que haya elegido uno de nuestros productos. Para utilizar el horno de forma óptima es aconsejable leer con atención este manual y conservarlo para poder consultarlo en el futuro. Antes de instalar el horno, anote el número de serie para poder facilitárselo al personal del servicio de asistencia técnica en caso de solicitar su intervención. -
Página 88: Recomendaciones
El hilo de toma de tierra conectado al terminal de tierra del horno debe estar conectado al ter- minal de tierra de la red eléctrica. ATENCIÓN Antes de conectar el horno a la red eléctrica, confíe la comprobación de la continuidad de la toma de tierra de la red eléctrica a un electricista cualificado. -
Página 89: Descripción Del Producto
Descripción del producto 1. Panel de control 2. Niveles del horno (rejilla lateral, si está inclu- ida) 3. Rejillas 4. Bandejas 5. Ventilador (si está presente) 6. Puerta del horno 7. Rejillas laterales (si están presentes: solo para cavidad plana) 8. -
Página 90: Descripción General
Descripción general 1- Selección de temperatura 2- Tiempo de cocción 3- Selección de función Con este mecanismo es posible programar la duración exacta en mi- nutos de la cocción y, por tanto, la desconexión automática del horno (máx.120 minutos) Una vez transcurrido el tiempo seleccionado el mando alcanzará la posición de señal acústica O, a partir de la cual el horno se desconectará... - Página 91 MODO DE ACTIVA- MODO DE DESCO- FUNCIÓN FUNCIONAMIENTO FINALIDAD CIÓN NEXIÓN Para activar la Para desactivar la función del “Bloqueo función del “Bloqueo para niños”, se debe para niños”, se debe pulsar “Set (+)” du- pulsar nuevamente rante un mínimo de “Set (+)”...
-
Página 92: Modalidades De Cocción
Modalidades de cocción T°C Mando Rango estable- Función selector de T°C cida LAMPARA: Conecta la luz interior GRILL + FAN : use the turbo-grill with the door closed. The top heating element is used with the fan circulating the air inside the oven. -
Página 93: Limpieza Y Mantenimiento Del Horno
Limpieza y mantenimiento del horno La vida útil del aparato se prolonga si se limpia ACCESORIOS a intervalos regulares. Espere a que el horno se Limpie los accesorios con una esponja empa- enfríe antes de llevar a cabo las operaciones de pada en agua y jabón, escúrralos y séquelos: no limpieza manuales. -
Página 94: Gestión De Residuos Y Respeto Por El Medio Ambiente
Gestión de residuos y respeto por el medio ambiente Este aparato está certificado cio de recogida a domicilio. Cuando se compra conforme a la directiva euro- un nuevo aparato, el viejo puede entregarse al pea 2012/19/EU sobre apara- vendedor, que debe adquirirlo gratuitamente tos eléctricos y electrónicos siempre que el aparato sea de tipo equivalente (WEEE). -
Página 95: Installation
Installation 600 mm 595 mm 20 mm 590 mm 595 mm 20 mm INSTALLATION 95... - Página 96 EN If the furniture is coverage with a bottom at EN If the oven does not have a cooling fan, cre- ate an opening 460 mm x 15 mm the back part, provide an opening for the power supply cable. CZ Pokud nemá...
- Página 97 EN The manufacturer will not be responsible for any inaccuracy resulting from printing or transcript errors contained in this brochure. We reserve the right to carry out modifications to products as required, includ- ing the interests of consumption, without prejudice to the characteristics relating tosafety or function. CZ Výrobce neodpovídá...