
Manuales relacionados para Cuisinart Premium SS-10P1


Resumen de contenidos para Cuisinart Premium SS-10P1
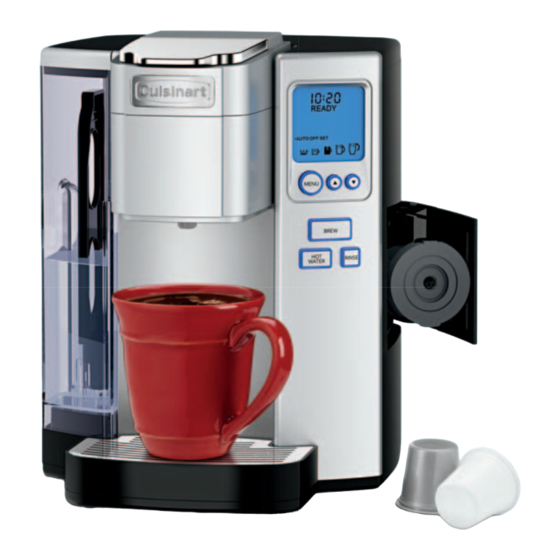
- Página 1 User Manual of Product 1: Cuisinart Coffee Maker, Single Serve 72-Ounce Reservoir Coffee Machine, Programmable Brewing & Hot Water Dispenser, Stainless Steel, SS-10P1,Silver...
- Página 2 INSTRUCTION BOOKLET Premium Single-Serve Coffeemaker SS-10 For your safety and continued enjoyment of this product, always read the instruction book carefully before using.
- Página 3 Return appliance When storing in an appliance garage, to the nearest Cuisinart Repair Center for always unplug the unit from the electrical examination, repair, or electrical or outlet. Not doing so could create a risk of mechanical adjustment.
- Página 4 SPECIAL CORD SET If a grounding-type outlet is not available, an adapter, shown in Figure B, may be obtained INSTRUCTIONS so that a 2-slot wall outlet can be used with A short power-supply cord is provided to a 3-prong plug. As shown in Figure C, the reduce the risks resulting from becoming adapter must be grounded by attaching its entangled in or tripping over a longer cord.
- Página 5 Contents Important Safeguards ..... 2 Important Unpacking Instructions ... . 3 The Quest for the Perfect Cup .
- Página 6 Element 4: PROPORTION ® No matter which cup size you choose, the Cuisinart Premium Single-Serve Coffeemaker, working in conjunction with a capsule, always produces the perfect cup every time. When grinding your own coffee and using it in the included HomeBarista ™...
- Página 7 Features and Benefits 1. Charcoal Filter Holder 5. Drip Tray 1a. Charcoal Water Filter 6. Drip Tray Base 2. Water Reservoir Lid 7. Removable Capsule Holder Removes for easy filling. 8. Handle 3. Removable 72 oz. Easy grip prevents slips. Water Reservoir 9.
- Página 8 12. Control Panel 21. Power Cord (not shown) 13. Menu Button 22. Power Switch 14. Up Button ( (located on right side of Coffeemaker) 15. Down Button ( 23. BPA Free (not shown) 16. Brew Button All parts that come in contact with 17.
- Página 9 IMPORTANT: Do not attempt to use freezing, wait at least two hours for it to ® your Cuisinart Premium Single-Serve reach room temperature before Coffeemaker until it has been set up for brewing. An extremely cold its first use as outlined below.
- Página 10 60 days or after 60 uses, Charcoal Water Filter and more often if you have hard water. Replacement filters can be purchased in stores, by calling Cuisinart Customer Service, or at www.cuisinart.com. Brewing figure 4 1. The control panel will display OPEN HEAD while in Idle mode.
- Página 11 Caution: There are two sharp Note: There may be a short pause needles that puncture the before the brewing process begins. capsule, one above and one The entire brew process lasts below. To avoid risk of injury, approximately 1–2 minutes, depending do not put your fingers in the on brew size selected, and ends with capsule brewing chamber.
- Página 12 Hot Water/Rinse To make Hot Water: 1. Place a cup or mug on the drip tray. Your coffeemaker is equipped to dispense 2. Lift the handle. Check to make sure hot water to make hot chocolate, tea, soup, there is no capsule inserted. and more.
- Página 13 (If you would like, store Filter Cup (included) the capsule holder in the HomeBarista ™ storage compartment.) ® The Cuisinart Premium Single-Serve Coffeemaker can be used with a Reusable 7. Drop the assembled HomeBarista ™ Filter Cup, which allows you to use your into the brewing chamber.
- Página 14 Stopping the Brew Programming Process Setting the Clock If for any reason you need to stop brewing Setting the clock is optional. When the clock after the process has started, press the is set, the time will appear on the control BREW button, OR press the power switch panel.
- Página 15 Clock set in READY Mode Set Hours figure 15 figure 16 b. Press or hold the button to Note: Depending upon the coffeemaker’s advance one hour at a time, up to current mode, other icons will be displayed 9 hours. as well.
- Página 16 3. Program your coffeemaker for a d. If you want to set an OFF TIME, specific ON and/or OFF TIME. use the buttons as above. If not, continue to next step. By programming your coffeemaker to turn on each morning, you will never e.
- Página 17 Programming Brew Programming Your Brew Size Temperature The coffeemaker’s default brew size preset is 8 oz. The default brew size lets you The coffeemaker brews at a pre-set choose the brew size most often used. temperature of XHOT. If you prefer a cooler cup of coffee, hot water, tea, or cocoa, you To change the default brew size to your may adjust this temperature down to HOT.
- Página 18 The drip tray and drip tray hold funnel in left hand, twist bottom plate are dishwasher safe. away from you slightly and pull away from capsule holder to remove. The funnel is Cleaning the Cuisinart top-rack dishwasher safe. ™ HomeBarista Reusable Filter Cup 1.
- Página 19 Replace funnel onto capsule holder by De-Scaling Your Coffeemaker lining up tabs in funnel with notches on Mineral content in water varies from place capsule holder, twist toward you until it to place. Depending on the mineral content locks into place. After cleaning, replace of the water in your area, calcium deposits capsule holder, being sure to align or scale may build up in your coffeemaker.
- Página 20 Note: If DE-SCALE is still displayed on the control panel after completing the procedure, repeat the de-scaling procedure above. Maintenance: Any other servicing should be performed by an authorized service representative. Contact Cuisinart Consumer Service Center, 1-800-726-0190.
- Página 21 The piercing and/or exit needle may be clogged (refer to page 17). ® Chlorine or mineral taste in coffee. Consider using bottled water, filtered water or the Cuisinart Charcoal Water Filter. Doesn’t brew a full cup. The piercing and/or exit needle may be clogged (refer to “Cleaning &...
- Página 22 1-800-726-0190. complete your product registration. However, Cuisinart will be responsible for the cost of the product registration does not eliminate the need repair, replacement, and shipping and handling for for the consumer to maintain the original proof of such products under warranty.
- Página 23 ©2016 Cuisinart 150 Milford Road East Windsor, NJ 08520 Printed in China 16CE014223 F IB-13633-ESP...
- Página 24 MANUAL DE INSTRUCCIONES Cafetera monodosis de calidad suprema SS-10 Para su seguridad y para disfrutar plenamente de este producto, siempre lea cuidadosamente las instrucciones antes de usarlo.
- Página 25 Siempre 7. El uso de accesorios no recomendados o desconecte el aparato antes de guardarlo proveídos por Cuisinart presenta un riesgo en un armario/gabinete. Dejar el aparato de incendio, electrocución o heridas. conectado presenta un riesgo de incendio, 8.
- Página 26 USO DE EXTENSIONES Si una toma de corriente con toma de tierra no está disponible, se podrá usar un El cable provisto con este aparato es adaptador para conectar el aparato a una corto, para reducir el peligro de que alguien toma de corriente sin toma de tierra (Fig.
- Página 27 Índice Medidas de seguridad importantes ..2 Importantes instrucciones de desembalaje . . . 3 Sugerencias para la preparación de un buen café......5 Piezas y características .
- Página 28 Por eso Cuisinart equipó su cafetera monodosis con un filtro de carbón que elimina el cloro y el mal sabor y olor, para preparar café, té o chocolate puro, taza tras taza.
- Página 29 Piezas y características 1. Soporte del filtro de agua 5. Bandeja de goteo 1a. Filtro de carbón 6. Base de la bandeja de goteo 2. Tapa del depósito de agua 7. Porta-cápsulas removible Removible, para facilitar el llenado. 8. Asa 3.
- Página 30 12. Panel de control 20. Compartimiento de almacenaje Para guardar la cápsula reutilizable 13. Botón de programación ™ HomeBarista 14. Flecha ascendente ( 21. Cable 15. Flecha descendente ( (no ilustrado) 16. Botón de preparación 22. Interruptor 17. Botón para enjuagar el sistema (en la parte lateral) 18.
- Página 31 El aparato IMPORTANTE: siga las instrucciones de no funcionará debidamente si está preparación a continuación antes de utilizar su muy frío. cafetera monodosis Cuisinart ® por primera vez. Preparación de 6. La pantalla mostrará “OPEN HEAD”...
- Página 32 Filtro de frecuentemente si el agua es dura. Los filtros carbón de repuesto están disponibles en las tiendas especializadas, en nuestro sitio web www.cuisinart.com, o llamando a nuestro servicio postventa al 1-800-726-0190. Instrucciones de Fig. 4 preparación 1. Cuando la cafetera está en el modo de Instalación del filtro de agua...
- Página 33 Precaución: hay dos agujas en Nota: puede que la unidad marque el porta-cápsula (una arriba y una pausa corta antes de iniciar el ciclo una en el fondo), cuyo papel es de preparación. perforar las cápsulas. Para evitar El proceso de preparación demorará las heridas, no meta los dedos aproximadamente 1 minuto y terminará...
- Página 34 Cómo servir agua Para servir agua caliente: 1. Coloque una taza en la bandeja de goteo caliente/enjuagar 2. Alce el asa. Abra la cámara de preparación el sistema interno para asegurarse de que no contenga ninguna cápsula. Su cafetera monodosis sirve agua caliente, para permitirle preparar chocolate, té, sopa 3.
- Página 35 ™ HomeBarista ™ HomeBarista en la cámara de ® La cafetera monodosis Cuisinart también preparación, sin empujar (Fig. 12). le deja preparar café con una cápsula reutilizable (incluida), un método que le permite usar su propio café molido La cápsula reutilizable HomeBarista ™...
- Página 36 Cómo interrumpir Programación el ciclo de preparación Cómo fijar la hora Si en algún momento necesita interrumpir La programación de la hora es opcional. el ciclo de preparación, presione el botón Después de fijar la hora, esta aparecerá en BREW U oprima el interruptor ubicado la pantalla.
- Página 37 Hora fijada Botón para fijar la hora Fig. 15 Fig. 16 b. Oprima repetidamente o mantenga oprimido el botón para fijar Nota: otros iconos también pueden el tiempo de apagado automático, aparecer en la pantalla, según las funciones de 1 a 9 horas después de la programadas.
- Página 38 3. CÓMO PROGRAMAR LA HORA DE ENCENDIDO/APAGADO AUTOMÁTICO Programar la hora de encendido automático le permitirá disfrutar de una taza de café fresco cada mañana, sin necesidad de esperar que el agua caliente. Nota: para usar esta función, la hora debe ser fijada.
- Página 39 Nota: otros iconos también Siga oprimiendo el botón MENU hasta pueden aparecer en la pantalla, salir del modo de programación. según las funciones programadas. Nota: siempre baje la temperatura por g. Para desactivar la hora de defecto en altitud (5000 pies o más). encendido/apagado automático, Cómo cambiar el tamaño de oprima el botón MENU repetidamente...
- Página 40 Limpieza y Limpieza del porta-cápsulas PRECAUCIÓN: hay dos agujas en mantenimiento el porta-cápsulas (una arriba y una en el fondo), cuyo papel es perforar las Limpieza de los componentes cápsulas. Para evitar las heridas, no externos meta los dedos en el porta-cápsulas. Le recomendamos que limpie el cuerpo del 1.
- Página 41 Precaución: enjuague el depósito con abundante agua después de limpiarlo a fin de evitar que rastros de detergente contaminen el agua. Eliminación del sarro Según el lugar donde vive, el agua puede ser más o menos dura, es decir contener una concentración de minerales más o menos alta.
- Página 42 Siga los pasos siguiente para eliminar el sarro: 1. Vacíe el depósito de agua. 2. Desactive las funciones de apagado automático si están programadas. 3. Asegúrese de que el porta-cápsulas esté vacío y llene el depósito con 20 onzas (590 ml) de vinagre blanco y 40 onzas (1.2 L) de agua.
- Página 43 Resolución de problemas Problema: Solución: La cafetera no se enciende. Conecte el aparato a una toma de corriente que no esté activada por un interruptor de luz. Asegúrese de que el cable esté debidamente conectado. Conecte el aparato a otra toma de corriente. Revise los disyuntores/interruptores del tablero eléctrico.
- Página 44 Cuisinart para que lo reparen o siempre que el aparato haya sido utilizado para lo cambien. Para esto, se debe llamar a nuestro uso doméstico y según las instrucciones.
- Página 45 ©2016 Cuisinart 150 Milford Road East Windsor, NJ 08520 Impreso en China 16CE014223 F IB-13633-ESP...