Tabla de contenido
Publicidad
Idiomas disponibles
Idiomas disponibles
Enlaces rápidos
CAMI
C
IP6
RE
EAL PLU
G AND P
RE
EAL PLU
G-AND-P
CA
AMÉRA D
DÔME CO
CÁ
ÁMARA C
COLOR I
RE
EAL PLU
G-AND-P
U
USER MAN
NUAL
G
GEBRUIKE
ERSHAND
N
NOTICE D
'EMPLOI
M
MANUAL D
DEL USUA
BEDIENUN
B
NGSANLEI
PLAY IP C
COLOUR
PLAY IP
KLEURE
OULEUR
IP REAL
P REAL P
PLUG-AN
PLAY IP-
-FARBKA
3
LEIDING
25
47
ARIO
69
ITUNG
91
R DOME C
CAMERA
N DOME
CAMERA
PLUG-A
AND-PLAY
ND-PLAY
Y
AMERA
A
Y
Publicidad
Tabla de contenido

Manuales relacionados para Velleman CAMIP6


Resumen de contenidos para Velleman CAMIP6
- Página 1 CAMI EAL PLU G AND P PLAY IP C COLOUR R DOME C CAMERA EAL PLU G-AND-P PLAY IP KLEURE N DOME CAMERA AMÉRA D DÔME CO OULEUR IP REAL PLUG-A AND-PLAY CÁ ÁMARA C COLOR I P REAL P PLUG-AN ND-PLAY EAL PLU...
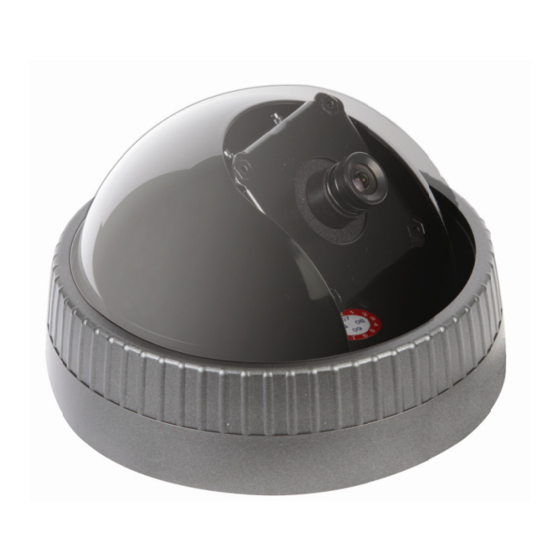
- Página 2 CAMIP6 Table 1 dome bas basis base base Basis locking rin verg rendelring annea au de fixatio on anillo d e fijación Schließri shield besc herming protec ction protecc ción Schutz transpare koep dôme cúpula transpar rente Kuppe cover transpa...
- Página 3 CAMIP6 er man . Introdu uction o all reside ents of the e Europea n Union mportant e environme ental infor rmation ab bout this p product s symbol o n the devic ce or the pa ackage indi cates that...
- Página 4 CAMIP6 • O Open the do ome by hol ding the ba ase [1] firm mly and rota ating the co over locking g ring [2] c counter clockwise. • L Lift the tran nsparent co ver [4] and d shield [3 •...
- Página 5 CAMIP6 • Click < Back to change settings or Next > to start the installation. • If Framework 2.0 (or higher) was already installed, a message is displayed. Click OK to continue installation of the CamView software. • The Installation Finished window appears. Click on Finish.
-
Página 6: Software Configuration
CAMIP6 7. Software configuration 7.1 General • To start the CamView software, locate the CamView icon on the desktop and click on it, or go to Start → Programs → CamView. Title bar shows software version, date, time and available disk space. -
Página 7: Auto Search
CAMIP6 7.2 Auto Search • In order to use Auto Search, a camera must be connected to the same LAN (Local Area Network) as the computer. Double-click on the Auto Search directory or right-click on Auto Search and left-click again on Auto search to start searching the network. - Página 8 CAMIP6 Model current firmware version IP CAM ID camera identification number Registration status is camera registered with CamView software or not. Network type shows current network type Video user number of people that currently access the camera Video resolution current display resolution...
- Página 9 CAMIP6 Note: both DHCP/manual IP setting and PPPoE can be selected together. However, PPPoE will have priority and will be used when possible. • Select Video Settings to configure the video set-up. On this page, it is also possible to retrieve or set the password which is required to get access to the video images.
- Página 10 CAMIP6 Note: 3GPP/ISMA is using RTSP protocol for 3G mobile phones to display the video stream from some network devices, including IP cameras. This camera supports the RTSP protocol and video/audio codec needed by 3GPP/ISMA. Users only need to access the address rtsp://ip_cam_address/CAM_ID.password on the 3G mobile phone to access the video stream of the IP camera.
- Página 11 CAMIP6 • T The Email/f ftp and NAS S schedule can be ena abled via th he Schedu ling page. • T To change a administrat tor settings s, go to the e Admin - A Admin log gin page. C...
- Página 12 CAMIP6 • The firmware filename can be found by browsing to the ftp-site (ftp:60.250.194.78), username upgrade and password upgrade. Scroll through the available list and locate the correct version. The name must start with VS316-gen. • To reboot the camera, go to the reboot page and click on Reboot.
- Página 13 CAMIP6 • First click on the desired playback-window, then right-click on the desired camera and left-click on Play on selected window. The images are shown in the desired area. • Click on ID/Password settings to edit camera name. • Click on Video settings to adjust the cameras’ video setup: Bandwidth Video color: select colour or black&white.
-
Página 14: Display Control
CAMIP6 • Change the 3GPP settings by selecting the 3GPP settings option. • After adjusting the settings, click the Update button. The administrators’ account and password are required. • To update the firmware, click on firmware upgrade (see §7.3 Web configuration – Upgrade page) •... -
Página 15: Start Up Options
CAMIP6 7.6 CamView Software options 7.6.1 Settings • Click on the settings button ( ) to enter the settings menu: Directories Recording • Enter the directory where the recorded files must be stored. • Enter a disk space lower limit. - Página 16 CAMIP6 7.6.2 CamPlay • Click on the camplay button ( ) to enter the CamPlay software, or locate the desktop item and double click on it: 7.6.2.1 Title bar: Shows software version, date, time, minimize, resize and exit button. 7.6.2.2 Functions: Click to open locally stored recorded video files.
-
Página 17: Video Playback
CAMIP6 a) Open record • Select recording date and all cameras that have recordings on that date are shown. Recorded files tree: year Month date: YYYY/MM/DD Camera list Cam Name = name of camera that has recordings on the selected day. - Página 18 CAMIP6 b) Open NAS • Browse the network (“My Network Places”). Select recording date and all cameras that have recordings on that date are shown. • Click ‘Scan Neighbourhood’. • Select workgroup (e.g. NAS) than double click to scan for network devices.
- Página 19 CAMIP6 • Click ‘convert’ to start conversion. • Click ‘Open AVI’ to open the converted video file(s). 7.6.2.3 Playback: Play Pause / resume Stop Slow forward Fast forward Zoom in Zoom out Snapshot: take snapshot during play-back Mute/un-mute, sound level Note: maximum zoom-in resolution is 640x480;...
- Página 20 CAMIP6 • Mode: - Play only: no recording - Continuous recording: record between set start and stop date/time (see image above) - Periodic recording: set recording time period on daily basis (see image below) Recording/playing conflict: • to determine the priority between current and scheduled camera.
- Página 21 CAMIP6 7.6.5 All - button • Click on the all-button ( ) to control all cameras simultaneously: 7.7 Uninstall CamView • There are two ways to uninstall the CamView software. Uninstall from the start menu .Start → CamView →Uninstall CamView Uninstall from the control panel .Start →...
- Página 22 CAMIP6 • Click Next >. If the CamView or similar software will be installed, keep all files. • Click Finish to close the uninstaller. 8. 3GGP software installation • mCamView is the software that is required to view the IP Camera images using an ID and password.
- Página 23 CAMIP6 9. Troubleshooting Important note: The video quality depends on the video parameter settings and the network quality. To have a • better video quality, select higher resolution and higher frame rates. This is no problem when viewing videos locally in the same network. When watching a video remotely through the Internet however, it is important to know the bandwidth of the Internet connection (Internet speed).
-
Página 24: Technical Specifications
430g Use this device with original accessories only. Velleman nv cannot be held responsible in the event of damage or injury resulted from (incorrect) use of this device. For more info concerning this product, please visit our website www.velleman.eu. The information in this manual is subject to change without prior notice. - Página 25 CAMIP6 BRUIKE ERSHAN NDLEIDI . Inleidin an alle ing gezetenen van de Eu uropese Un elangrijke milieu-inf formatie b betreffend de dit prod duct symbool op p het toeste el of de ver rpakking ge eeft aan da t, als het n...
- Página 26 CAMIP6 • Gebruik de basis [1] om de ligging van de montagegaten en de kabeluitsparing (voorzie een uitsparing van minstens 30 mm) te bepalen. • Steek de kabel in de grote uitsparing en bevestig de basis. • Richt de camera.
- Página 27 CAMIP6 • Klik op < Back indien u wijzigingen wilt aanbrengen of klik op Next > om verder te gaan. • Indien Framework 2.0 (of hoger) al op de computer geïnstalleerd was, krijgt u volgend bericht. Klik op OK om CamView verder te installeren.
- Página 28 CAMIP6 7. Softwareconfiguratie 7.1 Algemeen • Start CamView door op de shortcut te klikken of klik op Start → Programs → CamView. In de titelbalk staan softwareversie, datum, tijd en beschikbare schijfruimte. lijst met beschikbare camera’s met statusaanduiding display lijst met camera’s gevonden via...
-
Página 29: Auto Search
CAMIP6 7.2 Auto Search • Deze functie is enkel beschikbaar indien de camera en de computer op hetzelfde LAN-netwerk zijn aangesloten. Open de directory Auto Search om het netwerk te zoeken. Opmerking: Routers en firewalls kunnen de toegang tot de IP-camera blokkeren. Neem in dit geval contact op met uw netwerkprovider. - Página 30 CAMIP6 Model huidige firmwareversie IP CAM ID ID-nummer van de camera Registration status registratiestatus Network type huidig netwerktype Video user aantal gebruikers die op de camera zijn aangesloten Video resolution huidige beeldresolutie Video bandwidth huidige bandbreedte Email/ftp Alarm e-mail en ftp-alarm ingeschakeld...
- Página 31 CAMIP6 Opmerking: Zowel DHCP/handmatige IP-configuratie als PPPoE zijn selecteerbaar. De camera verkiest echter PPPoE. • Video Settings: configuratie video. Op deze pagina kunt u het paswoord instellen of opvragen dat u toegang geeft tot de videobeelden. Opmerking: Het originele paswoord kunt u vinden op de meegeleverde ID/Password-kaart. Wijzig om veiligheidsredenen het paswoord van de camera.
- Página 32 CAMIP6 camera hoeft verder geen instellingen. Het ingeven van het RTSP-adres verschilt van toestel tot toestel. Neem contact op met de fabrikant van de 3G-telefoon voor meer details. De beeldkwaliteit en –resolutie zijn dezelfde als die in het menu Video Settings.
- Página 33 CAMIP6 • Ga naar Scheduling om Email/ftp en NAS in te schakelen. • Wijzig de administratorinstellingen onder Admin – Admin login. Het is aan te raden het administratorpaswoord regelmatig te wijzigen. Opmerking: Noteer het administratorpaswoord. Zonder dit paswoord kunt u de camera niet instellen.
- Página 34 CAMIP6 Let o op: Wees vo oorzichtig b bij het lade n van nieuw we firmwar re in de cam mera. De came ra function eert niet m met incompa atibele firm mware. Upg rade de cam mera enkel indien ech t noodzake elijk.
- Página 35 CAMIP6 GEEL: de camera is online maar reageert niet (bv. verkeerde routerinstellingen) GROEN: de camera is online en reageert (de beelden worden eventueel geblokkeerd door de firewall) • De status wordt elke 30 seconden automatisch ververst. Klik op Refresh status om de status handmatig te verversen.
- Página 36 CAMIP6 Bandwidth Sharpness Bandbreedte van 64k tot 1,5 M. Stel in volgens de Stel de beeldscherpte in. uploadbandbreedte. Een hogere bandbreedte geeft Low light sensitivity een beeld van een hogere kwaliteit. Stel de gevoeligheid van de camera in bij Video Setting zwak omgevinglicht.
- Página 37 CAMIP6 • Klik met de rechtermuisknop in een scherm om volgende opties weer te geven: Full window: Volledige schermweergave. Auto reconnect: Automatisch herstel van de verbinding. Stop: Uitschakeling. Pause: Pauzeren. DI counter*: Telt van zodra een digitaal ingangssignaal ontvangen wordt Motion recording: Inschakelen van opname na beweging.
- Página 38 CAMIP6 Startup options settings • Vink het bovenste vakje aan om CamView automatisch bij het opstarten van Windows op te starten. • Vink het onderste vakje aan om bij het opstarten van CamView naar de laatste instellingen terug te keren.
- Página 39 CAMIP6 Directory-instellingen. Gebruik de naaminstellingen onder CamView om het opzoeken van bestanden te vergemakkelijken. Klik om uw taal te kiezen (v2.1 enkel in Engels en Chinees). a) Bestand openen • Selecteer een opnamedatum. Alle camera’s die op die datum een opname hebben gemaakt, zullen worden weergegeven.
- Página 40 CAMIP6 b) Openen NAS • Browse het netwerk (‘My Network Places’). Selecteer een opnamedatum. Alle camera’s die op die datum een opname hebben gemaakt, zullen worden weergegeven. • Klik op Scan Neighbourhood. • Selecteer WORKGROUP (bv. NAS) en dubbelklik om het netwerk af te scannen.
- Página 41 CAMIP6 Snapshot files: naam – camera-ID datum: JJJJ/MM/DD tijd: uu/mm/ss d) Converteren naar AVI • Selecteer een camera. • Selecteer Start Time en End Time. • Klik op Convert om te converteren. • Klik op Open AVI om het geconverteerde bestand te openen.
- Página 42 CAMIP6 7.6.3 Scheduling • Klik op een camera in de lijst en daarna op de programmeerknop ( ) om het menu weer te geven: • Mode - Play only: geen opname - Continuous recording: opname tussen start- en eindtijd (zie afbeelding hierboven)
-
Página 43: Camview De-Installeren
CAMIP6 7.6.5 All • Klik op All ( ) om alle camera’s gelijktijdig te bedienen: 7.7 CamView de-installeren • U kunt CamView op twee manieren de-installeren: Klik op Start → CamView → Uninstall CamView. Klik op Start → Settings → Control Panel → Add or Remove Programs. Selecteer CamView en klik op Change/Remove. - Página 44 CAMIP6 • Klik op Next >. Vink de gewenste opties aan en klik op Next >. • Klik op Finish om de deïnstallatie te voltooien. 8. Installatie van 3GGP-software • Met mCamView kunt u, met behulp van een ID en een paswoord, de beelden van de IP-camera bekijken.
-
Página 45: Problemen En Oplossingen Belangrijke Opmerking
CAMIP6 9. Problemen en oplossingen Belangrijke opmerking: De kwaliteit van de beelden hangt af van de instellingen en de kwaliteit van het netwerk. Voor • een hogere beeldkwaliteit, selecteer een hogere resolutie en framesnelheid. Het afspelen van een videobestand op een lokaal netwerk zou geen problemen moeten opleveren. Bij het afspelen van een videobestand op afstand via het internet echter speelt de bandbreedte van de internetaansluiting een belangrijke rol. -
Página 46: Technische Specificaties
430g Gebruik dit toestel enkel met originele accessoires. Velleman nv is niet aansprakelijk voor schade of kwetsuren bij (verkeerd) gebruik van dit toestel. Voor meer informatie over dit product, zie www.velleman.eu. De informatie in deze handleiding kan te allen tijde worden gewijzigd zonder voorafgaande kennisgeving. - Página 47 CAMIP6 NOTIC CE D’EM MPLOI . Introdu uction ux résiden nts de l'Un nion europ péenne es informa ations env vironneme entales imp portantes concerna nt ce prod duit e symbole s sur l'appare eil ou l'emb ballage indiq que que l’é...
-
Página 48: Installation Du Logiciel
CAMIP6 • Pour refermer la caméra, placer la protection [3] dans le dôme transparent [4] de façon à ce que les pattes soient placées dans les encoches. Placer l’anneau [2] sur le dôme [4] et visser l’anneau sur la base [1]. Veiller à ce que l’objectif [5] ne soit pas couvert par la protection [3]. -
Página 49: Configuration Du Logiciel
CAMIP6 • Cliquer sur < Back pour retourner à la fenêtre précédente et cliquer sur Next > pour continuer. • Le message ci-dessous surgit lorsque Framework 2.0 (ou plus) est déjà installé sur l’ordinateur. Cliquer sur OK pour continuer l’installation de CamView. -
Página 50: Auto Search
CAMIP6 La barre de titre affiche la version du logiciel, la date, l’heure et l’espace disque dur disponible. liste des caméras disponibles avec leur statut affichage liste des caméras retrouvées à l’aide de la fonction de recherche automatique Auto Search configuration panneau de contrôle pour... - Página 51 CAMIP6 • Le nom d’utilisateur par défaut admin ne nécessite pas de mot de passe. • La page d’information s’affiche après la validation du nom d’utilisateur et du mot de passe. Model version du firmware IP CAM ID numéro d’identification de la caméra Registration status état d’enregistrement de la caméra...
- Página 52 CAMIP6 • Network : Configuration du réseau. Le protocole par défaut est DHCP (Dynamic Host Configuration Protocol) qui assurera un adressage IP automatique. Contacter votre administrateur réseau si le protocole DHCP n’est pas disponible. • Advanced Network : Configuration de la connexion PPPoE (ADSL). Saisir le nom d’utilisateur et le mot de passe.
- Página 53 CAMIP6 Remarque : Tout comme la technologie 3GPP/ISMA, la caméra télécharge les images en utilisant le protocole RTSP et le codec vidéo/audio. Il suffit de taper l’adresse rtsp://ip_cam_address/CAM_ID.password dans le téléphone 3G. La caméra IP ne nécessite pas de configuration supplémentaire. La saisie de l’adresse RSTP peut changer selon le type de téléphone.
- Página 54 CAMIP6 • Accéder à la page NAS Settings pour configurer le système NAS (Network Attached Storage). • Accéder à la page Scheduling pour activer les fonctions Email/ftp et NAS. • Modifier la configuration de l’administrateur sous Admin – Admin login. Il est conseillé de modifier régulièrement le mot de passe de l’administrateur.
- Página 55 CAMIP6 • M Mettre le fir rmware à j our sous U pgrade à partir d’un fichier loca al ou d’un s serveur FTP Atten ntion : Télé écharger le nouveau f irmware av vec précaut tion. Le téléch hargement...
-
Página 56: Camera List
CAMIP6 7.4 Camera List • Une fois la caméra configurée, elle doit être ajoutée à la liste Camera List. Cliquer avec le bouton droit de la souris sur Camera List et ensuite cliquer sur New Camera. Remarque : Une caméra qui ne se trouve pas sous Camera List ne sera pas disponible depuis Internet. - Página 57 CAMIP6 Bandwidth Video color Largeur de bande de 64k à 1,5 M. Sélectionner la Sélectionner une image en couleur ou en largeur de bande selon la largeur en amont. Une noir et blanc. largeur de bande supérieure contribue à une qualité...
-
Página 58: Fonctions D'affichage
CAMIP6 • Cliquer sur Update et saisir le nom d’utilisateur et le mot de passe. • Cliquer sur Firmware upgrade pour mettre à jour le firmware (voir §7.3 Configuration web – Upgrade) • Cliquer sur Delete pour supprimer une caméra de la liste. - Página 59 CAMIP6 7.6 Options dans CamView 7.6.1 Settings • Cliquer sur le bouton de configuration ( ) pour afficher le menu : Directories settings Recording • Sélectionner le répertoire de sauvegarde des fichiers d’enregistrement. • Entrer l’espace disque dur minimal. • Sélectionner le mode d’enregistrement : écrasement des fichiers (Circular recording) ou arrêt de l’enregistrement lors d’un disque dur plein.
- Página 60 CAMIP6 7.6.2 CamPlay • Cliquer sur le bouton CamPlay ( ) pour lancer le logiciel ou cliquer double sur l’icone sur le bureau : 7.6.2.1 La barre de titre affiche : La version du logiciel, la date, l’heure, la case de minimisation, la case de restauration de la taille et la case pour quitter l’application.
- Página 61 CAMIP6 a) Ouverture d’un fichier • Sélectionner la date d’enregistrement. Toutes les caméras ayant enregistré à cette date seront affichées. Arborescence : année mois date : AAAA/MM/JJ Liste des caméras Cam Name = nom de la caméra ayant enregistré à la date sélectionnée.
- Página 62 CAMIP6 b) Ouverture du NAS • Naviguer le réseau (« My Network Places »). Sélectionner la date d’enregistrement. Toutes les caméras ayant enregistré à cette date seront affichées. • Cliquer sur Scan Neighbourhood. • Sélectionner WORKGROUP (p.ex. NAS) et cliquer double pour balayer le réseau.
- Página 63 CAMIP6 • Cliquer sur Convert pour démarrer la conversion. • Cliquer sur Open AVI pour ouvrir le(s) fichier(s) vidéo. 7.6.2.3 Lecture : lecture pause/reprise arrêt lecture lente avance rapide zoom en avant zoom en arrière capture d’image lors de la lecture activer/désactiver le son...
-
Página 64: Sélection De La Langue
CAMIP6 • Mode : - Play only : pas d’enregistrement - Continuous recording : enregistrement entre l’horaire de départ et l’horaire d’arrêt (voir ci-dessus) - Periodic recording : enregistrement quotidien programmé (voir ci-dessous) Recording/playing conflict : • Sélection du mode d’enregistrement : Record/Play as scheduled : La caméra commence l’enregistrement à... - Página 65 CAMIP6 7.6.5 Le bouton « All » • Cliquer sur All ( ) pour un pilotage simultané de toutes le caméras : 7.7 Désinstaller le logiciel CamView • Le logiciel peut être désinstallé de deux façons : Cliquer sur Start → CamView → Uninstall CamView.
- Página 66 CAMIP6 • Cliquer sur Finish pour compléter la désinstallation. 8. Installation du logiciel 3GGP • mCamView est le logiciel nécessaire pour visionner les images de la caméra à l’aide de l’adresse IP et d’un mot de passe. • La caméra ne nécessite pas d’adresse IP publique.
- Página 67 CAMIP6 9. Problèmes et solutions Remarque importante : La qualité de l’image est tributaire des configurations et de la qualité du réseau. Pour une qualité • d’image supérieure, sélectionner une résolution et une vitesse d’image supérieures. Le visionnage des images sur un réseau local ne posera généralement aucun problème. Cependant, un visionnage des images à...
-
Página 68: Spécifications Techniques
430g N’employer cet appareil qu’avec des accessoires d’origine. SA Velleman ne sera aucunement responsable de dommages ou lésions survenus à un usage (incorrect) de cet appareil. Pour plus d’information concernant cet article, visitez notre site web www.velleman.eu. Toutes les informations présentées dans cette notice peuvent être modifiées sans notification préalable. - Página 69 CAMIP6 MANUAL L DEL U USUARI . Introdu ucción los ciudad danos de l a Unión Eu uropea mportantes s informac ciones sob bre el med dio ambien nte concer rniente a e este produ ucto Este e símbolo e...
-
Página 70: Instalar El Software
CAMIP6 • Apunte la cámara a la zona que quiere vigilar. • Para cerrar la cámara, ponga la protección [3] en el domo transparente [4] de tal manera que las patas encajen en las muscas. Ponga el anillo [2] en el domo [4] y fije el anillo a la base [1]. -
Página 71: Configurar El Software
CAMIP6 • Haga clic en < Back para volver a la pantalla anterior y haga clic en Next > para continuar. • El siguiente mensaje aparece si Framework 2.0 (o superior) ya ha sido instalado en el ordenador. Haga clic en OK para continuar la instalación de CamView. - Página 72 CAMIP6 La barra de título visualiza la versión del software, la fecha, la hora y el espacio en el disco duro disponible. lista de las cámaras disponibles con visualización del estado visualización lista de las cámaras encontradas con la función de búsqueda automática Auto Search...
-
Página 73: Auto Search
CAMIP6 7.2 Auto Search • Esta función sólo está disponible si la cámara y el ordenador están conectados a la misma red local LAN. Abra el directorio Auto Search para buscar la red. Nota: algunos enrutadores y cortafuegos pueden bloquear el acceso a la cámara. Contacte con su proveedor de red en caso de problemas. - Página 74 CAMIP6 Model versión del firmware IP CAM ID número de identificación de la cámara Registration status estado de grabación de la cámara Network type tipo de red utilizado Video user número de usuarios que tienen acceso a la cámara Video resolution resolución de la imagen...
- Página 75 CAMIP6 • Las imágenes captadas por la cámara también están disponibles en una red telefónica 3G. Configure la conexión bajo 3GPP/RTSP. Copie la dirección del URL de acceso bajo Access URL en el teléfono 3G. ¡Ojo!: El formato del URL puede cambiar según el tipo de teléfono. Véase el manual del usuario del teléfono 3G para más información.
- Página 76 CAMIP6 • La cámara transmite las capturas de imagen a una dirección de correo electrónico o el servidor FTP en cuanto detecte un movimiento. Configure la dirección de correo electrónico y/o la dirección FTP bajo Schedule – Email/ftp Alarm. • Entre en la página NAS Settings para configurar el sistema NAS (Network Attached Storage).
- Página 77 CAMIP6 ota: Apunte e la contras seña del ad dministrado or. No es po osible confi gurar la cá mara sin co ontraseña. ota: Si ha o olvidado la contraseña a, vuelva a instaurar l os ajustes de fábrica de la cáma...
-
Página 78: Lista De Cámaras
CAMIP6 7.4 Lista de cámaras • Después de haber ajustado la cámara, añádala a la lista Camera List. Haga clic en Camera List con el botón derecho del ratón y luego haga clic en New Camera. Nota: Una cámara que no está bajo Camera List no estará disponible en Internet. - Página 79 CAMIP6 • Haga clic en Video settings para modificar la configuración vídeo de una cámara. Bandwidth Video color Ancho de banda de 64k a 1,5 M. Seleccione el ancho Seleccione una imagen de color o una de banda según el ancho de banda upload. Un ancho imagen blanco y negro.
-
Página 80: Funciones De Visualización
CAMIP6 • Haga clic en Update e introduzca el nombre de usuario y la contraseña. • Haga clic en Firmware upgrade para instalar una versión mejorada del firmware (véase §7.3 Configuración web – Upgrade) • Haga clic en Delete para borrar una cámara de la lista. -
Página 81: Opciones En Camview
CAMIP6 7.6 Opciones en CamView 7.6.1 Ajustes • Haga clic en el botón de configuración ( ) para visualizar el menú: Directories Recording • Seleccione el directorio donde quiere guardar los ficheros grabados. • Introduzca el espacio de disco duro mín. -
Página 82: La Barra De Título
CAMIP6 7.6.2 CamPlay • Haga clic en el botón CamPlay ( ) para activar el software o haga clic dos veces en el icono del escritorio: 7.6.2.1 La barra de título: La barra de título visualiza la versión del software, la fecha, la hora, el botón de minimización, el botón de ajuste y el botón para salir de la aplicación. - Página 83 CAMIP6 a) Abrir un fichero • Seleccione la fecha de grabación. Se visualizan todas las cámaras que han efectuado una grabación en esta fecha. Árbol de directorios: año fecha: AAAA/MM/DD Lista de las cámaras Cam Name = nombre de la cámara que ha efectuado una grabación en la fecha...
- Página 84 CAMIP6 b) Abrir NAS • Navegue por la red (« My Network Places »). Seleccione la fecha de grabación. Se visualizan todas las cámaras que han efectuado una grabación en esta fecha. • Haga clic en Scan Neighbourhood. • Seleccione WORKGROUP (p.ej. NAS) y haga clic dos veces para explorar la red.
-
Página 85: Reproducción
CAMIP6 • Haga clic en Convert para iniciar la conversión. • Haga clic en Open AVI para abrir el(los) fichero(s) de vídeo. 7.6.2.3 Reproducción: reproducción pausa/reproducir parada reproducción lenta avanzar alejar acercar captura de imagen durante la reproducción activar/desactivar el sonido Note: La resolución máx. -
Página 86: Seleccionar El Idioma
CAMIP6 • Mode: - Play only: no hay una grabación - Continuous recording : grabación entre la hora inicial y la hora de parada (véase arriba) - Periodic recording : grabación diaria programada (véase a continuación) Recording/playing conflict: • Para seleccionar el modo de grabación: Record/Play as scheduled: La cámara empieza la grabación a la hora programada. -
Página 87: Desinstalar El Software Camview
CAMIP6 7.6.5 All - button • Haga clic en All ( ) para un control simultáneo de todas las cámaras: 7.7 Desinstalar el software CamView • Es posible desinstalar el software de dos maneras: Haga clic en Start → CamView → Uninstall CamView. - Página 88 CAMIP6 • Haga clic en Finish para terminar la desinstalación. 8. 3GGP software installation • Es posible visualizar las imágenes de la cámara con mCamView y una dirección IP y una contraseña. • La cámara no necesita una dirección IP pública.
- Página 89 CAMIP6 9. Solución de problemas Nota importante: La calidad de imagen depende de los ajustes y la calidad de la red. Para una calidad de imagen • superior, seleccione una resolución y una velocidad de imagen más altas. La reproducción en una red local generalmente no causa problemas.
-
Página 90: Especificaciones
430g Utilice este aparato sólo con los accesorios originales. Velleman NV no será responsable de daños ni lesiones causados por un uso (indebido) de este aparato. Para más información sobre este producto, visite nuestra página web www.velleman.eu. Se pueden modificar las especificaciones y el contenido de este manual sin previo aviso. - Página 91 Sie sich für Entsor rgungsrich htlinien an n Ihre örtl iche ehörde. ir bedanken n uns für de en Kauf de r CAMIP6! ! Lesen Sie diese Bedi ienungsanle eitung vor betriebnah me sorgfält tig durch. Ü Überprüfen Sie, ob Tra ansportsch äden vorlie...
-
Página 92: Die Software Installieren
CAMIP6 • Halten Sie die Basis [1] gut fest und drehen Sie den Ring [2] gegen den Uhrzeigersinn, um die Kuppel zu öffnen • Entfernen Sie die Kuppel [4] und den Schutz [3]. • Verwenden Sie die Basis [1] um die Position der Montagelöcher und der Kabelaussparung (sorgen Sie für ein Loch von min. - Página 93 CAMIP6 • Klicken Sie auf < Back wenn Sie die Einstellungen ändern möchten oder klicken Sie auf Next > um weiterzugehen. • Wenn Framework 2.0 (oder höher) schon installiert ist, erscheint folgende Nachricht. Klicken Sie auf OK um CamView weiter zu installieren.
- Página 94 CAMIP6 7. Konfiguration der Software 7.1 Allgemein • Starten Sie CamView, indem Sie auf die Verknüpfung klicken oder klicken Sie auf Start → Programs → CamView. Die Titelleiste zeigt die Softwareversion, das Datum, die Uhrzeit und den verfügbaren Speicherplatz Liste mit verfügbaren Kameras...
- Página 95 CAMIP6 Displays: klicken Sie die Ikone an und wählen Sie ein 1-, 4-, 6-, 9-, 13-, 16- oder 21-stelliges Display (jedes Kameradisplay ist separat einstellbar) 7.2 Auto Search • Diese Funktion steht nur zur Verfügung wenn die Kamera und der PC mit demselben LAN- Netzwerk verbunden sind.
- Página 96 CAMIP6 Model aktuelle Firmware-Version IP CAM ID ID-Nummer der Kamera Registration status Registrierungsstatus Network tippen Siee aktueller Netzwerktyp Video user Anzahl Benutzer, die mit der Kamera verbunden sind Video resolution aktuelle Bildauflösung Video bandwidth aktuelle Bandbreite Email/ftp Alarm E-Mail und ftp-Alarm eingeschaltet...
- Página 97 CAMIP6 • Advanced Network: Konfiguration des PPPoE-Anschlusses (ADSL). Geben Sie den Benutzername und das Passwort ein. Bemerkung: Sowohl die DHCP/manuelle IP-Konfiguration als auch PPPoE können ausgewählt werden. Die Kamera bevorzugt aber PPPoE. • Video Settings: Konfiguration Video. Auf dieser Seite können Sie auch das Passwort, das Ihnen Zugang zu den Videobildern gibt, einstellen oder abfragen.
- Página 98 CAMIP6 Bemerkung: Genauso wie 3GPP/ISMA verwendet diese Kamera das RTSP-Protokoll und Video- /Audiocodec, um die Bilder herunterzuladen. Sie brauchen also nur die Adresse rtsp://ip_cam_address/CAM_ID.password in das 3G-Mobiltelefon einzugeben. Die IP-Kamera braucht keine weiter Einstellungen. Die RTSP-Adresse ist für jedes Gerät anders.
- Página 99 CAMIP6 • Gehen Sie zu NAS Settings um das NAS-System (Network Attached Storage) zu konfigurieren. • Gehen Sie zu Scheduling um Email/ftp und NAS einzuschalten. • Ändern Sie die Administratoreinstellungen unter Admin – Admin login. Ändern Sie das Administratorpasswort regelmäßig.
- Página 100 CAMIP6 • A Aktualisiere en Sie die F Firmware de er Kamera unter Upg rade. Das Upgrade ka ann ab eine er lokalen Datei oder ab einem F FTP-Server geschehen Achtu ung: Seien Sie vorsich htig beim L Laden neue er Firmware e.
- Página 101 CAMIP6 7.4 Kameraliste • Die Kamera ist jetzt konfiguriert. Fügen Sie diese nun der Liste hinzu. Klicken Sie mit der rechten Maustaste auf Camera List und klicken Sie danach auf New Kamera. Bemerkung: Wenn Sie die Kamera nicht der Liste hinzufügen, ist diese nicht weltweit verfügbar.
- Página 102 CAMIP6 • Klicken Sie auf Video settings um die Video-Einstellungen der Kamera zu ändern. Bandwidth Sharpness Bandbreite von 64k bis 1,5 M. Stellen Sie gemäß der Stellen Sie die Bildschärfe ein. Upload-Bandbreite ein. Eine höhere Bandbreite zeigt Low light sensitivity ein Bild von höherer Qualität.
- Página 103 CAMIP6 • Klicken Sie danach auf Update und geben Sie den Namen und das Passwort ein. • Klicken Sie auf Firmware upgrade um die Firmware zu aktualisieren (Siehe §7.3 WebKonfiguration – Upgrade). • Klicken Sie auf Delete um die Kamera aus der Liste zu löschen.
- Página 104 CAMIP6 7.6.1 Settings • Klicken Sie auf die Taste ( ) um das Konfigurationsmenü anzuzeigen: Directories Recording • Wählen Sie das Datenverzeichnis, wo Sie Dateien speichern möchten, aus. • Geben Sie den Mindestspeicherplatz ein. • Wählen Sie den Aufnahmemodus bei vollem Speicher aus: überschreiben (Circular recrording) oder stoppen.
- Página 105 CAMIP6 7.6.2 CamPlay • Klicken Sie die CamPlay-Taste ( ) oder klicken Sie zwei Mal die Ikone der Arbeitsoberfläche, um CamPlay zu starten: 7.6.2.1 Titelleiste: Die Titelleiste zeigt die Softwareversion, das Datum, die Uhrzeit, Minimiertaste, Taste um die Größe zu ändern und Taste zum Verlassen der Applikation.
- Página 106 CAMIP6 a) Eine Datei öffnen • Wählen Sie ein Aufnahmedatum. Alle Kameras, die an diesem Datum eine Aufnahme realisiert haben, werden angezeigt. Baumstruktur: Jahr Monath Datum: YYYY/MM/DD Camera list Cam Name = Name der Kamera, die am ausgewählten Tag die Aufnahme gemacht hat.
- Página 107 CAMIP6 b) NAS öffnen • Durchsuchen Sie die Netz (‘My Network Places’). Wählen Sie ein Aufnahmedatum. Alle Kameras, die an diesem Datum eine Aufnahme gemacht haben, werden angezeigt. • Klicken Sie auf Scan Neighbourhood. • Wählen Sie WORKGROUP (z.B. NAS) aus und klicken Sie zweimal, um das Netz abzutasten.
- Página 108 CAMIP6 • Klicken Sie ‘convert’ um die Konversion zu starten. • Klicken Sie ‘Open AVI’ um die umgesetzte Videodatei(en) zu öffnen. 7.6.2.3 Wiedergabe: abspielen pausieren/wieder abspielen stoppen langsam abspielen vorspulen herauszoomen heranzoomen Schnappschuss: machen Sie einen Schnappschuss während der Aufnahme Den Ton ein-/ausschalten Note: Die max.
- Página 109 CAMIP6 • Mode: - Play only: keine Aufnahme - Continuous recording: Aufnahme zwischen Start- und Endzeit (siehe Abbildung oben) - Periodic recording: täglich programmierte Aufnahme (siehe Abbildung unten) Recording/Playing Conflict • Hier können Sie bestimmen welchen Aufnahmemodus Sie bevorzugen: Record/Play as scheduled: Die Kamera startet die Aufnahme oder die Wiedergabe am programmierten Zeitpunkt.
- Página 110 CAMIP6 7.6.5 All - button • Klicken Sie auf All ( ) um alle Kameras gleichzeitig zu bedienen: 7.7 CamView deinstallieren • Sie können CamView auf zwei Weisen deinstallieren: Klicken Sie auf Start → CamView → Uninstall CamView. Klicken Sie auf Start → Settings → Control Panel → Add or Remove Programs. Wählen Sie CamView aus und klicken Sie auf Change/Remove.
- Página 111 CAMIP6 • Klicken Sie auf Next >. Kreuzen Sie die gewünschten Optionen an und klicken Sie auf Next >. • Klicken Sie auf Finish um das Deinstallieren zu beenden. 8. 3GGP Software-Installation • Mit mCamView können Sie, zusammen mit einer ID und einem Passwort, die Bilder der IP- Kamera sehen.
- Página 112 CAMIP6 9. Problemlösung Wichtige Bemerkung: Die Bildqualität hängt von den Einstellungen und die Qualität vom Netz ab. Für eine höhere • Bildqualität, wählen Sie eine höhere Auflösung und Bildgeschwindigkeit aus. Das Abspielen einer Videodatei auf einem lokalen Netz erfolgt normalerweise problemlos. Beim Fernabspielen einer Videodatei über das Internet spielt die Bandbreite vom Internetanschluss aber eine wichtige Rolle.
-
Página 113: Technische Daten
Ø117,5 x 82,6mm Gewicht 430g Verwenden Sie dieses Gerät nur mit originellen Zubehörteilen. Velleman NV übernimmt keine Haftung für Schaden oder Verletzungen bei (falscher) Anwendung dieses Gerätes. Für mehr Informationen zu diesem Produkt, siehe www.velleman.eu. Alle Änderungen ohne vorherige Ankündigung vorbehalten. - Página 114 Velleman®. Afin de garantir la qualité, nous soumettons régulièrement nos • Articles to be repaired must be delivered to your Velleman® dealer, produits à des contrôles de qualité supplémentaires, tant par solidly packed (preferably in the original packaging), and be notre propre service qualité...
- Página 115 - Verbrauchsgüter, Teile oder Zubehörteile, die regelmäßig Velleman®; ausgewechselt werden, wie z.B. Batterien, Lampen, Gummiteile, - se calcula gastos de transporte de y a Velleman® si el aparato Treibriemen, usw. (unbeschränkte Liste). ya no está cubierto por la garantía. - Schäden verursacht durch Brandschaden, Wasserschaden, Blitz, •...