Capítulos
Tabla de contenido

Manuales relacionados para Cuisinart Smart Stick CSB-179


Resumen de contenidos para Cuisinart Smart Stick CSB-179
- Página 1 INSTRUCTION AND RECIPE BOOKLET CSB-179 Smart Stick Variable Speed Hand Blender ® For your safety and continued enjoyment of this product, always read the instruction book carefully before using.
-
Página 2: Important Safeguards
Return the appliance to the nearest Cuisinart Repair Center for examination, repair, or mechanical or electrical adjustment. 8. Remove detachable shaft from the motor body before washing the blades or shaft. - Página 3 13. Check work bowl for presence of foreign objects before using. 14. The use of attachments or accessories not recommended by Cuisinart may cause fire, electric shock, or risk of injury. 15. Do not use outdoors or for other than its intended use.
-
Página 4: Tabla De Contenido
Warranty ..........30 UNPACKING INSTRUCTIONS Place the package containing the Cuisinart Smart Stick Variable ®... -
Página 5: Parts And Features
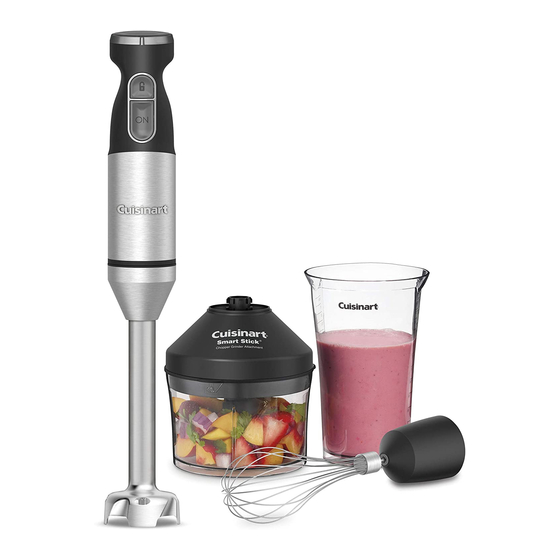
8a. Detachable Gear Box: Whisk attaches to it. 9. Chopper/Grinder Attachment with Reversible Blade: Chop, mince and grind with the Cuisinart chopper/grinder attachment. ® Chopper/grinder attaches to the motor body in place of the blending shaft or whisk attachment. - Página 6 PARTS AND FEATURES 1. Variable Speed Slide Control 2. Comfort 3. LOCK/ Handle 8. Whisk UNLOCK Button Attachment 4. ON/OFF Button 8a. Detachable 4a. Pulse Gear Box Feature 5. Motor Body Housing 6. Release Button (not shown) 9. Chopper/Grinder 7. Blending Attachment Shaft 7a.
-
Página 7: Assembly
ASSEMBLY BLENDING ATTACHMENT 1. Align the motor body housing with the blending shaft and push the pieces together until you hear and feel them click together. It may be helpful to press the release button when assembling. 2. Plug the power cord of the hand blender into an electrical outlet. -
Página 8: Whisk Attachment
NOTE: Whisk and whisk gearbox are detachable from one another. REVERSIBLE BLADE The Cuisinart Smart Stick Variable Speed Hand Blender chopper/ ® ® grinder attachment is equipped with a reversible blade. This blade is sharp on one side and blunt on the other. - Página 9 Assemble the parts: 1. Place the work bowl on a flat, dry, stable surface near an electrical outlet with the same specifications as the hand blender. 2. The fully assembled two-piece metal blade assembly (A) should be attached to the bottom of the work bowl. If not, slide it onto the metal shaft (B) in the bowl.
- Página 10 ridges (F) on either side of the sheath. Let the blade ring slide to bottom of sheath. 2. Grasp the top of the sheath firmly and, holding the grips (E) on the central hub of the blade ring, turn the blade ring clockwise to lock it into place on the sheath.
-
Página 11: Operation
OPERATION 1. Press and hold the 2. Then press and 3. Release the LOCK/ LOCK/UNLOCK hold the ON/OFF UNLOCK button while button button. continuing to hold down the ON/OFF button. No need to keep holding down the LOCK/UNLOCK button once the blender is operating. -
Página 12: Whisking
#5 under OPERATION BLENDING (unplug immediately after use). NOTE: Due to the powerful motor provided with this unit, Cuisinart recommends using one hand to support the work bowl during operation. 5. When you have finished processing the food, stop the unit by releasing the ON/OFF button. -
Página 13: Cleaning And Maintenance
Do not submerge the gearbox in water or any other liquids. Any service, other than cleaning and normal user maintenance, should be performed by an authorized Cuisinart Service Representative. TIPS AND HINTS FOR HAND BLENDER • When blending in the mixing cup, pour liquid ingredients in first, unless recipe instructs otherwise. - Página 14 • Do not fill mixing containers too full. The level of mixture will rise when blending and can overflow. • Liquid should not come closer than 1 inch of where the shaft attaches to the motor housing. • Using a gentle up-and-down motion is the best way to blend and incorporate ingredients uniformly.
- Página 15 FOR FOOD CHOPPER/GRINDER ATTACHMENT • Do not overload work bowl. For best results, most foods should not reach more than ∕ of the way up the work bowl. • Liquids in work bowl should not exceed 1½ cups. Use quantities given in the recipe section as a guide.
-
Página 16: Frequent Uses For Chopper/Grinder
FREQUENT USES FOR CHOPPER/GRINDER Ingredient Suggested Speed Comments Blade Baby foods (always Place small amounts of cooked foods into consult a pediatrician Low- chopper/grinder bowl. Add small amount of or family physician for Sharp Blade High appropriate liquid. Pulse to chop, then hold appropriate food to blend. -
Página 17: Recipes
SMOOTHIES AND DRINKS Simple Fruit Smoothie This recipe works great with any type of fruit or juice. Makes 16 Ounces ½ cup juice (use your favorite) ½ banana, cut into 1-inch pieces 1½ cups mixed fruit, fresh or frozen 1. Put all ingredients, in the order listed, into the mixing cup. 2. - Página 18 Power Blast Protein Smoothie Blend this for a post-workout pick-me-up. Makes about 16 ounces ½ cup coconut milk cup low-fat yogurt tablespoons protein powder banana, cut into ½-inch pieces cup mango pieces (½-inch pieces) ½ cup pineapple pieces (½-inch pieces) 1.
- Página 19 Chocolate Peanut Butter Ice Cream Shake This will satisfy your sweet tooth. Makes 2 cups 1½ cups chocolate ice cream teaspoons creamy peanut butter teaspoon chocolate syrup ¾ cup whole milk 1. Put all ingredients, in the order listed, into the mixing cup. 2.
- Página 20 Watermelon-Mint Refresher This summery drink doesn’t require any extra liquid to blend—the watermelon is watery enough. Makes 2 cups cup frozen strawberries tablespoon fresh mint leaves cups chopped watermelon, cut into ½-inch pieces 1. Put all ingredients, in the order listed, into the mixing cup. 2.
- Página 21 Hollandaise Using a hand blender makes this tricky-to-make sauce a no-fuss recipe that you will want to put on top of more than just poached eggs. Makes about 1 cup large egg yolks tablespoon fresh lemon juice ¾ teaspoon kosher salt ½...
- Página 22 Mango Salsa Serve alongside warm tortilla chips or over grilled chicken, fish or pork. The fresh flavors will brighten any simple meal. Makes about 1 cup garlic clove, peeled ¼ jalapeño, seeded and halved green onion, cut into ½-inch pieces tablespoon packed cilantro leaves cup grape tomatoes, halved ½...
- Página 23 Hummus This hummus is delicious on its own, but also makes a great foundation for new flavor variations like roasted pepper or fresh herbs. Makes about 2 cups garlic clove, peeled can (15.5 ounces) chickpeas, drained and rinsed ½ cup tahini tablespoons fresh lemon juice ¾...
-
Página 24: Black Bean Soup
minutes. Add the wine/vermouth, stirring to deglaze the pan (picking up the brown bits from the bottom of the pan and working into the mixture); let cook until fully evaporated. Add remaining ingredients. Increase heat to bring to a boil, then reduce the heat to allow to sim- mer, partially covered, for about 35 to 40 minutes. - Página 25 5. Remove soup from the heat. Using the blending shaft, blend on Low for about 20 seconds and then gradually increase to High and blend until very smooth, about 1 minute in total. Add remaining salt and vinegar; blend an additional 10 to 15 seconds to incorporate. 6.
- Página 26 • chol. 70mg • sod. 741mg • calc. 92mg • fiber 4g Cauliflower Soup Let this soup warm you up on a cold, winter afternoon. It is so easy to prepare with the Cuisinart Hand Blender. ® Makes about 6 cups...
- Página 27 additional couple of minutes. Add the broth and an additional ½ tea- spoon of the salt and increase heat. Allow liquid to come to a boil and then reduce heat so that the liquid is just simmering. 4. Simmer for about 20 minutes, until the cauliflower is tender. 5.
- Página 28 Berry Fool A traditional British dessert, fool is great any time of year, but is a real treat when summer berries are at their peak. Makes about 4 cups cups mixed berries (strawberries, raspberries, blueberries) tablespoon granulated sugar cups heavy cream, chilled tablespoons confectioners’...
- Página 29 Mexican Hot Chocolate Mexican chocolate is a stoneground chocolate that is mixed with sugar, spices or vanilla. It can be found in gourmet markets, some larger grocery stores or online. Makes 1½ cups 1½ cups whole milk ounces Mexican chocolate, broken into ½-inch pieces teaspoons granulated sugar Large pinch ground cinnamon Pinch cayenne...
-
Página 30: Warranty
To facilitate the speed and accuracy of your return, please enclose $10.00 for shipping and handling of the product. Please pay by check or money order made payable to Cuisinart (California residents need only supply proof of purchase and should call 1-800-726-0190 for shipping instructions). - Página 31 Cuisinart for repair, or if necessary, replacement, by calling our Consumer Service Center toll-free at 1-800-726-0190. Cuisinart will be responsible for the cost of the repair, replacement, and shipping and handling for such products under warranty. BEFORE RETURNING YOUR CUISINART PRODUCT...
- Página 32 ©2017 Cuisinart 150 Milford Road East Windsor, NJ 08520 Printed in China Trademarks or service marks of third 17CE031224 parties referred to herein are the trademarks or service marks of their IB-15341-ESP respective owners.
-
Página 33: Instrucciones Ylibro De Recetas
INSTRUCCIONES Y LIBRO DE RECETAS CSB-179 Licuadora de mano de velocidad variable Smart Stick ® Para su seguridad y para disfrutar plenamente de este producto, siempre lea cuidadosamente las instrucciones antes de usarlo. -
Página 34: Medidas De Seguridad Importantes
MEDIDAS DE SEGURIDAD IMPORTANTES Al usar aparatos eléctricos, especialmente en presencia de niños, siempre debe tomar precauciones básicas de seguridad, incluso las siguientes: 1. LEA TODAS LAS INSTRUCCIONES. 2. Desconecte el aparato cuando no está en uso, antes de instalar/sacar piezas y antes de limpiarlo. Para desconectar el cable de la toma de corriente, agárrelo por la clavija;... -
Página 35: Para Uso Doméstico Solamente
13. Averigüe que no hay objetos extraños en el bol antes del uso. 14. El uso de aditamentos o accesorios no recomendados por Cuisinart presenta un riesgo de incendio, electrocución o heridas. 15. No lo utilice en exteriores, ni para ningún fin que no sea el indicado. -
Página 36: Instrucciones De Desembalaje
ÍNDICE Medidas de seguridad importantes ......2 Instrucciones de desembalaje ......4 Piezas y características . -
Página 37: Piezas Y Características
PIEZAS Y CARACTERÍSTICAS 1. Control de velocidad: Permite ajustar la velocidad desde bajo hasta alto dependiendo de los ingredientes que está licuando. 2. Cómoda empuñadura: la empuñadura ergonómica permite manejar la licuadora de mano con facilidad. 3. Botón de bloqueo de seguridad: Debe presionarse para que el motor se encienda, lo que evita encender la unidad por accidente. - Página 38 PIEZAS Y CARACTERÍSTICAS 1. Control de velocidad 2. Cómoda 3. Botón de empuñadura 8. Accesorio bloqueo de seguridad batidor 8a. Caja de engranajes de 4. Botón de acoplamiento encendido/ removible apagado 4a. Función de pulso 5. Bloque- motor 6. Botón de liberación (no ilustrado) 9.
-
Página 39: Ensamblaje
ENSAMBLAJE ACCESORIO LICUADOR 1. Haga coincidir la varilla licuadora con el bloque-motor (la empuñadura) y conecte ambas piezas, presionando hasta que encajen. Nota: puede resultar útil oprimir el botón de liberación de la varilla. 2. Enchufe el cable en una toma de corriente. -
Página 40: Accesorio Picador
NOTA: la caja de engranajes de acoplamiento es removible. CUCHILLA REVERSIBLE El accesorio picador/moledor de la licuadora de mano multifunción con velocidad variable Smart Stick de Cuisinart está equipado con ® ® una cuchilla reversible. La cuchilla reversible tiene un filo afilado para moler, y otro recto para picar. - Página 41 Ensamblaje: 1. Coloque el bol sobre una superficie plana, seca y segura, cerca de un enchufe eléctrico con las mismas especificaciones eléctricas que el aparato. 2. La cuchilla de dos piezas ensamblada (A) debería encontrarse en el fondo del bol. Si lo está, deslícela sobre el eje de metal (B) del bol.
-
Página 42: Cuchilla De Doble Filo
Ensamblaje de la cuchilla a mano: 1. Coloque el aro metálico (C) sobre el eje de plástico de la cuchilla (D), haciendo coincidir las muescas en el centro del aro con los resaltes (F) en los costados del eje de plástico. Deje que la cuchilla se deslice a lo largo del eje de plástico. -
Página 43: Operación
OPERACIÓN 1. Presione y mantenga 2. Presione y 3. Suelte el botón presionado el botón mantenga de bloqueo de de bloqueo de presionado el botón seguridad, pero seguridad de encendido/ siga presionando el apagado. botón de encendido/ apagado. Una vez encendida la licuadora de mano, no es necesario seguir presionando el botón de bloqueo de seguridad. -
Página 44: Para Usar La Functión De Pulso
PARA USAR LA FUNCIÓN DE PULSO 1. Presione y mantenga presionado el botón de bloqueo de seguridad. 2. Presione y mantenga presionado el botón de encendido/ apagado. 3. Presione y suelte repetidamente el botón de encendido/apagado (mientras mantiene el botón de bloqueo de seguridad presionado) para procesar los ingredientes en forma intermitente hasta conseguir la consistencia deseada. -
Página 45: Limpieza Y Mantenimiento
LIMPIEZA Y MANTENIMIENTO BLOQUE-MOTOR Y VARILLA LICUADORA Siempre desenchufe el Smart Stick antes de la limpieza. Limpie ® el bloque-motor y la varilla licuadora cuidadosamente después de cada uso. Separe la varilla licuadora del bloque-motor. Limpie el bloque-motor con una esponja o un paño ligeramente humedecidos. No utilice limpiadores abrasivos, los cuales podrían dañarlo. - Página 46 • Cuando licue directamente en el vaso medidor/envase de mezcla, por ejemplo para preparar batidos de frutas, corte los alimentos en trocitos de ½ pulgada (1.5 cm). • Asegúrese de que el protector de cuchillas está completamente sumergido antes de empezar a licuar. •...
- Página 47 • Si el tiempo lo permite, es aconsejable refrigerar el tazón y el batidor antes de batir crema. El mejor tazón para batir crema es un tazón profundo con un fondo redondo que minimiza las salpicaduras. • Guarde la crema/nata en el refrigerador hasta el momento de batirla. Bata la crema hasta conseguir picos suaves o firmes, al gusto.
-
Página 48: Pautas De Uso Del Accesorio Picador/Moledor
PAUTAS DE USO DEL ACCESORIO PICADOR/MOLEDOR Lado de Ingrediente la cuchilla Velocidad Comentarios recomendado Colocar una pequeña cantidad de alimentos cocidos en el bol. Agregar una pequeña cantidad de líquido. Papillas (siempre pida consejo a Afilado Baja/Alta Pulsar para picar, y luego procesar continuamente su pediatra/médico) para licuar. -
Página 49: Batidos Y Bebidas
BATIDOS Y BEBIDAS Batido de frutas simple Esta receta puede servir para preparar muchos batidos, usando cualquier tipo de jugo o fruta. Rinde 16 onzas (475 ml) ½ taza (120 ml) de su jugo favorito ½ banana, en trozos de 1 pulgada (2.5 cm) 1½... -
Página 50: "Smoothie" De Cereza Con Jengibre
Batido (“smoothie”) proteico Este batido energizante es perfecto después de hacer ejercicio. Rinde aproximadamente 16 onzas (475 ml) ½ taza (120 ml) de leche de coco taza (80 ml) de yogur bajo en grasa cucharadas de proteína en polvo banana congelada, en trozos de ½ pulgada (1.5 cm) taza (150 g) de cubos de ½... -
Página 51: Batido De Helado De Chocolate Con Mantequilla De Maní
Batido de helado de chocolate con mantequilla de maní Este batido satisfará a los aficionados a los dulces. Rinde 2 tazas (475 ml) 1½ tazas (355 ml) de helado de chocolate cucharaditas de mantequilla de maní cremosa cucharadita de jarabe de chocolate ¾... -
Página 52: Licuado De Sandía Con Menta
Licuado de sandía con menta Esta refrescante bebida no requiere ningún tipo de líquido adicional; toda el agua proviene de la sandía. Rinde 2 tazas (475 ml) taza (200 g) de fresas congeladas cucharada de hojas de menta fresca tazas (500 g) de sandía, picada 1. -
Página 53: Salsa Holandesa
Nutritional information per serving (1 tablespoon, Aioli): Calorías 169 (98 % de grasa) • Carbohidratos 1 g • Proteínas 0 g • Grasa 19 g Grasa saturada 3 g • Colesterol 23 mg • Sodio 33 mg • Calcio 4 mg • Fibra 0 g Salsa holandesa Gracias a su licuadora de mano, esta salsa por lo general complicada es tan fácil de preparar que la querrá... -
Página 54: Salsa De Mango
segundos, usando un movimiento suave hacia arriba y abajo, hasta obtener una mezcla homogénea. 3. Probar y ajustar la sazón al gusto. Información nutricional por porción (2 cucharadas): Calorías 181 (100 % de grasa) • Carbohidratos 0 g • Proteínas 0 g • Grasa 21 g Grasa saturada 3 g •... -
Página 55: Salsa De Pimiento Rojo Asado Y Tomate
pulsar, usando velocidad alta (HIGH), hasta conseguir la consistencia deseada. 2. Probar y ajustar la sazón al gusto. Información nutricional por porción (2 cucharadas): Calorías 30 (72 % de grasa) • Carbohidratos 2 g • Proteínas 0 g • Grasa 3 g Grasa saturada 0 g •... -
Página 56: Sopa De Frijoles Negros
1. Calentar el aceite de oliva a fuego medio, en un sartén mediano. Cuando esté caliente, agregar la cebolla, la zanahoria, el apio, el ajo y la albahaca. Tapar parcialmente y cocinar por 6 a 8 minutos, hasta que los vegetales estén tiernos, pero sin permitir que se doren. Agregar el vino y raspar el fondo de la cacerola con un cucharón para despegar los pedazos. - Página 57 3. Agregar ¾ cucharadita de la sal, la hoja de laurel y el comino. Cocinar, revolviendo, por aproximadamente 1 minuto, hasta que la mezcla esté fragrante. 4. Agregar los frijoles (en su jugo) y el caldo. Cocinar a fuego lento, parcialmente tapado, por 20 a 25 minutos, hasta que todos los ingredientes estén tiernos.
-
Página 58: Sopa De Coliflor
Grasa saturada 11 g • Colesterol 70 mg • Sodio 741 mg • Calcio 92 mg • Fibra 4 g Sopa de coliflor Esta sopa rica y cremosa le calentará en los días fríos del invierno. Es muy fácil de preparar gracias a su licuadora de mano inalámbrica Cuisinart ® Rinde aproximadamente 6 tazas (1.4 L) puerro mediano (parte blanca y verde claro solamente), en rodajas de 1 pulgada (2.5 cm) -
Página 59: Puré De Camote
2. Calentar el aceite de oliva a fuego medio, en una olla. Una vez caliente, agregar el puerro y saltear suavemente por aproximadamente 5 minutos, hasta que esté suave y fragante pero sin permitir que se dore. 3. Agregar los cogollos de coliflor y 1 cucharadita de sal/pimienta/comino. Revolver y saltear suavemente por 2 minutos adicionales. - Página 60 “Fool” de frutas del bosque (crema batida con puré de frutas del bosque) Este postre británico tradicional es perfecto en cualquier momento del año, pero es verdaderamente delicioso en verano, cuando las frutas del bosque están maduras. Rinde aproximadamente 4 tazas (945 ml) tazas (400 g) de frutas del bosque mixtas (fresas, frambuesas, arándanos azules) cucharada de azúcar granulada...
-
Página 61: Chocolate Caliente Mexicano
Chocolate caliente mexicano El chocolate mexicano es un chocolate molido a piedra y mezclado con azúcar, especias y vainilla. Está disponible en las tiendas especializadas y en algunos supermercados grandes, o en línea. Rinde 1½ taza (355 ml) 1½ tazas (355 ml) de leche entera onzas (85 g) de chocolate semidulce, en pedacitos cucharaditas de azúcar granulada pizca grande de canela en polvo... -
Página 62: Garantía
Le aconsejamos que llene el formulario de registro disponible en www.cuisinart.com a fin de facilitar la verificación de la fecha de compra original. Sin embargo, no es necesario registrar el producto para recibir servicio bajo esta garantía. En ausencia del recibo de compra, el período de garantía será... -
Página 63: Antes De Hacer Reparar Su Aparato
Los residentes de California también pueden, si lo desean, mandar el aparato defectuoso directamente a Cuisinart para que lo reparen o lo cambien. Para esto, se debe llamar a nuestro servicio posventa al 1-800-726-0190. - Página 64 ©2017 Cuisinart 150 Milford Road East Windsor, NJ 08520 Impreso en China Todas las marcas registradas, 17CE031224 comerciales o de servicio mencionadas en este documento pertenecen a sus IB-15341-ESP titulares respectivos.