Tabla de contenido
Publicidad
Idiomas disponibles
Idiomas disponibles
Enlaces rápidos
Publicidad
Tabla de contenido

Manuales relacionados para Alesis Strike Performance Drum Module


Resumen de contenidos para Alesis Strike Performance Drum Module
- Página 1 Quickstart Guide English ( 3 – 8 ) Guía de inicio rápido Español ( 9 – 14 ) Guide d’utilisation rapide Français ( 15 – 20 ) Guida rapida Italiano ( 21 – 26 ) Schnellstart-Anleitung Deutsch ( 27 – 32 ) Appendix English ( 34 –...
- Página 3 Quickstart Guide (English) Introduction Thanks for choosing the Alesis Strike Performance Drum Module! This guide contains some basic information so you can get started quickly. To get the most out of your experience, though, we recommend visiting alesis.com and downloading the complete user guide to learn more about all of its great features.
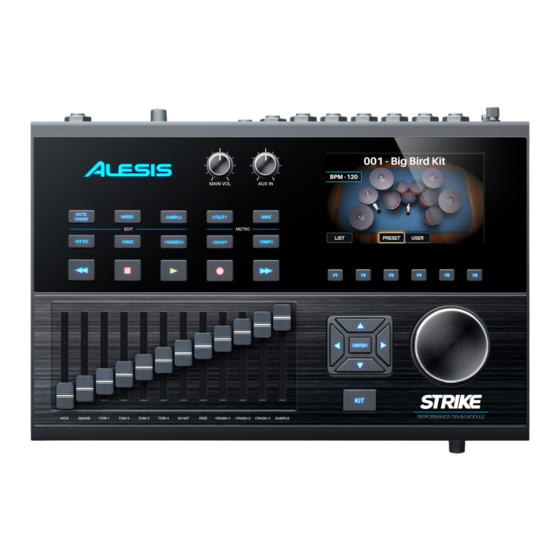
- Página 4 Features Top Panel 12 13 14 15 16 17 18 19 20 21 1. Display: This full-color display shows the current kit, settings, and other information. Use the cursors to move through the menus and lists shown here. Use the Data Dial to scroll through available options.
- Página 5 11. Sliders: Use these sliders to adjust the independent volume level of each trigger in your current kit. The trigger’s name is shown under the slider. 12. Note Chase: Press this button to activate or deactivate the Note Chase feature. When active, hitting a trigger will automatically select it in the drum module.
- Página 6 Rear Panel 1. Power Input: Connect the included power adapter (12 V, 2 A, center-positive) to this input. 2. Cable Restraint: You can secure the cable of the power adapter to this restraint to help prevent disconnecting it accidentally. 3. Power Switch: Press this button to power the drum module on or off. Power it on only after you have connected all of your input devices and before you power on any connected loudspeakers.
-
Página 7: Basic Operation
Basic Operation Below is some basic information so you can get started quickly using your Strike Performance Drum Module. Remember to download the complete user guide from alesis.com to learn about all of its great features. Using the Display The Strike module’s display shows information about its current mode and operations. - Página 8 Editing Kits Whenever you edit an instrument, it changes the kit, which is essentially the same as editing the kit. To edit a voice: Press Kit to enter the Kit menu (the default view when you power on the drum module). Select a kit (described above in Selecting Kits).
-
Página 9: Introducción
Guía de inicio rápido (Español) Introducción Gracias por elegir el Strike Performance Drum Module de Alesis! Estrella contiene cierta información básica para que pueda comenzar rápidamente. Para aprovechar al máximo su experiencia, le recomendamos visitar alesis.com y descargar la guía de usuario completa para aprender más sobre todas sus fabulosas características. -
Página 10: Características
Características Panel superior 12 13 14 15 16 17 18 19 20 21 1. Pantalla: Esta pantalla a todo color muestra el kit actual, los ajustes y demás información. Use los cursores para desplazarse por los menús y listas que se muestran aquí. Utilice el cuadrante de datos para desplazarse a través de las opciones disponibles. - Página 11 9. Salida para auriculares (6,35 mm / 1/4 pulg.): Conecte a esta entrada sus auriculares estéreos. Ajuste el volumen con la perilla Headphone Vol. 10. Headphone Vol: Gire esta perilla para ajustar el volumen de la salida para auriculares. 11. Controles deslizantes: Utilice estos controles deslizantes para ajustar el nivel de volumen independiente de cada disparador en su kit actual.
- Página 12 Panel trasero 1. Entrada de corriente: Conecte a esta entrada el adaptador de corriente (12 V, 2 A, pin central positivo) incluido. 2. Presilla del cable: Puede fijar el cable del adaptador de corriente a esta presilla para evitar que se desenchufe accidentalmente. 3.
-
Página 13: Funcionamiento Básico
Funcionamiento básico A continuación le brindamos información básica para que pueda comenzar rápidamente a usar su Strike Performance Drum Module. Recuerde descargar la guía de usuario completa de alesis.com para aprender sobre todas sus fabulosas características. Uso de la pantalla La pantalla del módulo de batería Strike muestra... - Página 14 Edición de los kits Siempre que edite un instrumento, esto modifica el kit, lo que esencialmente equivale a editar el kit. Cómo editar una voz: Pulse Kit para entrar al menú Kit (la vista predeterminada cuando enciende el módulo de la batería).
- Página 15 Guide d’utilisation rapide (Français) Présentation Nous vous remercions d’avoir choisi le Strike Performance Drum Module d’Alesis ! Ce guide contient les informations de base afin que vous puissiez commencer à jouer rapidement. Afin de tirer le meilleur parti du module, nous recommandons de visiter alesis.com...
- Página 16 Caractéristiques Panneau supérieur 12 13 14 15 16 17 18 19 20 21 1. Écran : Cet écran couleur affiche le kit sélectionné, les réglages et d’autres informations. Utilisez les touches de déplacement afin de parcourir les menus et les listes affichés. Utilisez la molette des valeurs pour faire défiler les options disponibles.
- Página 17 9. Sortie casque (6,35 mm) : Cette sortie permet de brancher un casque d’écoute stéréo. Le niveau de cette sortie peut être réglé avec le bouton Headphone Vol. 10. Headphone Vol : Ce bouton permet de régler le volume de la sortie casque. 11.
- Página 18 Panneau arrière 1. Entrée d’alimentation : Branchez le câble d’alimentation secteur fourni (12 V, 2 A, centre positif) à cette entrée, puis branchez l’autre l’extrémité à une prise secteur. 2. Clip de retenue : Ce clip permet de fixer le câble d’alimentation afin de ne pas le débrancher accidentellement.
-
Página 19: Fonctionnement De Base
Fonctionnement de base Les informations de base ci-dessous vous permettront de commencer à utiliser rapidement le Strike Performance Drum Module. N’oubliez pas de télécharger le Guide d’utilisation du site alesis.com afin d’en savoir plus sur l’ensemble de ses fonctionnalités. Écran L’écran du Strike affiche des informations sur le mode... - Página 20 Modification des kits Chaque fois que vous modifiez un instrument, cela modifie le kit. C’est essentiellement la même chose que de modifier le kit. Pour modifier une voix : Appuyez sur la touche Kit afin d’accéder au mode Kit (l’affichage par défaut lorsque vous mettez le module de percussion sous tension).
- Página 21 Guida rapida (Italiano) Introduzione Grazie per aver scelto lo Strike Performance Drum Module di Alesis! La presente guida contiene alcune informazioni di base che consentono di iniziare rapidamente a utilizzare il prodotto. Per poter trarre il massimo dall’esperienza, tuttavia, raccomandiamo di visitare la pagina alesis.com...
-
Página 22: Caratteristiche
Caratteristiche Pannello superiore 12 13 14 15 16 17 18 19 20 21 1. Display: questo display a colori mostra il kit corrente, le impostazioni e altre informazioni. Servirsi dei cursori per scorrere tra i menu e gli elenchi illustrati a questo livello. Servirsi della manopola data per scorrere lungo le opzioni disponibili. - Página 23 9. Uscita cuffie (1/4” / 6,35 mm): collegare a questa uscita le proprie cuffie stereo. Regolare il volume servendosi della manopola Headphone Vol. 10. Headphone Vol: girare questa manopola per regolare il volume dell’uscita cuffie. 11. Cursori: servirsi dei cursori per regolare il livello indipendente del volume di ciascun trigger nel kit corrente.
- Página 24 Pannello posteriore 1. Ingresso di alimentazione: collegare l’adattatore di alimentazione in dotazione (12 V, 2 A, centro positivo) a questo ingresso. 2. Sicura per il cavo: si può fissare il cavo dell’adattatore di alimentazione a questo dispositivo per evitare di scollegarlo accidentalmente. 3.
-
Página 25: Funzionamento Base
Funzionamento base Seguono alcune informazioni base per iniziare rapidamente a utilizzare lo Strike Performance Drum Module. Scaricare la guida per l’uso completa su alesis.com per conoscere tutte le sue fantastiche funzioni. Utilizzo del display display modulo batteria Strike mostra informazioni in merito alla modalità corrente e alle relative operazioni. - Página 26 Modifica dei Kit Quando si modifica uno strumento, la modifica va a modificare il kit, quindi è praticamente la stessa cosa che modificare un kit. Per modificare una voce: Premere Kit per entrare nel menu Kit (la vista predefinita quando si accende il modulo batteria).
- Página 27 Schnellstart-Anleitung (Deutsch) Einführung Wir danken Ihnen, dass Sie sich für das Strike Performance Drum Module entschieden haben! Dieses Handbuch enthält einige grundlegende Informationen, so dass Sie schnell beginnen können. Um das Produkt optimal zu nutzen, empfehlen wir Ihnen, alesis.com besuchen und das komplette Benutzerhandbuch herunterzuladen, um mehr über all seine wichtigen Funktionen zu lernen.
- Página 28 Funktionen Oberseite 12 13 14 15 16 17 18 19 20 21 1. Display: Dieses Vollfarbdisplay zeigt das aktuelle Kit, die Einstellungen und weitere Informationen an. Verwenden Sie die Cursor-Tasten, um sich durch die hier gezeigten Menüs und Listen zu bewegen. Verwenden Sie das Datenrad, um durch die verfügbaren Optionen zu blättern.
- Página 29 9. Kopfhörerausgang (6,35 mm): Schließen Sie Ihre Stereokopfhörer an diesen Eingang an. Stellen Sie die Lautstärke mit dem Headphone Vol-Regler ein. 10. Headphone Vol: Mit diesem Regler stellen Sie die Lautstärke des Kopfhörerausgangs ein. 11. Schieberegler: Verwenden Sie diese Schieberegler, um die unabhängige Lautstärke jedes Triggers in Ihrem aktuellen Kit anzupassen.
- Página 30 Rückseite 1. Netzeingang: Stecken Sie das mitgelieferte Netzteil (12 V, 2 A, mittlerer Pin mit positiver Polarität) in diesen Eingang. 2. Kabelhalter: Sie können das Stromkabel mit dieser Halterung sichern, um ein versehentliches Trennen zu verhindern. 3. Netzschalter: Drücken Sie diese Taste, um das Drum Modul ein- oder auszuschalten. Schalten Sie es erst ein, nachdem Sie all Ihre Eingabegeräte verbunden haben und bevor Sie Ihre verbundenen Lautsprecher einschalten.
-
Página 31: Einfacher Betrieb
Einfacher Betrieb Im Folgenden finden Sie einige grundlegende Informationen, damit Sie sofort mit der Verwendung Ihres Strike Performance Drum Module beginnen können. Denken Sie daran, die komplette Bedienungsanleitung von alesis.com herunterzuladen, um sich mit all seine großartigen Funktionen vertraut zu machen. - Página 32 So bearbeiten Sie Kits Wenn Sie ein Instrument bearbeiten, wird das Kit geändert. Dies kommt praktisch einem Bearbeiten des Kits gleich. So bearbeiten Sie eine Voice: Drücken Sie Kit, um in das Kit-Menü zu gelangen (die Standardansicht, wenn Sie das Drum-Modul einschalten).
-
Página 34: Technical Specifications
Appendix (English) Technical Specifications 136 kits Kits & Sounds 1,900 instruments Unlimited user kits, depending on SD card size (see requirements below) Display 4.4” / 111 mm (diagonal) 3.8” x 2.2” / 96 x 55 mm (width x height) Full-color LED-backlit display Connections Inputs (13) 1/4”... -
Página 35: Trademarks & Licenses
(f) consult the dealer or an experienced radio/television technician for help. Strike Performance Drum Module may be affected by static electricity. If this occurs, simply turn the module off and wait at least a few seconds before turning it on again. This device complies with Part 15 of the FCC rules. - Página 36 Manual Version 1.6...