Tabla de contenido
Publicidad
Idiomas disponibles
Idiomas disponibles
Enlaces rápidos
40 FLEXX guitarbug
BEDIENUNGSANLEITUNG
Bitte vor Inbetriebnahme des Gerätes lesen!
USER INSTRUCTIONS
. . . . . . . .
Please read the manual before using the equipment!
MODE D'EMPLOI
. . . . . . . . . . . . . . . .
Veuillez lire cette notice avant d'utiliser le système!
ISTRUZIONI PER L'USO
Prima di utilizzare l'apparecchio, leggere il manuale!
MODO DE EMPLEO
. . . . . . . . . . . .
¡Sirvase leer el manual antes de utilizar el equipo!
INSTRUÇÕES DE USO
. . . . . . . .
Favor leia este manual antes de usar o equipamento!
S. 2
. .
p. 10
p. 18
p. 26
. . . . .
p. 34
p. 42
Publicidad
Capítulos
Tabla de contenido

Manuales relacionados para AKG GB 40 FLEXX guitarbug


Resumen de contenidos para AKG GB 40 FLEXX guitarbug
- Página 1 40 FLEXX guitarbug BEDIENUNGSANLEITUNG S. 2 Bitte vor Inbetriebnahme des Gerätes lesen! USER INSTRUCTIONS p. 10 ..Please read the manual before using the equipment! MODE D’EMPLOI p. 18 ....Veuillez lire cette notice avant d’utiliser le système! ISTRUZIONI PER L’USO p.
-
Página 2: Tabla De Contenido
5 Reinigung ....................8 2.2 Lieferumfang ................3 2.3 Optionales Zubehör..............3 6 Technische Daten ................9 2.4 Beschreibung ................3 2.5 Bedienelemente.................4 3 Inbetriebnahme ...................5 3.1 Batterie einlegen/tauschen und testen ........5 3.2 Betrieb mit Akku ................6 4 Anwendung ..................7 4.1 Sender befestigen..............7 GB 40 FLEXX guitarbug... -
Página 3: Sicherheit Und Umwelt
• Kontrollieren Sie bitte, ob die Verpackung alle 1 Sicherheit und Umwelt 2 Beschreibung oben angeführten Teile enthält. Falls etwas fehlt, wenden Sie sich bitte an Ihren AKG-Händler. 1.1 Sicherheit 2.1 Einleitung 2.3 Optionales Zubehör 1. Setzen Sie das Gerät nicht direkter Sonnen- Vielen Dank, dass Sie sich für ein Produkt aus dem... -
Página 4: Bedienelemente
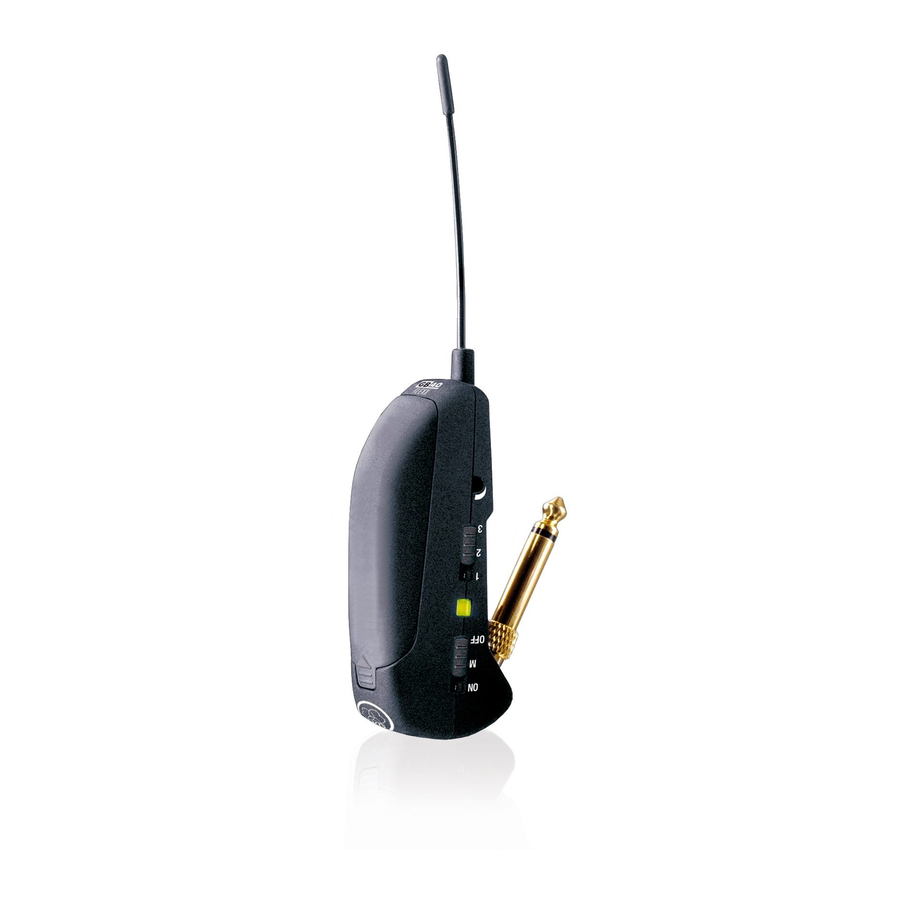
Sie den Sender auf eine von eingeschaltet. Dadurch wird der Empfänger drei verschie denen Trägerfre quenzen innerhalb trotz abgeschaltetem Mikrofon nicht durch des Trägerfrequenzbandes des Senders ein- andere Sender gestört. stellen. Abb. 1: Bedienelemente GB 40 FLEXX GB 40 FLEXX guitarbug... -
Página 5: Inbetriebnahme
Batterie anson- sten nicht richtig im Batterie fach fixiert ist und Klapper geräusche ver- ursachen kann. 3. Wenn sich eine leere oder defekte Batterie im Batteriefach befindet, nehmen Sie diese her- aus. Abb. 2: Batterie einlegen GB 40 FLEXX guitarbug... -
Página 6: Betrieb Mit Akku
Pfeilrichtung auf den Sender, bis der Bat- teriefach deckel (1) einrastet. 3.2 Betrieb mit Akku Sie können den Sender anstelle einer normalen Batterie auch mit einem 1,2 V-Akku betreiben. Wir empfehlen NiMH-Akkus des Typs SANYO HR-4U GB 40 FLEXX guitarbug... -
Página 7: Anwendung
3. Schalten Sie den Sender ein, indem Sie den möglicherweise zu kurz, um den elektrischen Kon- Ihres Instru ments hinein. ON/MUTE/OFF-Schalter (1) auf ON stellen. takt zum Sender herzustellen. Die im Sender eingebaute Feder fixiert den GB 40 FLEXX guitarbug... -
Página 8: Sender Stabilisieren
Gewindestecker (4) am Sender (2) auf. 4.5 Fehlerbehebung 4.4 Sender stabilisieren (s. Abb. 5) Hinweise zur Fehlerbehebung finden Sie in der • Verwenden Sie zum Sabilisieren des Senders Bedienungsanleitung des Empfängers SR 40 FLEXX. den mitgelieferten Klettverschluss: GB 40 FLEXX guitarbug... -
Página 9: Technische Daten
6 Technische Daten Trägerfrequenz 660 - 865 MHz Dieses Produkt entspricht den in der Konformitätserklärung angegebenen Normen. Sie können die Konformitätserklärung auf http://www.akg.com oder Modulation per E-Mail an sales@akg.com anfordern. Frequenzstabilität (-10°C bis +50°C): ±15 kHz HF-Ausgangsleistung typ. 5 mW... - Página 10 4.5 Troubleshooting ...............16 2.1 Introduction ................12 2.2 Packing List................12 5 Cleaning ....................16 2.3 Optional Accessories..............12 2.4 Descriptiuon ................12 6 Specifications..................17 2.5 Controls ..................12 3 Setting Up ..................13 3.1 Inserting/Replacing and Testing Batteries ........13 3.2 Using Rechargeable Batteries ...........14 GB 40 FLEXX guitarbug...
-
Página 11: Fcc Statement
3. The packaging of the equipment is recyclabe. user is encouraged to try to correct the interfer- in writing by AKG Acoustics may void the user’s To dispose of the packaging, make sure to use ence by one or more of the follow ing measures: authority to operate this equipment. -
Página 12: Description
Operating in the 660 MHz to 865 MHz UHF range, the 2.1 Introduction GB 40 FLEXX provides three selectable, quartz stabi- Thank you for purchasing an AKG product. Please 2.3 Optional Accessories lized carrier frequencies within the 3-MHz-wide fre- take a few minutes to read the instructions quency band you specified at the time of ordering and •... -
Página 13: Setting Up
Refer to the Manual battery compartment as shown in fig. 2. Supplement sheet for a color code table. 5. Set the ON/MUTE/OFF switch (3) to ON. Fig. 1: GB 40 FLEXX controls GB 40 FLEXX guitarbug... -
Página 14: Using Rechargeable Batteries
Rechargeable PRO+ (550 mAh) NiMH re- chargeable batteries. Note: If you use a rechargeable battery, the LED will switch to red 15 to 20 minutes before the battery will be dead! Fig. 2: Inserting a battery. GB 40 FLEXX guitarbug... -
Página 15: Operating Notes
4. Set the SQUELCH control on the receiver to The spring inside the transmitter will hold the 1. Unscrew the jack plug (1) from the transmitter minimum and switch power to your receiver transmitter securely in place on the instrument. (2) CCW. GB 40 FLEXX guitarbug... -
Página 16: Stabilizing The Transmitter
• For troubleshooting hints, refer to the instruc- transmitter sit more securely on your instru- tion manual of your SR 40 FLEXX receiver. ment: 1. Remove the backing from one of the pads and attach it to the transmitter rear panel. GB 40 FLEXX guitarbug... -
Página 17: Specifications
1.5-V AAA size battery Current consumption typ. 75 mA Battery life >11/>6 hours (dry/rechargeable battery) Size (WxDxH) 76 x 20 x 28 mm (3 x 0.8 x 1.1 in.) Net weight 28 g (1 oz.) GB 40 FLEXX guitarbug... - Página 18 6 Caractéristiques techniques .............25 2.4 Description ................19 2.5 Eléments de commande............20 3 Mise en service.................21 3.1 Mise en place/remplacement et essai de la pile ......21 3.2 Fonctionnement sur accu ............22 4 Mode opératoire................23 4.1 Fixation de l’émetteur ..............23 GB 40 FLEXX guitarbug...
-
Página 19: Sécurité Et Écologie
1. Ne placez jamais l’appareil à un endroit où il Nous vous remercions d’avoir choisi un produit risque d’être exposé directement au soleil, à AKG. Veuillez lire très attentivement ce mode • Vous trouverez la liste des accessoires option- une atmosphère poussiéreuse, à l’humidité, à... -
Página 20: Eléments De Commande
émetteurs. gamme des fréquences porteuses de l'émet- OFF : L’émetteur n’est pas sous tension. teur. Fig. 1 : Eléments de commande sur le GB 40 FLEXX GB 40 FLEXX guitarbug... -
Página 21: Mise En Service
3. Enlevez, le cas échéant, la pile épuisée ou défectueuse se trouvant dans le compartiment. 4. Mettez la pile fournie ou la nouvelle pile (2) dans le compartiment comme indiqué à la Fig. 2. Fig. 2 : Mise en place de la pile GB 40 FLEXX guitarbug... -
Página 22: Fonctionnement Sur Accu
3.2 Fonctionnement sur accu Au lieu d’une pile normale, vous pouvez également utiliser un accu de 1,2 V. Nous recommandons les accus NiMH, type SANYO HR-4U (650 mAh) ou Panasonic Rechargeable PRO+ (550 mAh). GB 40 FLEXX guitarbug... -
Página 23: Mode Opératoire
3. Mettez l’émetteur sous tension en amenant le sortie (3) de votre instrument. peut que la fiche Jack de l’émetteur soit trop cour- curseur ON/MUTE/OFF (1) sur ON. Le ressort intégré dans l’émetteur fixe celui-ci te pour établir le contact avec l’émetteur. GB 40 FLEXX guitarbug... -
Página 24: Stabilisation De L'émetteur
2. Vissez l’adaptateur (3) sur la fiche filetée (4) de l’émetteur (2). 4.5 Dépannage 4.4 Stabilisation de l’émetteur (voir Fig. 5) • Vous trouverez les instructions relatives au • Pour stabiliser l’émetteur, utilisez les disques dépannage dans le mode d’emploi de votre autoagrippants fournis: récepteur. GB 40 FLEXX guitarbug... -
Página 25: Caractéristiques Techniques
Ce produit est conforme aux normes citées dans la Déclaration de Conformité, dont vous pouvez prendre connaissance en consultant le site Modulation http://www.akg.com ou en adressant un e-mail à sales@akg.com. Stabilité de fréquence (entre -10°C et +50°C) : ±15 kHz Puissance sortie HF typ. - Página 26 6 Dati tecnici ..................33 2.4 Descrizione................27 2.5 Elementi di comando ...............28 3 Messa in funzione ................29 3.1 Inserire/sostituire e testare la batteria ........29 3.2 Esercizio con accumulatori ............30 4 Impiego .....................31 4.1 Come fissare il trasmettitore.............31 GB 40 FLEXX guitarbug...
-
Página 27: Sicurezza Ed Ambiente
AKG. 1.1 Sicurezza 2.1 Introduzione 1. Non esponete l’apparecchio direttamente al Vi ringraziamo di aver scelto un prodotto dell‘AKG. 2.3 Accessori opzionali sole, alla polvere e all'umidità, alla pioggia, a Leggete per favore attentamente le istruzioni •... -
Página 28: Elementi Di Comando
Fig. 1: Elementi di comando del GB 40 FLEXX GB 40 FLEXX guitarbug... -
Página 29: Messa In Funzione
Non togliete il cuscinetto perché altrimenti la batte- ria non è fissata bene nello scompar- to e può causare rumori. 3. Se c’è una batteria esausta o difettosa nello scomparto batteria, toglietela. Fig. 2: Come inserire la batteria GB 40 FLEXX guitarbug... -
Página 30: Esercizio Con Accumulatori
6. Mettete il coperchio dello scomparto batteria (1) sul trasmettitore, facendolo scorrere contro la direzione della freccia fin quando il coper- chio (1) scatta. 3.2 Esercizio con accumulatori Potete far funzionare il trasmettitore anche con un GB 40 FLEXX guitarbug... -
Página 31: Impiego
4. Portate il regolatore SQUELCH disposto sul to elettrico con il trasmettitore. La molla integrata nel trasmettitore fissa il tra- ricevitore sulla posizione minima e inserite il GB 40 FLEXX guitarbug... -
Página 32: Come Stabilizzare Il Trasmettitore
4.4 Come stabilizzare il trasmettitore • Le indicazioni come rimediare a difetti sono • Per fissare il trasmettotire in mod più stabile, contenute nelle istruzioni per l’uso del vostro ricevitore. usate i dischi velcrati in dotazione: GB 40 FLEXX guitarbug... -
Página 33: Dati Tecnici
6 Dati tecnici Frequenza portante 660 - 865 MHz Questo prodotto corrisponde alle norme elencate nella dichiarazione di con- formità, che è disponibile al sito http://www.akg.com oppure all'indirizzo Modulazione email sales@akg.com. Stabilità della frequenza (da -10°C a +50°C): ±15 kHz Potenza d’uscita RF... - Página 34 2.3 Accesorios opcionales..............35 6 Datos técnicos...................41 2.4 Descripción ................35 2.5 Elementos de mando ...............36 3 Puesta en funcionamiento ..............37 3.1 Colocar/cambiar y ensayar la pila ..........37 3.2 Funcionamiento con acumulador ..........38 4 Aplicaciones ..................39 4.1 Sujetar el transmisor..............39 GB 40 FLEXX guitarbug...
-
Página 35: Seguridad Y Medio Ambiente
1. No exponer el aparato directamente al sol, a Muchas gracias por haberse decidido por un produc- polvo o humedad intensos, a la lluvia, a vibra- to de la empresa AKG. Tómese, por favor, unos • Los accesorios opcionales los encontrará en el ciones o a golpes. -
Página 36: Elementos De Mando
Fig. 1: Elementos de mando del GB 40 FLEXX GB 40 FLEXX guitarbug... -
Página 37: Puesta En Funcionamiento
3. Si en la caja de pilas hay una pila descargada o defectuosa, sírvase sacarla. 4. Coloque la pila suministrada o nueva (2) en la caja de pilas, tal como se indica en la Fig. 2. Fig. 2: Introducir la pila GB 40 FLEXX guitarbug... -
Página 38: Funcionamiento Con Acumulador
El transmisor se puede hacer funcionar también con un acumulador de 1,2 V en lugar de una pila normal. Recomendamos los acumuladores NiMH del tipo SANYO HR-4U (650 mAh) o Panasonic Recharge able PRO+ (550 mAh). GB 40 FLEXX guitarbug... -
Página 39: Aplicaciones
ON/MUTE/OFF (1) en ON. El resorte integrado en el transmisor lo fija en En ese caso, monte el conector adaptador más 4. Coloque el regulador SQUELCH del receptor forma segura en el instrumento. La capa de largo suministrado: GB 40 FLEXX guitarbug... -
Página 40: Estabilización Del Transmisor
• Las indicaciones para la reparación de desper- en el instrumento: fectos las encuentra en el Modo de empleo del 1. Saque la protección del dorso de una de los receptor SR 40 FLEXX. GB 40 FLEXX guitarbug... -
Página 41: Datos Técnicos
Frecuencia portadora: 660 – 865 MHz Este aparato corresponde a las normas citadas en la declaración de confor- midad. Esta última está disponible en el sitio http://www.akg.com o puede Modulación: ser solicitada al correo electrónico sales@akg.com. Estabilidad de frecuencia (-10°C hasta +50°C): ±15 kHz Potencia de salida RF típ.:... - Página 42 2.2 Coneúdo da embalagem ............43 2.3 Acessórios opcionais..............43 6 Especificações ..................49 2.4 Descrição ................43 2.5 Elementos de controle..............44 3 Acionamento ..................45 3.1 Colocar/trocar a pilha e testá-la..........45 3.2 Uso com acumulador ...............46 4 Operação ...................47 4.1 Fixar o emissor................47 GB 40 FLEXX guitarbug...
-
Página 43: Segurança E Meio Ambiente
Agradecemos a sua preferência por um produto da 2.3 Acessórios opcionais poeira ou umidade, chuva, vibrações e golpes. AKG. Por favor reserve alguns minutos para ler este manual antes de acionar este equipamen- • Os acessórios opcionais encontrará no catálo- 1.2 Meio ambiente... -
Página 44: Elementos De Controle
Desta forma o emissor não é perturba- freqüências portadoras diferentes dentro da do por outros emissores embora o microfone banda de freqüências portadoras do emissor. Fig. 1: Controles do GB 40 FLEXX esteja desligado. GB 40 FLEXX guitarbug... -
Página 45: Acionamento
3. Se houver uma pilha gasta ou defeituosa no compartimento de pilha, retire-a. 4. Coloque a pilha nova ou a pilha fornecida na embalagem (2) no compartimento como é mos- trado na fig. 2. Fig. 2: Colocar a pilha GB 40 FLEXX guitarbug... -
Página 46: Uso Com Acumulador
3.2 Uso com acumulador Em vez de usar uma pilha normal, pode operar o emissor também com um acumulador de 1,2 V. Recomendamos acumuladores NiMH do tipo SANYO HR-4U (650 mAh) ou Panasonic Recharge- able PRO+ (550 mAh). GB 40 FLEXX guitarbug... -
Página 47: Operação
2. Enfie o plugue jack (1) até atingir o ponto final 3. Ligue o emissor posicionando o comutador Neste caso instale o plugue adaptador fornecido na na saída jack (3) do seu instrumento. ON/MUTE/OFF (1) em ON. embalagem: A mola integrada no emissor fixa de forma GB 40 FLEXX guitarbug... -
Página 48: Estabilizar O Emissor
• Utilize os discos de velcro fornecidas na emba- lagem para fixar o emissor de forma mais está- • Os avisos para resolver problemas encontrará vel no emissor: no manual do usuário do receptor SR 40 FLEXX. GB 40 FLEXX guitarbug... -
Página 49: Especificações
Freqüência portadora 660 - 865 MHz Este produto corresponde às normas citadas na declaração de conformidade, que pode pedir na nossa página da web http://www.akg.com, ou enviando- Modulação nos um email para sales@akg.com. Estabilidade de freqüência (-10°C a +50°C): ±15 kHz Potência de saída RF... - Página 50 Notizen | Notes | Notes | Note | Notas | Notas GB 40 FLEXX guitarbug...
- Página 51 Notizen | Notes | Notes | Note | Notas | Notas GB 40 FLEXX guitarbug...
- Página 52 For other products and distributors worldwide visit www.akg.com Technische Änderungen vorbehalten. Specifications subject to change without notice. Ces caractéristiques sont susceptibles de modifications. Ci riserviamo il diritto di effettuare modifiche tecniche. Nos reservamos el derecho de introducir modifica- ciones técnicas.