Tabla de contenido
Publicidad
Idiomas disponibles
Idiomas disponibles
Enlaces rápidos
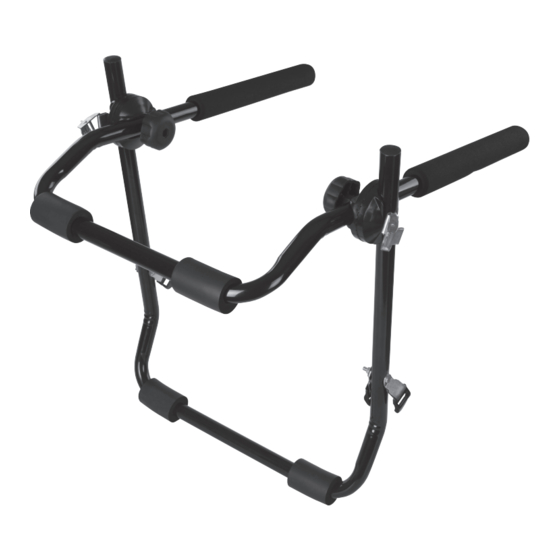
Bike Rack 45kg / 3 Bikes
FR Porte-vélo
DE Heckfahrradträger
ES Portabicicletas
IT Rastrelliera per bici
NL Fietsendrager
PL Uchwyt na rower
Version date: 11.09.17
silverlinetools.com
GARANTIE À VIE
UNBEGRENZTE GARANTIE
GARANTÍA DE POR VIDA
GARANZIA A VITA
LEVENSLANGE GARANTIE
GWARANCJA DOŻYWOTNIA
MAX
45kg
621444
XXXXXX
Publicidad
Tabla de contenido

Resumen de contenidos para Silverline 621444
- Página 1 621444 XXXXXX Bike Rack 45kg / 3 Bikes FR Porte-vélo DE Heckfahrradträger GARANTIE À VIE ES Portabicicletas UNBEGRENZTE GARANTIE GARANTÍA DE POR VIDA IT Rastrelliera per bici GARANZIA A VITA LEVENSLANGE GARANTIE GWARANCJA DOŻYWOTNIA NL Fietsendrager PL Uchwyt na rower 45kg silverlinetools.com...
- Página 3 English ....04 Français ....10 Deutsch ....16 Español ....22 Italiano ....28 Nederlands ..34 Polski ....40 silverlinetools.com...
-
Página 4: Product Familiarisation
• Chemical exposure results in local weakening and softening of the material. This is indicated by flaking of the surface which may be plucked or rubbed off. If this is visible, the strap should be Thank you for purchasing this Silverline product. This manual contains information necessary removed from service for safe and effective operation of this product. - Página 5 621444 Bike Rack Assembly Fig. IV Fitting the lower and side strap anchor buckles Fig. I 4 Clip one of the Plastic Strap Buckles on to one of the Flat Steel Anchor Loops (7) (Fig. I) 5. Next place the Flat Steel Anchor Loop (7) on the protruding Bolt followed by a Washer (4) and an M6 Nylon Locking Nut (3) Fig.
- Página 6 Attaching the Straps Fig. IX Fig. VI 20° • Feed the 1200mm Straps (9) through the Spring Lock Buckles (13) 2. Adjust the carrier so there is a minimum of a 20° upward angle from the horizontal position away Fig. VII from the vehicle once in final position.
- Página 7 621444 Bike Rack 3. Progressively tighten each pair of straps in order: top/bottom/side Fig. XI 4. Repeat tightening process until the carrier is secure Note: the clearance between the carrier and the bodywork and the carrier and the bumper will decrease during tightening.
- Página 9 Guarantee period becomes effective from the date of retail purchase as detailed on your sales receipt. The repair of the product, if it can be verified to the satisfaction of Silverline Tools that the PLEASE KEEP YOUR SALES RECEIPT deficiencies were due to faulty materials or workmanship within the guarantee period.
-
Página 10: Caractéristiques Techniques
Nous vous remercions d’avoir choisi cet équipement Silverline. Ces instructions contiennent les • Assurez-vous que les vélos soient positionnés sur le portant de sorte qu’ils ne dépassent pas la informations nécessaires pour vous en garantir un fonctionnement efficace et en toute sécurité. - Página 11 621444 Porte-vélo Fig. IV Assemblage Installation des boucles de fixation des sangles inférieure et latéral Fig. I 4. Attachez l’une des boucles de sangle plastique sur l’un des culots d’ancrage droit en acier (7). 5. Ensuite, placez le culot d’ancrage droit en acier (7) sur le boulon sortant puis, une rondelle (4) et enfin un écrou de blocage M6 nylon (3).
- Página 12 Fixation des sangles Fig. IX Fig. VI 20° • Introduisez les sangles de 1 200 mm (9) dans les boucles de verrouillage en acier ressort (13). 2. La position définitive du portant sur le véhicule doit être établie de manière à respecter un arc Fig.
- Página 13 621444 Porte-vélo Fig. XI 1. Fixez les crochets latéraux au hayon (Fig. XIII). 2. Éliminez tout jeu des sangles. 3. Resserrez chaque paire de sangles en procédant progressivement selon le même schéma : les sangles du haut, du bas puis du côté.
-
Página 15: Conditions Générales
Les demandes de service sous garantie faites pendant la période de garantie seront vérifiées par Silverline Tools pour établir si la défaillance du produit est liée à un vice de matériau ou L’utilisation du produit à des fins autres que son utilisation domestique normale. - Página 16 ACHTUNG! Lassen Sie beim Überfahren von Fahrbahnschwellen, Auffahrten und Fahrbahnunebenheiten besondere Vorsicht walten. Vielen Dank, dass Sie sich für dieses Silverline-Werkzeug entschieden haben. Diese Anleitung • Die Gurte müssen stets vor Reibung, scharfen Kanten und anderen, möglicherweise Schäden enthält wichtige Informationen für das sichere und effektive Arbeiten mit diesem Produkt. Bitte verursachenden Oberflächen ferngehalten werden.
- Página 17 621444 Heckfahrradträger Montage Abb. IV Stahlwinkel für untere und seitliche Gurte anbringen Abb. I 4. Lassen Sie eine der Gurtschnallen in einen der flachen Stahlwinkel (7) einschnappen. 5. Setzen Sie dann den flachen Stahlwinkel (7) und anschließend eine Unterlegscheibe (4) sowie eine M6-Nylonkontermutter (3) auf die herausstehende Schraube.
- Página 18 Spanngurte anbringen Abb. IX Abb. VI 20° • Führen Sie die 1200-mm-Spanngurte (9) durch die Schließschnallen mit Metallfeder (13). 2. Verstellen Sie den Fahrradträger so, dass er in einem Winkel von mindestens 20° nach oben und Abb. VII vom Fahrzeug fortweist. 3.
-
Página 19: Wartung Und Pflege
621444 Heckfahrradträger 13. Ziehen Sie die Gurte dann nacheinander paarweise in dieser Reihenfolge an: oben – unten – Abb. XI seitlich. 14. Wiederholen Sie den Anziehvorgang, bis der Fahrradträger fest sitzt. Hinweis: Der Abstand zwischen Fahrradträger und Karosserie bzw. zwischen Fahrradträger und Stoßstange verringert sich während des Anziehens. -
Página 21: Garantiebedingungen
Garantiezeitraum fällt. zurückerstattet. Wenn ein Ersatzteil nicht mehr erhältlich ist oder nicht mehr hergestellt wird, kann Silverline Falls dieser Artikel nach Ablauf von 30 Tagen nach dem Kauf einen Mangel aufweist, senden Tools es gegen einen funktionellen Ersatz austauschen. -
Página 22: Introducción
Nunca intente reparar las correas, contacte con un servicio técnico autorizado. Evite el calor y el contacto con superficies calientes. Gracias por haber elegido esta herramienta Silverline. Estas instrucciones contienen la información necesaria para utilizar este producto de forma segura y eficaz. Lea atentamente este manual para Nunca utilice la correa de este producto para sujetar cargas, podría dañarla. -
Página 23: Montaje
621444 Portabicicletas Fig. IV Montaje Instalación de los cierres inferiores y laterales Fig. I 4. Coloque uno de los cierres de plástico en uno de los soportes planos de acero (7). 5. Coloque el soporte plano de acero (7) sobre el perno e introduzca la arandela (4) y la tuerca de nylon (3). -
Página 24: Montaje Del Portabicicletas
Instalación de las correas Fig. IX Fig. VI 20° • Introduzca las correas de 1.200 mm (9) a través de los cierres metálicos con resorte (13). 2. Ajuste la inclinación del portabicicletas como mínimo en un ángulo de 20° respecto al vehículo. Fig. -
Página 25: Mantenimiento
• Nunca utilice agentes cáusticos para limpiar las piezas de plástico. Lubricación • Aplique regularmente spray lubricante en las piezas móviles. Contacto Servicio técnico de reparación Silverline – Tel: (+44) 1935 382 222 Web: www.silverlinetools.com/es-ES/Support Dirección: Powerbox Fig. XII... -
Página 27: Garantía
Las reclamaciones distintas a las indicadas en las presentes condiciones de garantía no estarán de evitar que se produzcan daños durante el transporte. Silverline Tools se reserva el derecho a cubiertas. -
Página 28: Disimballaggio Del Prodotto
I prodotti chimici possono debilitare e danneggiare i materiali della cinghia. I prodotti chimici provocano l’erosione dei materiali. Non utilizzare questo prodotto quando le cinghie sono Grazie per aver acquistato questo utensile Silverline. Queste istruzioni contengono informazioni entrate in contatto con prodotti chimici. - Página 29 621444 Rastrelliera per bici Fig. IV Assemblaggio Collegare la fibbia in plastica (5) al telaio (1) seguendo le sueguenti istruzioni: Fig. I Inserire una delle fibbie di plastica (5) in una delle grappe di ancoraggio in acciaio piatto (7) (Fig.
- Página 30 Montare le cinghie Fig. IX Fig. VI 20° • Inserire la cinghia di 1200 mm (9) nella molla metallica della fibbia di bloccaggio (13 • Regolare il portabici di modo che si alzi di 20° rispetto alal posizione orizzontale iniziale Fig.
- Página 31 621444 Rastrelliera per bici 3. Stringere le cinghie in quest’ordine: superiori/inferiori/laterali Fig. XI 4. Continuare a stringere le cinghie finché il portabici non sia assicurato NB: La distanza tra il portabici, la carrozzeria del veicolo e il paraurte diminuirà una volta strette le cinghie.
-
Página 33: Termini E Condizioni
SI PREGA DI CONSERVARE LA RICEVUTA D'ACQUISTO La riparazione del prodotto, nel caso in cui Silverline Tools determini che il problema sia dovuto a difetti dei materiali o difetti di lavorazione riscontrati durante il periodo della garanzia. Nel caso in cui il prodotto risultasse difettoso entro 30 giorni dalla data d’acquisto, sarà necessario Nel caso in cui un componente non sia più... -
Página 34: Algemene Veiligheid
BELANGRIJK: Wees extra voorzichtig wanneer u over hobbels, op hellingen en op ruwe of oneffen Hartelijk dank voor de aankoop van dit Silverline-product. Deze handleiding omvat informatie die ondergrond rijdt. nodig is voor een veilig en efficiënt gebruik van dit product. Dit product is in het bezit van unieke... - Página 35 621444 Fietsendrager Fig. IV Assemblage Aanbrengen van de onderste en zijdelingse spanriemgespen Fig. I 4. Haak één van de plastic spanriemgespen in één van de vlakke stalen ankerogen (7) Fig.I) 5. Plaats vervolgens het vlakke stalen ankeroog (7) op de uitstekende bout, gevolgd door een ring (4) en een M6 nylon borgmoer (3) (Fig.
- Página 36 Bevestigen van de spanriemen Fig. IX Fig. VI 20° Voer de 1200 mm spanriemen (9) door de veerborggespen (13) (Fig. VI) 2. Stel de drager op een zodanige wijze in dat er minimaal een 20° opwaartse hoekverstelling Fig. VII mogelijk is ten opzichte van de horizontale positie, weg van het vertuig, vanuit de definitieve positie (Fig.
-
Página 37: Algemene Inspectie
621444 Fietsendrager 1. Breng de zijhaken aan op de kofferbak (Fig. XIII) Fig. XI 2. Verwijder eventuele speling in de spanriemen 3. Span elk paar spanriemen geleidelijk aan in de volgorde: top/bodem/zijde 4. Herhaal de aanspanning tot de drager veilig gepositioneerd is. - Página 39 Ongeschikte en onveilige leveringen kunnen Reparaties of wijzigingen die zijn uitgevoerd door anderen dan Silverline Tools of diens officiële reparatiediensten.
- Página 40 • Pasy transportowe powinny być zabezpieczone przed tarciem, ostrymi krawędziami lub Dziękujemy za zakup narzędzia marki Silverline. Zalecamy zapoznaj się z niniejszymi powierzchniami, które mogą być przyczyną uszkodzeń instrukcjami: zawierają one informacje niezbędne dla bezpiecznej i wydajnej obsługi produktu.
- Página 41 621444 Uchwyt na rower Rys. IV Montaż Montaż dolnych i bocznych klamer Rys. I 4. Załóż klamrę na płaską stalową kotwę (7) (Rys. I) 5. Umieść płaską stalową kotwę (7) na wystającej śrubie zakładając uprzednio podkładkę (4) oraz nylonową nakrętkę blokującą M6 (3) (Rys. IV) Rys.
-
Página 42: Mocowanie Uchwytu
Mocowanie pasów Rys. IX Rys. VI 20° • Wsuń 1200 mm pas (9) przez stalowa klamrę blokującą (13) (Rys. IV) 2. Wyreguluj uchwyt, aby kąt pozycjonowania wynosił 20° od poziomej pozycji pojazdu (Rys. IX) Rys. VII 3. Upewnij się, że zęby pokrętła regulacji kąta są poprawnie zrównane , po czym przykręć pokrętło Mocowanie uchwytu Rys. - Página 43 621444 Uchwyt na rower 3. Stopniowo zaciśnij każdą parę pasów w kolejności: góra/dół/boki Rys. XI 4. Powtórz proces do momentu, aż uchwyt będzie solidnie zabezpieczony Uwaga: Luz między uchwytem, a nadwoziem oraz uchwytem, a zderzakiem zmniejszy się podczas dokręcania. Upewnij się, że po zabezpieczeniu uchwytu, pomiędzy uchwytem, a nadwoziem jest minimum 5 cm, zaś...
- Página 45 Naprawę produktu ( w okresie gwarancji), jeśli zostanie on zakwalifikowany zgodnie z PROSIMY O ZACHOWANIE PARAGONU wymogami Silverline Tools w związku z usterkami, które wynikły z wad materiałowych lub wad związanych z produkcją. Jeśli produkt wykaże jakiekolwiek usterki w ciągu 30 dni od daty zakupu, należy go zwrócić do Jeżeli jakaś...
- Página 46 GB 3 Year Guarantee. Register online within ES 3 años de garantía. Registre su producto online durante 30 days. Terms and Conditions apply. los primeros 30 días. Se aplican términos y condiciones. IT 3 anni di garanzia. Registra il tuo prodotto on-line FR Garantie de 3 ans.