
Manuales relacionados para Axis Q86–E Serie


Resumen de contenidos para Axis Q86–E Serie
- Página 1 AXIS Q86–E Series AXIS Q8631–E PT Thermal Network Camera AXIS Q8632–E PT Thermal Network Camera Installation Guide...
- Página 2 2. Every care has been taken in the preparation of this • Low Voltage (LVD) Directive 2006/95/EC. See Safety document. Please inform your local Axis office of any on page 3. inaccuracies or omissions. Axis Communications AB cannot •...
- Página 3 정외의 지역에서 사용하는 것을 목적으로 합니다. Search by product, category, or phrase 적절히 접지된 STP (shielded twisted pair) 케이블 • report problems to Axis support staff by logging in to 을 사용하여 제품을 연결 하십시오. your private support area •...
-
Página 5: Safety Information
AXIS Q86–E Series Safety Information Read through this Installation Guide carefully before installing the product. Keep the Installation Guide for future reference. Hazard Levels DANGER Indicates a hazardous situation which, if not avoided, will result in death or serious injury. -
Página 6: Safety Instructions
Axis or a third party. • Use only spare parts provided by or recommended by Axis. • Do not attempt to repair the product by yourself. Contact Axis support or your Axis reseller for service matters. • A readily and easily accessible disconnecting device must be incorporated in the electrical system of the building for rapid intervention. - Página 7 AXIS Q86–E Series Battery The Axis product uses a 3.0 V BR/CR2032 lithium battery as the power supply for its internal real-time clock (RTC). Under normal conditions this battery will last for a minimum of five years. Low battery power affects the operation of the RTC, causing it to reset at every power-up. When the battery needs replacing, a log message will appear in the product’s server report.
-
Página 8: Product Variants
AXIS Q86–E Series Installation Guide This Installation Guide provides instructions for installing AXIS Q8631-E or AXIS Q8632–E PT Thermal Network Camera on your network. For other aspects of using the product, see the User Manual available at www.axis.com Product Variants... -
Página 9: Required Hardware (Sold Separately)
AXIS Q86–E Series Installation Guide (this document) Extra serial number label (2x) Required Hardware (sold separately) • AXIS Wall Bracket K or AXIS Column Bracket K AXIS Wall Bracket K AXIS Column Bracket K Optional Accessories • AXIS T95A64 Corner Bracket •... - Página 10 AXIS Q86–E Series Sunshield PT Thermal Network Camera Base Unit...
-
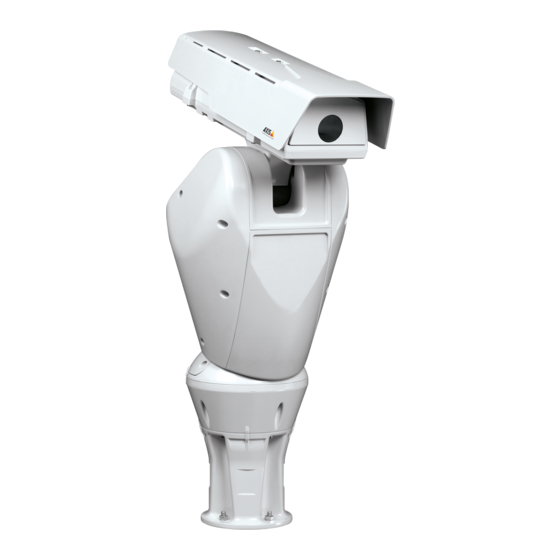
Página 11: Housing Unit
AXIS Q86–E Series Housing Unit Top cover Protective window Thermal network camera... -
Página 12: Camera Unit
AXIS Q86–E Series Camera Unit RS485/RS422 connector Power connector Network connector Status indicator LED microSD memory card slot Control button Connectors and Buttons For specifications and operating conditions, see page 13. Network Connector RJ45 Ethernet connector. NO TICE TICE TICE The product shall be connected using a shielded network cable (STP). -
Página 13: Operating Conditions
The control button is used for: • Resetting the product to factory default settings. See page 22. • Connecting to an AXIS Video Hosting System service or AXIS Internet Dynamic DNS Service. For more information about these services, see the User Manual. Specifications Operating Conditions... -
Página 14: Power Consumption
230 V AC Install the Hardware Install the Bracket (sold separately) The brackets are sold separately. See www.axis.com for information on available mounting accessories. WARNING Risk of injury. Make sure the product is secured to the building surface before operation. -
Página 15: Attach The Base Unit To The Bracket
AXIS Q86–E Series Network cable Power cable Column bracket Wall bracket Attach the Base Unit to the Bracket WARNING The electrical connections and conduit installations shall be made by a certified electrician and in compliance with local regulations. 1. Remove the desiccant bag, which is placed in the base unit. - Página 16 AXIS Q86–E Series WARNING Base unit Network cable Power cable Seal Wall bracket Column bracket Power cable Network cable Gaskets 6. Using a RJ45 crimp tool, strip and crimp the network cable according to the manufacturer’s instructions. 7. Connect the network cable to the network connector on the base unit.
- Página 17 AXIS Q86–E Series Network cable Power cables Important The dip switches are configured with the correct PT or PTZ protocol in the factory and must not be changed. Note The base unit can be attached to the bracket in four different positions.
-
Página 18: Attach The Pan/Tilt Unit To The Base Unit
AXIS Q86–E Series Base unit Seal Washer (4x) Alignment indicator Washer (4x) Screw (4x) Column bracket Wall bracket Attach the Pan/Tilt Unit to the Base Unit NO TICE TICE TICE Use the alignment indicators to align the units. Incorrect alignment could cause damage to components. - Página 19 AXIS Q86–E Series Pan/tilt unit Configuration board lid Alignment indicators Seal Base Washer (4x) Screw (4x) 4. The mechanical installation is complete. To access the camera unit, see Access the Camera Unit on page 20. See the product’s user manual for information on how to...
-
Página 20: Access The Product
The PT functionality is controlled through the network camera. The PT functionality is enabled by default and the controls will be available from the Live View page in the network camera’s web pages. See the User Manual, available at the product pages at www.axis.com Access the Camera Unit To access the camera unit for mounting the SD card or resetting the camera to factory default settings, remove the two screws and open the top cover. - Página 21 AXIS Q86–E Series Screw Power cable RX/TX cable Network cable 3. Lift the camera including the bracket and insert the SD card. Bracket SD card 4. Attach the cables and attach the four screws.
-
Página 22: Reset To Factory Default Settings
IP address, to the factory default values. Note The installation and management software tools are available on the CD supplied with the product and from the support pages on www.axis.com/techsup To reset the product to the factory default settings: 1. Disconnect power from the product. -
Página 23: Change The Fuses In The Base Unit
AXIS Q86–E Series Change the Fuses in the Base Unit DANGER Risk of electric shock. Turn off power supply to equipment prior to working inside base unit. CAUTION • The electrical connections and conduit installations shall be made by a certified electrician and in compliance with local regulations. -
Página 24: Further Information
Further Information The User Manual is available at www.axis.com Visit www.axis.com/techsup to check if there is updated firmware available for your network product. To see the currently installed firmware version, go to Setup > About. Visit Axis learning center www.axis.com/academy for useful trainings, webinars, tutorials and guides. -
Página 25: Informations Sur La Sécurité
AXIS Q86–E Series Informations sur la sécurité Lisez attentivement ce guide d'installation avant d'installer l'appareil. Conservez le guide d'installation pour toute référence ultérieure. Niveaux de risques DANGER Indique une situation dangereuse qui, si elle n'est pas évitée, entraînera le décès ou des blessures graves. -
Página 26: Consignes De Sécurité
CA) doit être installé dans un Emplacement à Accès Restreint. A A A VIS • Le produit Axis doit être utilisé conformément aux lois et règlementations locales en vigueur. • Conserver ce produit Axis dans un environnement sec et ventilé. - Página 27 AXIS Q86–E Series Batterie Le produit Axis utilise une batterie au lithium BR/CR2032 3,0 V comme alimentation de son horloge en temps réel interne (RTC). Dans des conditions normales, cette batterie a une durée de vie minimale de cinq ans.
-
Página 28: Variantes Du Produit
Ce Guide d'installation fournit des instructions pour l'installation de la caméra réseau thermique AXIS Q8631-E ou AXIS Q8632–E PT sur votre réseau. Pour toute autre information relative à l’utilisation du produit, consultez le manuel de l’utilisateur disponible sur le site www.axis.com... -
Página 29: Accessoires En Option
Rondelle AXIS Kit A • Convertisseur de média AXIS T8604 • Adaptateur Ethernet sur câble coaxial avec PoE+ AXIS T8640 Pour plus d'informations sur les accessoires disponibles, consultez le site www.axis.com Outils recommandés • Pince à sertir RJ45 • Ensemble à cliquet •... - Página 30 AXIS Q86–E Series Pare-soleil Caméra réseau thermique PT Unité de base...
- Página 31 AXIS Q86–E Series Boîtier Couvercle supérieur Fenêtre de protection Caméra réseau thermique...
-
Página 32: Connecteurs Et Boutons
AXIS Q86–E Series Caméra Connecteur RS485/RS422 Connecteur d'alimentation Connecteur réseau Voyant d’état Logement de carte microSD Bouton de commande Connecteurs et boutons Pour les caractéristiques et les conditions d'utilisation, consultez page 33. Connecteur réseau Connecteur Ethernet RJ45. A A A VIS Le produit doit être connecté... -
Página 33: Caractéristiques Techniques
• Réinitialisation du produit aux paramètres d’usine par défaut. Cf. page 42. • Connexion au service du Système d'hébergement vidéo AXIS ou au service AXIS Internet Dynamic DNS. Pour plus d'informations sur ces services, reportez-vous au Manuel de l'utilisateur. Caractéristiques techniques Conditions d’utilisation... -
Página 34: Consommation Électrique
40 W Installation du matériel Installez le support (vendu séparément) Les supports sont vendus séparément. Consultez le site www.axis.com pour plus d’informations sur les accessoires de montage disponibles. AVERTISSEMENT Risque de blessure. Vérifiez que le produit est bien fixé à la surface du bâtiment avant de le mettre en service. - Página 35 AXIS Q86–E Series Câble réseau Câble d’alimentation Support colonne Support mural Fixation de l'unité de base au support AVERTISSEMENT Les branchements électriques et les installations de conduits doivent être réalisés par un électricien certifié et conformément à la réglementation locale.
- Página 36 AXIS Q86–E Series WARNING Unité de base Câble réseau Câble d’alimentation Joint Support mural Support colonne Câble d’alimentation Câble réseau Joints 6. A l'aide d'un outil de sertissage RJ45, dénudez et sertissez le câble réseau conformément aux instructions du fabricant.
- Página 37 AXIS Q86–E Series Câble réseau Câbles d’alimentation Important Les commutateurs DIP sont configurés avec le bon protocole PT ou PTZ dans l'usine et ne doivent pas être changés. Note L'unité de base peut être fixée sur le support en quatre positions différentes.
- Página 38 AXIS Q86–E Series Unité de base Joint Rondelle (x4) Témoin d'alignement Rondelle (x4) Vis (x4) Support colonne Support mural Fixation de l'unité de panorama/inclinaison à l'unité de base A A A VIS Utilisez les indicateurs d'alignement pour aligner les unités. Un alignement incorrect peut causer des dommages aux composants.
- Página 39 AXIS Q86–E Series Unité de panorama/inclinaison Couvercle de la carte de configuration Témoins d'alignement Joint Socle Rondelle (x4) Vis (x4) 4. L'installation mécanique est terminée. Pour accéder à la caméra, reportez-vous à la section Accès à la caméra page 40. Pour plus d'informations sur l'accès au flux de...
-
Página 40: Accès Au Produit
Utilisez les outils fournis sur le CD d’installation et de gestion pour attribuer une adresse IP, configurez le mot de passe et accédez au flux de données vidéo. Ces informations sont également disponibles sur les pages d’assistance technique du site www.axis.com/techsup Panoramique/inclinaison La fonctionnalité... - Página 41 AXIS Q86–E Series Câble d’alimentation Câble RX/TX Câble réseau 3. Soulevez la caméra avec le support et insérez la carte SD. Support Carte SD 4. Fixez les câbles et remettez en place les quatre vis.
- Página 42 Note Les logiciels d'installation et de gestion sont disponibles sur le CD fourni avec le produit et sur les pages d'assistance du site www.axis.com/techsup Pour réinitialiser l'appareil aux paramètres d'usine par défaut : 1. Déconnectez l'alimentation de l'appareil. 2. Maintenez le bouton de commande enfoncé et remettez l'appareil sous tension.
- Página 43 AXIS Q86–E Series Changement des fusibles dans l'unité de base DANGER Risque de choc électrique. Avant toute intervention à l'intérieur de l'unité de base, mettez l’alimentation de l'équipement hors tension. ATTENTION • Les branchements électriques et les installations de conduits doivent être réalisés par un électricien certifié...
-
Página 44: Pour Obtenir Plus De Renseignements
Pour connaître la version du microprogramme actuellement installée, reportez-vous à la page Setup > About (Configuration > À propos de). Visitez le centre de formation en ligne Axis sur le site www.axis.com/academy pour en savoir plus sur les formations, les webinaires, les tutoriels et les guides. -
Página 45: Sicherheitsinformation
AXIS Q86–E Series Sicherheitsinformation Lesen Sie das Installationshandbuch sorgfältig durch bevor sie das Produkt installieren. Bewahren Sie das Installationshandbuch für zukünftige Zwecke auf. Gefährdungsstufen GEFAHR Weist auf eine gefährliche Situation hin, die, falls nicht verhindert, zu Tod oder schweren Verletzungen führt. - Página 46 Bestimmungen erfolgen. • Lagern Sie das Axis Produkt in einer trockenen und belüfteten Umgebung. • Achten Sie darauf, dass das Axis Produkt weder Stößen noch starkem Druck ausgesetzt ist. • Installieren Sie das Produkt nicht an instabilen Halterungen, Oberflächen oder Wänden.
- Página 47 Produkts, wenn ein Batteriewechsel erforderlich ist. Weitere Informationen über den Serverbericht finden Sie auf den Setup-Seiten des Produkts, oder wenden Sie sich an den Axis Support. Die Batterie sollte nur bei Bedarf ersetzt werden. Wenden Sie sich in diesem Fall an den Axis Support unter www.axis.com/techsup.
-
Página 48: Lieferumfang
AXIS Q86–E Series Installationsanleitung Die Installationsanleitung enthält Anweisungen zur Installation der AXIS Q8631-E- oder AXIS Q8632–E PT-Wärmebild-Netzwerk-Kamera in Ihrem Netzwerk. Weitere Informationen zur Verwendung dieses Produkts finden Sie im Benutzerhandbuch unter www.axis.com. Ausführungen Produkt Stromversorgung Bildrate* AXIS Q8631–E 24 V AC 8,3 Bilder/Sek. -
Página 49: Erforderliche Befestigungsteile (Separat Erhältlich)
AXIS T95A64-Eckhalterung • AXIS T95A67-Masthalterung • AXIS Unterlegscheibensatz A • AXIS T8604-Media-Konverter-Switch • AXIS T8640-Ethernet-over-Coax-Adapter PoE+ Unter www.axis.com finden Sie Informationen über verfügbares Zubehör. Empfohlene Werkzeuge • RJ-45-Crimp-Werkzeug • Ratschensatz • Bohrmaschine zum Bohren von Löchern in die Montagefläche •... - Página 50 AXIS Q86–E Series Sonnenblende PT-Wärmebild-Netzwerk-Kamera Basiseinheit...
- Página 51 AXIS Q86–E Series Gehäuse Obere Abdeckung Schutzfenster Wärmebild-Netzwerk-Kamera...
-
Página 52: Anschlüsse Und Tasten
AXIS Q86–E Series Kameraeinheit RS485-/RS422-Anschluss Netzanschluss Netzwerkanschluss LED-Statusanzeige Einschub für microSD-Speicherkarte Steuertaste Anschlüsse und Tasten Für die technischen Daten und Betriebsbedingungen siehe Seite 53. Netzwerkanschluss RJ45-Ethernetanschluss. HINWEIS HINWEIS HINWEIS Das Produkt muss mit einem abgeschirmten Netzwerkkabel (STP) angeschlossen werden. Alle Kabel, die das Produkt mit dem Netzwerkswitch verbinden, müssen hierfür ausgelegt sein. -
Página 53: Technische Daten
Die Steuertaste hat folgende Funktionen: • Zurücksetzen des Produkts auf Werkseinstellungen. Siehe Seite 62. • Verbinden mit einem AXIS Video Hosting System-Service oder einem AXIS Internet Dynamic DNS-Service. Weitere Informationen zu diesen Diensten finden Sie in der Bedienungsanleitung. Technische Daten... -
Página 54: Installieren Der Hardware
55 W 40 W Installieren der Hardware Anbringen der Halterung (separat erhältlich) Die Halterungen sind separat erhältlich. Unter www.axis.com finden Sie Informationen über verfügbares Montagezubehör. WARNUNG Verletzungsgefahr. Stellen Sie vor dem Betrieb sicher, dass das Produkt an der Montagefläche befestigt ist. -
Página 55: Anbringen Der Basiseinheit An Der Halterung
AXIS Q86–E Series Netzwerkkabel Stromversorgungskabel Halterung für Säulenmontage Wandhalterung Anbringen der Basiseinheit an der Halterung WARNUNG Die Installationen der elektrischen Verbindungen und Kabelkanäle müssen von einem zugelassenen Elektriker in Übereinstimmung mit örtlichen Bestimmungen vorgenommen werden. 1. Nehmen Sie den Antikondensationsbeutel aus der Basiseinheit. - Página 56 AXIS Q86–E Series WARNING Basiseinheit Netzwerkkabel Stromversorgungskabel Dichtung Wandhalterung Halterung für Säulenmontage Stromversorgungskabel Netzwerkkabel Dichtungen 6. Manteln Sie das Netzwerkkabel ab und crimpen Sie es gemäß den Anweisungen des Herstellers mit einem für RJ-45 geeigneten Crimp-Werkzeug. 7. Verbinden Sie das Netzwerkkabel mit dem Netzwerkanschluss an der Basiseinheit.
- Página 57 AXIS Q86–E Series Netzwerkkabel Stromversorgungskabel Wichtig Die DIP-Schalter wurden werkseitig mit dem richtigen PT- oder PTZ-Protokoll konfiguriert. Hier sind keine Änderungen erforderlich. Beachten Die Basiseinheit kann in vier verschiedenen Positionen an der Halterung angebracht werden. 9. Ermitteln Sie mithilfe der Ausrichtungsmarken eine geeignete Position, die den Zugang zum Konfigurationsring ermöglicht.
-
Página 58: Anbringen Des Schwenk-/Neigemoduls An Der Basiseinheit
AXIS Q86–E Series Basiseinheit Dichtung Unterlegscheibe (4x) Ausrichtungsmarke Unterlegscheibe (4x) Schraube (4x) Halterung für Säulenmontage Wandhalterung Anbringen des Schwenk-/Neigemoduls an der Basiseinheit HINWEIS HINWEIS HINWEIS Richten Sie die Einheiten mithilfe der Ausrichtungsmarken aus. Eine falsche Ausrichtung kann die Komponenten beschädigen. - Página 59 AXIS Q86–E Series Schwenk-/Neigemodul Konfigurationsabdeckung Ausrichtungsmarken Dichtung Basis Unterlegscheibe (4x) Schraube (4x) 4. Die mechanische Installation ist damit abgeschlossen. Informationen zum Zugang zur Kameraeinheit finden Sie unter Zugang zur Kameraeinheit auf Seite 60. Informationen zum Zugriff auf den Videostrom finden Sie im Benutzerhandbuch des Produkts.
-
Página 60: Zugriff Auf Das Produkt
Verwenden Sie die bereitgestellten Tools der Installations- und Management-Software-CD, um eine IP-Adresse zuzuordnen, ein Passwort einzurichten und auf den Videostrom zuzugreifen. Diese Information finden Sie ebenso auf den Support-Seiten unter www.axis.com/techsup/ Schwenken/Neigen Die PT-Funktion wird durch die Netzwerk-Kamera gesteuert. Die PT-Funktion ist standardmäßig aktiviert. - Página 61 AXIS Q86–E Series Schraube Stromversorgungskabel RX/TX-Kabel Netzwerkkabel 3. Heben Sie die Kamera inklusive Halterung an und setzen Sie die SD-Karte ein. Halterung SD-Karte 4. Bringen Sie die Kabel und die vier Schrauben an.
-
Página 62: Zurücksetzen Auf Werkseinstellungen
IP-Adresse auf die Werkseinstellungen zurückgesetzt. Beachten Die Software-Tools für Installation und Verwaltung sind auf der mit dem Produkt ausgelieferten CD-ROM und über die Supportseiten unter www.axis.com/techsup verfügbar. So wird das Produkt auf die Werkseinstellungen zurückgesetzt: 1. Trennen Sie das Produkt von der Stromversorgung. -
Página 63: Auswechseln Der Sicherungen In Der Basiseinheit
AXIS Q86–E Series Auswechseln der Sicherungen in der Basiseinheit GEFAHR Stromschlaggefahr. Trennen Sie die Ausrüstung von der Stromversorgung, bevor Sie Arbeiten im Inneren der Basiseinheit vornehmen. VORSICHT • Die Installationen der elektrischen Verbindungen und Kabelkanäle müssen von einem zugelassenen Elektriker in Übereinstimmung mit örtlichen Bestimmungen vorgenommen werden. -
Página 64: Weitere Informationen
Firmware-Version zu sehen, gehen Sie auf Setup > About (Einrichten > Über). Besuchen Sie das Axis-Schulungszentrum www.axis.com/academy für anregende Schulungen, Webinare, Lernprogramme und Anleitungen. Gewährleistung Informationen zur Gewährleistung der Axis Produkte und hierzu verbundene Informationen, finden Sie unter www.axis.com/warranty/... -
Página 65: Informazioni Di Sicurezza
AXIS Q86–E Series Informazioni di sicurezza Leggere con attenzione questa guida all'Installazione prima di installare il dispositivo. Conservare questo documento per usi futuri. Livelli di pericolo PERICOLO Indica una situazione pericolosa che, se non evitata, provoca morte o lesioni gravi. - Página 66 VVISO VVISO • Il dispositivo Axis deve essere utilizzato in conformità alle leggi e alle disposizioni locali. • Conservare il dispositivo Axis in un ambiente asciutto e ventilato. • Evitare di esporre il dispositivo Axis a urti o pressioni eccessive.
- Página 67 AXIS Q86–E Series Batteria Il prodotto Axis utilizza una batteria al litio da 3,0 V BR/CR2032 come alimentazione per il suo orologio interno (RTC). In condizioni normali questa batteria avrà una durata minima di cinque anni. Una bassa carica della batteria influisce sul funzionamento del RTC, facendolo resettare a ogni accensione.
-
Página 68: Guida All'installazione
Guida all'installazione La presente guida all'installazione fornisce le istruzioni necessarie per installare la telecamera termica di rete AXIS Q8631-E o AXIS Q8632–E PT nella rete in uso. Per ulteriori informazioni sull'utilizzo del dispositivo, consultare la guida per l'utente disponibile all'indirizzo www.axis.com... -
Página 69: Elementi Hardware (Venduti Separatamente)
Guida all'installazione (questo documento) Etichetta aggiuntiva con numero di serie (2x) Elementi hardware (venduti separatamente) • Staffa a parete K AXIS o staffa per colonna K AXIS Staffa a parete K AXIS Staffa per colonna K AXIS Accessori opzionali •... - Página 70 AXIS Q86–E Series Parasole Telecamera termica di rete PT Unità base...
-
Página 71: Unità Alloggiamento
AXIS Q86–E Series Unità alloggiamento Coperchio superiore Finestra di protezione Telecamera termica di rete... -
Página 72: Unità Telecamera
AXIS Q86–E Series Unità telecamera Connettore RS485/RS422 Connettore di alimentazione Connettore di rete Indicatore LED di stato Slot per scheda di memoria microSD Pulsante di comando Connettori e pulsanti Per le specifiche e le condizioni di funzionamento, consultare pagina 73. -
Página 73: Dati Tecnici
• Ripristino del prodotto alle impostazioni predefinite di fabbrica. Consultare pagina 82. • Collegamento a un servizio AXIS Video Hosting System o AXIS Internet Dynamic DNS Service. Per ulteriori informazioni su questi servizi, consultare il Manuale Utente. Dati tecnici Condizioni di funzionamento... -
Página 74: Consumo Energetico
230 V CA Installazione dell'Hardware Installare la staffa (venduta separatamente) Le staffe sono vendute separatamente. Visitare il sito Web www.axis.com per informazioni sugli accessori di montaggio disponibili. AVVERTENZA Rischio di lesione. Accertarsi che il dispositivo sia fissato alla superficie dell'edificio prima del funzionamento. - Página 75 AXIS Q86–E Series Cavo di rete Cavo di alimentazione Staffa per colonna Staffa a parete Fissare l'unità base alla staffa AVVERTENZA Le connessioni elettriche e l'installazione dei tubi protettivi devono essere effettuate da un elettricista certificato e in conformità alle normative locali.
- Página 76 AXIS Q86–E Series WARNING Unità base Cavo di rete Cavo di alimentazione Tenuta Staffa a parete Staffa per colonna Cavo di alimentazione Cavo di rete Guarnizioni 6. Servendosi di un attrezzo di piegatura RJ45, spellare e piegare il cavo di rete in base alle istruzioni del costruttore.
- Página 77 AXIS Q86–E Series Cavo di rete Cavi di alimentazione Importante I dip switch sono configurati con il corretto protocollo PT o PTZ in fabbrica e non devono essere cambiati. Nota L'unità base può essere fissata alla staffa in quattro diverse posizioni.
- Página 78 AXIS Q86–E Series Unità base Tenuta Rondella (4x) Indicatore di allineamento Rondella (4x) Vite (4x) Staffa per colonna Staffa a parete Collegare l'unità rotazione/inclinazione all'unità base A A A VVISO VVISO VVISO Utilizzare gli appositi indicatori per allineare le unità. L'errato allineamento potrebbe causare il danneggiamento dei componenti.
- Página 79 AXIS Q86–E Series Unità rotazione/inclinazione Coperchio scheda di configurazione Indicatori di allineamento Tenuta Base Rondella (4x) Vite (4x) 4. L'installazione meccanica è completata. Per accedere all'unità telecamera, vedere Accedere all'unità telecamera alla pagina 80. Per informazioni su come accedere al flusso...
-
Página 80: Accedere Al Prodotto
Utilizzare le utility contenute nel CD del software d'installazione e configurazione per assegnare un indirizzo IP, impostare la password ed accedere al flusso video. Queste informazioni sono disponibili anche sulle pagine dedicate all'assistenza sul sito www.axis.com/techsup/ Rotazione/inclinazione La funzione di rotazione/inclinazione è controllata dalla telecamera di rete. La funzione è abilitata per impostazione predefinita e i controlli saranno disponibili nella pagina Live View delle pagine Web della telecamera di rete. - Página 81 AXIS Q86–E Series Vite Cavo di alimentazione Cavo RX/TX Cavo di rete 3. Sollevare la telecamera insieme alla staffa e inserire la scheda SD. Staffa Scheda SD 4. Collegare i cavi e fissare le quattro viti.
-
Página 82: Ripristino Dei Valori Predefiniti Di Fabbrica
Nota Gli strumenti per l'installazione e la gestione del software sono disponibili sul CD fornito con il dispositivo e sulle pagine dedicate all'assistenza sul sito Web www.axis.com/techsup. Per ripristinare il dispositivo alle impostazioni predefinite di fabbrica: 1. Scollegare l'alimentazione dal dispositivo. - Página 83 AXIS Q86–E Series Cambiare i fusibili nell'unità base PERICOLO Rischio di scosse elettriche. Scollegare l'alimentazione dall'attrezzatura prima di lavorare all'interno dell'unità base. ATTENZIONE • Le connessioni elettriche e l'installazione dei tubi protettivi devono essere effettuate da un elettricista certificato e in conformità alle normative locali.
-
Página 84: Ulteriori Informazioni
Setup (Impostazioni) > About (Informazioni su). Visitare il Centro di apprendimento Axis alla pagina www.axis.com/academy per servizi di formazione utili, webinar, tutorial e guide. Informazioni sulla garanzia Per informazioni sulla garanzia del dispositivo Axis e informazioni ad esso relative, consultare la pagina www.axis.com/warranty/... -
Página 85: Información De Seguridad
AXIS Q86–E Series Información de seguridad Lea esta Guía de instalación con atención antes de instalar el producto. Guarde la Guía de instalación para poder consultarla en otro momento. Niveles de peligrosidad PELIGRO Indica una situación peligrosa que, si no se evita, provocará... -
Página 86: Instrucciones De Seguridad
VISO VISO • El producto de Axis debe utilizarse de acuerdo con la legislación y la normativa locales. • Almacene el producto de Axis en un entorno seco y ventilado. • Evite la exposición del producto de Axis a choques o a una fuerte presión. - Página 87 AXIS Q86–E Series Batería Este producto de Axis utiliza una batería de litio BR/CR2032 de 3,0 V como fuente de alimentación del reloj interno en tiempo real. En condiciones normales, esta batería durará un mínimo de cinco años. Un nivel bajo de batería afectará al funcionamiento del reloj en tiempo real, lo que provocará el restablecimiento de este cada vez que se encienda el producto.
-
Página 88: Variantes Del Producto
Esta Guía de instalación incluye las instrucciones necesarias para instalar las cámaras de red AXIS Q8631-E o AXIS Q8632–E PT térmicas en su red. Para conocer otros aspectos de uso del producto, consulte el Manual del usuario disponible en www.axis.com. -
Página 89: Hardware Necesario (Se Vende Por Separado)
Guía de instalación (este documento) Etiquetas adicionales con el número de serie (2) Hardware necesario (se vende por separado) • Soporte de pared K de AXIS o soporte de columna K de AXIS Soporte de pared K de Soporte de columna K de AXIS... - Página 90 AXIS Q86–E Series • Para obtener información general sobre los botones y conectores de la cámara, consulte página 92 Parasol Cámara de red térmica PT Unidad base...
- Página 91 AXIS Q86–E Series Unidad de la carcasa Cubierta superior Ventana de protección Cámara de red térmica...
-
Página 92: Unidad De Cámara
AXIS Q86–E Series Unidad de cámara Conector RS485/RS422 Conector de alimentación Conector de red Indicador LED de estado Ranura para tarjetas de memoria microSD Botón de control Conectores y botones Para conocer las especificaciones y las condiciones de funcionamiento, vea página 93. -
Página 93: Especificaciones
Restablecer el producto a la configuración predeterminada de fábrica. Vea página 102. • Conectarse a un servicio AXIS Video Hosting System o al Servicio de DNS dinámico de Internet de AXIS. Para obtener más información sobre estos servicios, consulte el Manual del usuario. -
Página 94: Instalación Del Hardware
AXIS Q86–E Series funciona de forma correcta incluso en temperaturas bajas. El proceso de descongelación tarda un máximo de 90 minutos. Durante este periodo la cámara está desconectada. Consumo Producto Consumo normal Tensión de entrada Consumo máx. AXIS 24 V CA... -
Página 95: Montaje De La Unidad Base En El Soporte
AXIS Q86–E Series Cable de red Cable de alimentación Soporte de columna Soporte de pared Montaje de la unidad base en el soporte ADVERTENCIA Las conexiones eléctricas y las instalaciones de los conductos debe realizarlas un electricista cualificado, de conformidad con la normativa local. - Página 96 AXIS Q86–E Series WARNING Unidad base Cable de red Cable de alimentación Junta Soporte de pared Soporte de columna Cable de alimentación Cable de red Juntas 6. Con una crimpadora RJ45, pele y crimpe el cable de red según las instrucciones del fabricante.
- Página 97 AXIS Q86–E Series Cable de red Cables de alimentación Importante Los conmutadores DIP vienen configurados de fábrica con el protocolo PT o PTZ correspondiente y no deben modificarse. Nota La unidad base puede montarse en el soporte en cuatro posiciones distintas.
-
Página 98: Conexión De La Unidad De Movimiento Horizontal Y Vertical A La Unidad Base
AXIS Q86–E Series Unidad base Junta Arandelas (4) Indicador de alineación Arandelas (4) Tornillos (4) Soporte de columna Soporte de pared Conexión de la unidad de movimiento horizontal y vertical a la unidad base A A A VISO VISO VISO Utilice los indicadores de alineación para alinear las unidades. - Página 99 AXIS Q86–E Series Unidad de movimiento horizontal y vertical Tapa del panel de configuración Indicadores de alineación Junta Base Arandelas (4) Tornillos (4) 4. La instalación mecánica se ha completado. Para acceder a la unidad de la cámara, consulte Acceso a la unidad de la cámara en la página 100. Para obtener información acerca de cómo acceder a la transmisión de vídeo, consulte el manual del usuario del...
-
Página 100: Acceso Al Producto
Utilice las herramientas suministradas en el CD del software de instalación y gestión para asignar una dirección IP, establecer la contraseña y acceder a la transmisión de vídeo. Esta información también está disponible en las páginas de asistencia técnica en www.axis.com/techsup/ Movimiento horizontal y vertical La funcionalidad PT se controla a través de la cámara de red. - Página 101 AXIS Q86–E Series Tornillo Cable de alimentación Cable RX/TX Cable de red 3. Levante la cámara, incluido el soporte, e inserte la tarjeta SD. Soporte Tarjeta SD 4. Conecte los cables y monte los cuatro tornillos.
-
Página 102: Restablecimiento A La Configuración Predeterminada De Fábrica
AXIS Q86–E Series Restablecimiento a la configuración predeterminada de fábrica Importante Hay que tener cuidado al restablecer la configuración predeterminada de fábrica. Todos los valores, incluida la dirección IP, se restablecerán a la configuración predeterminada de fábrica. Nota Las herramientas del software de instalación y gestión están disponibles en el CD suministrado con el producto, así... -
Página 103: Cambio De Los Fusibles De La Unidad Base
AXIS Q86–E Series También es posible restablecer los parámetros a los valores predeterminados de fábrica mediante la interfaz web. Para ello, vaya a Setup > System Options > Maintenance (Configuración > Opciones del sistema > Mantenimiento). Cambio de los fusibles de la unidad base PELIGRO Riesgo de descarga eléctrica. -
Página 104: Más Información
Visite el centro de aprendizaje de www.axis.com/academy para consultar guías, tutoriales, seminarios web y cursos que pueden resultarle útiles. Información de garantía Para obtener más detalles sobre la garantía del producto Axis y la información relacionada con ella, consulte www.axis.com/warranty/... - Página 105 AXIS Q86–E Series 安 安 安 全 全 全 情 情 情 報 報 報 本製品を設置する前に、このインストールガイドをよくお読みください。 インス トールガイドは、後で参照できるように保管しておいてください。 危 危 危 険 険 険 レ レ レ ベ ベ ベ ル ル ル 回避しない場合、死亡または重傷につながる危険な状 危 危 危 険 険 険...
- Página 106 AXIS Q86–E Series 安 安 安 全 全 全 手 手 手 順 順 順 警 警 警 告 告 告 • 本製品の設置は、訓練を受けた専門技術者が行ってください。 注 注 注 意 意 意 • 損傷の危険があります。 動作時に可動する部品があるため、権限を持つ担当 者だけがアクセスできるように本製品を設置してください。 • この装置 (24 V ACには非対応) を接続した光センサーボックスは、アクセ ス制限区域 (RAL) 内に設置する必要があります。...
- Página 107 AXIS Q86–E Series バ バ バ ッ ッ ッ テ テ テ リ リ リ ー ー ー 本製品は、内部リアルタイムクロック (RTC) 用電源として、3.0 V BR/CR2032リチウ ムバッテリーを使用します。 このバッテリーは、通常条件下で最低5年間使用で きます。 バッテリーが低電力状態になると、RTCの動作に影響し、電源を入れるたびにRTCが リセットされます。 バッテリーの交換が必要になると、製品のサーバーレポートに ログメッセージが表示されます。 サーバーレポートの詳細については、製品の設定 ページを参照するか、Axisサポートまでお問い合わせください。 必要な場合以外はバッテリーを交換しないでください。バッテリーの交換が必要な場 www.axis.com/techsup 合は、Axisサポート ( ) までご連絡ください。 警 警 警 告 告 告...
- Página 108 AXIS Q86–E Series イ イ イ ン ン ン ス ス ス ト ト ト ー ー ー ル ル ル ガ ガ ガ イ イ イ ド ド ド このインストールガイドでは、AXIS Q8631‑EまたはAXIS Q8632–E PTサーマルネット ワークカメラをお使いのネットワークにインストールする手順について説明してい www.axis.com ます。 製品の使用の詳細については、Axisのホームページ ( ) でユー...
- Página 109 オ オ オ プ プ プ シ シ シ ョ ョ ョ ン ン ン ア ア ア ク ク ク セ セ セ サ サ サ リ リ リ ー ー ー AXIS T95A64コーナーブラケット • AXIS T95A67ポールブラケット • AXISワッシャーキットA • AXIS T8604メディアコンバータスイッチ • AXIS T8640 PoE+ 同軸変換アダプター • www.axis.com 利用可能なアクセサリーについては、 を参照してください。 推 推 推 奨 奨 奨 ツ ツ ツ ー ー ー ル ル ル RJ45圧着工具 • ラチェットレンチセット...
- Página 110 AXIS Q86–E Series ハ ハ ハ ー ー ー ド ド ド ウ ウ ウ ェ ェ ェ ア ア ア の の の 概 概 概 要 要 要 111ページ ハウジングユニットの概要については、 を参照してください • 112ページ カメラのボタンおよびコネクターの概要については、 を参照し • てください サンシールド...
- Página 111 AXIS Q86–E Series ハ ハ ハ ウ ウ ウ ジ ジ ジ ン ン ン グ グ グ ユ ユ ユ ニ ニ ニ ッ ッ ッ ト ト ト トップカバー 保護ウィンドウ サーマルネットワークカメラ...
- Página 112 AXIS Q86–E Series カ カ カ メ メ メ ラ ラ ラ ユ ユ ユ ニ ニ ニ ッ ッ ッ ト ト ト RS485/RS422コネクタ 電源コネクタ ネットワークコネクタ ステータスインジケーターLED microSDメモリーカードスロット コントロールボタン コ コ コ ネ ネ ネ ク ク ク タ タ タ ー ー ー と と と ボ ボ ボ タ タ タ ン ン ン...
- Página 113 照してください。 コントロールボタンは、以下の用途で使用します。 122ページ 製品を工場出荷時の設定にリセットする。 を参照してください。 • AXIS Video Hosting SystemサービスまたはAXIS Internet Dynamic DNSサービ • スに接続する。 これらのサービスの詳細については、ユーザーズマニュ アルを参照してください。 仕 仕 仕 様 様 様 動 動 動 作 作 作 条 条 条 件 件 件 製 製 製 品 品 品...
- Página 114 AXIS Q86–E Series 除 除 除 氷 氷 氷 製品がオンになり、気温が0℃を下回ると、自動的に除氷プロセスが開始されます。 除氷プロセスにより、低温下でも製品を正常に動作させることができます。 除氷時 間は最大90分間継続します。 この時間はカメラをオフにしてください。 消 消 消 費 費 費 電 電 電 力 力 力 製 製 製 品 品 品 入 入 入 力 力 力 電 電 電 圧 圧 圧...
- Página 115 AXIS Q86–E Series ネットワークケーブル 電源ケーブル 柱頂取付ブラケット 壁面ブラケット ベ ベ ベ ー ー ー ス ス ス ユ ユ ユ ニ ニ ニ ッ ッ ッ ト ト ト の の の ブ ブ ブ ラ ラ ラ ケ ケ ケ ッ ッ ッ ト ト ト へ へ へ の の の 取 取 取 り り り 付 付 付 け け け...
- Página 116 AXIS Q86–E Series WARNING ベースユニット ネットワークケーブル 電源ケーブル シール 壁面ブラケット 柱頂取付ブラケット 電源ケーブル ネットワークケーブル ガスケット 6. RJ45 圧着工具を使用して、メーカーの説明書に従ってネットワークケーブ ルの被覆を剥き、圧着を行います。 7. ネットワークケーブルをベースユニットのネットワークコネクターに接 続します。 注意 取り付けを簡単に行えるようにするため、電源コネクターブロックは回路基板 から取り外し て正しく接続してから元の位置に戻せるようになっています。 8. 電源ケーブルをベースユニットの電源コネクターに接続します。 緑/黄のグ ランド線がミドルピンに接続されていることを確認してください。...
- Página 117 AXIS Q86–E Series ネットワークケーブル 電源ケーブル 重要 ディップ スイッチは工場出荷時に適切なPTまたはPTZ プロトコルに合わせ て設定されているので、変更しないでください。 注意 ベースユニットは、ブラケットの4 つの異なる位置に取り付けることがで きます。 9. 設定ボードにアクセスするのに適切な位置を見つけるには、位置合わせ 用インジケーターを使用します。その位置で、トラブルシューティング を行う際などにネットワークコネクターにアクセスしやすいように穴が 開くようになっています。 10. ケーブル接続後にたるみがある場合、ケーブルグランドを緩め、たるみを なくしてから再度ケーブルグランドを取り付けます。 11. ベースユニットをブラケットに取り付けます。...
- Página 118 AXIS Q86–E Series 12. ネジにはLoctite ® 243スレッドロッカーを塗布し、ネジを締めます (トルク 4 Nm)。 ベースユニット シール ワッシャ×4 位置合わせ用インジケーター ワッシャ×4 ネジ×4 柱頂取付ブラケット 壁面ブラケット パ パ パ ン ン ン / / / チ チ チ ル ル ル ト ト ト ユ ユ ユ ニ ニ ニ ッ ッ ッ ト ト ト の の の ベ ベ ベ ー ー ー ス ス ス ユ ユ ユ ニ ニ ニ ッ ッ ッ ト ト ト へ へ へ の の の 取 取 取 り り り 付 付 付 け け け...
- Página 119 AXIS Q86–E Series 3. パン/チルトユニットをベースユニットに取り付け、付属の六角レンチを使 用してネジを締めます (トルク4 Nm)。 パン/チルトユニット 設定ボードの蓋 位置合わせ用インジケーター シール ベース ワッシャ×4 ネジ×4 4. これで、機械部分の設置は完了です。 カメラユニットにアクセスするに 120ページの、カメラユニットへのアクセス は、 を参照してください。 ビデ オストリームにアクセスする方法については、製品のユーザーズマニュ アルを参照してください。...
- Página 120 AXIS Q86–E Series 製 製 製 品 品 品 へ へ へ の の の ア ア ア ク ク ク セ セ セ ス ス ス IPアドレスの割り当て、パスワードの設定、ビデオストリームへのアクセスを行うに は、インストール・管理ソフトウェアCDに収録されているツールを使用します。 こ www.axis.com/techsup/ の情報は、Axisのサポートページ ( ) にも掲載されています。 パ パ パ ン ン ン / / / チ チ チ ル ル ル ト ト ト...
- Página 121 AXIS Q86–E Series ネジ 電源ケーブル RX/TXケーブル ネットワークケーブル 3. ブラケットを含めカメラを持ち上げ、SDカードを挿入します。 ブラケット SDカード 4. ケーブルを取り付け、4本のネジを取り付けます。...
- Página 122 AXIS Q86–E Series 工 工 工 場 場 場 出 出 出 荷 荷 荷 時 時 時 の の の 設 設 設 定 定 定 に に に リ リ リ セ セ セ ッ ッ ッ ト ト ト す す す る る る...
- Página 123 AXIS Q86–E Series ベ ベ ベ ー ー ー ス ス ス ユ ユ ユ ニ ニ ニ ッ ッ ッ ト ト ト の の の ヒ ヒ ヒ ュ ュ ュ ー ー ー ズ ズ ズ の の の 交 交 交 換 換 換...
- Página 124 AXIS Q86–E Series F 6.3 A 250 V T 4 A 250 V 120 V AC (50/60 Hz) 230 V AC (50/60 Hz) F 6.3 A 250 V T 2 A 250 V 3. パン/チルトユニットをベースユニットに取り付けます。 関 関 関 連 連 連 情 情 情 報 報 報...
- Página 126 Installation Guide Ver. M1.3 AXIS Q86–E Series Date: March 2015 © Axis Communications AB, 2015 Part No. 61382...