Tabla de contenido
Publicidad
Idiomas disponibles
Idiomas disponibles
Enlaces rápidos
Publicidad
Capítulos
Tabla de contenido

Manuales relacionados para auna KRCD-100 BT


Resumen de contenidos para auna KRCD-100 BT
-
Página 3: Tabla De Contenido
Sehr geehrter Kunde, wir gratulieren Ihnen zum Erwerb Ihres Gerätes. Lesen Sie die folgenden Hinweise sorgfältig durch und befolgen Sie diese, um möglichen Schäden vorzubeugen. Für Schäden, die durch Missachtung der Hinweise und unsachgemäßen Gebrauch entstehen, übernehmen wir keine Haftung. Scannen Sie den folgenden QR-Code, um Zugriff auf die aktuellste Bedienungsanleitung und weitere Informationen rund um das Produkt zu erhalten. -
Página 4: Geräteübersicht
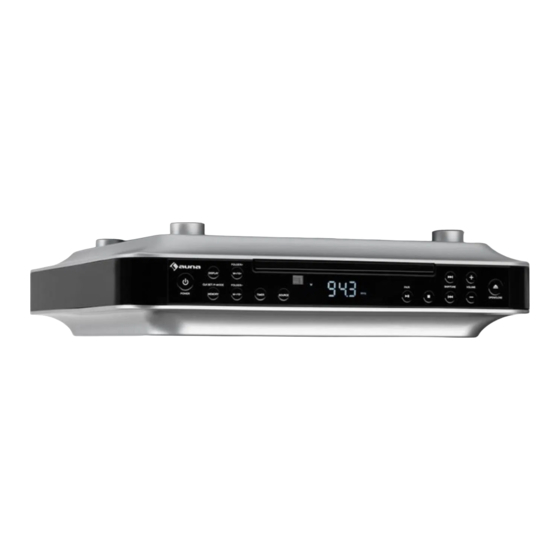
GERÄTEÜBERSICHT 1 DISPLAY Taste 11 Fernbedienungssensor 2 Folder+/M+/10+ Taste 12 Display 3 CD-Fach 13 BT-Verbindung/ Taste 4 Nächster Titel/Sendersuche 14 STOP-Taste 5 Lautstärke+ 15 Vorheriger Titel/Sendersuche 16 Lautstärke- 6 Power-Taste 7 CLK.SET/P-MODE/MEMORY Taste 17 CD-Fach öffnen 8 Folder-/M-/10-Taste 18 Line-In Buchse 9 TIMER Taste 19 Netzanschluss 10 Musikquelle... -
Página 5: Inbetriebnahme
INBETRIEBNAHME Das Gerät wird über das Netzteil an den Stromkreis angeschlossen. Netzteil anschließen HINWEIS: Verwenden Sie nur das mitgelieferte Netzteil! Schließen Sie das Netzteil an eine Steckdose an Stecken Sie den DC-Stecker des Netzteils in die DC-Buchse an der Seite des Gerätes. -
Página 6: Fernbedienung
FERNBEDIENUNG Verwendung der Fernbedienung Die Tasten auf der Fernbedienung und dem Hauptgerät sind identisch gekennzeichnet und haben die gleichen Funktionen. Wichtige Hinweise zur Fernbedienung Reichweite bis zu 5 Meter. Die Reichweite kann von hellen Lichtquellen gestört werden. Stellen Sie kein Gegenstände zwischen die Fernbedienung und den Sensor. -
Página 7: Uhr Und Timer
UHR UND TIMER Uhr einstellen Drücken Sie im ausgeschalteten Zustand die CLK. SET / P-MODE / MEMORY-Taste. Die Stundenanzeige beginnt zu blinken Drücken Sie die oder Taste, um die Stunde einzustellen. Drücken Sie die CLK. SET / P-MODE / MEMORY-Taste, um zur Minutenanzeige zu wechseln. -
Página 8: Fm-Radio
FM-RADIO FM Radio einstellen Drücken Sie die Power-Taste, um das Gerät einzuschalten Ziehen Sie für einen besseren Empfang die FM-Antenne aus. Drücken Sie wiederholt die SOURCE-Taste, um das FM-Band auszuwählen. Die FM-Anzeige und P01, P02, P03... erscheinen auf dem- Display Halten Sie die oder Taste gedrückt, um den nächsten oder... - Página 9 MUSIKWIEDERGABE ÜBER CD UND MP3 CD laden und abspielen Drücken Sie die Power-Taste, um das Gerät einzuschalten. Drücken Sie die SOURCE-Taste, um auf CD auszuwählen. Öffnen Sie das CD-Fach. Legen Sie eine CD ins Fach mit dem Etikett nach oben. Schließen Sie das CD-Fach.
-
Página 10: Bt Verbindung Herstellen
Wiederholte Wiedergabe • Um den aktuellen Titel während der Wiedergabe zu wiederholen, drücken Sie die CLK. SET / P-MODE / MEMORY-Taste einmal. • Um den Ordner während der Wiedergabe zu wiederholen (nur für MP3), drücken Sie die CLK. SET / P-MODE / MEMORY-Taste zweimal. •... -
Página 11: Line-In Anschluss
Audio via BT abspielen Nach erfolgreichem Pairing mit einem Gerät, verwenden Sie die Bedienelemente des angeschlossenen BT-Geräts, um einen Titel auszuwählen. Um den ausgewählten Titel zu spielen oder anzuhalten, verwenden Sie die Bedienelemente des angeschlossenen BT-Geräts oder die PLAY/ PAUSE-Taste am Gerät Um vorwärts oder zurück von der ausgewählten Spur zu springen, verwenden Sie die Bedienelemente des angeschlossenen BT-Geräts oder die... -
Página 12: Hinweise Zur Entsorgung
HINWEISE ZUR ENTSORGUNG Befindet sich die linke Abbildung (durchgestrichene Mülltonne auf Rädern) auf dem Produkt, gilt die Europäische Richtlinie 2012/19/EU. Diese Produkte dürfen nicht mit dem normalen Hausmüll entsorgt werden. Informieren Sie sich über die örtlichen Regelungen zur getrennten Sammlung elektrischer und elektronischer Gerätschaften. -
Página 13: Technical Data
Dear Customer, Congratulations on purchasing this device. Please read the following instructions carefully and follow them to prevent possible damages. We assume no liability for damage caused by disregard of the instructions and improper use. Scan the QR code to get access to the latest user manual and more product information. -
Página 14: Product Description
PRODUCT DESCRIPTION 1 DISPLAY Button 11 Remote Sensor 2 Folder+/M+/10+ Button 12 Display 3 CD Door 13 PAIR/ Button 4 Skip / Tune 14 STOP Button 5 Volume + 15 Skip / Tune 16 Volume- 6 Power-Taste 7 CLK.SET/P-MODE/MEMORY Button 17 CD Door open/close 8 Folder-/M-/10-Button 18 Line In Jack... -
Página 15: Getting Started
GETTING STARTED This unit uses the supplied AC Adapter. Connecting AC Adapter NOTE: only use the supplied adapter Plug the AC adapter into a normal power outlet. Insert the DC plug of the AC adapter cord into the DC jack on the side of the unit. -
Página 16: Remote Control
REMOTE CONTROL Using the Remote Control Buttons on the remote control and the main unit are labeled identically and have the same functions Notes on Usage of the Remote Control Operating range is up to 5 yards. Range may be affected by bright light sources in your home. -
Página 17: Clock And Timer
CLOCK AND TIMER Setting the Clock With the power Off, press and hold the CLK. SET / P-MODE / MEMORY button. The hour display will start blinking. Press the SKIP/TUNE (up) button or SKIP/TUNE (down) button to adjust the hour up or down. Press the CLK. -
Página 18: Fm Radio
FM RADIO Tuning the FM Radio Press the Power button to turn on the unit. Extend and position the FM antenna for better reception. Press the SOURCE button repeatedly to select FM band. The FM indicator and P01, P02, P03... will appear on the LCD display. Press and hold the SKIP/TUNE (up) button or SKIP/TUNE (down) button to search the next/previous available station. - Página 19 CD AND MP3 OPERATION Loading and Playing a CD Press the Power button to turn on the unit. Press the SOURCE button to switch to CD. Open the CD tray. Place a CD into the tray with the label facing up. Close the CD tray.
-
Página 20: Bt Operation
Repeat Playback Modes • To repeat the current track during playback, press the CLK. SET / P-MODE / MEMORY button once. • To repeat the folder during playback (for mp3 only), press the CLK. SET / P-MODE / MEMORY button twice. •... -
Página 21: Line In Operation
Playing Audio via BT After successfully pairing with a device, use the controls on the connected BT device to select a track. To play or pause the selected track, use the controls on the connected BT device or the PLAY/PAUSE button on the unit. To skip forward or back from the selected track, use the controls on the connected BT device or the SKIP/TUNE (up) button or SKIP/TUNE (down) button on the unit. -
Página 22: Hints On Disposal
HINTS ON DISPOSAL According to the European waste regulation 2012/19/EU this symbol on the product or on its packaging indicates that this product may not be treated as household waste. Instead it should be taken to the appropriate collection point for the recycling of electrical and electronic equipment. -
Página 23: Datos Técnicos
Estimado cliente, Le felicitamos por la adquisición de este producto. Lea atentamente las siguientes instrucciones y sígalas para evitar posibles daños. No asumimos ninguna responsabilidad por los daños causados por el incumplimiento de las instrucciones y el uso inadecuado. Escanee el siguiente código QR para obtener acceso a la última guía del usuario y más información sobre el producto. -
Página 24: Descripción Del Aparato
DESCRIPCIÓN DEL APARATO 1 Botón DISPLAY 11 Sensor del mando a distancia 2 Botón Folder+/M+/10+ 12 Display 3 Compartimento para CD 13 Botón conexión BT/ 4 Pista siguiente/ búsqueda de emisoras 14 Botón STOP 5 Volumen+ 15 Pista anterior/búsqueda de emisoras 16 Volumen 6 Botón POWER 7 Botón CLK.SET/P-MODE/MEMORY... -
Página 25: Puesta En Marcha
PUESTA EN MARCHA El aparato se conecta al circuito eléctrico a través de la fuente de alimentación. Conectar fuente de alimentación ADVERTENCIA: Utilice exclusivamente la fuente de alimentación incluida. Conecte el cable de alimentación a una toma de corriente. Conecte el enchufe DC de la fuente de alimentación al conector DC del lateral del aparato. -
Página 26: Mando A Distancia
MANDO A DISTANCIA Utilización del mando a distancia Los botones del mando a distancia y del aparato principal poseen la misma identificación y tienen las mismas funciones. Indicaciones importantes sobre el mando a distancia Alcance de hasta 5 metros. El alcance puede verse afectado por las fuentes de luz. -
Página 27: Hora Y Temporizador
HORA Y TEMPORIZADOR Configurar la hora Pulse el botón CLK. SET / P-MODE / MEMORY con el aparato apagado. El indicador de las horas comienza a parpadear Pulse de nuevo el botón para regular las horas. Pulse el botón CLK. SET / P-MODE / MEMORY para pasar al indicador de minutos. -
Página 28: Radio Fm
RADIO FM Configurar la radio FM Pulse el botón power para encender el aparato. Desenrolle la antena FM para obtener una mejor recepción. Pulse varias veces el botón SOURCE para seleccionar la banda FM. El indicador FM y P01, P02, P03... aparecen en el display Mantenga pulsado el botón para buscar la siguiente o anterior emisora. -
Página 29: Reproducción De Música A Través De Cd Y Mp3
REPRODUCCIÓN DE MÚSICA A TRAVÉS DE CD Y Cargar y reproducir CD Pulse el botón POWER para encender el aparato. Pulse el botón SOURCE para seleccionar CD. Abra el compartimento del CD. Introduzca un CD en el compartimento con la cara impresa hacia arriba. Cierre el compartimento del CD. -
Página 30: Establecer Conexión Bt
Reproducción con repetición • Pulse una vez el botón CLK. SET / P-MODE / MEMORY para repetir la pista actual durante la reproducción. • Pulse dos veces el botón CLK. SET / P-MODE / MEMORY para repetir la carpeta actual durante la reproducción (solo MP3). •... -
Página 31: Conexión Line-In
Reproducir audio vía BT Tras una sincronización satisfactoria con un aparato, utilice los elementos de control del dispositivo BT para seleccionar una pista. Para reproducir o detener la pista seleccionada, utilice los elementos de control del dispositivo BT conectado o el botón PLAY/PAUSE del aparato Para avanzar o retroceder en la pista seleccionada, utilice los elementos de control del dispositivo BT conectado o los botones... -
Página 32: Retirada Del Aparato
RETIRADA DEL APARATO Si el aparato lleva adherida la ilustración de la izquierda (el contenedor de basura tachado) entonces rige la normativa europea, directiva 2012/19/UE. Este producto no debe arrojarse a un contenedor de basura común. Infórmese sobre las leyes territoriales que regulan la recogida separada de aparatos eléctricos y electrónicos. -
Página 33: Fiche Technique
Chère cliente, cher client, Toutes nos félicitations pour l’acquisition de ce nouvel appareil. Veuillez lire attentivement et respecter les instructions de ce mode d’emploi afin d’éviter d’éventuels dommages. Nous ne saurions être tenus pour responsables des dommages dus au non-respect des consignes et à... -
Página 34: Aperçu De L'appareil
APERÇU DE L’APPAREIL 1 Touche ECRAN 11 Capteur de télécommande 2 Touche Folder +/M+/10+ 12 Ecran 3 Lecteur CD 13 Touche de connexion BT 4 Titre suivant /recherche de stations 14 Touche STOP 5 Volume + 15 Titre précédent /recherche de stations 16 Volume - 6 Touche Power 7 Touche CLK.SET/P-MODE/MEMORY... -
Página 35: Mise En Service
MISE EN SERVICE L’appareil est branché au secteur via un adaptateur. Branchement de l’adaptateur REMARQUE : utilisez uniquement l’adaptateur fourni ! Branchez l’adaptateur secteur dans une prise de l’appareil. Allumage l’appareil Appuyez sur l’interrupteur POWER pour allumer l’appareil. L’écran s’allume. Pour éteindre l’appareil, appuyez de nouveau sur la touche POWER. -
Página 36: Télécommande
TÉLÉCOMMANDE Utilisation de la télécommande Les touches de la télécommande et de l’appareil principal sont marquées de la même façon et ont exactement les mêmes fonctions. Consignes importantes pour la télécommande Portée jusqu’à 5 mètres. La portée peut être perturbée par de fortes sources de lumière. -
Página 37: Heure Et Minuterie
HEURE ET MINUTERIE Réglage de l’heure L’appareil étant éteint, appuyez sur la touche CLK. SET / P-MODE / MEMORY. L’affichage des heures commence à clignoter Appuyez sur la touche pour régler les heures. Appuyez sur la touche CLK. SET / P-MODE / MEMORY pour passer à l’affichage des minutes. -
Página 38: Radio Fm
RADIO FM Réglage de la radio FM Appuyez sur la touche Power pour allumer l’appareil Pour une meilleure qualité de réception, déroulez l’antenne FM. Appuyez de nouveau sur la touche SOURCE pour choisir la bande FM. Le témoin FM et P01, P02, P03... apparaissent à l’écran. Maintenez la touche pour rechercher la station disponible suivante ou précédente. -
Página 39: Lecture De Musique Sur Cd Et Mp3
LECTURE DE MUSIQUE SUR CD ET MP3 Insérer un CD et le lire Appuyez sur la touche Power pour allumer l’appareil. Appuyez sur la touche SOURCE pour choisir CD. Ouvrez le lecteur CD. Insérez un CD dans le lecteur, avec la face imprimée vers le haut. Refermez le lecteur CD. -
Página 40: Configurer La Connexion Bt
Lecture à répétition • Pour répéter le titre en cours de lecture, appuyez une fois sur la touche CLK. SET / P-MODE / MEMORY. • Pour répéter la lecture d’un dossier en cours (MP3 uniquement), appuyez deux fois sur la touche CLK. SET / P-MODE / MEMORY. •... -
Página 41: Prise Line-In
Lire de l’audio par BT Une fois l’appariement établi avec un appareil, utilisez les touches de commande de l‘appareil BT connecté pour choisir un titre. Pour lire le titre sélectionné ou le mettre en pause, utilisez les touches de commande de l’appareil BT connecté ou bien la touche PLAY/PAUSE de l’appareil. -
Página 42: Informations Sur Le Recyclage
INFORMATIONS SUR LE RECYCLAGE Vous trouverez sur le produit l’image ci-contre (une poubelle sur roues, barrée d‘une croix), ce qui indique que le produit se trouve soumis à la directive européenne 2012/19/UE. Renseignez-vous sur les dispositions en vigueur dans votre région concernant la collecte séparée des appareils électriques et électroniques. -
Página 43: Dati Tecnici
Gentile cliente, La ringraziamo per aver acquistato il dispositivo. La preghiamo di leggere attentamente le seguenti istruzioni per l’uso e di seguirle per evitare possibili danni. Non ci assumiamo alcuna responsabilità per danni scaturiti da una mancata osservazione delle avvertenze di sicurezza e da un uso improprio del dispositivo. -
Página 44: Descrizione Del Dispositivo
DESCRIZIONE DEL DISPOSITIVO 1 tasto display 11 sensore telecomando 2 tasto folder+/M+/10+ 12 display 3 vano CD 13 connessione BT/PLAY/PAUSE 4 titolo successivo/ricerca emittenti 14 tasto STOP 5 volume + 15 titolo precedente/ricerca emittenti 16 volume - 6 tasto POWER 7 tasto CLK.SET/P-MODE/MEMORY 17 aprire vano CD 8 tasto folder-/M-/10-... -
Página 45: Messa In Funzione
MESSA IN FUNZIONE Il dispositivo viene connesso al circuito elettrico attraverso il trasformatore. Collegare il trasformatore AVVERTENZA: utilizzare esclusivamente il trasformatore incluso in consegna! Collegare il trasformatore ad una presa di corrente. Collegare il connettore DC del trasformatore alla connessione DC sul lato del dispositivo. -
Página 46: Telecomando
TELECOMANDO Utilizzare il telecomando I tasti su telecomando e dispositivo principale hanno gli stessi simboli e le stesse funzioni. Informazioni importanti sul telecomando Copertura fino a 5 metri. La copertura può essere disturbata da fonti di luce particolarmente intensa. Non posizionare oggetti tra telecomando e sensore. -
Página 47: Orologio E Timer
OROLOGIO E TIMER Impostare l‘ora A dispositivo acceso, premere il tasto CLK. SET / P-MODE / MEMORY. L’indicazione dell’ora comincia a lampeggiare. Premere i tasti per impostare l’ora. Premere il tasto CLK. SET / P-MODE / MEMORY per passare all’indicazione dei minuti. Premere i tasti per impostare i minuti. -
Página 48: Radio Fm
RADIO FM Impostare la radio FM Premere il tasto POWER per accendere il dispositivo. Estrarre l’antenna FM per migliorare la ricezione. Premere ripetutamente il tasto SOURCE per selezionare la banda FM. L’indicazione FM e P01, P02, P03... compaiono sul display. Tenere premuti tasti per cercare l’emittente successiva o precedente disponibile. -
Página 49: Riproduzione Musicale Da Cd E Mp3
RIPRODUZIONE MUSICALE DA CD E MP3 Caricare e riprodurre un CD Premere il tasto POWER per accendere il dispositivo. Premere il tasto SOURCE per selezionare CD. Aprire il vano CD. Inserire un CD con l’etichetta rivolta verso l’alto. Chiudere il vano CD. Premere il tasto PAIR/ per dare inizio alla riproduzione del CD. -
Página 50: Realizzare Connessione Bt
Riproduzione ripetuta • Per ripetere il titolo attuale durante la riproduzione, premere una volta il tasto CLK. SET / P-MODE / MEMORY. • Per ripetere la cartella (solo per MP3) durante la riproduzione, premere due volte il tasto CLK. SET / P-MODE / MEMORY. •... -
Página 51: Connessione Line-In
Riproduzione audio via BT Dopo aver realizzato il Pairing con successo, utilizzare gli elementi di controllo del dispositivo BT connesso per selezionare un titolo. Per riprodurre o mettere in pausa il titolo selezionato, utilizzare gli elementi di controllo del dispositivo BT connesso o il tasto PLAY/PAUSE sul dispositivo. -
Página 52: Smaltimento
SMALTIMENTO Se sul prodotto è presente la figura a sinistra (il cassonetto mobile sbarrato), si applica la direttiva europea 2012/19/UE. Questi prodotti non possono essere smaltiti con i rifiuti normali. Informarsi sulle disposizioni vigenti sulla raccolta separata di dispositivi elettrici ed elettronici. Non smaltire i vecchi dispositivi con i rifiuti domestici.