Tabla de contenido
Publicidad
Idiomas disponibles
Idiomas disponibles
Enlaces rápidos
Publicidad
Capítulos
Tabla de contenido

Manuales relacionados para auna Concept 620


Resumen de contenidos para auna Concept 620
-
Página 3: Tabla De Contenido
Sehr geehrter Kunde, wir gratulieren Ihnen zum Erwerb Ihres Gerätes. Lesen Sie die folgenden Hinweise sorgfältig durch und befolgen Sie diese, um möglichen Schäden vorzubeugen. Für Schäden, die durch Missachtung der Hinweise und unsachgemäßen Gebrauch entstehen, übernehmen wir keine Haftung. Scannen Sie den folgenden QR-Code, um Zugriff auf die aktuellste Bedienungsanleitung und weitere Informationen rund um das Produkt zu erhalten:... -
Página 4: Technische Daten
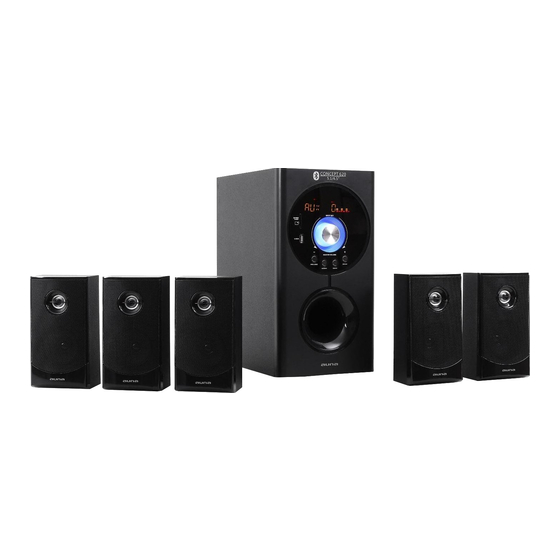
TECHNISCHE DATEN Artikelnummer 10006335 Stromversorgung 220-240 V ~ 50/60 Hz BT-Frequenz 2402-2480 MHz BT-Sendeleistung (max.) 3,31 dBm Frequenzempfindlichkeit 40 Hz-20 KHz S/N Verhältnis ≥75 dB Kanaltrennung ≥50 dB Lautsprecher 6.5“+3“x5... -
Página 5: Sicherheitshinweise
SICHERHEITSHINWEISE Allgemeine Hinweise • Blitzschlag - Wenn Sie das Gerät länger nicht benutzen oder es gewittert, ziehen Sie den Stecker aus der Steckdose der trennen Sie das Gerät vom Antennenanschluss. Dadurch werden Schäden am Produkt durch Blitzschlag und Überspannung vermieden. •... -
Página 6: Vorderseite
VORDERSEITE • INPUT SET: Wählen Sie hiermit die Eingangsquelle. • MASTER VOLUME: Drehen zum Einstellen der Lautstärke. • PRO-LOGIC: Pro-Logic-Taste • AUTO/ : USB/SD Wiedergabe/Pause. • VOL-/ /CH-: Zurück, wenn Sie die Taste länger als 3 Sek. halten, reduziert sich die Lautstärke. •... -
Página 7: Fernbedienung
FERNBEDIENUNG Ein-/Ausschalter (Standby) SD-Wiedergabe Pro-Logic-Kanalwahl USB-Speicher AUX-Wiedergabe DVD-Wiedergabe BLUE BT-Wiedergabe Wiedergabe/Pause USB/SD: Vorheriger Titel USB/SD: Nächster Titel SLEEP Einschlaftimer FL +/- Lautstärke vorne links FR +/- Lautstärke vorne rechts SW +/- Lautstärke Subwoofer CEN +/- Lautstärke Center VOL +/- Gesamtlautstärke SL +/- Lautstärke Surround links SR +/-... -
Página 8: Anschlussplan 1
ANSCHLUSSPLAN 1 Lautsprecheranschlüsse Schließen Sie die vorderen, den Center- und die Surroundlautsprecher entsprechend an die 5.1-Anschlüsse an. • Schließen Sie die vorderen Lautsprecher an den Anschluss FRONT SPEAKERS an. • Schließen Sie den Center-Lautsprecher an den Anschluss CENTER an. • Schließen Sie den Surroundlautsprecher an den Anschluss SURROUND SPEAKERS an. -
Página 9: Anschlussplan 2
ANSCHLUSSPLAN 2 Radioantenne Anschluss von Zubehör Schließen Sie das Zubehör den Farben entsprechend an: Rote Stecker und Anschlüsse: Linker Audiokanal. Hinweis: Schließen Sie die Stecker richtig an. Lose Verbindungen können ein Summen und andere Störgeräusche verursachen. Wichtig: Schließen Sie sämtliches Zubehör an und verbinden Sie erst danach das Gerät mit dem Stromnetz. -
Página 10: Positionierung Der Lautsprecher
POSITIONIERUNG DER LAUTSPRECHER (a) Subwoofer: Stellen Sie den Subwoofer auf den Boden. (b) Vordere Lautsprecher (c) Surroundlautsprecher: Stellen Sie diese Lautsprecher auf Höhe und ein wenig hinter Ihrer Sitzposition ca. 1 m oberhalb Ihrer Ohren auf. (d) Mittlerer Lautsprecher: Stellen Sie diesen Lautsprecher zwischen den vorderen Lautsprechern auf. -
Página 11: Reinigung Und Pflege
REINIGUNG UND PFLEGE • Verwenden Sie ein weiches Tuch, um die Oberfläche des Lautsprechers zu reinigen. Verwenden Sie zur Reinigung keine Scheuerschwämme, Scheuermittel oder scharfe Reiniger. • Wenn der Lautsprecher während eines Gewitters nicht richtig funktioniert, ziehen Sie den Stecker aus der Steckdose und stecken Sie ihn nach einer Minute wieder ein. -
Página 12: Hinweise Zur Entsorgung
HINWEISE ZUR ENTSORGUNG Wenn es in Ihrem Land eine gesetzliche Regelung zur Entsorgung von elektrischen und elektronischen Geräten gibt, weist dieses Symbol auf dem Produkt oder auf der Verpackung darauf hin, dass dieses Produkt nicht im Hausmüll entsorgt werden darf. Stattdessen muss es zu einer Sammelstelle für das Recycling von elektrischen und elektronischen Geräten gebracht werden. - Página 13 Dear Customer, Congratulations on purchasing this device. Please read the following instructions carefully and follow them to prevent possible damages. We assume no liability for damage caused by disregard of the instructions and improper use. Scan the QR code to get access to the latest user manual and more product information.
-
Página 14: Technical Data
TECHNICAL DATA Item number 10006335 Power supply 220-240 V ~ 50/60 Hz BT frequency 2402-2480 MHz BT radio-frequency power (max.) 3.31 dBm Frequency Response 40 Hz-20 kHz S/N Ratio ≥75 dB Separation ≥50 dB Speaker 6.5“+3“x5... -
Página 15: Safety Instructions
SAFETY INSTRUCTIONS General information • Lightning - If you are not going to use the device for a long time or if there is a storm, disconnect the plug from the electrical outlet and disconnect the device from the antenna connector. This will avoid damage to the product that may be caused by lightning or overvoltage. -
Página 16: Front Panel
FRONT PANEL • INPUT SET: when pressing the button, the function is „input“ function. • MASTER VOLUME: when rotating the button, the function os Volume+/ Volume- function. • PRO-LOGIC: pro-logic function key. • AUTO/ : USB/SD pause/play function key. • VOL-/ /CH-: „previous“... -
Página 17: Control Panel
CONTROL PANEL On/off switch (standby) SD playback Pro-Logic channel selection USB memory AUX playback DVD playback BLUE BT playback Play/Pause USB/SD: Previous track USB/SD: Next track SLEEP Sleep timer FL +/- Volume front left FR +/- Volume front right SW +/- Subwoofer volume CEN +/- Center volume... -
Página 18: Connection Diagram 1
CONNECTION DIAGRAM 1 Speaker Terminals Connect front speakers, a center speaker, surround speakers to 5.1 speaker output terminals. • The front speaker‘s cords to the FRONT SPEAKERS terminals • The center speaker‘s cord to the CENTER SPEAKERS terminals. • The surround speaker‘s cords to SURROUND SPEAKER terminals. Note: Do not leave objects generating magnetism near the speakers. -
Página 19: Connection Diagram
CONNECTION DIAGRAM 2 Radio antenna Connection of accessories Connect the accessories according to the colors: Red plugs and connectors: Left audio channel. Note: Connect the connectors properly. Loose connections can cause buzzing and other noise. Important: Connect all accessories and only then connect the device to the mains. -
Página 20: Positioning The Speakers
POSITIONING THE SPEAKERS (a) Subwoofer: Place the subwoofer any place on the floor. There is no directional requirement for the Bass effect. (b) Front speakers (c) Surround Speakers: Place the surround spakers in the same level slightly behind the listening area by facing it. Align horizontally about 1 metre above ear high. -
Página 21: Cleaning And Care
CLEANING AND CARE • Use a soft cloth or cotton dipped in a neutral solution for cleaning the surface of the speaker. Do not use the type of cloth that you use for washing dishes or aggressive chemical agents. • If the speaker is not working properly during a storm, please disconnect the plug from the power socket and reinsert it after a minute. -
Página 22: Disposal Considerations
DISPOSAL CONSIDERATIONS If there is a legal regulation for the disposal of electrical and electronic devices in your country, this symbol on the product or on the packaging indicates that this product must not be disposed of with household waste. Instead, it must be taken to a collection point for the recycling of electrical and electronic equipment. - Página 23 Cher client, Toutes nos félicitations pour l’acquisition de ce nouvel appareil. Veuillez lire attentivement les instructions suivantes de branchement et d’utilisation afin d’éviter d’éventuels dommages. Le fabricant ne saurait être tenu pour responsable des dommages dus au non-respect des consignes de sécurité et à la mauvaise utilisation de l’appareil.
-
Página 24: Fiche Technique
FICHE TECHNIQUE Numéro d'article 10006335 Alimentation 220-240 V ~ 50/60 Hz WiFi fréquence 2402-2480 MHz WiFi puissance de radiofréquence (max.) 3,31 dBm Sensibilité en fréquences 40 Hz-20 KHz Rapport S/N ≥75 dB Séparation des canaux ≥50 dB Haut-parleurs 6.5“+3“x5... -
Página 25: Consignes De Sécurité
CONSIGNES DE SÉCURITÉ Consignes générales • Foudre - Si vous n‘utilisez pas l‘appareil pendant une longue période ou s‘il y a de l‘orage, débranchez la fiche de la prise et débranchez l‘antenne de l‘appareil. Cela évite d‘endommager le produit à cause de la foudre et des surtensions. -
Página 26: Façade Avant
FAÇADE AVANT • INPUT SET : Pour sélectionner la source en entrée. • MASTER VOLUME : Tourner pour régler le volume. • PRO-LOGIC : Touche Pro-Logic • AUTO / : USB/SD Lecture/Pause. • VOL-/ /CH- : Retour, diminue le volume si vous appuyez pendant plus de 3 secondes. -
Página 27: Télécommande
TÉLÉCOMMANDE Bouton ON/OFF (Standby) Lecture SD Choix du canal Pro-Logic Prise USB Lecture AUX Lecture DVD BLUE Lecture BT Lecture/Pause USB/SD : Titre précédente. USB/SD : Titre suivant SLEEP Sleep timer FL +/- Volume avant gauche FR +/- Volume avant droit SW +/- Volume Subwoofer CEN +/-... -
Página 28: Schéma Des Branchements 1
SCHÉMA DES BRANCHEMENTS 1 Branchement des enceintes Branchez les enceintes avant, centrales et surround conformément aux prises 5.1. • Branchez les enceintes avants aux prises FRONT SPEAKERS. • Branchez les enceintes centrales aux prises CENTER. • Branchez les enceintes surround aux prises SURROUND SPEAKERS. Remarque : Ne placez pas d‘objets magnétiques à... -
Página 29: Schéma Des Branchements
SCHÉMA DES BRANCHEMENTS 2 Antenne radio Branchements des accessoires Branchez les accessoires en respectant les indica- tions de couleur. La prise rouge correspond au canal audio gauche. Note : Enfoncez bien les câbles dans les prises sans quoi des distorsions pourraient survenir. -
Página 30: Positionnement Des Enceintes
POSITIONNEMENT DES ENCEINTES (a) Subwoofer : Posez les subwoofers sur le sol. (b) Enceintes avants. (c) Enceintes Surround : Placez ces enceintes en hauteur, à environ un mètre en retrait de vos oreilles. (d) Enceintes centrales : Placez ces enceintes entre les enceintes avants. -
Página 31: Nettoyage Et Entretien
NETTOYAGE ET ENTRETIEN • Utilisez un chiffon doux ou du coton trempé dans une solution neutre pour nettoyer la surface de l‘enceinte. N‘utilisez pas le type de tissu que vous utilisez pour laver la vaisselle ni des agents chimiques agressifs. •... -
Página 32: Informations Sur Le Recyclage
INFORMATIONS SUR LE RECYCLAGE S‘il existe une réglementation pour l‘élimination ou le recyclage des appareils électriques et électroniques dans votre pays, ce symbole sur le produit ou sur l‘emballage indique que cet appareil ne doit pas être jeté avec les ordures ménagères. Vous devez le déposer dans un point de collecte pour le recyclage des équipements électriques et électroniques. - Página 33 Estimado cliente: Le felicitamos por la adquisición de este producto. atentamente siguiente manual siga cuidadosamente las instrucciones de uso con el fin de evitar posibles daños. La empresa no se responsabiliza de los daños ocasionados por un uso indebido del producto o por haber desatendido las indicaciones de seguridad.
-
Página 34: Datos Técnicos
DATOS TÉCNICOS Número de artículo 10006335 Alimentación 220-240 V ~ 50/60 Hz Frecuencia BT 2402-2480 MHz Potencia de transmisión BT (máx.) 3,31 dBm Sensibilidad de frecuencia 40 Hz-20 KHz Relación señal/ruido ≥75 dB Separación de canales ≥50 dB Altavoz 6,5“+3“x5... -
Página 35: Indicaciones De Seguridad
INDICACIONES DE SEGURIDAD Indicaciones generales • Rayos- Si no va a utilizar la unidad durante un período prolongado de tiempo, o si hay rayos, desenchufe la unidad de la toma de corriente y desconecte el conector de la antena. Esto evitará que el producto resulte dañado por los rayos y las subidas de tensión. -
Página 36: Parte Delantera
PARTE DELANTERA • INPUT SET: seleccione la fuente de entrada. • MASTER VOLUME: gire el regulador para ajustar el volumen. • PRO-LOGIC: tecla Pro-logic • AUTO/ : Reproducción/pausa en USB/SD. • VOL-/ /CH-:Atrás; cuando se mantiene la tecla presionada más de 3 seg, se reduce el volumen. -
Página 37: Mando A Distancia
MANDO A DISTANCIA Encender/apagar (modo de espera) Reproducción SD Selección de canal Pro-Logic Memoria USB Reproducción AUX Reproducción DVD BLUE Reproducción BT Reproducción/pausa USB/SD: pista anterior USB/SD: pista siguiente SLEEP Temporizador de apagado FL +/- Volumen altavoz delantero izquierdo FR +/- Volumen altavoz delantero derecho SW +/- Volumen subwoofer... -
Página 38: Esquema De Conexiones 1
ESQUEMA DE CONEXIONES 1 Tomas para altavoces Conecte los altavoces delanteros, el central y los surround a las tomas 5.1 según corresponda. • Conecte los altavoces delanteros a la toma FRONT SPEAKERS. • Conecte el altavoz central a la toma CENTER. •... -
Página 39: Esquema De Conexiones
ESQUEMA DE CONEXIONES 2 Antena de radio Conexión de accesorios Conecte los accesorios siguiendo los colores: conector y tomas en color rojo: canal de audio izquierdo. Nota: introduzca correctamente el conector. Las conexiones sueltas pueden ocasionar zumbidos y otras interferencias. Importante: conecte todos los accesorios primero y, posteriormente, enchufe el aparato a la red eléctrica. -
Página 40: Colocación De Los Altavoces
COLOCACIÓN DE LOS ALTAVOCES (a) Subwoofer: coloque el subwoofer en el suelo. (b) Altavoces delanteros (c) Altavoces surround: coloque estos altavoces en altura y un poco más hacia atrás que su asiento, aprox. a 1 m por encima de su campo auditivo. -
Página 41: Limpieza Y Cuidado
LIMPIEZA Y CUIDADO • Utilice un paño suave para limpiar la superficie de los altavoces. No utilice esponjas abrasivas, productos abrasivos ni limpiadores potentes para la limpieza. • Si el altavoz no funciona correctamente durante una tormenta, desconecte el enchufe de la toma de corriente y vuelva a enchufarlo transcurrido un minuto. -
Página 42: Indicaciones Sobre La Retirada Del Aparato
INDICACIONES SOBRE LA RETIRADA DEL APARATO Si en su país existe una disposición legal relativa a la eliminación de aparatos eléctricos y electrónicos, este símbolo estampado en el producto o en el embalaje advierte que no debe eliminarse como residuo doméstico. Debe depositarse en un punto de recogida de reciclaje de aparatos eléctricos y electrónicos. - Página 43 Gentile Cliente, La ringraziamo per aver acquistato il dispositivo. La preghiamo di leggere attentamente le seguenti istruzioni per l’uso e di seguirle per evitare possibili danni. Non ci assumiamo alcuna responsabilità per danni scaturiti da una mancata osservazione delle avvertenze di sicurezza e da un uso improprio del dispositivo.
-
Página 44: Dati Tecnici
TDATI TECNICI Numero articolo 10006335 Alimentazione 220-240 V ~ 50/60 Hz Frequenza BT 2402-2480 MHz Potenza di trasmissione BT (max.) 3,31 dBm Sensibilità in frequenza 40 Hz-20 KHz Rapporto S/N ≥75 dB Separazione tra i canali ≥50 dB Altoparlanti 6.5“+3“x5... -
Página 45: Avvertenze Di Sicurezza
AVVERTENZE DI SICUREZZA Avvertenze generiche • Colpo di fulmine - Se non si usa più il dispositivo o se ci sono temporali, staccare la spina dalla presa elettrica e scollegare il dispositivo dall'antenna. In questo modo si evitano danni al prodotto dovuti a colpi di fulmine e sovratensione. -
Página 46: Lato Anteriore
LATO ANTERIORE • INPUT SET: per selezionare la sorgente di ingresso. • MASTER VOLUME: ruotare la manopola per impostare il volume. • PRO-LOGIC: pulsante Pro-Logic • AUTO/ : USB/SD play/pausa. • VOL-/ /CH-: indietro, quando si tiene premuto il pulsante per più di 3 secondi il volume si abbassa. -
Página 47: Telecomando
TELECOMANDO Interruttore on/off (standby) Riproduzione SD Selezione canale Pro-Logic Memoria USB Riproduzione AUX Riproduzione DVD BLUE Riproduzione BT Play/pausa USB/SD: brano precedente USB/SD: brano successivo SLEEP Sleep timer FL +/- Volume davanti sinistra FR +/- Volume davanti destra SW +/- Volume subwoofer CEN +/- Volume center... -
Página 48: Schema Di Collegamento 1
SCHEMA DI COLLEGAMENTO 1 Collegare gli altoparlanti Collegare gli altoparlanti anteriori, center e surround secondo gli allacci raffigurati in 5.1. • Collegare gli altoparlanti anteriori ai FRONT SPEAKERS. • Collegare l'altoparlante center a CENTER. • Collegare l'altoparlante surround ai SURROUND SPEAKERS. Nota: non sistemare oggetti magnetici vicino agli altoparlanti. -
Página 49: Schema Di Collegamento
SCHEMA DI COLLEGAMENTO 2 Antenna radio Collegare gli accessori Collegare gli accessori seguendo i colori: spine rosse e allacci: canale audio sinistro. Nota: inserire la spina correttamente. I collegamenti lenti possono causare ronzii e altre interferenze. Importante: collegare prima tutti gli accessori e poi il dispositivo alla rete elettrica. -
Página 50: Posizionamento Degli Altoparlanti
POSIZIONAMENTO DEGLI ALTOPARLANTI (a) Subwoofer: sistemare il subwoofer sul pavimento. (b) Altoparlanti anteriori (c) Altoparlanti surround: sistemare gli altoparlanti in alto a ca. 1 m sopra le proprie orecchie e poco più indietro rispetto a dove si sta seduti. (d) Altoparlante centrale: sistemare l'altoparlante tra gli altoparlanti anteriori. -
Página 51: Pulizia E Manutenzione
PULIZIA E MANUTENZIONE • Utilizzare un panno morbido per pulire la superficie dell'altoparlante. Non ricorrere a pagliette, prodotti abrasivi o detergenti aggressivi. • Se l'altoparlante non funziona bene durante un temporale, togliere la spina dalla presa elettrica e reinserirla dopo circa un minuto. •... -
Página 52: Avviso Di Smaltimento
AVVISO DI SMALTIMENTO Se nel vostro Paese sono vigenti regolamenti legislativi relativi allo smaltimento di dispositivi elettrici ed elettronici, questo simbolo sul prodotto o sull'imballaggio indica che non è consentito smaltire questo prodotto nei rifi uti casalinghi. Il dispositivo deve invece essere portato in un centro di raccolta per il riciclaggio di dispositivi elettrici ed elettronici.