Tabla de contenido
Publicidad
Idiomas disponibles
Idiomas disponibles
Enlaces rápidos
Publicidad
Tabla de contenido

Manuales relacionados para auna Line 700 A


Resumen de contenidos para auna Line 700 A
-
Página 3: Tabla De Contenido
Sehr geehrter Kunde, wir gratulieren Ihnen zum Erwerb Ihres Gerätes. Lesen folgenden Anschluss- Anwendungshinweise sorgfältig durch und befolgen Sie diese, um möglichen technischen Schäden vorzubeugen. Für Schäden, die durch Missachtung der Sicherheitshinweise und unsachgemäßen Gebrauch entstehen, übernehmen wir keine Haftung. Scannen Sie den QR-Code, um Zugriff auf die aktuellste Bedienungsanleitung und weitere Informationen rund um das Produkt zu erhalten. -
Página 4: Sicherheitshinweise
SICHERHEITSHINWEISE • Lesen Sie diese Bedienungsanleitung sorgfältig. Bewahren Sie die Bedienungsanleitung auf. • Beachten Sie alle Hinweise. • Verwenden Sie das Gerät nicht in der Nähe von Wasser. • Reinigen Sie das Gerät nur mit einem trockenen Tuch. • Verdecken Sie nicht die Lüftungsöffnungen. Stellen Sie das Gerät in Übereinstimmung mit den Hinweisen des Herstellers auf. -
Página 5: Lieferumfang
Warnung: Gefahr eines Stromschlags Setzen Sie das Gerät nicht Regen oder Feuchtigkeit aus. Warnung: Explosionsgefahr (Batterien) Legen Sie die Batterien richtig herum ein. Verwenden Sie den richtigen Battietyp. Erklärung der Symbole auf dem Gerät Warnung: Gefahr eines Stromsschlags: Entfernen Sie nicht die Gehäuseabdeckung. Das Gerät ent- hält keine durch den Benutzer einzustellenden oder zu wartenden Teile. -
Página 6: Bedienelemente Und Anzeigen
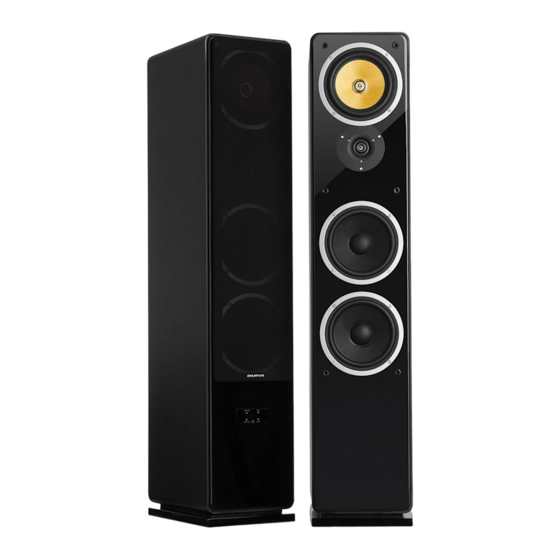
BEDIENELEMENTE UND ANZEIGEN Fernbedienung 1.STANDBY STANDBY: Ein-und Ausschalten der Lautsprecher 2.TREBLE+ 2 TREBLE+: Erhöhen der Tonhöhe 3.BASS+ 3 BASS +: Erhöhen des Basses 4.TREBLE- 5.BASS- 4 TREBLE -: Verringern der Tonhöhe 6.BALANCE.RIGHT 5 BASS -: Drücken, um den Bass zu verringern. 7.BALANCE.LEFT 6 BAL. - Página 7 Anzeige auf der Vorderseite COAXIAL OPTICAL 1. Licht für AUX-Eingang: 2. Licht für Koaxial-Eingang: 3. Licht für STANDBY/BT 4. Licht für optischen Eingang...
- Página 8 Rückseite To the left speaker AUX -Eingang: Anschluss für Audio-Cinchstecker 2 Volume: Regelung der Lautstärke 3 INPUT: Wahl der Audioquelle 4 Anschluss an den linken Lautsprecher 5 POWER: Lautsprecher ein- oder ausschalten 6 COAXIAL: Koaxialanschluss 7 SW OUT: Ausgang Subwoofer 8 OPTICAL: optischer Anschluss 9 AC INPUT:...
-
Página 9: Anschlüsse Herstellen
ANSCHLÜSSE HERSTELLEN 1. Trennen Sie vor dem Herstellen der Anschlüsse die Stromversorgung. 2. Alle Eingänge müssen richtig eingesteckt sein, um Störgeräusche auszuschließen. Anschluss an einen Subwoofer SUBWOOFER Anschlüsse an DVD/CD-Player oder Fernsehgerät. DVD/CD/TV DVD/CD/TV OPTICAL COAXIAL... -
Página 10: Funktion
FUNKTION 1. Stellen Sie die Lautstärke über die Tasten "+" und "-" auf der Fernbedienung oder auf der Rückseite des rechten Lautsprechers ein. 2. Drücken Sie die INPUT-Taste auf der Fernbedienung oder auf der Rückseite um die Audiosignaleingänge AUX/BT/ optisch oder koaxial zu wählen. -
Página 11: Problembehebung
PROBLEMBEHEBUNG Fehler Lösungen Überprüfen Sie die Verbindung des Kein Strom Netzgerätes zwischen der Steckdose und dem Gerät. Sehen Sie nach, ob die Lautstärke etwa auf Minimum gestellt ist. Kein Ton Sehen Sie nach, ob die Lautsprecher etwa auf Stumm gestellt sind. Überprüfen Sie die Batterie und tauschen Sie die Batterie ggf. -
Página 12: Spezielle Entsorgungshinweise Für Verbraucher In Deutschland
SPEZIELLE ENTSORGUNGSHINWEISE FÜR VERBRAUCHER IN DEUTSCHLAND Entsorgen Sie Ihre Altgeräte fachgerecht. Dadurch wird gewährleistet, dass die Altgeräte umweltgerecht verwertet und negative Auswirkungen auf die Umwelt und menschliche Gesundheit vermieden werden. Bei der Entsorgung sind folgende Regeln zu beachten: • Jeder Verbraucher ist gesetzlich verpflichtet, Elektro- und Elektronikaltgeräte (Altgeräte) sowie Batterien und Akkus getrennt vom Hausmüll zu entsorgen. - Página 13 • Bei einem Vertrieb unter Verwendung von Fernkommunikationsmitteln ist die unentgeltliche Abholung am Ort der Abgabe auf Elektro- und Elektronikgeräte der Kategorien 1, 2 und 4 gemäß § 2 Abs. 1 ElektroG, nämlich „Wärmeüberträger“, „Bildschirmgeräte“ (Oberfläche von mehr als 100 cm²) oder „Großgeräte“ (letztere mit mindestens einer äußeren Abmessung über 50 Zentimeter) beschränkt.
-
Página 14: Hinweise Zur Entsorgung
Berlin Brands Group UK Ltd PO Box 1145 Oxford, OX1 9UW United Kingdom Hiermit erklärt Chal-Tec GmbH, dass der Funkanlagentyp Line 700 A der Richtlinie 2014/53/ EU entspricht. Der vollständige Text der EU- Konformitätserklärung ist unter der folgenden Internetadresse verfügbar: use.berlin/10031508... - Página 15 Dear Customer, Congratulations on purchasing this device. Please read the following instructions carefully and follow them to prevent possible damages. We assume no liability for damage caused by disregard of the instructions and improper use. Scan the QR code to get access to the latest user manual and more product information.
-
Página 16: Safety Instructions
SAFETY INSTRUCTIONS • Read these Instructions. Keep these Instructions. Heed all Warnings. Follow all instructions. • Do not use this apparatus near water. • Clean only with a dry cloth. • Do not block any ventilation openings. Install in accordance with the manufacturer’s instructions. -
Página 17: Scope Of Supply
Warning: Danger of electric shock Do not expose this device to rain or humidity. Warning: Danger of explosion (batteries) Insert the batteries with the correct polarity. Use the correct battery type. Explanation of the symbols on the device WARNING: TO REDUCE THE RISK OF ELECTRIC SHOCK, DO NOT REMOVE COVER (OR BACK). -
Página 18: Location Of Controls And Leds
LOCATION OF CONTROLS AND LEDS Remote Control 1.STANDBY STANDBY 2.TREBLE+ 2 TREBLE+ 3.BASS+ 3 BASS+ 4.TREBLE- 5.BASS- 4 TREBLE- 6.BALANCE.RIGHT 5 BASS- 7.BALANCE.LEFT 6 BALANCE.RIGHT 8.AUX 7 BALANCE.LEFT 9.LOUDNESS 10.COAXIAL 8 AUX 11.PRECIOUS 9 LOUDNESS 12.PLAY/PAUSE 10 COAXIAL 13.VOLUME- 11 PRECIOUS 14.MUTE 12 PLAY/PAUSE 15.SUBWOOFER.VOLUME+... -
Página 19: Front Panel
Front Panel COAXIAL OPTICAL 1. AUX INPUT LIGHT 2. COAXIAL INPUT LIGHT 3. STANDBY/BLUETOOTH LIGHT 4. OPTICAL INPUT LIGHT... -
Página 20: Rear Panel
Rear Panel To the left speaker AUX INPUT: Connect to aux audio input jacks 2 VOLUME: Regelung der Lautstärke 3 INPUT: Press the INPUT key to choose input mode 4 TO THE LEFT SPEAKER Connect to the left speaker 5 POWER: Switch power on or off 6 COAXIAL: Connect to the coaxial audio output... -
Página 21: Equipment Connection
EQUIPMENT CONNECTION 1. Please switch off power supply when doing connection. 2. All inputs should be inserted firmly to avoid noise distortion. Connection to subwoofer SUBWOOFER Connection to DVD/CD player or TV audio input. DVD/CD/TV DVD/CD/TV OPTICAL COAXIAL... -
Página 22: Operation
OPERATION 1. Press the key VOL+/- on the rear panel or the key VOL+/- on the remote control to adjust the setting of main volume control to you listening level. 2. Press the key INPUT on the rear panel or the key on the remote control to select AUX/BT/OPTICAL/COAXIAL mode. -
Página 23: Troubleshooting
TROUBLESHOOTING Problem What to do Check the connection of the AC/DC adapter No power between the tower speaker and wall outlet. Check that the volume control is NOT at No sound minimum. Check that it is NOT set to mute. Inspect or replace the battery. -
Página 24: Disposal Considerations
Oxford, OX1 9UW United Kingdom Hereby, Chal-Tec GmbH declares that the radio equipment type Line 700 A is in compliance with Directive 2014/53/EU. The full text of the EU declaration of conformity is available at the following internet address: use.berlin/10031508... -
Página 25: Sommaire
Cher client, chère cliente, Toutes nos félicitations pour l’acquisition de ce nouvel appareil. Lisez attentivement les instructions de branchement et d'utilisation suivantes et suivez- les pour éviter d'éventuels dommages techniques. Nous ne saurions être tenus pour responsables des dommages dus au non-respect des consignes et à... -
Página 26: Consignes De Sécurité
CONSIGNES DE SÉCURITÉ • Lisez attentivement ce mode d'emploi. Conservez le mode d'emploi. • Respectez toutes les mises en garde. • N'utilisez pas l'appareil à proximité de l'eau. • Nettoyez l'appareil avec un chiffon sec uniquement. • Ne couvrez pas les ouvertures de ventilation. Installez l'appareil conformément aux instructions du fabricant. -
Página 27: Contenu De L'emballage
Mise en garde : Risque d'électrocution N'exposez pas l'appareil à la pluie ou à l'humidité. Mise en garde : Risque d'explosion (piles) Insérez les piles dans le bon sens. Utilisez le type de pile approprié. Explication des symboles sur l'appareil Mise en garde : risque d'électrocution : ne retirez pas le couvercle du boîtier. -
Página 28: Commandes Et Indicateurs
COMMANDES ET INDICATEURS Télécommande 1.STANDBY STANDBY : Allumer et éteindre les enceintes 2.TREBLE+ 2 TREBLE+ : Augmente les aigus 3.BASS+ 3 BASS + : Augmente les basses 4.TREBLE- 5.BASS- 4 TREBLE - : Diminue les aigus 6.BALANCE.RIGHT 5 BASS - : Appuyez pour augmenter le volume 7.BALANCE.LEFT 6 BAL. - Página 29 Affichage sur la face avant COAXIAL OPTICAL 1. Voyant lumineux pour l'entrée AUX : 2. Voyant lumineux pour l'entrée coaxiale : 3. Voyant lumineux pour STANDBY/BT 4. Voyant lumineux pour l'entrée optique...
-
Página 30: Dos De L'appareil
Dos de l'appareil To the left speaker Entrée AUX : Connecteur pour fiche RCA audio 2 Volume : Réglage du volume 3 INPUT : Sélection de la source audio 4 Raccordement de l'enceinte gauche 5 POWER : allumer ou éteindre l'enceinte 6 COAXIAL : Connecteur coaxial 7 SW OUT :... -
Página 31: Effectuer Des Branchements
EFFECTUER DES BRANCHEMENTS 1. Débranchez l'alimentation électrique avant d'effectuer les branchements. 2. Toutes les entrées doivent être correctement branchées afin d'éviter les bruits parasites. Connexion à un subwoofer SUBWOOFER Connexions au lecteur DVD/CD ou au téléviseur. DVD/CD/TV DVD/CD/TV OPTICAL COAXIAL... -
Página 32: Fonction
FONCTION 1. Réglez le volume à l'aide des touches «+ » et « -» de la télécommande ou à l'arrière de l'enceinte droite. 2. Appuyez sur la touche INPUT de la télécommande ou du panneau arrière pour sélectionner les entrées de signal audio AUX/BT/optique ou coaxiale. -
Página 33: Résolution Des Problèmes
RÉSOLUTION DES PROBLÈMES Problème Solutions Vérifiez la connexion de l'adaptateur Pas de courant secteur entre la prise de courant et l'appareil. Vérifie si le volume est réglé au minimum. Pas de son Vérifie si les enceintes sont réglées sur silencieux. Vérifiez la pile et remplacez-la si La télécommande ne nécessaire. -
Página 34: Informations Sur Le Recyclage
Oxford, OX1 9UW United Kingdom Chal-Tec GmbH déclare par la présente que l'équipement radio Line 700 A est conforme à la directive 2014/53/UE. Le texte intégral de la déclaration de conformité UE est disponible à l'adresse Internet suivante : use.berlin/10031508... -
Página 35: Contenido
Estimado cliente: Le felicitamos por la adquisición de este producto. Lea atentamente el siguiente manual de funcionamiento y conexión y siga cuidadosamente las instrucciones de uso con el fin de evitar posibles daños técnicos. La empresa no se responsabiliza de los daños ocasionados por un uso indebido del producto o por haber desatendido las indicaciones de seguridad. -
Página 36: Indicaciones De Seguridad
INDICACIONES DE SEGURIDAD • Lea atentamente el manual de instrucciones. Conserve este manual de instrucciones. • Siga todas las instrucciones. • No utilice el aparato cerca del agua. • Limpie el aparato únicamente con un paño húmedo. • No cubra las rendijas de ventilación. Instale la unidad de acuerdo con las instrucciones del fabricante. -
Página 37: Contenido Del Envío
Advertencia: Riesgo de descarga eléctrica No exponga el aparato a la lluvia o humedad. ADVERTENCIA ¡Peligro de explosión! (baterías) Inserte las baterías en el sentido correcto. Utilice el tipo de pila correcto. Explicación de los símbolos presentes en el aparato Advertencia: Riesgo de descarga eléctrica: No re- tire la tapa de la carcasa. -
Página 38: Controles Y Pantallas
CONTROLES Y PANTALLAS Mando a distancia 1.STANDBY STANDBY: Encendido y apagado de los altavoces 2.TREBLE+ 2 TREBLE+: Aumenta la altura 3.BASS+ 3 BASS +: Aumentar los bajos 4.TREBLE- 5.BASS- 4 TREBLE -: Disminuye los graves 6.BALANCE.RIGHT 5 BASS -: Pulse para aumentar el volumen de . 7.BALANCE.LEFT 6 BAL. -
Página 39: Pantalla En La Parte Delantera
Pantalla en la parte delantera COAXIAL OPTICAL 1. Luz para la entrada AUX: 2. Luz para la entrada coaxial: 3. Luz para STANDBY/BT 4. Luz para la entrada óptica... -
Página 40: Parte Trasera
Parte trasera To the left speaker Entrada AUX: Conexión para enchufe cinch de audio 2 Volumen: Control de volumen 3 INPUT: Selección de la fuente de audio 4 Conexión al altavoz izquierdo 5 POWER: Encender o apagar el altavoz 6 COAXIAL: Conexión coaxial 7 SW OUT: Salida de subwoofer... -
Página 41: Establecer Conexiones
ESTABLECER CONEXIONES 1. Desconecte la fuente de alimentación antes de realizar las conexiones. 2. Todas las entradas deben estar conectadas correctamente para eliminar el ruido. Conexión a un subwoofer SUBWOOFER Conexiones al reproductor de DVD/CD o al televisor. DVD/CD/TV DVD/CD/TV OPTICAL COAXIAL... -
Página 42: Función
FUNCIÓN 1. Ajuste el volumen con los botones "+" y "-" del mando a distancia o de la parte posterior del altavoz derecho. 2. Pulse el botón INPUT del mando a distancia o del panel posterior para seleccionar las entradas de señal de audio AUX/BT/óptica o coaxial. 3. -
Página 43: Resolución De Anomalías
RESOLUCIÓN DE ANOMALÍAS Error Soluciones Compruebe la conexión de la fuente de No hay electricidad alimentación entre la toma de corriente y la unidad. Compruebe si el volumen está ajustado al mínimo. No hay sonido Compruebe que los altavoces no están ajustados en modo silencio. -
Página 44: Indicaciones Sobre La Retirada Del Aparato
Oxford, OX1 9UW United Kingdom Chal-Tec GmbH declara por la presente que el tipo de equipo de radio Line 700 A cumple con la Directiva 2014/53/UE. El texto completo de la declaración de conformidad de la UE está disponible en la siguiente... -
Página 45: Indice
Gentile cliente, La ringraziamo per aver acquistato il dispositivo. La preghiamo di leggere attentamente le seguenti istruzioni per l'allacciamento e l’uso e di seguirle per evitare possibili danni tecnici. Non ci assumiamo alcuna responsabilità per danni scaturiti da una mancata osservazione delle avvertenze di sicurezza e da un uso improprio del dispositivo. -
Página 46: Avvertenze Di Sicurezza
AVVERTENZE DI SICUREZZA • Leggere attentamente questo manuale d'uso. Conservare il manuale d'uso. • Rispettare tutte le indicazioni. • Non usare il dispositivo vicino all'acqua. • Pulire il dispositivo solo con un panno umido. • Non coprire le aperture di ventilazione. Impostare il dispositivo secondo le istruzioni del produttore. -
Página 47: Volume Di Consegna
Avvertimento: pericolo di scossa elettrica Non esporre il dispositivo a pioggia o umidità. Avvertimento: pericolo di esplosione (batterie) Inserire correttamente le batterie. Utilizzare il tipo di batterie corretto. Spiegazione dei simboli sul dispositivo Attenzione: rischio di scossa elettrica: non rimuo- vere la copertura dell'alloggiamento. -
Página 48: Elementi Di Controllo E Indicazioni
ELEMENTI DI CONTROLLO E INDICAZIONI Telecomando 1.STANDBY STANDBY: accensione e spegnimento degli 2.TREBLE+ altoparlanti 3.BASS+ 2 TREBLE+: aumentare gli alti 4.TREBLE- 3 BASS +: aumentare i bassi 5.BASS- 4 TREBLE -: diminuire gli alti 6.BALANCE.RIGHT 7.BALANCE.LEFT 5 BASS -: premere per diminuire i bassi 8.AUX 6 BAL. - Página 49 Indicazioni sul lato anteriore COAXIAL OPTICAL 1. Spia per l'ingresso AUX: 2. Spia per l'ingresso coassiale: 3. Spia per STANDBY/BT 4. Spia per l'ingresso ottico...
-
Página 50: Lato Posteriore
Lato posteriore To the left speaker Ingresso AUX: collegamento per connettore audio RCA 2 Volume: controllo del volume 3 INPUT: selezione della sorgente audio 4 Collegamento all'altoparlante sinistro 5 POWER: accendere o spegnere l'altoparlante 6 COAXIAL: connessione coassiale 7 SW OUT: uscita subwoofer 8 OPTICAL: connessione ottica... -
Página 51: Stabilire I Collegamenti
STABILIRE I COLLEGAMENTI 1. Scollegare l'alimentazione prima di effettuare i collegamenti. 2. Tutti gli ingressi devono essere collegati correttamente per eliminare le interferenze. Collegamento a un subwoofer SUBWOOFER Collegamenti al lettore DVD/CD o al televisore. DVD/CD/TV DVD/CD/TV OPTICAL COAXIAL... -
Página 52: Funzione
FUNZIONE 1. Regolare il volume usando i tasti "+" e "-" sul telecomando o sul lato posteriore dell'altoparlante destro. 2. Premere il tasto INPUT sul telecomando o sul pannello posteriore per selezionare gli ingressi del segnale audio AUX/BT/ottico o coassiale. 3. -
Página 53: Risoluzione Problemi
RISOLUZIONE PROBLEMI Errore Soluzioni Controllare il collegamento Non c'è corrente dell'alimentatore tra la presa e il dispositivo. Controllare se il volume è impostato al minimo. Nessun audio Controllare che gli altoparlanti non siano impostati sulla funzione muta. Controllare la batteria e sostituirla se Il telecomando non necessario. -
Página 54: Avviso Di Smaltimento
Berlin Brands Group UK Ltd PO Box 1145 Oxford, OX1 9UW United Kingdom Con la presente, Chal-Tec GmbH dichiara l'impianto radio Line 700 A conforme alla direttiva 2014/53/UE. Il testo completo della dichiarazione di conformità UE è disponibile al seguente indirizzo Internet: use. berlin/10031508...