Tabla de contenido
Publicidad
Idiomas disponibles
Idiomas disponibles
Publicidad
Tabla de contenido
Solución de problemas

Manuales relacionados para Oster Press X press GCSTSG1200


Resumen de contenidos para Oster Press X press GCSTSG1200
- Página 1 GCSTSG1200 GCSTSG1200 MODELO/MODEL MODELO/MODEL Manual de Instrucciones Central de vapor Press X press LEA TODAS LAS INSTRUCCIONES ANTES DE USAR ESTE APARATO Instruction Manual Steam Generator Press X press READ ALL INSTRUCTIONS BEFORE USING THIS APPLIANCE...
- Página 2 I M P ORTA NT E S M E D I D A S DE S E G U R I DAD 1. LEA ESTAS INSTRUCCIONES ANTES DE USAR EL ARTEFACTO. 2. Utilice este artefacto sólo para su uso previsto. 3.
- Página 3 22. El enchufe debe retirarse del tomacorriente antes de llenar el depósito de agua. 23. La abertura de llenado no debe abrirse durante el uso. Vea las instrucciones para llenar de manera segura el depósito de agua. 24. La plancha debe usarse y descansar sobre una superficie estable. 25. Al colocar la plancha sobre su soporte, asegúrese de que la superficie sobre la que se coloca el soporte sea estable. 26.
-
Página 4: Descripción Del Aparato
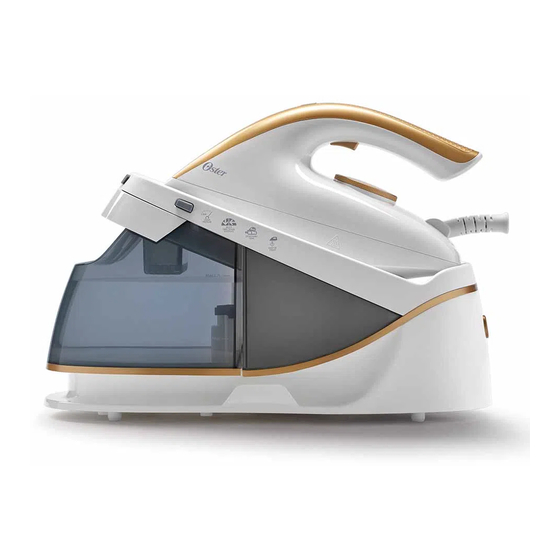
DESCRIPCIÓN DEL APARATO 1 Luz Indicadora de Limpieza / Botón de Auto-Limpieza 2 Luz Indicadora de Temperatura 3 Mango 4 Disparador de Vapor 5 Disco instead of Dial 6 Botón de Bloqueo 7 Botón de Desbloqueo 8 Tanque de Agua 9 Botón de Encendido/Apagado (I/O) 10 Estación Base 11 Manguera de Vapor... -
Página 5: Antes Utilizar Su Generador De Vapor Por Primera Vez
ANTES UTILIZAR SU GENERADOR DE VAPOR POR PRIMERA VEZ Advertencia: Retire todo el material de embalaje, incluyendo la protección de la suela antes de operar su generador de vapor. 1. Limpie la suela con un paño suave. 2. Coloque el mango de la plancha (3) en la estación base (10), en su tabla de planchar (si es lo suficientemente grande) o en una superficie resistente al calor, segura y que tenga la misma altura que su tabla de planchar. -
Página 6: Llenado Durante El Uso
LLENADO DURANTE EL USO Usted puede llenar su generador de vapor mientras lo está utilizando. Simplemente retire el tanque de agua (8) como se describe anteriormente y agregue agua según sea necesario. No llene más allá de la marca del indicador de MAX en el tanque. Su generador de vapor emitirá dos pitidos y la luz indicadora de encendido (9) parpadeará... -
Página 7: Planchando Sin Vapor
PLANCHANDO SIN VAPOR Si tiene la intención de planchar las telas en seco, no es necesario llenar el tanque de agua. Sin embargo, si el agua ya está en el tanque de agua, no necesita vaciarlo. 1. G ire el disco de control de temperatura (5) para ajustar el indicador a la configuración de calor deseada. 2. -
Página 8: Mantenimiento Y Limpieza
1. Gire el disco de control de temperatura (5) para establecer el indicador en la configuración lana. Inicialmente, la luz indicadora de temperatura (2) puede estar intermitente mientras la unidad se ajusta a la nueva temperatura. 2. Espere hasta que la luz indicadora de temperatura se encienda de nuevo. Su generador de vapor ahora se ha enfriado a la temperatura correcta. -
Página 9: Solución De Problemas
Cuando la luz indicadora de temperatura se enciende, la unidad está lista para usarse. Para más resolución de problemas y preguntas frecuentes, visite www.oster.com. SERVICIO POSTVENTA Y PIEZAS DE REPUESTO En el caso de que el aparato no funcione, pero esté bajo garantía, lleve la unidad al Centro de servicio autorizado Oster más cercano para su revisión, reparación o ajuste. - Página 10 I M P ORTA N T S A F E TY IN F OR M ATI O N 1. READ ALL INSTRUCTIONS BEFORE USING 2. Use appliance only for its intended use. 3. To reduce the risk of electric shock, do not immerse the appliance in water or other liquids.
- Página 11 18. To avoid personal injury and damage to the appliance, only add water to the water tank. NEVER add cleaning solutions, perfumes, oils or any other chemical additives. 19. Care should be taken when using the appliance due to the emission of steam. 20.
-
Página 12: Product Description
PRODUCT DESCRIPTION 1 Clean Indicator Light / Self-Clean Button 2 Temperature Indicator Light 3 Iron Handset 4 Steam Trigger 5 Temperature Control Dial 6 Lock Button 7 Unlock Button 8 Water Tank 9 Power Switch (I/O) 10 Base Station 11 Steam Cord 12 Power Cord 13 Cleaning Tray E ng l ish - 3... -
Página 13: Before Using For The First Time
BEFORE USING FOR THE FIRST TIME Warning: Remove all packaging including any soleplate protection before operating your steam generator. 1. Wipe over the soleplate with a soft cloth. 2. Position the iron handset (3) on the base station (10), on your ironing board (if it is large enough) or on a heat resistant and secure surface at the same height as your ironing board. -
Página 14: Steam Ironing
FILLING DURING USE You can fill your steam generator during use. Simply remove the water tank (8) as described above and add water as required. Do not fill past the MAX indicator mark on the tank. Your steam generator will beep twice and the power indicator light (9) will flash to let you know that the water tank needs filling. STEAM IRONING The smart features of the iron prevent you from creating steam in temperature settings below . This is to ensure that delicate fabrics are protected from ironing with steam. It is recommended that for harder to iron fabrics such as cotton and linen, steam should be used when ironing. -
Página 15: Ironing Without Steam
IRONING WITHOUT STEAM If you intend to dry-iron fabrics, there is no need to fill the water tank. However, if water is already in the water tank, you do not need to empty it. 1. Rotate the temperature control dial (5) to set the pointer to the desired heat setting. 2. When the temperature indicator light (2) turns solid your steam generator is ready to use. -
Página 16: Care And Cleaning
IMPORTANT Your steam generator takes time to heat up and cool down. If you change the temperature setting on your steam generator, you must give it time to adjust to the new setting. This is especially important when you change from a high setting to a lower one. It takes your steam generator longer to cool down than it does to heat up and this is the reason we recommend that you begin ironing at lower temperatures. -
Página 17: Troubleshooting
When the temperature indicator light turns solid the unit is ready for use. For further troubleshooting and FAQs visit www.oster.com. AFTER SALES SERVICE AND SPARE PARTS In the event that the appliance does not work, but is under warranty, take the unit to the... - Página 18 Características eléctricas de los modelos de la serie: Electric characteristics of series models: Modelo / Model Voltaje / Voltage Frecuencia / Frequency Potencia / Power GCSTSG1200-052 220 V~ 50 Hz 2000 W GCSTSG1200-013 127 V~ 60 Hz 1600 W XXX en donde X es cualquier numero entre 0 y 9 o cualquier letra entre A y Z. XXX where X is any number between 0 and 9 or any letter between A and Z.