Tabla de contenido
Publicidad
Idiomas disponibles
Idiomas disponibles
Enlaces rápidos
Publicidad
Tabla de contenido

Resumen de contenidos para Steren K-310
- Página 1 Kit para experimentar energía verde K-310 V0.0 0717A Manual de instrucciones...
-
Página 2: Advertencias Y Precauciones
AÑOS Debido a actualizaciones pueden existir diferencias. Por favor, consulte nuestra página web www.steren.com para obtener la versión más reciente de este manual. • No use ni almacene este producto en lugares donde existan goteras o salpicaduras. - Página 3 Reloj digital con cables Vasos Cable de conexión Calcomanías transparentes Barras de cobre y magnesio CONTENIDO...
-
Página 4: Conexión De Las Barras
1. Una un par de barras de cobre y magnesio con un cable de conexión como se muestra en la imagen. Con cuidado, enrosque los cables metálicos expuestos a través del agujero de la barra. Suavemente gire el alambre para asegurarlo a la barra. Cubra y asegure la conexión con las calcomanías transparentes. -
Página 5: Hacer El Experimento
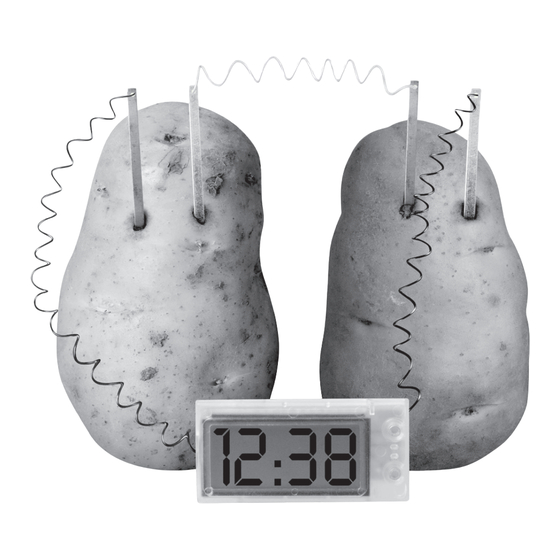
2. Conecte el cable negro del reloj LCD (negativo) a una de las barras de magnesio. A continuación, conecte el cable rojo del reloj LCD (positivo) a la barra de cobre. Ahora todos los componentes están conectados. 3. Inserte las barras de cobre y magnesio en las papas, como se muestra en la imagen, tenga cuidado de que las barras de metal no se toquen entre sí. -
Página 6: Otros Experimentos
OTROS EXPERIMENTOS Ponga un poco de refresco en los vasos proporcionados. Inserte las barras de cobre y magnesio en los vasos, como se muestra en la imagen, teniendo cuidado de que las barras de metal no se toquen entre sí. El reloj deberá empezar a funcionar. -
Página 7: Viendo El Reloj
RELOJ Cuando las barras de metal se inserten por primera vez en las papas, la pantalla LED se encenderá y mostrará "12:00" Pulse A una vez. El reloj comenzará a funcionar. Verá que los dos puntos en el centro empiezan a parpadear. Pulse B dos veces para configurar el mes, luego pulse A para ajustar el mes correcto. -
Página 8: Problemas Y Soluciones
Si el reloj muestra una pantalla débil, pruebe una de las siguientes soluciones: Déle tiempo, la señal es a veces débil al principio, pero se vuelve más fuerte después de un corto tiempo. Examine las barras de metal si están oxidadas, use papel para eliminar el óxido. Trate de poner las barras metálicas más cerca (pero sin tocarse). - Página 10 Green energy experiment kit K-310 V0.0 0717A Instruction manual...
-
Página 11: Cautions And Warnings
YEARS Due to updates there may be differences. Please refer to our website www.steren.com for the latest version of this manual. • Do not use or store this product in dripping or splashing places. • This appliance is NOT intended for use by persons with different capacities, unless properly prepared and supervised. - Página 12 Digital clock with cables Glasses Connection cable Transparent decals Copper and magnesium bars CONTENT...
- Página 13 1. Attach a pair of copper and magnesium rods with a connecting cable as shown in the picture. Carefully screw in exposed metal cables through the hole in the bar. Gently rotate the wire to secure it to the rod. Cover and secure connection with transparent decals.
- Página 14 2. Connect the black (LCD) clock cable to one of the magnesium bars. Then connect the red cable from the LCD (positive) clock to the copper bar. All components are now connected. 3. Insert the copper and magnesium bars into the potatoes, as shown in the picture, be careful that the metal bars do not touch each other.
- Página 15 OTHER EXPERIMENTS Put some soda in the glasses provided. Insert the copper and magnesium bars into the cups, as shown in the picture, taking care that the metal bars do not touch each other. The watch should start working. You can experiment with different liquids like salt water, fruit juices; Or fruits such as lemon, orange, tomato, etc.
-
Página 16: Clock Adjustment
CLOCK When the metal bars are first inserted into the potatoes, the LED display will light up and display "12:00" Press A once. The clock will start to run. You will see that the two points in the center start to blink. Press B twice to set the month, then press A to set the correct month. - Página 17 If the watch shows a weak display, try one of the following solutions: Give it time, the signal is sometimes weak at first, but it gets stronger after a short time. Examine metal bars if they are oxidized, use paper to remove rust. Try to place the metal bars closer (but not touching).


