Publicidad
Idiomas disponibles
Idiomas disponibles
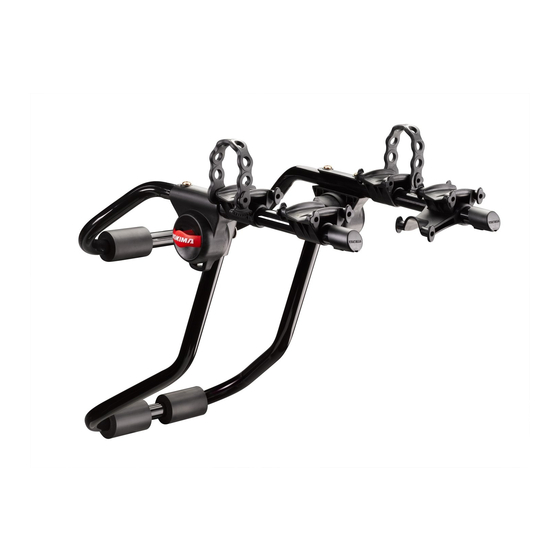
UppEr straps
UppEr
(rEd triggEr)
Hooks
sidE
straps
sidE
Hooks
gLaSS
HatCH HookS
for glass or plastic
hatch or trunk edge.
SuperJoe 3
maximum load is 3 bikes
(90 lbs. (41kg) total)
The use of Glass Hatch Hooks
with upper straps will limit the
load to 2 bikes only.
Important warnIng
I
t Is crItIcal that all yakIma racks and accessorIes be properly and securely attached to your vehIcle
,
an automobIle accIdent
and could cause serIous bodIly Injury or death to you or to others
,
accessorIes to your car
checkIng the attachments prIor to use
t
,
herefore
you must read and understand all of the InstructIons and cautIons supplIed wIth your yakIma product prIor to InstallatIon
. I
or use
f you do not understand all of the InstructIons and cautIons
famIlIar wIth the InstallatIon procedures
.
auto body shop
1033309E-1/24
SuperJoe 2 & 3, LittleJoe
upper
frame
HUb—
lowEr
framE
lowEr straps
SuperJoe 2
maximum load
is 2 bikes (60 lbs.
(27kg) total)
,
you should have the product Installed by a professIonal Installer such as a qualIfIed garage or
(SuperJoe 3)
stabilizEr
cradlE
lowEr
Hooks
LittleJoe 3
maximum load is 3 bikes
(90 lbs. (41kg) total)
The use of Glass Hatch
Hooks with upper straps will
limit the load to 2 bikes only.
,
and perIodIcally InspectIng the products for adjustment
,
or If you have no mechanIcal experIence and are not thoroughly
cradlE
Extra wHEEl strap
(sUpEr JoEs)
(LittleJoe 3)
before
DrIvIng away:
reaD CautIonS
anD warnIngS
at enD of
InStruCtIonS.
. I
mproper attachment could result In
. y
ou are responsIble for securIng the racks and
,
part #1033309 rev.E
load arms
bikE straps
(sUpEr JoEs)
load
stops
,
.
wear
and damage
Publicidad
Tabla de contenido

Manuales relacionados para Yakima SuperJoe Pro 3 Three Bike


Resumen de contenidos para Yakima SuperJoe Pro 3 Three Bike
- Página 1 InstructIons and cautIons supplIed wIth your yakIma product prIor to InstallatIon or use f you do not understand all of the InstructIons and cautIons or If you have no mechanIcal experIence and are not thoroughly...
- Página 2 CAUTION: Although your carrier is covered by a warranty (see final page), Yakima cannot warranty any installation onto any LISteD aS “no fIt”. vehicle that is not listed in the Yakima Fit List or Joe Fit Sheet. rotate tHe upper frame. poSItIon tHe frameS.
- Página 3 SeCure tHe frame poSItIon. • turn and push the red triggers until they are seated in the hub. • Move the frames apart very slightly until the red triggers Do not allow the frames snap. to move out of position. •...
- Página 4 Do not attaCH tHe No glass or plastic? You won’t need the upper HookS to gLaSS glass Hatch Hooks, continue to Step 13. or pLaStIC! repLaCIng upper Strap HookS puLL upper StrapS CompLeteLy out of tHe buCkLeS. pass the strap ends through open the the hatch opening from hatch door.
- Página 5 If not attaCHIng upper HookS to gLaSS or pLaStIC, ContInue Here. aDJuSt upper StrapS. position the frame as determined in step 6. the upper straps should hold the carrier in place. Adjust upper straps by pulling on the ends. (Loosen by pressing the metal buckles.) pLaCe Lower Strap HookS.
- Página 6 repLacing Lower STrap hookS remove The carrier from The car. puLL Lower StrapS CompLeteLy out of tHe Hub. position the pads open tHe inside the trunk trunk Door. with the straps hanging free. before CLoSIng tHe trunk: • ClOse the tRUNK. •...
- Página 7 LoaD armS SHouLD be JuSt above HorIzontaL. unLISteD veHICLeS: if you must adjust the frame to allow LoaD armS the arms to be just above horizontal, follow these guidelines: • With triggers out, adjust load arms until just above horizontal. •...
-
Página 8: Load Limits
Although your carrier is covered by a warranty (see below), Yakima cannot warranty warnIng any installation onto any vehicle that is not listed in the Yakima Fit List or Joe Fit Sheet. TechnicaL aSSiSTance or mainTenance repLacemenT parTS: •... - Página 9 à deux le nombre de vélos à nombre de vélos à transporter. transporter. avertISSement Important l est ImpératIf que les porte bagages et les accessoIres yakIma soIent correctement et solIdement fIxés au véhIcule n montage mal réalIsé ’ ’ pourraIt provoquer un accIdent d automobIle quI pourraIt entraîner des blessures graves ou même la mort...
- Página 10 SI votre vÉHICuLe ne fIgure paS DanS La LISte (feuillet de particuliers. compatibilité “Joe” ou autre), et que le détaillant ou Yakima ne le retrouve dans aucune liste, installer le porte-vélos en suivant les instructions fournies ici aux endroits affichant ce symbole.
- Página 11 verrouILLer Le CaDre en poSItIon. • tourner et pousser les boutons de verrouillage jusqu’à ce qu’ils s’enfoncent dans les moyeux. • Écarter légèrement les cadres Les cadres ne doivent pas l’un de l’autre jusqu’au son du bouger. Au besoin, vérifier déclic.
- Página 12 ne paS fIxer LeS CroCHetS DeS pas de verre ou de plastique? les crochets pour SangLeS SupÉrIeureS Sur Du hayon vitré sont inutiles. passer à l’OpÉRatiON 13. pLaStIQue ou Du verre! rempLaCement DeS CroCHetS SupÉrIeurS: retIrer CompLètement LeS SangLeS SupÉrIeureS DeS bouCLeS.
- Página 13 l’ON N’a pas à fixeR les CROChets sUR dU VeRRe OU dU plastiQUe? pOURsUiVRe à paRtiR de l’OpÉRatiON Ci-dessOUs. rÉgLer LeS SangLeS SupÉrIeureS. positionner le porte-vélos à l’endroit déterminé à l’opération 6. les sangles supérieures devraient le maintenir en place. Ajuster les sangles supérieures en tirant sur les bouts.
- Página 14 rempLacemenT deS crocheTS infÉrieurS enLever Le porTe-vÉLoS du vÉhicuLe. SortIr CompLètement LeS SangLeS InfÉrIeurS DeS moyeux. placer les butées à ouvrIr Le l’intérieur du coffre Coffre. en laissant les sangles pendre. avant De fermer Le Coffre • feRMeR le COffRe. •...
- Página 15 les BRas deVRaieNt se tROUVeR JUste aU-dessUs de l’hORiZONtale. vÉHICuLeS ne fIgurant paS DanS s’il faUt CORRigeR la pOsitiON des CadRes Le feuILLet De CompatIbILItÉ: pour Que LeS braS SoIent JuSte au-DeSSuS de l’hORiZONtale, sUiVRe Ces iNdiCatiONs: braS • tirer les deux boutons de verrouillage et amener les bras juste au-dessus de l’horizontale.
- Página 16 7 h et 17 h, heure du Pacifique. ce produit est couvert par la garantie limitée « Tant que durera notre histoire d’amour » YakiMa Pour se procurer une copie de cette garantie, aller en ligne à www.yakima.com <http://www.yakima.com/>...
-
Página 17: Superjoe 2 Y 3, Littlejoe
3 bicicletas solamente. avISo Importante s fundamental que todas las parrIllas y accesorIos yakIma estén bIen colocados y asegurados al vehículo na InstalacIón defIcIente podría resultar en accIdente automovIlístIco y provocar herIdas graves o muerte a usted o a terceros sted es responsable de asegurar las parrIllas y accesorIos al vehículo... - Página 18 VehÍCUlO NO se eNCUeNtRa (en la hoja de compatibilidad con productos Joe o en la Lista de compatibilidad. compatibilidad, o a través del distribuidor o de Yakima) es porque no está incluido en una lista. Instale el portabicicletas según las instrucciones donde aparece este ícono.
- Página 19 fIJe eL armazÓn en poSICIÓn. • gire y empuje los gatillos rojos hasta que se asienten en el cubo. • separe los armazones muy No deje que los armazones levemente hasta que los gatillos se muevan de la posición rojos encajen a presión. establecida.
- Página 20 ¡no fIJe LoS ganCHoS Si no tiene vidrio o plástico, no necesitará usar los SuperIoreS a vIDrIo o ganchos para vidrio de la puerta trasera, vaya al pLÁStICo! paSo 13. rempLazo De ganCHoS De Correa SuperIoreS: SaQue CompLetamente LaS CorreaS De LaS HebILLaS.
- Página 21 SI no SuJeta LoS ganCHoS SuperIoreS a vIDrIo o pLÁStICo, ContInúe aQuÍ. aJuSte LaS CorreaS SuperIoreS. Coloque el armazón como se explicó al paso 6. las correas superiores deben sostenerlo en su lugar. Ajuste las correas superiores tirando de los extremos. (Para aflojar, apriete las hebillas de metal).
- Página 22 rempLazo De ganCHoS De Correa InferIoreS QuiTe eL porTabicicLeTaS deL vehÍcuLo. tIre De LaS CorreaS InferIoreS para SaCarLaS CompLetamente DeL Cubo. Coloque las abra La puerta almohadillas DeL baúL protectoras dentro del baúl con las correas colgando libremente. anteS De Cerrar eL baúL: •...
- Página 23 LoS brazoS De Carga Deben eStar apenaS Sobre La HorIzontaL. veHÍCuLoS Que no SI Debe aJuStar eL armazÓn para Que LoS brazoS apareCen en La LISta QueDen LIgeramente Sobre La HorIzontaL: brazoS De Carga • Con los gatillos salidos, ajuste los brazos de carga hasta apenas sobre la horizontal.
-
Página 24: Límites De Carga
Pacífico. un lavadero automático de coches. este producto está cubierto por la garantía limitada a vida “mientras dure el romance” de YakiMa Para obtener una copia de esta garantía, visítenos en www.yakima.com, envíenos un correo electrónico a yakwarranty@yakima.com o llámenos al (888) 925-4621.